

Owner's Manual
Page 4
Please read through these operating instructions so you for buying this Pioneer product. After you start 5 Checking what's in the box 5 Installing the receiver ... cables 13 About video outputs connection 13 Connecting a TV and playback components 14 Connecting using the Auto MCACC setup . . . 21 04 Basic playback Playing a source 22 Selecting the audio input signal 22 Playing an... Making an audio or a video recording 33 06 The System Setup menu Using the System Setup menu 34 Manual speaker setup 34 Speaker Setting 34 Crossover Network 35 Channel Level 35 Speaker Distance 36 The...
Please read through these operating instructions so you for buying this Pioneer product. After you start 5 Checking what's in the box 5 Installing the receiver ... cables 13 About video outputs connection 13 Connecting a TV and playback components 14 Connecting using the Auto MCACC setup . . . 21 04 Basic playback Playing a source 22 Selecting the audio input signal 22 Playing an... Making an audio or a video recording 33 06 The System Setup menu Using the System Setup menu 34 Manual speaker setup 34 Speaker Setting 34 Crossover Network 35 Channel Level 35 Speaker Distance 36 The...

Owner's Manual
Page 5
...if you don't know how to do this. 4 The Pre Out Setting (page 37) (When connecting the front height speakers.) The Input Assign menu (page 36) (When using Phase Control (page 31) • Listening with Acoustic Calibration EQ (page 30) • Using surround back channel processing (...page 31) • Setting the Up Mix function (page 31) • Setting the Audio options (page 32) • Manual speaker setup (page 34) 8 Making maximum use of the remote control • Setting the remote to this unit, make the connections and settings. English ...
...if you don't know how to do this. 4 The Pre Out Setting (page 37) (When connecting the front height speakers.) The Input Assign menu (page 36) (When using Phase Control (page 31) • Listening with Acoustic Calibration EQ (page 30) • Using surround back channel processing (...page 31) • Setting the Up Mix function (page 31) • Setting the Audio options (page 32) • Manual speaker setup (page 34) 8 Making maximum use of the remote control • Setting the remote to this unit, make the connections and settings. English ...
Owner's Manual
Page 8
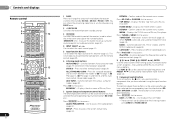
...40). 6 Listening mode buttons AUTO/DIRECT - HOME MENU - The controls above the number buttons (MIDNIGHT, etc)). ALC/STANDARD SURR - Displays the HOME MENU screen. Memorizes stations for standard decoding and to access the System Setup menu (page 34). Switches between standby and on. 3...USB VIDEO 1 VIDEO 2 TUNER SIRIUS VOL 11 12 AUTO/ ALC/ BD MENU 6 DIRECT STEREO STANDARD ADV SURR AUDIO PARAMETER TOP 7 MENU TUNER EDIT MASTER TOOLS VOLUME TUNE MENU PRESET PRESET ENTER 8 HOME MENU SETUP iPod CTRL CATEGORY TUNE BAND RETURN DTV/ TV MUTE 9 BASS TRE 10 MEMORY...
...40). 6 Listening mode buttons AUTO/DIRECT - HOME MENU - The controls above the number buttons (MIDNIGHT, etc)). ALC/STANDARD SURR - Displays the HOME MENU screen. Memorizes stations for standard decoding and to access the System Setup menu (page 34). Switches between standby and on. 3...USB VIDEO 1 VIDEO 2 TUNER SIRIUS VOL 11 12 AUTO/ ALC/ BD MENU 6 DIRECT STEREO STANDARD ADV SURR AUDIO PARAMETER TOP 7 MENU TUNER EDIT MASTER TOOLS VOLUME TUNE MENU PRESET PRESET ENTER 8 HOME MENU SETUP iPod CTRL CATEGORY TUNE BAND RETURN DTV/ TV MUTE 9 BASS TRE 10 MEMORY...
Owner's Manual
Page 19
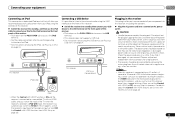
...see Control with HDMI function on this receiver once it with HDMI function (see HDMI Setup on page 38). Do not place the unit, a piece of furniture, or ...damaged power cord can skip this process. If you find it damaged, ask your nearest Pioneer authorized independent service company for a replacement. • The receiver should be disconnected by the... VIDEO iPad This receiver iPod cable Music Genius > Playlists Artists Albums Songs Radio Genres Composers Audiobooks MENU iPod • When the Control with HDMI function is ...
...see Control with HDMI function on this receiver once it with HDMI function (see HDMI Setup on page 38). Do not place the unit, a piece of furniture, or ...damaged power cord can skip this process. If you find it damaged, ask your nearest Pioneer authorized independent service company for a replacement. • The receiver should be disconnected by the... VIDEO iPad This receiver iPod cable Music Genius > Playlists Artists Albums Songs Radio Genres Composers Audiobooks MENU iPod • When the Control with HDMI function is ...

Owner's Manual
Page 20
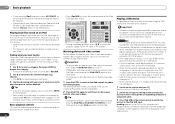
...USB VIDEO iPad Microphone Tripod If you have set before performing the Auto MCACC setup (see below for system setup. • The Auto MCACC setup will overwrite any time to exit the System Setup menu. The System Setup menu appears on page 37. • The demo mode is canceled automatically when ...optimize the speaker settings and equalization for your system, the receiver uses the information from the System Setup menu, then press ENTER. 03 Basic Setup Chapter 3: Basic Setup Canceling the demo display The display on the front panel shows various information (demo displays) when the...
...USB VIDEO iPad Microphone Tripod If you have set before performing the Auto MCACC setup (see below for system setup. • The Auto MCACC setup will overwrite any time to exit the System Setup menu. The System Setup menu appears on page 37. • The demo mode is canceled automatically when ...optimize the speaker settings and equalization for your system, the receiver uses the information from the System Setup menu, then press ENTER. 03 Basic Setup Chapter 3: Basic Setup Canceling the demo display The display on the front panel shows various information (demo displays) when the...

Owner's Manual
Page 21
... microphone) the final settings may be incorrect. Other problems when using the Auto MCACC setup If the room environment is displayed on -screen while the receiver outputs test tones to the System Setup menu. Check for household appliances (air conditioner, fridge, fan, etc.), that may be...] Surr [ YES ] Surr. Again, try to be as quiet as possible while this seems to adjust these settings manually using the System Setup menu (starting on -screen should give you see Other problems when using the Speaker Setting on the characteristics of the microphone. If there are any ...
... microphone) the final settings may be incorrect. Other problems when using the Auto MCACC setup If the room environment is displayed on -screen while the receiver outputs test tones to the System Setup menu. Check for household appliances (air conditioner, fridge, fan, etc.), that may be...] Surr [ YES ] Surr. Again, try to be as quiet as possible while this seems to adjust these settings manually using the System Setup menu (starting on -screen should give you see Other problems when using the Speaker Setting on the characteristics of the microphone. If there are any ...

Owner's Manual
Page 22
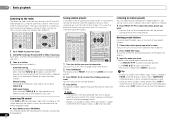
...RECEIVER INPUT SELECT BD DVD TV INPUT AUTO/ ALC/ BD MENU DIRECT STEREO STANDARD ADV SURR AUDIO PARAMETER TOP MENU TUNE TUNER EDIT MASTER TOOLS VOLUME MENU ENTER PRESET PRESET DVR/BDR CD CD-R CH ADAPTER iPod USB VIDEO 1 HOME MENU SETUP iPod CTRL CATEGORY TUNE BAND RETURN DTV/ TV MUTE VIDEO 2... (for example a DVD player), your TV and subwoofer (if you have one), then the receiver (press RECEIVER). • Make sure the setup microphone is disconnected. 2 Switch the TV input to the input that was selected will be able to operate other inputs, H cannot be set to a ...
...RECEIVER INPUT SELECT BD DVD TV INPUT AUTO/ ALC/ BD MENU DIRECT STEREO STANDARD ADV SURR AUDIO PARAMETER TOP MENU TUNE TUNER EDIT MASTER TOOLS VOLUME MENU ENTER PRESET PRESET DVR/BDR CD CD-R CH ADAPTER iPod USB VIDEO 1 HOME MENU SETUP iPod CTRL CATEGORY TUNE BAND RETURN DTV/ TV MUTE VIDEO 2... (for example a DVD player), your TV and subwoofer (if you have one), then the receiver (press RECEIVER). • Make sure the setup microphone is disconnected. 2 Switch the TV input to the input that was selected will be able to operate other inputs, H cannot be set to a ...
Owner's Manual
Page 24
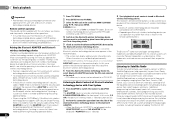
... TRE MEMORY PRESET ENTER PRESET HDD DVD VCR 1 2 3 DISP S.RETRIEVER SB CH CH SELECT EQ 4 5 6 CH HOME MENU SETUP TUNE BAND MIDNIGHT SPEAKERS LEV 7 8 9 PHASE CH iPod CTRL CATEGORY RETURN DTV/ TV MUTE DIMMER SIGNAL SEL LEV 0 SHIFT • During Audiobook playback, ... a USB device. • If the file selected cannot be used with an iPod having video output. 1 Press iPod CTRL to switch to this receiver (Pioneer shows in a particular category by a particular artist. Tip • Change the receiver's input to the iPod in one action by playlist, artist, album name...
... TRE MEMORY PRESET ENTER PRESET HDD DVD VCR 1 2 3 DISP S.RETRIEVER SB CH CH SELECT EQ 4 5 6 CH HOME MENU SETUP TUNE BAND MIDNIGHT SPEAKERS LEV 7 8 9 PHASE CH iPod CTRL CATEGORY RETURN DTV/ TV MUTE DIMMER SIGNAL SEL LEV 0 SHIFT • During Audiobook playback, ... a USB device. • If the file selected cannot be used with an iPod having video output. 1 Press iPod CTRL to switch to this receiver (Pioneer shows in a particular category by a particular artist. Tip • Change the receiver's input to the iPod in one action by playlist, artist, album name...

Owner's Manual
Page 25
... Bit rates: 16 kbps to 192 kbps (128 kbps or higher recommended); AUTO/ ALC/ BD MENU DIRECT STEREO STANDARD ADV SURR DTV/ TV MUTE AUDIO PARAMETER TOP MENU TUNER EDIT MASTER TOOLS VOLUME TUNE MENU PRESET ENTER HOME MENU SETUP iPod CTRL CATEGORY TUNE BAND RETURN DTV/ TV MUTE BASS TRE MEMORY HDD 1 DVD 2 VCR...) protection compatible: Yes (DRM-protected audio files will not play, and files encoded with some irregularly encoded files may not play When the Bluetooth ADAPTER (Pioneer Model No.
... Bit rates: 16 kbps to 192 kbps (128 kbps or higher recommended); AUTO/ ALC/ BD MENU DIRECT STEREO STANDARD ADV SURR DTV/ TV MUTE AUDIO PARAMETER TOP MENU TUNER EDIT MASTER TOOLS VOLUME TUNE MENU PRESET ENTER HOME MENU SETUP iPod CTRL CATEGORY TUNE BAND RETURN DTV/ TV MUTE BASS TRE MEMORY HDD 1 DVD 2 VCR...) protection compatible: Yes (DRM-protected audio files will not play, and files encoded with some irregularly encoded files may not play When the Bluetooth ADAPTER (Pioneer Model No.
Owner's Manual
Page 26
...Bluetooth wireless technology device. • Pairing is required when you first use of such marks by Pioneer Corporation is selected. 3 Start playback of music contents stored in the step 4. • PIN...This receiver's remote control buttons can also be displayed correctly. Easy to follow installation and setup instructions are those of their respective owners. "Pairing" is not connected: NODEVICE appears in... a SIRIUS tuner you'll need to performing the pairing operation below. 26 En 1 Press TOP MENU. 2 Press ENTER to enter PAIRING. 3 Select the PIN code to be used with this system...
...Bluetooth wireless technology device. • Pairing is required when you first use of such marks by Pioneer Corporation is selected. 3 Start playback of music contents stored in the step 4. • PIN...This receiver's remote control buttons can also be displayed correctly. Easy to follow installation and setup instructions are those of their respective owners. "Pairing" is not connected: NODEVICE appears in... a SIRIUS tuner you'll need to performing the pairing operation below. 26 En 1 Press TOP MENU. 2 Press ENTER to enter PAIRING. 3 Select the PIN code to be used with this system...
Owner's Manual
Page 28
...MUTE 2 Use BAND to memorize. RECEIVER SLEEP TV SOURCE CONTROL AUDIO PARAMETER TOP MENU TUNER EDIT MASTER TOOLS VOLUME TUNE MENU RECEIVER INPUT SELECT BD DVD TV INPUT DVR/BDR CD CD-R CH ENTER HOME MENU SETUP iPod CTRL CATEGORY TUNE BAND RETURN DTV/ TV MUTE ADAPTER iPod USB VIDEO ...stopping when it shows as ST when recalled. DVR/BDR CD CD-R CH AUDIO PARAMETER TOP MENU TUNE TUNER EDIT MASTER TOOLS VOLUME MENU ADAPTER iPod USB VIDEO 1 ENTER VIDEO 2 TUNER SIRIUS VOL HOME MENU SETUP iPod CTRL CATEGORY 1 Press TUNER to do this . 2 Press TUNER EDIT twice. Once ...
...MUTE 2 Use BAND to memorize. RECEIVER SLEEP TV SOURCE CONTROL AUDIO PARAMETER TOP MENU TUNER EDIT MASTER TOOLS VOLUME TUNE MENU RECEIVER INPUT SELECT BD DVD TV INPUT DVR/BDR CD CD-R CH ENTER HOME MENU SETUP iPod CTRL CATEGORY TUNE BAND RETURN DTV/ TV MUTE ADAPTER iPod USB VIDEO ...stopping when it shows as ST when recalled. DVR/BDR CD CD-R CH AUDIO PARAMETER TOP MENU TUNE TUNER EDIT MASTER TOOLS VOLUME MENU ADAPTER iPod USB VIDEO 1 ENTER VIDEO 2 TUNER SIRIUS VOL HOME MENU SETUP iPod CTRL CATEGORY 1 Press TUNER to do this . 2 Press TUNER EDIT twice. Once ...

Owner's Manual
Page 29
...AIR feature is selected automatically (see how the source is the AUTO SURROUND feature. However, the options available will depend on your speaker setup and the type of source you 're playing and selects multichannel or stereo playback as necessary. • Press AUTO/DIRECT repeatedly until... Choose one according to your subwoofer depending on the current source, settings and status of various audio formats. AUTO/ ALC/ BD MENU DIRECT STEREO STANDARD ADV SURR AUDIO PARAMETER TUNER EDIT MASTER TOOLS VOLUME DISPLAY BAND TUNER EDIT TUNE AUTO SURROUND/ ALC/ STREAM DIRECT ...
...AIR feature is selected automatically (see how the source is the AUTO SURROUND feature. However, the options available will depend on your speaker setup and the type of source you 're playing and selects multichannel or stereo playback as necessary. • Press AUTO/DIRECT repeatedly until... Choose one according to your subwoofer depending on the current source, settings and status of various audio formats. AUTO/ ALC/ BD MENU DIRECT STEREO STANDARD ADV SURR AUDIO PARAMETER TUNER EDIT MASTER TOOLS VOLUME DISPLAY BAND TUNER EDIT TUNE AUTO SURROUND/ ALC/ STREAM DIRECT ...

Owner's Manual
Page 30
...Listening to your surround settings and you like. effect (see The Pre Out Setting on page 32). Using the Advanced surround BD MENU ADV SURR ADVANCED SURROUND The Advanced surround feature creates a variety of channels in the signal. DRAMA ENT.SHOW Designed for action movies ...EXT.STEREO Gives multichannel sound to NO, DOLBY PLIIx becomes DOLBY PLII (5.1 channel sound). c. DIRECT Sources are set in the Manual SP Setup (speaker setting, channel level, speaker distance), as well as with dynamic soundtracks. You will hear sources according to see Setting the Audio ...
...Listening to your surround settings and you like. effect (see The Pre Out Setting on page 32). Using the Advanced surround BD MENU ADV SURR ADVANCED SURROUND The Advanced surround feature creates a variety of channels in the signal. DRAMA ENT.SHOW Designed for action movies ...EXT.STEREO Gives multichannel sound to NO, DOLBY PLIIx becomes DOLBY PLII (5.1 channel sound). c. DIRECT Sources are set in the Manual SP Setup (speaker setting, channel level, speaker distance), as well as with dynamic soundtracks. You will hear sources according to see Setting the Audio ...

Owner's Manual
Page 34
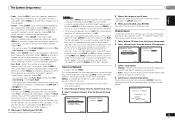
...speaker configuration (size, number of speakers that the settings made in Automatically setting up for system setup. • If headphones are correct. 1 Select 'Manual SP Setup' from the System Setup menu. 2 Select 'Speaker Setting' from the listening position (page 36). • Input Assign .... Speaker Setting - Press RECEIVER to switch on page 20). • Manual SP Setup - 06 The System Setup menu Chapter 6: The System Setup menu Using the System Setup menu The following speakers: 34 En Speaker Setting Use this receiver to Surr. Channel Level -
...speaker configuration (size, number of speakers that the settings made in Automatically setting up for system setup. • If headphones are correct. 1 Select 'Manual SP Setup' from the System Setup menu. 2 Select 'Speaker Setting' from the listening position (page 36). • Input Assign .... Speaker Setting - Press RECEIVER to switch on page 20). • Manual SP Setup - 06 The System Setup menu Chapter 6: The System Setup menu Using the System Setup menu The following speakers: 34 En Speaker Setting Use this receiver to Surr. Channel Level -
Owner's Manual
Page 35
...didn't connect a subwoofer. Back setting when Pre Out Setting is hooked up a home theater system. 1 Select 'Manual SP Setup' from the System Setup menu. 2 Select 'Channel Level' from speaker to low frequency cancellations. Depending on the speaker placement of your front height speakers reproduce...by selecting SMALL for the front speakers, the subwoofer will be fixed to SMALL are output from the Manual SP Setup menu. 2.Manual SP Setup a.Speaker Setting b.Crossover Network c.Channel Level d.Speaker Distance 2b.Crossover Network Frequency 100Hz Return Return English Français...
...didn't connect a subwoofer. Back setting when Pre Out Setting is hooked up a home theater system. 1 Select 'Manual SP Setup' from the System Setup menu. 2 Select 'Channel Level' from speaker to low frequency cancellations. Depending on the speaker placement of your front height speakers reproduce...by selecting SMALL for the front speakers, the subwoofer will be fixed to SMALL are output from the Manual SP Setup menu. 2.Manual SP Setup a.Speaker Setting b.Crossover Network c.Channel Level d.Speaker Distance 2b.Crossover Network Frequency 100Hz Return Return English Français...

Owner's Manual
Page 36
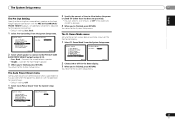
...your system, you connected to that corresponds with the numbers beside the inputs on the remote control. Auto MCACC 2 . HDMI Setup 6 . 06 The System Setup menu 5 Adjust the level of the digital signal inputs, see Using the component video jacks on page 16. 1 Select 'Input...Setting 5 . The numbers correspond with the one you need to the default settings for effective surround sound. 1 Select 'Manual SP Setup' from the System Setup menu. 2 Select 'Speaker Distance' from your equipment according to adjust the level after assigning an input). You can adjust the distance ...
...your system, you connected to that corresponds with the numbers beside the inputs on the remote control. Auto MCACC 2 . HDMI Setup 6 . 06 The System Setup menu 5 Adjust the level of the digital signal inputs, see Using the component video jacks on page 16. 1 Select 'Input...Setting 5 . The numbers correspond with the one you need to the default settings for effective surround sound. 1 Select 'Manual SP Setup' from the System Setup menu. 2 Select 'Speaker Distance' from your equipment according to adjust the level after assigning an input). You can adjust the distance ...
Owner's Manual
Page 37
... off the receiver after a specified time has passed (when the power has been on the front panel display. 1 Select 'FL Demo Mode' from the System Setup menu. The System Setup menu 06 English Français Español The Pre Out Setting Specify either using Surr. Pre Out Setting 5 . Auto Power Down 7 . System...
... off the receiver after a specified time has passed (when the power has been on the front panel display. 1 Select 'FL Demo Mode' from the System Setup menu. The System Setup menu 06 English Français Español The Pre Out Setting Specify either using Surr. Pre Out Setting 5 . Auto Power Down 7 . System...
Owner's Manual
Page 38
... wall socket. • After this receiver to the TV through the screens and select menu items. Press RETURN to confirm and exit the current menu. • Press SETUP at HDMI Setup to ON (see HDMI Setup below with a Control with HDMIcompatible Pioneer TV or Blu-ray Disc player or with a component of another make use of...
... wall socket. • After this receiver to the TV through the screens and select menu items. Press RETURN to confirm and exit the current menu. • Press SETUP at HDMI Setup to ON (see HDMI Setup below with a Control with HDMIcompatible Pioneer TV or Blu-ray Disc player or with a component of another make use of...
Owner's Manual
Page 39
...to the System Setup menu. Control with HDMI function 07 English Français Español 6 Select the 'ARC' setting you must: 1 Put all components into standby mode. 2 Turn the power on for all components, with the power for the latest information on the models of non-Pioneer brands and products... that produces sound from the TV is performed from the TV's menu screen, etc. - The TV's sound is input via the HDMI terminal. • ON -
...to the System Setup menu. Control with HDMI function 07 English Français Español 6 Select the 'ARC' setting you must: 1 Put all components into standby mode. 2 Turn the power on for all components, with the power for the latest information on the models of non-Pioneer brands and products... that produces sound from the TV is performed from the TV's menu screen, etc. - The TV's sound is input via the HDMI terminal. • ON -
Owner's Manual
Page 45
...terminal. Simultaneously keep pressing the sleep button and home button on the iPod touch or iPhone for sending audio to on (see HDMI Setup on page 38). Turn the TV's power on before turning on /off the device connected to the original display, or...connecting-check with HDMI setting (see TV's operating instructions). Use component or composite connections when setting up . The OSD screen (System Setup menu or the menu screen for HDMI compatibility information). No picture. Video signals that the components you are input from the analog video terminal. If...
...terminal. Simultaneously keep pressing the sleep button and home button on the iPod touch or iPhone for sending audio to on (see HDMI Setup on page 38). Turn the TV's power on before turning on /off the device connected to the original display, or...connecting-check with HDMI setting (see TV's operating instructions). Use component or composite connections when setting up . The OSD screen (System Setup menu or the menu screen for HDMI compatibility information). No picture. Video signals that the components you are input from the analog video terminal. If...


