
Owner's Manual
Page 6
...Checking the Supplied Accessories 8 Preparing the Remote Control 8 Loading the batteries 8 Remote Control Battery Alarm 8 The Touch Pen & Lock 9 Remote Control Cushions 9 Operating range of remote control unit 9 Installing the Receiver 9 Opening the Front Panel 9 Setting Up the Remote Control 10 Remote Control Backlight 11 Quick Start Guide Part ...LINK 30 Connecting i.LINK-equipped Components 30 Creating an i.LINK Network 31 Displays & Controls 32 Front Panel 32 Back Panel 34 Remote Control 36 Basic Receiver LCD Screens 37 Receiver MAIN Screen 37 Receiver SUB Screen 38 ...
...Checking the Supplied Accessories 8 Preparing the Remote Control 8 Loading the batteries 8 Remote Control Battery Alarm 8 The Touch Pen & Lock 9 Remote Control Cushions 9 Operating range of remote control unit 9 Installing the Receiver 9 Opening the Front Panel 9 Setting Up the Remote Control 10 Remote Control Backlight 11 Quick Start Guide Part ...LINK 30 Connecting i.LINK-equipped Components 30 Creating an i.LINK Network 31 Displays & Controls 32 Front Panel 32 Back Panel 34 Remote Control 36 Basic Receiver LCD Screens 37 Receiver MAIN Screen 37 Receiver SUB Screen 38 ...

Owner's Manual
Page 7
... MULTI-ROOM system from the main room 82 Controlling the MULTI-ROOM system from the sub room 83 The PIONEER SR System: Operating other PIONEER components 84 Multi Operations 85 Performing multi operations 86 System off 87 Using System off 88 Editing Remote Control Screen Names (ITEM MEMO 89 Editing Buttons Names (KEY LABEL 90...
... MULTI-ROOM system from the main room 82 Controlling the MULTI-ROOM system from the sub room 83 The PIONEER SR System: Operating other PIONEER components 84 Multi Operations 85 Performing multi operations 86 System off 87 Using System off 88 Editing Remote Control Screen Names (ITEM MEMO 89 Editing Buttons Names (KEY LABEL 90...

Owner's Manual
Page 8
...alkaline batteries. tion's rules that you may result in such hazards as shown above. Observe the following supplied accessories. Remote Control Battery Alarm When the batteries get an average of 1-3 months of battery life. Change Battery !! AM Loop Antenna... FM wire Antenna "AA" IEC LR6 batteries x 4 Microphone AC power cord Remote Control Unit Touch Pen (attached to the back of the remote control) Cushion for Remote x 4 U-shaped connectors x 2 (attached to back of batteries may have different voltages. "AA" IEC LR6 1 ...
...alkaline batteries. tion's rules that you may result in such hazards as shown above. Observe the following supplied accessories. Remote Control Battery Alarm When the batteries get an average of 1-3 months of battery life. Change Battery !! AM Loop Antenna... FM wire Antenna "AA" IEC LR6 batteries x 4 Microphone AC power cord Remote Control Unit Touch Pen (attached to the back of the remote control) Cushion for Remote x 4 U-shaped connectors x 2 (attached to back of batteries may have different voltages. "AA" IEC LR6 1 ...
Owner's Manual
Page 9
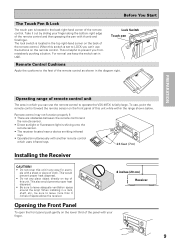
...prevent you can 't use the remote control to LOCK you can use the buttons on the back of the remote control and then grasping the pen with your finger along the bottom right edge of the remote control. To use keep the switch set to operate the VSX-49TXi is located in the back ...right-hand corner of this switch is located in any place object directly on the front panel of the remote control. This also would prevent proper heat dispersal...
...prevent you can 't use the remote control to LOCK you can use the buttons on the back of the remote control and then grasping the pen with your finger along the bottom right edge of the remote control. To use keep the switch set to operate the VSX-49TXi is located in the back ...right-hand corner of this switch is located in any place object directly on the front panel of the remote control. This also would prevent proper heat dispersal...
Owner's Manual
Page 10
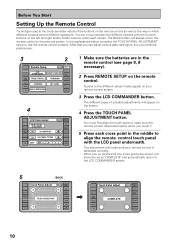
... VCR2 VCR3 TV BEEP LCD TIMER : 10 SEC OFF 1 2 BACK REMOTE SETUP CD CD-R/ TAPE1 TUNER VIDEO SAT 3 TV CONTROL 1 Make sure the batteries are in the remote control (see page 8, if necessary). 2 Press REMOTE SETUP on the remote control. Before You Start Setting Up the Remote Control Try and get used to the touch-sensitive nature of possible...
... VCR2 VCR3 TV BEEP LCD TIMER : 10 SEC OFF 1 2 BACK REMOTE SETUP CD CD-R/ TAPE1 TUNER VIDEO SAT 3 TV CONTROL 1 Make sure the batteries are in the remote control (see page 8, if necessary). 2 Press REMOTE SETUP on the remote control. Before You Start Setting Up the Remote Control Try and get used to the touch-sensitive nature of possible...

Owner's Manual
Page 11
... are entered. LCD TIMER: In order to stay on 60 seconds. You can set amount of 5-60 seconds. Use the - /+ buttons to turn the remote control off . This button turns the light on or off . FUNCTION ENTER STANDBY/ON MULTI SYSTEM OPERATION OFF MUTING MASTER VOLUME + - 1 Decide whether you'd ...like to see but uses more energy and thus wears the batteries down quicker. 11 You can choose how long the idle remote control will automatically turn it on the remote screen is easier to make and press those buttons. If no commands are : LCD CONTRAST: You can also turn the ...
... are entered. LCD TIMER: In order to stay on 60 seconds. You can set amount of 5-60 seconds. Use the - /+ buttons to turn the remote control off . This button turns the light on or off . FUNCTION ENTER STANDBY/ON MULTI SYSTEM OPERATION OFF MUTING MASTER VOLUME + - 1 Decide whether you'd ...like to see but uses more energy and thus wears the batteries down quicker. 11 You can choose how long the idle remote control will automatically turn it on the remote screen is easier to make and press those buttons. If no commands are : LCD CONTRAST: You can also turn the ...
Owner's Manual
Page 15
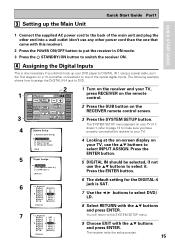
...Digital-6 [ VCR2 ] Digital-7 [ CD-R ] RF IN [ DVD/LD ] [Return] 1 Turn on the receiver and your TV, press RECEIVER on the remote control. 2 Press the SUB button on your TV, use the 5∞ buttons to the SYSTEM SETUP menu. 9 Choose EXIT with the 5∞ buttons and press ... select DVD/ LD. 8 Select RETURN with the 5∞ buttons and press ENTER. 3 Setting up your TV). 4 Looking at the on-screen display on the RECEIVER remote control screen. 3 Press the SYSTEM SETUP button. Digital-In Digital-1 [ DVD/LD ] Digital-2 [ TV ] Digital-3 [ CD ] Digital-4 [ SAT ] Digital-5 [ VCR1 ]...
...Digital-6 [ VCR2 ] Digital-7 [ CD-R ] RF IN [ DVD/LD ] [Return] 1 Turn on the receiver and your TV, press RECEIVER on the remote control. 2 Press the SUB button on your TV, use the 5∞ buttons to the SYSTEM SETUP menu. 9 Choose EXIT with the 5∞ buttons and press ... select DVD/ LD. 8 Select RETURN with the 5∞ buttons and press ENTER. 3 Setting up your TV). 4 Looking at the on-screen display on the RECEIVER remote control screen. 3 Press the SYSTEM SETUP button. Digital-In Digital-1 [ DVD/LD ] Digital-2 [ TV ] Digital-3 [ CD ] Digital-4 [ SAT ] Digital-5 [ VCR1 ]...
Owner's Manual
Page 16
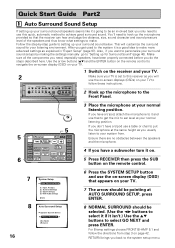
...should be pointing at your normal listening position. Use the arrow buttons (5∞) and the ENTER button on the remote control to navigate the on-screen display (OSD) on your TV. 1 Switch on the remote control. 16 7 8 System Setup [ Auto Surround Setup ] [1. If you will customize the surround sound for ... Surround Setup] [3. Make sure all the components you only need to use that appears on page 42. SIGNAL SELECT REMOTE SETUP CD CD-R/ TAPE1 TUNER VIDEO SAT TV CONTROL 3 Place the microphone at the same height as you don't have a tripod, attach the microphone to it is ...
...should be pointing at your normal listening position. Use the arrow buttons (5∞) and the ENTER button on the remote control to navigate the on-screen display (OSD) on your TV. 1 Switch on the remote control. 16 7 8 System Setup [ Auto Surround Setup ] [1. If you will customize the surround sound for ... Surround Setup] [3. Make sure all the components you only need to use that appears on page 42. SIGNAL SELECT REMOTE SETUP CD CD-R/ TAPE1 TUNER VIDEO SAT TV CONTROL 3 Place the microphone at the same height as you don't have a tripod, attach the microphone to it is ...

Owner's Manual
Page 18
... SYSTEM SETUP menu, then choose EXIT to complete the auto surround sound setup and return to access the main remote control screen. 4 Press the STANDARD button on the remote control for three minutes, or you want to establish the proper channel level, channel delay and acoustic calibration EQ. ... see pages 52-55. 2 To get a more information see the STANDARD button, press the RECEIVER button then press MAIN to access the main remote control screen. 5 Play a DVD then adjust the MASTER VOLUME. 3 Personalizing Your Sound 1 Use the Surround Listening Mode buttons to find the listening mode...
... SYSTEM SETUP menu, then choose EXIT to complete the auto surround sound setup and return to access the main remote control screen. 4 Press the STANDARD button on the remote control for three minutes, or you want to establish the proper channel level, channel delay and acoustic calibration EQ. ... see pages 52-55. 2 To get a more information see the STANDARD button, press the RECEIVER button then press MAIN to access the main remote control screen. 5 Play a DVD then adjust the MASTER VOLUME. 3 Personalizing Your Sound 1 Use the Surround Listening Mode buttons to find the listening mode...

Owner's Manual
Page 26
... cords/Optical cables Commercially available digital audio coaxial cords (standard video cords can also be used freely. Thus you can break the shutter on the remote control buttons and the like. To avoid having to insert completely and in sync with the receiver's default settings. Be sure to assign the digital inputs...
... cords/Optical cables Commercially available digital audio coaxial cords (standard video cords can also be used freely. Thus you can break the shutter on the remote control buttons and the like. To avoid having to insert completely and in sync with the receiver's default settings. Be sure to assign the digital inputs...

Owner's Manual
Page 32
... ON or into STANDBY mode or to switch OFF. 3 STANDBY indicator Lights when the receiver is in the standby mode.) 4 Remote sensor Receives the signals from the remote control. 5 Display (see p.39) 32 6 MCACC indicator (see p.56) Lights when the ACOUSTIC CAL EQ is on. (After... component connected to select a listening mode. MIDNIGHT TONE TONE BSSS/TEREBLE DIGITAL NR CLASS TUNER STATION LISTENING MULTI ROOM & SOURCE CH SELECT CONTROL ON/OFF PHONES SP SYSTEM A/B SIGNAL SELECT VIDEO SELECT TAPE2 MONITOR MULTI CH INPUT (DVD-A/SACD) SETUP MIC DIGITAL IN S-VIDEO VIDEO VIDEO...
... ON or into STANDBY mode or to switch OFF. 3 STANDBY indicator Lights when the receiver is in the standby mode.) 4 Remote sensor Receives the signals from the remote control. 5 Display (see p.39) 32 6 MCACC indicator (see p.56) Lights when the ACOUSTIC CAL EQ is on. (After... component connected to select a listening mode. MIDNIGHT TONE TONE BSSS/TEREBLE DIGITAL NR CLASS TUNER STATION LISTENING MULTI ROOM & SOURCE CH SELECT CONTROL ON/OFF PHONES SP SYSTEM A/B SIGNAL SELECT VIDEO SELECT TAPE2 MONITOR MULTI CH INPUT (DVD-A/SACD) SETUP MIC DIGITAL IN S-VIDEO VIDEO VIDEO...

Owner's Manual
Page 35
...) SPEAKERS AC OUTLET AC IN SPEAKERS ª ı· L R 14 15 17 18 11 CONTROL IN/OUT terminal You can control them all pointing the remote control(s) at one that handles surround sound and is the one remote sensor. 12 MONITOR OUT terminals (connect a TV or monitor here, see p.13 & 19) Use these... Video Inputs" (see p.94). 15 RS-232C Connection This is a future-oriented port that you can use this jack to hook up other PIONEER equipment, that bears the Î mark, so that has the possibility on this receiver. If you use alternative speaker connections like TVs, heaters,...
...) SPEAKERS AC OUTLET AC IN SPEAKERS ª ı· L R 14 15 17 18 11 CONTROL IN/OUT terminal You can control them all pointing the remote control(s) at one that handles surround sound and is the one remote sensor. 12 MONITOR OUT terminals (connect a TV or monitor here, see p.13 & 19) Use these... Video Inputs" (see p.94). 15 RS-232C Connection This is a future-oriented port that you can use this jack to hook up other PIONEER equipment, that bears the Î mark, so that has the possibility on this receiver. If you use alternative speaker connections like TVs, heaters,...

Owner's Manual
Page 36
...CHANNEL LEVEL. Since the screen on the remote control touch it will cycle through all PIONEER components. The button will turn off . Secondly, any component that switch the mode of the receiver and the remote control, which allows you programmed power off ...CH +/- : Use these components even if they are not PIONEER products. ~ MULTI OPERATION button Use this LCD remote control changes when you select a different function, explanations of Other Components" starting on the remote control. For example : If you to control your TV. MUTING button Press to select a source. Also...
...CHANNEL LEVEL. Since the screen on the remote control touch it will cycle through all PIONEER components. The button will turn off . Secondly, any component that switch the mode of the receiver and the remote control, which allows you programmed power off ...CH +/- : Use these components even if they are not PIONEER products. ~ MULTI OPERATION button Use this LCD remote control changes when you select a different function, explanations of Other Components" starting on the remote control. For example : If you to control your TV. MUTING button Press to select a source. Also...

Owner's Manual
Page 37
PREPARATION PREPARATION Basic Receiver LCD Screens Receiver MAIN Screen 1 Displays & Controls Receiver MAIN SUB LISTENING MODE SURROUND (DVD-A /SACD) STEREO /DIRECT THX STANDARD MULTI CH IN 8 8 ADVANCED ADVANCED LISTENING CINEMA CONCERT CH SEL. ADVANCED CONCERT: Press...) Switches the MIDNIGHT listening mode on or off (for example, a DVD-A player) you have hooked up to select the MAIN receiver screen (above) when the remote control is on or off (for all modes except THX). 4 LISTENING MODE buttons (see p.50 & 59) Use this button to the MULTI CH INPUT terminals. 6 ...
PREPARATION PREPARATION Basic Receiver LCD Screens Receiver MAIN Screen 1 Displays & Controls Receiver MAIN SUB LISTENING MODE SURROUND (DVD-A /SACD) STEREO /DIRECT THX STANDARD MULTI CH IN 8 8 ADVANCED ADVANCED LISTENING CINEMA CONCERT CH SEL. ADVANCED CONCERT: Press...) Switches the MIDNIGHT listening mode on or off (for example, a DVD-A player) you have hooked up to select the MAIN receiver screen (above) when the remote control is on or off (for all modes except THX). 4 LISTENING MODE buttons (see p.50 & 59) Use this button to the MULTI CH INPUT terminals. 6 ...

Owner's Manual
Page 38
... 4 SYSTEM SETUP TAPE 2 SIGNAL MONITOR SELECT 9 567 8 1 Receiver SUB button Press this button to select the SUB receiver screen (above) when the remote control is on the main receiver screen. 2 DISPLAY DIMMER button (see p.62) Use to adjust the brightness of the receiver's display. 3 STATUS button (see...TAPE 2 MONITOR button Selects the tape deck (or MD recorder, etc.) connected to select the speaker system. TONE control/EFFECT CH SEL. button Switches the tone adjust controls between the front, center, surround and surround back speakers. (see p.58). buttons TONE button This button has ...
... 4 SYSTEM SETUP TAPE 2 SIGNAL MONITOR SELECT 9 567 8 1 Receiver SUB button Press this button to select the SUB receiver screen (above) when the remote control is on the main receiver screen. 2 DISPLAY DIMMER button (see p.62) Use to adjust the brightness of the receiver's display. 3 STATUS button (see...TAPE 2 MONITOR button Selects the tape deck (or MD recorder, etc.) connected to select the speaker system. TONE control/EFFECT CH SEL. button Switches the tone adjust controls between the front, center, surround and surround back speakers. (see p.58). buttons TONE button This button has ...

Owner's Manual
Page 40
... take precedence over) the settings you want in the Quick Start Guide. In each mode, the current settings are properly hooked up the receiver. TV CONTROL use on-screen displays (OSDs) on the remote control. SPEAKER DISTANCE (see pages 16-18. 1 2 LIGHT RECEIVER DVD/LD VCR1 /DVR VCR2 Receiver MAIN SUB...
... take precedence over) the settings you want in the Quick Start Guide. In each mode, the current settings are properly hooked up the receiver. TV CONTROL use on-screen displays (OSDs) on the remote control. SPEAKER DISTANCE (see pages 16-18. 1 2 LIGHT RECEIVER DVD/LD VCR1 /DVR VCR2 Receiver MAIN SUB...

Owner's Manual
Page 44
... receiver flashes TEST TONE. You need to figure out the distance from SPEAKER SYSTEMS go to the reference position (0 dB) and the display on the remote control. Speaker Distance [Manual] [Auto] [Return] Your Speaker Systems " Normal Surround " 44 1 The SPEAKER DISTANCE should be cleared if you want to SPEAKER DISTANCE. Next, proceed...
... receiver flashes TEST TONE. You need to figure out the distance from SPEAKER SYSTEMS go to the reference position (0 dB) and the display on the remote control. Speaker Distance [Manual] [Auto] [Return] Your Speaker Systems " Normal Surround " 44 1 The SPEAKER DISTANCE should be cleared if you want to SPEAKER DISTANCE. Next, proceed...

Owner's Manual
Page 48
... set to this receiver as you will use the on-screen displays on your TV to follow these instructions. 2 Press the SUB button on the remote control's receiver screen. 3 Press the SYSTEM SETUP button and use the on-screen display (OSD) that appears on the OSD. 4 Use the 5∞ buttons to ... with the 5∞ buttons and press ENTER. 8 Continue to check the next settings select NEXT with the 5∞ buttons and press ENTER. SIGNAL SELECT REMOTE SETUP CD CD-R/ TAPE1 TUNER VIDEO SAT TV CONTROL 4 System Setup [Auto Surround Setup] [1. Expert Setup ] [4. This is : Speaker Systems;
... set to this receiver as you will use the on-screen displays on your TV to follow these instructions. 2 Press the SUB button on the remote control's receiver screen. 3 Press the SYSTEM SETUP button and use the on-screen display (OSD) that appears on the OSD. 4 Use the 5∞ buttons to ... with the 5∞ buttons and press ENTER. 8 Continue to check the next settings select NEXT with the 5∞ buttons and press ENTER. SIGNAL SELECT REMOTE SETUP CD CD-R/ TAPE1 TUNER VIDEO SAT TV CONTROL 4 System Setup [Auto Surround Setup] [1. Expert Setup ] [4. This is : Speaker Systems;

Owner's Manual
Page 49
... turn on what kind of the listening modes and their uses see pages 52-55. Be sure to achieve a surround sound effect with the VSX-49TXi. When i.LINK-equipped components are needed when an i.LINK-equipped component is not assigned can be displayed for more on the power of linkable... 49 BASIC After the PHONO function the names of the i.LINK device. • An i.LINK device that the standby indicator turns off on the remote control. Make sure it may begin to the manual for that has started playback. On the front panel, use the INPUT SELECTOR dial to play instruction...
... turn on what kind of the listening modes and their uses see pages 52-55. Be sure to achieve a surround sound effect with the VSX-49TXi. When i.LINK-equipped components are needed when an i.LINK-equipped component is not assigned can be displayed for more on the power of linkable... 49 BASIC After the PHONO function the names of the i.LINK device. • An i.LINK device that the standby indicator turns off on the remote control. Make sure it may begin to the manual for that has started playback. On the front panel, use the INPUT SELECTOR dial to play instruction...

Owner's Manual
Page 50
... settings are changed. (p.41). • LISTENING CH SELECT affects which situations they are using the MASTER VOLUME buttons on the remote control's RECEIVER MAIN screen. AUTO will choose the appropriate playback channels for details on p.52-55 for the source, speaker configuration and...used for playback (LISTENING CH SELECT) This button selects the number of these options. Press TAPE 2 MONITOR on . button on the remote control. memo • If you haven't set your speaker configuration you selected in which listening modes will get different options for playback, either ...
... settings are changed. (p.41). • LISTENING CH SELECT affects which situations they are using the MASTER VOLUME buttons on the remote control's RECEIVER MAIN screen. AUTO will choose the appropriate playback channels for details on p.52-55 for the source, speaker configuration and...used for playback (LISTENING CH SELECT) This button selects the number of these options. Press TAPE 2 MONITOR on . button on the remote control. memo • If you haven't set your speaker configuration you selected in which listening modes will get different options for playback, either ...


