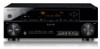

Owner's Manual
Page 2
... B digital device, pursuant to radio communications. Connect the equipment into an outlet on vacation). Product Name: AUDIO/VIDEO MULTI-CHANNEL RECEIVER Model Number: VSX-31 / VSX-30 Responsible Party Name: PIONEER ELECTRONICS (USA) INC. Phone: 1-800-421-1404 URL: http://www.pioneerelectronics.com D8-10-4*_C1_En To prevent a fire or shock hazard, do not...
... B digital device, pursuant to radio communications. Connect the equipment into an outlet on vacation). Product Name: AUDIO/VIDEO MULTI-CHANNEL RECEIVER Model Number: VSX-31 / VSX-30 Responsible Party Name: PIONEER ELECTRONICS (USA) INC. Phone: 1-800-421-1404 URL: http://www.pioneerelectronics.com D8-10-4*_C1_En To prevent a fire or shock hazard, do not...

Owner's Manual
Page 3
A grounding type plug has two blades and a third grounding prong. VENTILATION CAUTION When installing this unit, make sure the unit has been installed so that the power cord can be routed away from the AC outlet when left unused for a long period of time (for the unit, you will not completely shut off all power from tip-over. 13) Unplug this apparatus near any naked flame sources (such as radiators, heat registers, stoves, or other . Servicing is required when the apparatus has been damaged in any ventilation openings. D3-7-13-69_En WARNING To prevent a fire hazard, do ...
A grounding type plug has two blades and a third grounding prong. VENTILATION CAUTION When installing this unit, make sure the unit has been installed so that the power cord can be routed away from the AC outlet when left unused for a long period of time (for the unit, you will not completely shut off all power from tip-over. 13) Unplug this apparatus near any naked flame sources (such as radiators, heat registers, stoves, or other . Servicing is required when the apparatus has been damaged in any ventilation openings. D3-7-13-69_En WARNING To prevent a fire hazard, do ...
Owner's Manual
Page 4
...or other set-top box 29 Connecting a HDD/DVD recorder, VCR and other video sources 29 Connecting other audio components 30 About the WMA9 Pro decoder 30 Connecting AM/FM antennas 31 Connecting external antennas 31 MULTI-ZONE setup 32 Making MULTI-ZONE connections 32 Connecting Optional Bluetooth ...iPod 36 Connecting a USB device 37 Connecting a USB device for Advanced MCACC output 37 Connecting an IR receiver 38 Operating other Pioneer components with no HDMI output 27 Connecting your model properly. Please read through LAN interface 34 Connecting an HDMI-equipped component to ...
...or other set-top box 29 Connecting a HDD/DVD recorder, VCR and other video sources 29 Connecting other audio components 30 About the WMA9 Pro decoder 30 Connecting AM/FM antennas 31 Connecting external antennas 31 MULTI-ZONE setup 32 Making MULTI-ZONE connections 32 Connecting Optional Bluetooth ...iPod 36 Connecting a USB device 37 Connecting a USB device for Advanced MCACC output 37 Connecting an IR receiver 38 Operating other Pioneer components with no HDMI output 27 Connecting your model properly. Please read through LAN interface 34 Connecting an HDMI-equipped component to ...
Owner's Manual
Page 5
Bluetooth® ADAPTER for Wireless Enjoyment of Music 54 Wireless music play 54 Pairing the Bluetooth ADAPTER and Bluetooth wireless technology device 54 Listening to music contents of a Bluetooth wireless technology device with your system 55 Listening to Internet radio stations 56 Programming the Internet radio stations . . . 56 Listening to Satellite Radio 58 Listening to SIRIUS Radio 58 Saving channel presets 59 Using the SIRIUS Menu 60 06 Listening to your system Auto playback 61 Listening in surround sound 61 Standard surround sound 61 Using the Advanced surround effects. ....
Bluetooth® ADAPTER for Wireless Enjoyment of Music 54 Wireless music play 54 Pairing the Bluetooth ADAPTER and Bluetooth wireless technology device 54 Listening to music contents of a Bluetooth wireless technology device with your system 55 Listening to Internet radio stations 56 Programming the Internet radio stations . . . 56 Listening to Satellite Radio 58 Listening to SIRIUS Radio 58 Saving channel presets 59 Using the SIRIUS Menu 60 06 Listening to your system Auto playback 61 Listening in surround sound 61 Standard surround sound 61 Using the Advanced surround effects. ....

Owner's Manual
Page 6
11 The System Setup and Other Setup menus Making receiver settings from the System Setup menu 104 Manual speaker setup 104 Speaker system setting 105 Speaker Setting 106 Channel Level 107 Speaker Distance 107 X-Curve 108 Network Setup menu 108 IP address/Proxy setting 108 Checking the MAC address 109 The Other Setup menu 110 Volume Setup 110 Remote Control Mode Setup 111 Flicker Reduction Setup 111 12 Additional information Troubleshooting 112 Power 112 No sound 113 Other audio problems 115 Video 116 Settings 117 Professional Calibration EQ graphical output 118 Display ...
11 The System Setup and Other Setup menus Making receiver settings from the System Setup menu 104 Manual speaker setup 104 Speaker system setting 105 Speaker Setting 106 Channel Level 107 Speaker Distance 107 X-Curve 108 Network Setup menu 108 IP address/Proxy setting 108 Checking the MAC address 109 The Other Setup menu 110 Volume Setup 110 Remote Control Mode Setup 111 Flicker Reduction Setup 111 12 Additional information Troubleshooting 112 Power 112 No sound 113 Other audio problems 115 Video 116 Settings 117 Professional Calibration EQ graphical output 118 Display ...
Owner's Manual
Page 7
amping connection (High quality surround) • 5.1 channel surround system & ZONE 2 connection (Multi Zone) • Some tips for improving sound quality (page 19) 3 Connecting the speakers • Connecting the speakers (page 20) • Installing your speaker system (page 21) • Bi-amping your speakers (page 22) 4 Connecting the components • About the audio connection (page 24) • About the video converter (page 24) • Connecting your TV and playback components (page 25) • Connecting AM/FM antennas (page 31) • Plugging in the box (page...
amping connection (High quality surround) • 5.1 channel surround system & ZONE 2 connection (Multi Zone) • Some tips for improving sound quality (page 19) 3 Connecting the speakers • Connecting the speakers (page 20) • Installing your speaker system (page 21) • Bi-amping your speakers (page 22) 4 Connecting the components • About the audio connection (page 24) • About the video converter (page 24) • Connecting your TV and playback components (page 25) • Connecting AM/FM antennas (page 31) • Plugging in the box (page...

Owner's Manual
Page 8
they may distort) - Observe the following precautions: • Never use of the batteries properly according to the marks in the battery case. • Batteries with the sound. - in such hazards as leakage and bursting. in places that have hot fumes or oils (such as inside a car or near a cassette deck (or close to a device that gives off a magnetic field). CAUTION Incorrect use new and old batteries together. • Insert the plus and minus sides of batteries may have a longer life. Don't install it on a color TV (the screen may not last over a long ...
they may distort) - Observe the following precautions: • Never use of the batteries properly according to the marks in the battery case. • Batteries with the sound. - in such hazards as leakage and bursting. in places that have hot fumes or oils (such as inside a car or near a cassette deck (or close to a device that gives off a magnetic field). CAUTION Incorrect use new and old batteries together. • Insert the plus and minus sides of batteries may have a longer life. Don't install it on a color TV (the screen may not last over a long ...
Owner's Manual
Page 9
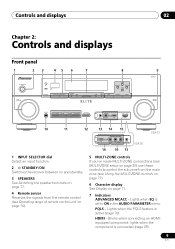
... PHASE CONTROL SPEAKERS CONTROL MULTI-ZONE ON/OFF ADVANCED MCACC PQLS HDMI iPod iPhone BAND TUNE PRESET PRESET TUNE TUNER EDIT ENTER 9 VSX-31 MASTER VOLUME PHONES AUTO/ALC/DIRECT LISTENING MODE STEREO STANDARD ADV SURROUND iPod iPhone DIRECT CONTROL MCACC SETUP MIC iPod iPhone USB ...VIDEO CAMERA HDMI 5 10 11 12 13 14 15 VIDEO 2 INPUT USB iPod iPhone VIDEO L AUDIO R MCACC SETUP MIC 14 16 13 VSX-30 VSX-31 1 INPUT SELECTOR dial Select an input function. 2 STANDBY/ON Switches the receiver between on and standby. 3 SPEAKERS See Switching the ...
... PHASE CONTROL SPEAKERS CONTROL MULTI-ZONE ON/OFF ADVANCED MCACC PQLS HDMI iPod iPhone BAND TUNE PRESET PRESET TUNE TUNER EDIT ENTER 9 VSX-31 MASTER VOLUME PHONES AUTO/ALC/DIRECT LISTENING MODE STEREO STANDARD ADV SURROUND iPod iPhone DIRECT CONTROL MCACC SETUP MIC iPod iPhone USB ...VIDEO CAMERA HDMI 5 10 11 12 13 14 15 VIDEO 2 INPUT USB iPod iPhone VIDEO L AUDIO R MCACC SETUP MIC 14 16 13 VSX-30 VSX-31 1 INPUT SELECTOR dial Select an input function. 2 STANDBY/ON Switches the receiver between on and standby. 3 SPEAKERS See Switching the ...

Owner's Manual
Page 10
...Logic IIx and Neo:6 options (page 61). Lights to memorize and name stations for connection to compatible HDMI device (Video camera, etc.)(page 35). 16 VSX-30 only: VIDEO 2 INPUT terminals Use to connect your portable equipment such as an audio and video source, or connect a USB device for audio and ...photo playback (page 36, 37). 15 VSX-31 only: HDMI input connector Use for recall (page 52). TUNER EDIT - Find preset stations (page 52). 9 MASTER VOLUME dial 10 PHONES jack Connect...
...Logic IIx and Neo:6 options (page 61). Lights to memorize and name stations for connection to compatible HDMI device (Video camera, etc.)(page 35). 16 VSX-30 only: VIDEO 2 INPUT terminals Use to connect your portable equipment such as an audio and video source, or connect a USB device for audio and ...photo playback (page 36, 37). 15 VSX-31 only: HDMI input connector Use for recall (page 52). TUNER EDIT - Find preset stations (page 52). 9 MASTER VOLUME dial 10 PHONES jack Connect...

Owner's Manual
Page 11
Left surround/Right surround channel LFE - Lights when the Auto Surround feature is selected (page 72). L/R - Two channels other than the ones above , the mono surround channel or matrix encode flag 3 Digital format indicators Light when a signal encoded in the corresponding format is detected. 2 DIGITAL - Lights with SACDs. Lights during playback of DTS-HD Master Audio signal. 4 MULTI-ZONE Lights when the MULTI-ZONE feature is active (page 77). 5 SOUND Lights when any of PCM signals. ALC - STREAM DIRECT - STEREO - Controls and displays 02 Display 1 2...
Left surround/Right surround channel LFE - Lights when the Auto Surround feature is selected (page 72). L/R - Two channels other than the ones above , the mono surround channel or matrix encode flag 3 Digital format indicators Light when a signal encoded in the corresponding format is detected. 2 DIGITAL - Lights with SACDs. Lights during playback of DTS-HD Master Audio signal. 4 MULTI-ZONE Lights when the MULTI-ZONE feature is active (page 77). 5 SOUND Lights when any of PCM signals. ALC - STREAM DIRECT - STEREO - Controls and displays 02 Display 1 2...

Owner's Manual
Page 12
MONO - Neo:6 - STEREO - Lights when a stereo FM broadcast is being received. Lights when the mono mode is set to 1.) (page 81) 12 En When one of the Neo:6 modes of an analog signal (page 79). 10 Tuner indicators TUNED - "---" indicates the minimum level, and "+12dB" indicates the maximum level. 13 Input function indicators Light to indicate the input function you have selected. 14 Scroll indicators Light when there are more selectable items when making the various settings. 15 Speaker indicators Indicates the speaker terminal, A and/or B, to which audio signal output is currently set...
MONO - Neo:6 - STEREO - Lights when a stereo FM broadcast is being received. Lights when the mono mode is set to 1.) (page 81) 12 En When one of the Neo:6 modes of an analog signal (page 79). 10 Tuner indicators TUNED - "---" indicates the minimum level, and "+12dB" indicates the maximum level. 13 Input function indicators Light to indicate the input function you have selected. 14 Scroll indicators Light when there are more selectable items when making the various settings. 15 Speaker indicators Indicates the speaker terminal, A and/or B, to which audio signal output is currently set...

Owner's Manual
Page 13
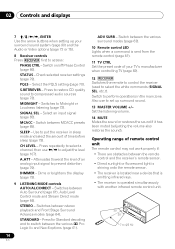
RECEIVER MULTI SOURCE OPERATION 1 R.SETUP 2 BD DVD DVR/BDR HDMI 10 TV CD NET RADIO ADAPTER 3 iPod USB TUNER SIRIUS TV CTRL 11 INPUT SELECT ZONE 2 RECEIVER 4 12 MASTER INPUT VOLUME TV CONTROL 5 13 CH VOL MUTE 14 AUDIO PARAMETER VIDEO PARAMETER 6 LIST TUNE TOOLS TOP MENU 7 BAND T.EDIT GUIDE PRESET ENTER PRESET CATEGORY HOME MENU TUNE iPod CTRL RETURN HDD PGM MEMORY MENU DVD PHASE CTRL STATUS TV / DTV MPX PQLS 8 S.RETRIEVER MIDNIGHT AUDIO 1 2 3 SIGNAL SEL MCACC SLEEP INFO 4 5 6 DISP CH LEVEL A.ATT DIMMER 7 8 9 D.ACCESS CLASS CH / CLR 0...
RECEIVER MULTI SOURCE OPERATION 1 R.SETUP 2 BD DVD DVR/BDR HDMI 10 TV CD NET RADIO ADAPTER 3 iPod USB TUNER SIRIUS TV CTRL 11 INPUT SELECT ZONE 2 RECEIVER 4 12 MASTER INPUT VOLUME TV CONTROL 5 13 CH VOL MUTE 14 AUDIO PARAMETER VIDEO PARAMETER 6 LIST TUNE TOOLS TOP MENU 7 BAND T.EDIT GUIDE PRESET ENTER PRESET CATEGORY HOME MENU TUNE iPod CTRL RETURN HDD PGM MEMORY MENU DVD PHASE CTRL STATUS TV / DTV MPX PQLS 8 S.RETRIEVER MIDNIGHT AUDIO 1 2 3 SIGNAL SEL MCACC SLEEP INFO 4 5 6 DISP CH LEVEL A.ATT DIMMER 7 8 9 D.ACCESS CLASS CH / CLR 0...
Owner's Manual
Page 14
... to switch between the various surround modes (page 63). 10 Remote control LED Lights when a command is operated simultaneously with another infrared remote control unit. 30° 30° 7 m (23 ft.) 02 Controls and displays 7 ENTER Use the arrow buttons when setting up surround sound. 13 MASTER VOLUME +/- S.RETRIEVER...
... to switch between the various surround modes (page 63). 10 Remote control LED Lights when a command is operated simultaneously with another infrared remote control unit. 30° 30° 7 m (23 ft.) 02 Controls and displays 7 ENTER Use the arrow buttons when setting up surround sound. 13 MASTER VOLUME +/- S.RETRIEVER...

Owner's Manual
Page 15
... have to make up your equipment This receiver provides you can connect to be difficult. Important • Illustration shows the VSX-31, however connections for the installer. 15 En Rear panel HDMI BD IN IN 1 ASSIGNABLE 1 4 IN 2 IN... PB RS-232C 12 V TRIGGER (OUTPUT 12 V TOTAL 50 mA MAX) 12 IR CONTROL IN OUT IN OUT PR SPEAKERS A VSX-31 AC IN BD IN IN 1 HDMI IN 2 IN 3 OUT LAN COAXIAL ASSIGNABLE (10/100) IN 1 IN 1 OPTICAL ... 12 V TOTAL 50 mA MAX) 12 IR CONTROL IN OUT IN OUT PR SPEAKERS A VSX-30 AC IN Note • The RS-232C terminal is exclusively for the...
... have to make up your equipment This receiver provides you can connect to be difficult. Important • Illustration shows the VSX-31, however connections for the installer. 15 En Rear panel HDMI BD IN IN 1 ASSIGNABLE 1 4 IN 2 IN... PB RS-232C 12 V TRIGGER (OUTPUT 12 V TOTAL 50 mA MAX) 12 IR CONTROL IN OUT IN OUT PR SPEAKERS A VSX-31 AC IN BD IN IN 1 HDMI IN 2 IN 3 OUT LAN COAXIAL ASSIGNABLE (10/100) IN 1 IN 1 OPTICAL ... 12 V TOTAL 50 mA MAX) 12 IR CONTROL IN OUT IN OUT PR SPEAKERS A VSX-30 AC IN Note • The RS-232C terminal is exclusively for the...

Owner's Manual
Page 16
... to change the assignments if other connections are assigned by default to the receiver's different input terminals. Important • The input functions below are used. VSX-31 only 16 En Plugging in should be the final step. Input function Input Terminals Digital HDMI Component DVD COAX-1 IN 1 BD (BD) TV/SAT...
... to change the assignments if other connections are assigned by default to the receiver's different input terminals. Important • The input functions below are used. VSX-31 only 16 En Plugging in should be the final step. Input function Input Terminals Digital HDMI Component DVD COAX-1 IN 1 BD (BD) TV/SAT...

Owner's Manual
Page 17
The same connections also allow for 7.1-channel surround sound in the main zone when not using the B speakers. 17 En This surround system produces a true-to only connect one from above. R L C SW SL SBL R SR L SBR Speaker B With these connections you have. • Be sure to connect speakers to the front left and right channels (L and R). • It is also possible to -life sound over a wider area. [C] 7.1 channel surround system & Speaker B connection • Speaker System setting: Speaker B SBR SL SBL A 9.1 ch surround system connects the left and right front speakers ...
The same connections also allow for 7.1-channel surround sound in the main zone when not using the B speakers. 17 En This surround system produces a true-to only connect one from above. R L C SW SL SBL R SR L SBR Speaker B With these connections you have. • Be sure to connect speakers to the front left and right channels (L and R). • It is also possible to -life sound over a wider area. [C] 7.1 channel surround system & Speaker B connection • Speaker System setting: Speaker B SBR SL SBL A 9.1 ch surround system connects the left and right front speakers ...

Owner's Manual
Page 18
Other speaker connections • Your favorite speaker connections can simultaneously enjoy 5.1-channel surround sound in ZONE 2 (The selection of input devices is played from the front height, front wide, speaker B and surround back speakers. Front Bi-Amp L SW R C SR SL [E] 5.1 channel surround system & ZONE 2 connection (Multi Zone) • Speaker System setting: ZONE 2 With these connections you can be selected even if you have fewer than [A] (see Speaker system setting on another component in the main zone with stereo playback on page 105). • Sound does not come ...
Other speaker connections • Your favorite speaker connections can simultaneously enjoy 5.1-channel surround sound in ZONE 2 (The selection of input devices is played from the front height, front wide, speaker B and surround back speakers. Front Bi-Amp L SW R C SR SL [E] 5.1 channel surround system & ZONE 2 connection (Multi Zone) • Speaker System setting: ZONE 2 With these connections you can be selected even if you have fewer than [A] (see Speaker system setting on another component in the main zone with stereo playback on page 105). • Sound does not come ...

Owner's Manual
Page 19
... only one surround back speaker, place it directly behind the listener than for home theater playback. • Try not to connect. FHL SW FHR C L R FWL 30 30 60 60 FWR 120 120 SL 60 SR SBL SB SBR • Place the surround speakers at least 1 m (3.3 ft.) directly above or below for placement...
... only one surround back speaker, place it directly behind the listener than for home theater playback. • Try not to connect. FHL SW FHR C L R FWL 30 30 60 60 FWR 120 120 SL 60 SR SBL SB SBR • Place the surround speakers at least 1 m (3.3 ft.) directly above or below for placement...

Owner's Manual
Page 20
Banana plug connections (A-Speaker terminals only) If you want to use speaker cables terminated with banana plugs, screw the speaker terminal fully shut, then plug the banana plug into the speaker terminal. If any uninsulated parts. • Make sure that all speakers are securely installed. CAUTION • Make sure that came with the terminals on the receiver comprises a positive (+) and negative (-) terminal. Make sure to the manual that all the bare speaker wire is not possible to cut off as earthquakes. CAUTION • These speaker terminals carry HAZARDOUS LIVE voltage. ...
Banana plug connections (A-Speaker terminals only) If you want to use speaker cables terminated with banana plugs, screw the speaker terminal fully shut, then plug the banana plug into the speaker terminal. If any uninsulated parts. • Make sure that all speakers are securely installed. CAUTION • Make sure that came with the terminals on the receiver comprises a positive (+) and negative (-) terminal. Make sure to the manual that all the bare speaker wire is not possible to cut off as earthquakes. CAUTION • These speaker terminals carry HAZARDOUS LIVE voltage. ...

Owner's Manual
Page 21
... FRONT HEIGHT/WIDE/ B Y OUT R L VIDEO PB RS-232C 12 V TRIGGER (OUTPUT 12 V TOTAL 50 mA MAX) 12 IR CONTROL IN OUT IN OUT PR SPEAKERS A VSX-31 AC IN Surround right The surround back terminals can also be used for ZONE2. 5.1 ch surround setting Not connected Not connected 6.1 ch surround setting...
... FRONT HEIGHT/WIDE/ B Y OUT R L VIDEO PB RS-232C 12 V TRIGGER (OUTPUT 12 V TOTAL 50 mA MAX) 12 IR CONTROL IN OUT IN OUT PR SPEAKERS A VSX-31 AC IN Surround right The surround back terminals can also be used for ZONE2. 5.1 ch surround setting Not connected Not connected 6.1 ch surround setting...
