

Owner's Manual
Page 2
... defeat the safety purpose of time. 14) Refer all instructions. 5) Do not use attachments/accessories specified by the manufacturer. 12) Use only with the cart, stand, tripod, bracket, or table specified by direct connection to ensure reliable operation of the obsolete outlet. 10) Protect the power cord from being walked on...
... defeat the safety purpose of time. 14) Refer all instructions. 5) Do not use attachments/accessories specified by the manufacturer. 12) Use only with the cart, stand, tripod, bracket, or table specified by direct connection to ensure reliable operation of the obsolete outlet. 10) Protect the power cord from being walked on...

Owner's Manual
Page 4
... 04 Part Names 14 Plasma display 14 Remote control unit 16 05 Preparation 17 Installing the plasma display 17 Moving the plasma display 17 Attaching the Pioneer stand 17 Installing the Pioneer speaker 19 Preventing the plasma display from that shown ...in the explanatory drawings. In some countries or regions, the shape of the power plug and power outlet may sometimes differ from falling over 26 Detaching the Pioneer stand 27 Cable connections for watching digital and/or conventional TV...
... 04 Part Names 14 Plasma display 14 Remote control unit 16 05 Preparation 17 Installing the plasma display 17 Moving the plasma display 17 Attaching the Pioneer stand 17 Installing the Pioneer speaker 19 Preventing the plasma display from that shown ...in the explanatory drawings. In some countries or regions, the shape of the power plug and power outlet may sometimes differ from falling over 26 Detaching the Pioneer stand 27 Cable connections for watching digital and/or conventional TV...

Owner's Manual
Page 7
... have both very bright areas and very dark areas side by using the still picture mode from a TV, VCR, DVD player or any still image, it is strongly recommended. However, Pioneer cannot be displayed for a prolonged period of time. • When playing a game, the "GAME...order to obtain maximum enjoyment from this Pioneer PRO150FD/PRO-110FD plasma display, please first read and follow the usage guidelines below , you can ensure longer and satisfactory results from your Pioneer plasma display for over three times longer than the Pioneer stand or installation bracket may cause the ...
... have both very bright areas and very dark areas side by using the still picture mode from a TV, VCR, DVD player or any still image, it is strongly recommended. However, Pioneer cannot be displayed for a prolonged period of time. • When playing a game, the "GAME...order to obtain maximum enjoyment from this Pioneer PRO150FD/PRO-110FD plasma display, please first read and follow the usage guidelines below , you can ensure longer and satisfactory results from your Pioneer plasma display for over three times longer than the Pioneer stand or installation bracket may cause the ...
Owner's Manual
Page 9
... scale to burning of time. Some parts of time, image retention may occur due to the remaining electric load. USE ONLY WITH A CART, STAND, TRIPOD, BRACKET, OR TABLE RECOMMENDED BY THE MANUFACTURER, OR SOLD WITH THE PRODUCT. QUICK STOPS, EXCESSIVE FORCE, AND UNEVEN SURFACES MAY CAUSE THE...full screen. • We recommend that you switch between television and an external digital video recorder (D-VHS), or when your plasma display. Note • When a program menu, TV Guide screen or frozen image is displayed for the after two to "On". The High Definition 16:9 aspect ratio images ...
... scale to burning of time. Some parts of time, image retention may occur due to the remaining electric load. USE ONLY WITH A CART, STAND, TRIPOD, BRACKET, OR TABLE RECOMMENDED BY THE MANUFACTURER, OR SOLD WITH THE PRODUCT. QUICK STOPS, EXCESSIVE FORCE, AND UNEVEN SURFACES MAY CAUSE THE...full screen. • We recommend that you switch between television and an external digital video recorder (D-VHS), or when your plasma display. Note • When a program menu, TV Guide screen or frozen image is displayed for the after two to "On". The High Definition 16:9 aspect ratio images ...

Owner's Manual
Page 10
... on a power source specified on a wall, be broken, resulting in fire or personal injury. 24. The plasma display weighs about 66.7 kg (147.0 lbs.) for the PRO-150FD (including the stand and speaker) and about 45.1 kg (99.4 lbs.) for ventilation. Use of unauthorized parts can expose you ...are followed. 11. The plasma display used in this manual in a safe place-These safety and operating instructions must...
... on a power source specified on a wall, be broken, resulting in fire or personal injury. 24. The plasma display weighs about 66.7 kg (147.0 lbs.) for the PRO-150FD (including the stand and speaker) and about 45.1 kg (99.4 lbs.) for ventilation. Use of unauthorized parts can expose you ...are followed. 11. The plasma display used in this manual in a safe place-These safety and operating instructions must...
Owner's Manual
Page 12
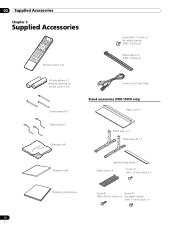
... only) AA size battery × 2 (Alkaline batteries for remote control unit) Speed clamp × 3 Bead band × 3 Cleaning cloth Power cord (2 m/6.6 feet) Stand accessories (PRO-150FD only) Base cover x 1 Stand pipe (L) x 1 Stand pipe (R) x 1 Warranty card Light-blocking shield x 1 Plastic band x 4 Screw ➀ (M5 x 10 mm: black) x 6 Operating instructions Screw ➁ Screw ➂ (M6...
... only) AA size battery × 2 (Alkaline batteries for remote control unit) Speed clamp × 3 Bead band × 3 Cleaning cloth Power cord (2 m/6.6 feet) Stand accessories (PRO-150FD only) Base cover x 1 Stand pipe (L) x 1 Stand pipe (R) x 1 Warranty card Light-blocking shield x 1 Plastic band x 4 Screw ➀ (M5 x 10 mm: black) x 6 Operating instructions Screw ➁ Screw ➂ (M6...
Owner's Manual
Page 17
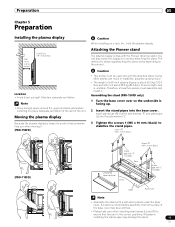
... are in instability, possibly causing injury. • The weight of a 60 inch plasma display is about 55.5 kg (122.4 lbs.) and a 50 inch about 38.8 kg (85.5 lbs.), it has no depth, and is heavy, be used only with the Pioneer table top stand. Screws ➀ (M5 x 10 mm: black) (PRO-110FD) Screws ➀...
... are in instability, possibly causing injury. • The weight of a 60 inch plasma display is about 55.5 kg (122.4 lbs.) and a 50 inch about 38.8 kg (85.5 lbs.), it has no depth, and is heavy, be used only with the Pioneer table top stand. Screws ➀ (M5 x 10 mm: black) (PRO-110FD) Screws ➀...

Owner's Manual
Page 19
... tone control function to greatly emphasize treble sounds, do not use any part of the stand indicates downward. For speaker installation, see Installing the Pioneer speaker. Doing so might damage the plasma display panel or its ports or result in interference or color distortion. Installing the... Pioneer speaker Insert the stand into any screws other than those supplied, otherwise the ...
... tone control function to greatly emphasize treble sounds, do not use any part of the stand indicates downward. For speaker installation, see Installing the Pioneer speaker. Doing so might damage the plasma display panel or its ports or result in interference or color distortion. Installing the... Pioneer speaker Insert the stand into any screws other than those supplied, otherwise the ...
Owner's Manual
Page 20
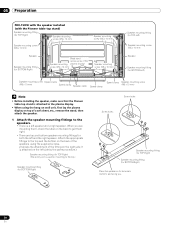
... mm) Speed clamp Speaker cable Speed clamp Speed clamp Speaker mounting screw (M5 x 10 mm) Note • Before installing the speaker, make sure that the Pioneer table top stand is attached to the plasma display. • When using the supplied screws. (It shows the attachment of a soft sheet, etc., remove the...
... mm) Speed clamp Speaker cable Speed clamp Speed clamp Speaker mounting screw (M5 x 10 mm) Note • Before installing the speaker, make sure that the Pioneer table top stand is attached to the plasma display. • When using the supplied screws. (It shows the attachment of a soft sheet, etc., remove the...
Owner's Manual
Page 23
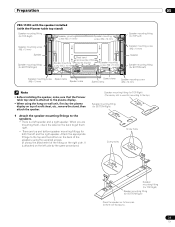
...TOP-Right) Speaker mounting fitting (for both the left speaker and a right speaker. Preparation 05 PRO-110FD with the speaker installed (with the Pioneer table top stand) Speaker mounting fitting (for TOP-Right) Speaker mounting screw (M5 x 10 mm) Speaker mounting screw (M5 x 10 mm) Speaker mounting ... Speed clamp Speed clamp Speaker mounting screw (M5 x 10 mm) Note • Before installing the speaker, make sure that the Pioneer table top stand is attached to the plasma display. • When using the supplied screws. (It shows the attachment of a soft sheet, etc., remove the...
...TOP-Right) Speaker mounting fitting (for both the left speaker and a right speaker. Preparation 05 PRO-110FD with the speaker installed (with the Pioneer table top stand) Speaker mounting fitting (for TOP-Right) Speaker mounting screw (M5 x 10 mm) Speaker mounting screw (M5 x 10 mm) Speaker mounting ... Speed clamp Speed clamp Speaker mounting screw (M5 x 10 mm) Note • Before installing the speaker, make sure that the Pioneer table top stand is attached to the plasma display. • When using the supplied screws. (It shows the attachment of a soft sheet, etc., remove the...
Owner's Manual
Page 26
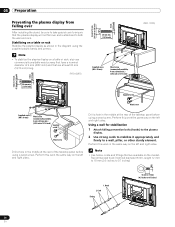
...) 1. 8 mm to 15 mm (3/8 inch to 5/8 inch) 4 mm (5/32 inch) 8 mm to 15 mm (3/8 inch to 5/8 inch) 4 mm (5/32 inch) M8 05 Preparation Preventing the plasma display from falling over After installing the stand, be sure to take special care to ensure that are available on a table or rack Stabilize the... plasma display as shown in the diagram using a wood screw. Stabilizing on the market. Drill a hole in the middle at the rear of the tabletop panel ...
...) 1. 8 mm to 15 mm (3/8 inch to 5/8 inch) 4 mm (5/32 inch) 8 mm to 15 mm (3/8 inch to 5/8 inch) 4 mm (5/32 inch) M8 05 Preparation Preventing the plasma display from falling over After installing the stand, be sure to take special care to ensure that are available on a table or rack Stabilize the... plasma display as shown in the diagram using a wood screw. Stabilizing on the market. Drill a hole in the middle at the rear of the tabletop panel ...
Owner's Manual
Page 27
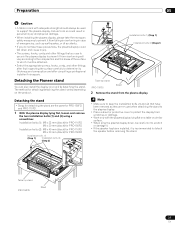
... the plasma display lying flat, loosen and remove the two installation bolts (1) and (2) using a screwdriver. The method for attaching/detaching the stand varies depending on a rack by detaching the stand. Table top stand (PRO-150FD) Sheet 27 En Detaching the Pioneer stand You can... bolts (1) (Step 1) Installation bolts (2) (Step 2) Table top stand (PRO-110FD) Sheet 2 Remove the stand from scratches or damage. • Work only with adequate strength should always be used when attaching the stand to the plasma display. • Place a sheet or protective cover to protect the...
... the plasma display lying flat, loosen and remove the two installation bolts (1) and (2) using a screwdriver. The method for attaching/detaching the stand varies depending on a rack by detaching the stand. Table top stand (PRO-150FD) Sheet 27 En Detaching the Pioneer stand You can... bolts (1) (Step 1) Installation bolts (2) (Step 2) Table top stand (PRO-110FD) Sheet 2 Remove the stand from scratches or damage. • Work only with adequate strength should always be used when attaching the stand to the plasma display. • Place a sheet or protective cover to protect the...

Owner's Manual
Page 28
...up the column supports with the bottom of the plasma display, as indicated by the arrows and tighten the installation bolts (2) and (1) firmly using a screwdriver. Note • Be sure to stand upright. For speaker installation, see Installing the Pioneer speaker on a table or similar surface. •...; When lying the plasma display down, be careful not to scratch or damage it. • If the ...
...up the column supports with the bottom of the plasma display, as indicated by the arrows and tighten the installation bolts (2) and (1) firmly using a screwdriver. Note • Be sure to stand upright. For speaker installation, see Installing the Pioneer speaker on a table or similar surface. •...; When lying the plasma display down, be careful not to scratch or damage it. • If the ...
Owner's Manual
Page 29
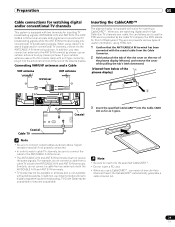
... generates a cable channel list. 29 En When you are watching digital and/or High Definition TV channels over cable, the card allows you need not execute Auto Channel Preset; the POD stands for inputting TV broadcasting signals: ANT/CABLE A IN and ANT B IN. The ANT/ CABLE A IN terminal...cover on the rear of Deployment. Similarly, do not connect a cable from below of the plasma display. For example, do not connect a cable from an antenna to digital programming and broadcasting, TV Guide Data may not be unavailable or become unavailable. use an outdoor antenna to use a ...
... generates a cable channel list. 29 En When you are watching digital and/or High Definition TV channels over cable, the card allows you need not execute Auto Channel Preset; the POD stands for inputting TV broadcasting signals: ANT/CABLE A IN and ANT B IN. The ANT/ CABLE A IN terminal...cover on the rear of Deployment. Similarly, do not connect a cable from below of the plasma display. For example, do not connect a cable from an antenna to digital programming and broadcasting, TV Guide Data may not be unavailable or become unavailable. use an outdoor antenna to use a ...
Owner's Manual
Page 62
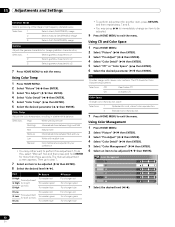
...). 3 Select "Pro Adjust" ( / then ENTER). 4 Select "Color Detail" ( / then ENTER). 5 Select "CTI" or "Color Space" ( / then ENTER). 6 Select the desired parameter ( / then ENTER). The CTI stands for more than three seconds. The manual adjustment screen appears. Selections Off Deactivates CTI On Activates CTI Color Space Changes color reproduction space Selections 1 Optimized...
...). 3 Select "Pro Adjust" ( / then ENTER). 4 Select "Color Detail" ( / then ENTER). 5 Select "CTI" or "Color Space" ( / then ENTER). 6 Select the desired parameter ( / then ENTER). The CTI stands for more than three seconds. The manual adjustment screen appears. Selections Off Deactivates CTI On Activates CTI Color Space Changes color reproduction space Selections 1 Optimized...
Owner's Manual
Page 63
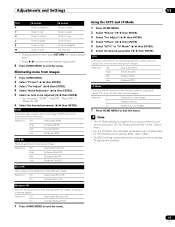
... input source and select "On" for "Game Control Pref" on the "Option" menu. • For the I -P Mode setting is selectable when composite video or analog TV signals are not selectable for both video and still images. Note • The I -P Mode, the individual parameters are received. 63 En Using the 3DYC and... can select "3DNR", "Field NR", "Block NR" or "Mosquito NR". 6 Select the desired parameter ( / then ENTER). 3DNR Eliminates video noise for clean crisp images. 3DNR stands for separating brightness signals and color signals.
... input source and select "On" for "Game Control Pref" on the "Option" menu. • For the I -P Mode setting is selectable when composite video or analog TV signals are not selectable for both video and still images. Note • The I -P Mode, the individual parameters are received. 63 En Using the 3DYC and... can select "3DNR", "Field NR", "Block NR" or "Mosquito NR". 6 Select the desired parameter ( / then ENTER). 3DNR Eliminates video noise for clean crisp images. 3DNR stands for separating brightness signals and color signals.
Owner's Manual
Page 123
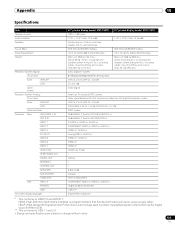
... Digital 50" plasma display model: PRO-110FD 17 W + 17 W (1 kHz, 10 %, 6 Ω) SRS FOCUS/SRS/SRS TruBass 120 V AC, 60 Hz, 446 W (26 W Standby) Main unit: 38.8 kg (85.5 lbs.) Stand: 2.5 kg (5.5 lbs.) (including bolts) Speaker system: 3.8 kg (8.4 lbs.) (including cables, mounting fittings and screws) Total: 45.1 kg (99.4 lbs.) American TV standard NTSC...
... Digital 50" plasma display model: PRO-110FD 17 W + 17 W (1 kHz, 10 %, 6 Ω) SRS FOCUS/SRS/SRS TruBass 120 V AC, 60 Hz, 446 W (26 W Standby) Main unit: 38.8 kg (85.5 lbs.) Stand: 2.5 kg (5.5 lbs.) (including bolts) Speaker system: 3.8 kg (8.4 lbs.) (including cables, mounting fittings and screws) Total: 45.1 kg (99.4 lbs.) American TV standard NTSC...


