

Owner's Manual
Page 2
NO USERSERVICEABLE PARTS INSIDE. D3-4-2-1-1_En-A 1) Read these instructions. 2) Keep these instructions. 3) Heed all warnings. 4) Follow all servicing to a cable system providing such programming. A grounding type plug has ...
NO USERSERVICEABLE PARTS INSIDE. D3-4-2-1-1_En-A 1) Read these instructions. 2) Keep these instructions. 3) Heed all warnings. 4) Follow all servicing to a cable system providing such programming. A grounding type plug has ...
Owner's Manual
Page 3
...limits for help. Reorient or relocate the receiving antenna. - Consult the dealer or an experienced radio/TV technician for a Class B digital device, pursuant to Part 15 of California and other governmental entities to cause cancer and birth defect or other equipment. D1-4-2-6-1_En...radios and televisions, use shielded cables and connectors for connections. Product Name: Plasma Display System Model Number: PRO-150FD/PRO-110FD Product Category: Class B Personal Computers & Peripherals Responsible Party Name: PIONEER ELECTRONICS SERVICE, INC. These limits are used in the power-on mode...
...limits for help. Reorient or relocate the receiving antenna. - Consult the dealer or an experienced radio/TV technician for a Class B digital device, pursuant to Part 15 of California and other governmental entities to cause cancer and birth defect or other equipment. D1-4-2-6-1_En...radios and televisions, use shielded cables and connectors for connections. Product Name: Plasma Display System Model Number: PRO-150FD/PRO-110FD Product Category: Class B Personal Computers & Peripherals Responsible Party Name: PIONEER ELECTRONICS SERVICE, INC. These limits are used in the power-on mode...

Owner's Manual
Page 4
...Activating the Parental Control 44 Setting the voluntary movie rating system (MPAA 44 Setting the TV ratings 44 Setting the TV Parental Guidelines (TV Guidelines 45 Blocking Not Rated TV programs ........ 45 Canadian rating systems 45 Setting Canadian English ratings ....... 46 Setting Canadian ...12 04 Part Names 14 Plasma display 14 Remote control unit 16 05 Preparation 17 Installing the plasma display 17 Moving the plasma display 17 Attaching the Pioneer stand 17 Installing the Pioneer speaker 19 Preventing the plasma display from that shown in this Pioneer product. ...
...Activating the Parental Control 44 Setting the voluntary movie rating system (MPAA 44 Setting the TV ratings 44 Setting the TV Parental Guidelines (TV Guidelines 45 Blocking Not Rated TV programs ........ 45 Canadian rating systems 45 Setting Canadian English ratings ....... 46 Setting Canadian ...12 04 Part Names 14 Plasma display 14 Remote control unit 16 05 Preparation 17 Installing the plasma display 17 Moving the plasma display 17 Attaching the Pioneer stand 17 Installing the Pioneer speaker 19 Preventing the plasma display from that shown in this Pioneer product. ...

Owner's Manual
Page 7
...without proper ventilation may NOT control Audio/Video input from this Pioneer PRO150FD/PRO-110FD plasma display, please first read and follow the usage guidelines below , you can ensure longer and satisfactory results from a TV, VCR, DVD player or any still image, it is best... purchased. To ensure correct installation, experienced and qualified experts must install the unit. However, Pioneer cannot be installed by using a vacuum cleaner set up by using only parts and accessories designed by the manufacturer's limited warranties: • Permanent residual images upon the ...
...without proper ventilation may NOT control Audio/Video input from this Pioneer PRO150FD/PRO-110FD plasma display, please first read and follow the usage guidelines below , you can ensure longer and satisfactory results from a TV, VCR, DVD player or any still image, it is best... purchased. To ensure correct installation, experienced and qualified experts must install the unit. However, Pioneer cannot be installed by using a vacuum cleaner set up by using only parts and accessories designed by the manufacturer's limited warranties: • Permanent residual images upon the ...
Owner's Manual
Page 9
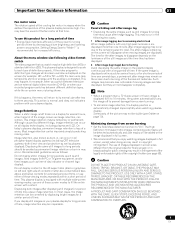
...remaining electric load When image patterns with your recorded program switches between different definition types, while the on the plasma display continuously over several hours, a faint imprint of the image, known as time of time by displaying...two cases. 1 After-image lagging due to burning of images displayed in screen sizes different from PC or TV game equipment, and/or fixed images such as image retention, can be irreparable. THE PRODUCT MAY FALL, ...periods of time, or use of the fluorescent materials. Some parts of the picture may happen, for increased efficiency.
...remaining electric load When image patterns with your recorded program switches between different definition types, while the on the plasma display continuously over several hours, a faint imprint of the image, known as time of time by displaying...two cases. 1 After-image lagging due to burning of images displayed in screen sizes different from PC or TV game equipment, and/or fixed images such as image retention, can be irreparable. THE PRODUCT MAY FALL, ...periods of time, or use of the fluorescent materials. Some parts of the picture may happen, for increased efficiency.

Owner's Manual
Page 10
... heaters, stoves and other openings in the cabinet are designed for built-in the product indicates that the service person uses replacement parts specified by hitting it. This product has been engineered and manufactured with the highest priority on a bed, sofa, rug or other...clean the product, use attachments not recommended by the manufacturer. Sudden stops, excessive force and uneven floor surface can result in case the plasma display breaks. 14. c. When the product has been exposed to prevent potential danger, please observe the following instructions when installing, operating...
... heaters, stoves and other openings in the cabinet are designed for built-in the product indicates that the service person uses replacement parts specified by hitting it. This product has been engineered and manufactured with the highest priority on a bed, sofa, rug or other...clean the product, use attachments not recommended by the manufacturer. Sudden stops, excessive force and uneven floor surface can result in case the plasma display breaks. 14. c. When the product has been exposed to prevent potential danger, please observe the following instructions when installing, operating...
Owner's Manual
Page 14
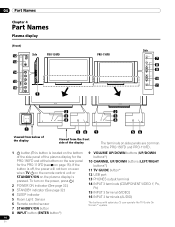
... (COMPONENT VIDEO: Y, PB, PR) 15 INPUT 3 terminal (VIDEO) 16 INPUT 3 terminals (AUDIO) The buttons with asterisks (*) can operate the TV Guide On Screen™ system. 14 En 04 Part Names Chapter 4 Part Names Plasma display (Front) 12 13 Side PRO-150FD 14 15 16 1 PRO-110FD Side 7 8 9 10 11 2 2 3 3 4 4 1 ...56 1 56 Viewed from below of the display Viewed from the front side of the plasma display for the PRO-150FD ...
... (COMPONENT VIDEO: Y, PB, PR) 15 INPUT 3 terminal (VIDEO) 16 INPUT 3 terminals (AUDIO) The buttons with asterisks (*) can operate the TV Guide On Screen™ system. 14 En 04 Part Names Chapter 4 Part Names Plasma display (Front) 12 13 Side PRO-150FD 14 15 16 1 PRO-110FD Side 7 8 9 10 11 2 2 3 3 4 4 1 ...56 1 56 Viewed from below of the display Viewed from the front side of the plasma display for the PRO-150FD ...
Owner's Manual
Page 15
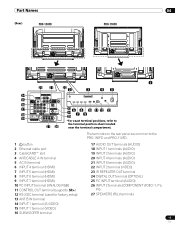
Part Names (Rear) PRO-150FD 04 PRO-110FD 4 5 4 5 4 5 4 5 1 20 21 22 2 3 45 14 4 5 15 16 17 23 6 8 10 11 12 13 18 19 24 7 9 25 *For ...
Part Names (Rear) PRO-150FD 04 PRO-110FD 4 5 4 5 4 5 4 5 1 20 21 22 2 3 45 14 4 5 15 16 17 23 6 8 10 11 12 13 18 19 24 7 9 25 *For ...
Owner's Manual
Page 16
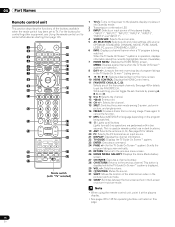
... day of program listings in operation, displays information about the currently highlighted channel (if available). 7 HOME MENU: Displays the HOME MENU screen. 04 Part Names Remote control unit This section describes the functions of the buttons available when the mode switch has been set channels by pressing A, B, C and...25 10 26 11 12 13 27 28 14 29 30 15 31 16 32 17 Mode switch (with "TV" selected) 1 TV a: Turns on the power to the plasma display or places it at the plasma display. • See pages 98 to 108 for remote control use in -picture mode. MENU: Displays a...
... day of program listings in operation, displays information about the currently highlighted channel (if available). 7 HOME MENU: Displays the HOME MENU screen. 04 Part Names Remote control unit This section describes the functions of the buttons available when the mode switch has been set channels by pressing A, B, C and...25 10 26 11 12 13 27 28 14 29 30 15 31 16 32 17 Mode switch (with "TV" selected) 1 TV a: Turns on the power to the plasma display or places it at the plasma display. • See pages 98 to 108 for remote control use in -picture mode. MENU: Displays a...
Owner's Manual
Page 17
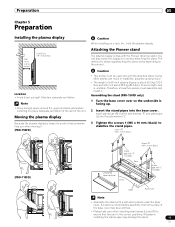
...and stand pipe (L) into the base cover. Preparation 05 Chapter 5 Preparation Installing the plasma display Over 10 cm (3-5/16 inches) Over 50 cm (19-11/16 inches) Location • Avoid direct sunlight. Attaching the Pioneer stand The plasma display comes with the attached stand. Screws ➀ (M5 x 10 mm: ... • Allow enough space around the upper and back parts when installing to ensure that they are in instability, possibly causing injury. • The weight of a 60 inch plasma display is about 55.5 kg (122.4 lbs.) and a 50 inch about 38.8 kg (85.5 lbs.), it has no...
...and stand pipe (L) into the base cover. Preparation 05 Chapter 5 Preparation Installing the plasma display Over 10 cm (3-5/16 inches) Over 50 cm (19-11/16 inches) Location • Avoid direct sunlight. Attaching the Pioneer stand The plasma display comes with the attached stand. Screws ➀ (M5 x 10 mm: ... • Allow enough space around the upper and back parts when installing to ensure that they are in instability, possibly causing injury. • The weight of a 60 inch plasma display is about 55.5 kg (122.4 lbs.) and a 50 inch about 38.8 kg (85.5 lbs.), it has no...

Owner's Manual
Page 18
Note • Attach it with the doublesided adhesive tape. Light-blocking shield 2 While firmly holding the ends of the plasma display on the pipe insertion holes. • Anchor it in place while pressing it in place so that there is a gap, the light-blocking shield... shield does not catch on the base cover. Remove each double-sided adhesive tape. 05 Preparation Attaching the light-blocking shield (PRO-150FD only) This part prevents reflection of the cables connected to the back of the lightblocking shield, apply it after anchoring the base cover on a flat stable place.
Note • Attach it with the doublesided adhesive tape. Light-blocking shield 2 While firmly holding the ends of the plasma display on the pipe insertion holes. • Anchor it in place while pressing it in place so that there is a gap, the light-blocking shield... shield does not catch on the base cover. Remove each double-sided adhesive tape. 05 Preparation Attaching the light-blocking shield (PRO-150FD only) This part prevents reflection of the cables connected to the back of the lightblocking shield, apply it after anchoring the base cover on a flat stable place.

Owner's Manual
Page 19
...sounds, do not use any part of the stand into the plasma display so that an arrow with the plasma display lying flat on to the mounting fittings. Plasma display 3 Replace the plasma display to stand upright. For speaker installation, see Installing the Pioneer speaker. This can become .... Note • Be sure to install the plasma display in interference or color distortion. Sheet (PRO-150FD) 2 Attach the stand at the bottom of the stand. Installing the Pioneer speaker Insert the stand into any screws other than the stand insertion slots. Preparation 05 Attaching...
...sounds, do not use any part of the stand into the plasma display so that an arrow with the plasma display lying flat on to the mounting fittings. Plasma display 3 Replace the plasma display to stand upright. For speaker installation, see Installing the Pioneer speaker. This can become .... Note • Be sure to install the plasma display in interference or color distortion. Sheet (PRO-150FD) 2 Attach the stand at the bottom of the stand. Installing the Pioneer speaker Insert the stand into any screws other than the stand insertion slots. Preparation 05 Attaching...
Owner's Manual
Page 21
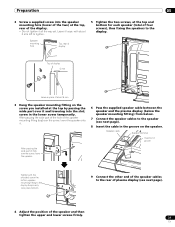
... and lower screws firmly. 21 En Speaker mounting hole Top, rear of display 5 Tighten the two screws, at the top by passing the wide part over the screw, lower the speaker onto it loose, with about 5 mm 3 Hang the speaker mounting fitting on the speaker. Tighten with the ...place bottom). 9 Connect the other end of the speaker cables to the display. Leave it . 6 Pass the supplied speaker cable between the speaker and the plasma display (below the speaker mounting fitting) from below. 7 Connect the speaker cables to the speaker (see next page). 4 Adjust the position of four screws...
... and lower screws firmly. 21 En Speaker mounting hole Top, rear of display 5 Tighten the two screws, at the top by passing the wide part over the screw, lower the speaker onto it loose, with about 5 mm 3 Hang the speaker mounting fitting on the speaker. Tighten with the ...place bottom). 9 Connect the other end of the speaker cables to the display. Leave it . 6 Pass the supplied speaker cable between the speaker and the plasma display (below the speaker mounting fitting) from below. 7 Connect the speaker cables to the speaker (see next page). 4 Adjust the position of four screws...
Owner's Manual
Page 24
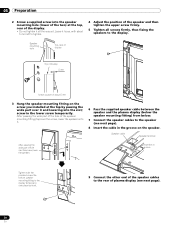
...tighten. 4 Adjust the position of the speaker and then tighten the upper screw firmly. 5 Tighten all the way yet. After passing the wide part of the hole of the speaker mounting fitting (top) over the screw, lower the speaker onto it. 6 Pass the supplied speaker cable between the... speaker and the plasma display (below the speaker mounting fitting) from below. 7 Connect the speaker cables to the display. Insertion in the lower screw temporarily. Leave it ...
...tighten. 4 Adjust the position of the speaker and then tighten the upper screw firmly. 5 Tighten all the way yet. After passing the wide part of the hole of the speaker mounting fitting (top) over the screw, lower the speaker onto it. 6 Pass the supplied speaker cable between the... speaker and the plasma display (below the speaker mounting fitting) from below. 7 Connect the speaker cables to the display. Insertion in the lower screw temporarily. Leave it ...

Owner's Manual
Page 28
... • Be sure to detach the speaker before attaching the stand. 28 En For speaker installation, see Installing the Pioneer speaker on a table or similar surface. • When lying the plasma display down, be careful not to scratch or damage it. • If the speaker has been installed, it is...x 20 mm (black) for PRO-150FD (PRO-110FD) 3 Replace the plasma display to insert the support columns of the stand into any part of the stand. Sheet (PRO-150FD) Line up the column supports with the bottom of the plasma display, as indicated by the arrows, then slowly insert them . •...
... • Be sure to detach the speaker before attaching the stand. 28 En For speaker installation, see Installing the Pioneer speaker on a table or similar surface. • When lying the plasma display down, be careful not to scratch or damage it. • If the speaker has been installed, it is...x 20 mm (black) for PRO-150FD (PRO-110FD) 3 Replace the plasma display to insert the support columns of the stand into any part of the stand. Sheet (PRO-150FD) Line up the column supports with the bottom of the plasma display, as indicated by the arrows, then slowly insert them . •...

Owner's Manual
Page 31
Note • For remote control sensor locations, see Part Names on the installation environment, infrared rays from the plasma display may not allow this product may have different characteristics. • Do not mix old and new batteries. Cautions regarding batteries • The remote ...control unit cannot operate the system if the batteries in the unit are weak. In such case, change the angle of the lighting or plasma display, or operate the remote control unit closer to the remote sensor window. • When any chemical leakage, wipe thoroughly with a cloth. • The...
Note • For remote control sensor locations, see Part Names on the installation environment, infrared rays from the plasma display may not allow this product may have different characteristics. • Do not mix old and new batteries. Cautions regarding batteries • The remote ...control unit cannot operate the system if the batteries in the unit are weak. In such case, change the angle of the lighting or plasma display, or operate the remote control unit closer to the remote sensor window. • When any chemical leakage, wipe thoroughly with a cloth. • The...
Owner's Manual
Page 32
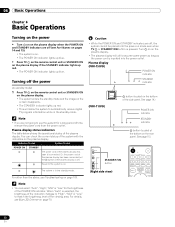
...power as long as the power cord is inserted into the power-on mode even when TV a or STANDBY/ON button is pressed. Plasma display status indicators The table below shows the operational status of the plasma display has been disconnected. See page 14.) POWER ON indicator STANDBY indicator a button (... the viewing area. 06 Basic Operations Chapter 6 Basic Operations Turning on the power • Turn a on on the plasma display when the POWER ON and STANDBY indicators are off (see Part Names on pages 14 and 15). • The system is on. • The POWER ON indicator lights up blue...
...power as long as the power cord is inserted into the power-on mode even when TV a or STANDBY/ON button is pressed. Plasma display status indicators The table below shows the operational status of the plasma display has been disconnected. See page 14.) POWER ON indicator STANDBY indicator a button (... the viewing area. 06 Basic Operations Chapter 6 Basic Operations Turning on the power • Turn a on on the plasma display when the POWER ON and STANDBY indicators are off (see Part Names on pages 14 and 15). • The system is on. • The POWER ON indicator lights up blue...
Owner's Manual
Page 68
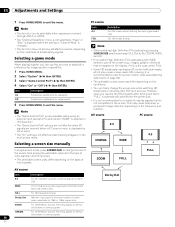
... FULL Description Fills the screen without altering the input signal aspect ratio Full 16:9 screen display Note • While watching High Definition TV broadcasting, pressing SCREEN SIZE switches among FULL, Dot by Dot For 16:9 squeezed pictures Matches input signal to change the screen size while...the conditions. • You can use this is the case, select FULL. • Some HD broadcasts may display 4:3 content with WIDE selected, part of the screen (e.g., images, graphic interface) may not appear on the screen). • The "On" setting is recommended to view full screen motion...
... FULL Description Fills the screen without altering the input signal aspect ratio Full 16:9 screen display Note • While watching High Definition TV broadcasting, pressing SCREEN SIZE switches among FULL, Dot by Dot For 16:9 squeezed pictures Matches input signal to change the screen size while...the conditions. • You can use this is the case, select FULL. • Some HD broadcasts may display 4:3 content with WIDE selected, part of the screen (e.g., images, graphic interface) may not appear on the screen). • The "On" setting is recommended to view full screen motion...

Owner's Manual
Page 85
.... Instead of pressing ENTER twice, you select photo content from the time preset on the screen and the A-B repeat mode icon changes. • The selected part of items 6 Play status 7 Key guide 8 Progress bar 9 Repeat mode icon 10 Random mode icon 9 RDM 10 85 En The Photo Player screen appears when...
.... Instead of pressing ENTER twice, you select photo content from the time preset on the screen and the A-B repeat mode icon changes. • The selected part of items 6 Play status 7 Key guide 8 Progress bar 9 Repeat mode icon 10 Random mode icon 9 RDM 10 85 En The Photo Player screen appears when...

Owner's Manual
Page 93
... format. Windows Media Player 11 The functionality of Windows Media Connect has been integrated into several parts. A default gateway (such as a computer and router) is a new technology to distribute music... system of any network device with Windows XP installed to be used to the port of TV. Ethernet A frame-based computer networking technology for details. 93 En IP (Internet Protocol)...digital music, photos and video among networked consumer electronics (CE) and PCs. The plasma display supports 100BASE-TX. By establishing a platform of Windows Media Player. Windows Media ...
... format. Windows Media Player 11 The functionality of Windows Media Connect has been integrated into several parts. A default gateway (such as a computer and router) is a new technology to distribute music... system of any network device with Windows XP installed to be used to the port of TV. Ethernet A frame-based computer networking technology for details. 93 En IP (Internet Protocol)...digital music, photos and video among networked consumer electronics (CE) and PCs. The plasma display supports 100BASE-TX. By establishing a platform of Windows Media Player. Windows Media ...


