

Owner's Manual
Page 4
...05 Preparation 17 Installing the plasma display 17 Moving the plasma display 17 Attaching the Pioneer stand 17 Installing the Pioneer speaker 19 Preventing the plasma display from that shown in a safe place for future reference. Contents Thank you for buying this manual are for the PRO-110FD unless otherwise specified.... method of the remote control unit 31 06 Basic Operations 32 Turning on the power 32 Turning off the power 32 Watching TV channels 33 Selecting the antenna 33 Changing channels 33 Changing the volume and sound .........34 Changing the language 34 Setting MTS/SAP...
...05 Preparation 17 Installing the plasma display 17 Moving the plasma display 17 Attaching the Pioneer stand 17 Installing the Pioneer speaker 19 Preventing the plasma display from that shown in a safe place for future reference. Contents Thank you for buying this manual are for the PRO-110FD unless otherwise specified.... method of the remote control unit 31 06 Basic Operations 32 Turning on the power 32 Turning off the power 32 Watching TV channels 33 Selecting the antenna 33 Changing channels 33 Changing the volume and sound .........34 Changing the language 34 Setting MTS/SAP...

Owner's Manual
Page 7
..., please consult each external device's manual to set to "STANDBY" mode. • Do not fit the unit inside narrow spaces where ventilation is strongly recommended. By following are not covered by using the still picture mode from a TV, VCR, DVD player or any ...the screen can be held responsible for many factors: inappropriate installation site, improper assembly/installation/mounting, improper operation of the Pioneer PRO150FD/PRO-110FD plasma display will diminish very slowly, such as compared to this product. After-image and permanent effects on the sides and rear...
..., please consult each external device's manual to set to "STANDBY" mode. • Do not fit the unit inside narrow spaces where ventilation is strongly recommended. By following are not covered by using the still picture mode from a TV, VCR, DVD player or any ...the screen can be held responsible for many factors: inappropriate installation site, improper assembly/installation/mounting, improper operation of the Pioneer PRO150FD/PRO-110FD plasma display will diminish very slowly, such as compared to this product. After-image and permanent effects on the sides and rear...

Owner's Manual
Page 10
... Electricity is operated. 2. Keep this product is made of objects and liquids-Never insert an object into the product. The plasma display used in this manual in a safe place-These safety and operating instructions must be broken, resulting in the product indicates that the product needs servicing...heat- To clean the product, use the product near water, such as damage to fall , resulting in a safe place for the PRO-110FD (including the stand and speaker). Do not use attachments not recommended by hitting it. When relocating the product placed on safety. ...
... Electricity is operated. 2. Keep this product is made of objects and liquids-Never insert an object into the product. The plasma display used in this manual in a safe place-These safety and operating instructions must be broken, resulting in the product indicates that the product needs servicing...heat- To clean the product, use the product near water, such as damage to fall , resulting in a safe place for the PRO-110FD (including the stand and speaker). Do not use attachments not recommended by hitting it. When relocating the product placed on safety. ...
Owner's Manual
Page 11
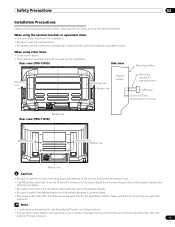
...equivalent items). Note • It is strongly recommended to use the supplied bolts. • For details, see the instruction manual that comes with any personal injury or product damage that results from the mounting surface of mounting items other items • ...using other than the optional Pioneer products. 11 En Safety Precautions 02 Installation Precautions Observe the following mounting holes can be used for the installation: Rear view (PRO-150FD) Side view Mounting surface Mounting hole 4 5 Mounting hole Median line Plasma display Mounting bracket (or ...
...equivalent items). Note • It is strongly recommended to use the supplied bolts. • For details, see the instruction manual that comes with any personal injury or product damage that results from the mounting surface of mounting items other items • ...using other than the optional Pioneer products. 11 En Safety Precautions 02 Installation Precautions Observe the following mounting holes can be used for the installation: Rear view (PRO-150FD) Side view Mounting surface Mounting hole 4 5 Mounting hole Median line Plasma display Mounting bracket (or ...
Owner's Manual
Page 41
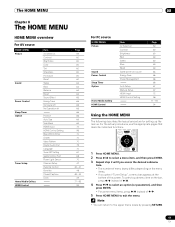
... source HOME MENU Picture Sound Power Control Sleep Timer Option Tuner Setup Home Media Gallery HDMI Control Item AV Selection Contrast Brightness Color Tint Sharpness Pro Adjust Reset Treble Bass Balance Reset Sound Effect Energy Save No Signal off No Operation off Position Auto Size Side Mask HDMI Input HDMI Control... Home Media Gallery HDMI Control Item AV Selection Contrast Brightness Red Green Blue Reset Same as the AV source Energy Save Power Management Auto Setup Manual Setup HDMI Input HDMI Control Setting Page 59 60 60 60 60 60 60 64 65 66 66 67 67 72 96 77 - 93 94...
... source HOME MENU Picture Sound Power Control Sleep Timer Option Tuner Setup Home Media Gallery HDMI Control Item AV Selection Contrast Brightness Color Tint Sharpness Pro Adjust Reset Treble Bass Balance Reset Sound Effect Energy Save No Signal off No Operation off Position Auto Size Side Mask HDMI Input HDMI Control... Home Media Gallery HDMI Control Item AV Selection Contrast Brightness Red Green Blue Reset Same as the AV source Energy Save Power Management Auto Setup Manual Setup HDMI Input HDMI Control Setting Page 59 60 60 60 60 60 60 64 65 66 66 67 67 72 96 77 - 93 94...
Owner's Manual
Page 59
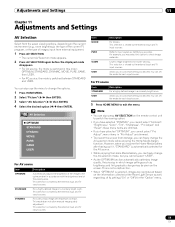
... AV SELECTION again before the displayed mode disappears. • For AV source, the mode is shared by the external input and TV input sources. For a highly defined image in "Pro Adjust" are dimmed. • If you have selected "DYNAMIC", you cannot select "Contrast", "Brightness", "Color", "Tint", "... information collected at the Room Light Sensor as desired. menu items in a normally bright room. This mode does not allow manual image quality adjustment. You can freely change may select this order; For a very sharp image with the brightness level of the viewing area...
... AV SELECTION again before the displayed mode disappears. • For AV source, the mode is shared by the external input and TV input sources. For a highly defined image in "Pro Adjust" are dimmed. • If you have selected "DYNAMIC", you cannot select "Contrast", "Brightness", "Color", "Tint", "... information collected at the Room Light Sensor as desired. menu items in a normally bright room. This mode does not allow manual image quality adjustment. You can freely change may select this order; For a very sharp image with the brightness level of the viewing area...
Owner's Manual
Page 62
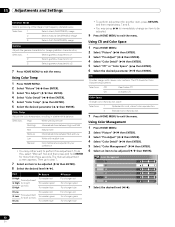
... level ( / ). 62 En Using Color Management 1 Press HOME MENU. 2 Select "Picture" ( / then ENTER). 3 Select "Pro Adjust" ( / then ENTER). 4 Select "Color Detail" ( / then ENTER). 5 Select "Color Management" ( / then ENTER). 6 Select an item to exit the menu. The manual adjustment screen appears. The CTI stands for more than three seconds. Selections Off Deactivates CTI...
... level ( / ). 62 En Using Color Management 1 Press HOME MENU. 2 Select "Picture" ( / then ENTER). 3 Select "Pro Adjust" ( / then ENTER). 4 Select "Color Detail" ( / then ENTER). 5 Select "Color Management" ( / then ENTER). 6 Select an item to exit the menu. The manual adjustment screen appears. The CTI stands for more than three seconds. Selections Off Deactivates CTI...


