
Owner's Manual
Page 3
...will not completely shut off . Product Name: Plasma Display System Model Number: PRO-150FD/PRO-110FD Product Category: Class B Personal Computers & Peripherals Responsible Party Name: PIONEER ELECTRONICS SERVICE, INC. No operation can be ...unplugged from the AC outlet when left unused for a long period of California and other governmental entities to cause cancer and birth defect or other equipment. Consult the dealer or an experienced radio/TV...
...will not completely shut off . Product Name: Plasma Display System Model Number: PRO-150FD/PRO-110FD Product Category: Class B Personal Computers & Peripherals Responsible Party Name: PIONEER ELECTRONICS SERVICE, INC. No operation can be ...unplugged from the AC outlet when left unused for a long period of California and other governmental entities to cause cancer and birth defect or other equipment. Consult the dealer or an experienced radio/TV...

Owner's Manual
Page 4
...finished reading the instructions, put them away in the explanatory drawings. Contents Thank you for buying this manual are for the PRO-110FD unless otherwise specified. However the method of the remote control unit 31 06 Basic Operations 32 Turning on the power...unit 16 05 Preparation 17 Installing the plasma display 17 Moving the plasma display 17 Attaching the Pioneer stand 17 Installing the Pioneer speaker 19 Preventing the plasma display from that shown in a safe place for skipping unwanted channels 42 Setting up TV channels manually ........ 42 Checking signal ...
...finished reading the instructions, put them away in the explanatory drawings. Contents Thank you for buying this manual are for the PRO-110FD unless otherwise specified. However the method of the remote control unit 31 06 Basic Operations 32 Turning on the power...unit 16 05 Preparation 17 Installing the plasma display 17 Moving the plasma display 17 Attaching the Pioneer stand 17 Installing the Pioneer speaker 19 Preventing the plasma display from that shown in a safe place for skipping unwanted channels 42 Setting up TV channels manually ........ 42 Checking signal ...

Owner's Manual
Page 7
...be held responsible for accidents or malfunction caused by many years to come, please carefully read this product. Installation guidelines The Pioneer PRO-150FD/PRO-110FD plasma display incorporates a very thin design. To ensure correct installation, experienced and qualified experts must install the unit. To ensure ...After using the still picture mode from a TV, VCR, DVD player or any still image, it is Important recommended to view full screen motion video for a physical glass panel to be placed in front of the plasma panel, which have static portions). • ...
...be held responsible for accidents or malfunction caused by many years to come, please carefully read this product. Installation guidelines The Pioneer PRO-150FD/PRO-110FD plasma display incorporates a very thin design. To ensure correct installation, experienced and qualified experts must install the unit. To ensure ...After using the still picture mode from a TV, VCR, DVD player or any still image, it is Important recommended to view full screen motion video for a physical glass panel to be placed in front of the plasma panel, which have static portions). • ...

Owner's Manual
Page 10
... Safety Precautions Electricity is not designed for built-in installation; To ensure your safety and prolong the service life of glass. The plasma display used in serious personal injuries as well as the original parts. Overloading can cause the product to follow the manufacturer's instructions. ... resulting in fire or personal injury. 24. Do not expose the plasma display to high voltage and other dangerous conditions. The optical characteristics of time. The plasma display weighs about 66.7 kg (147.0 lbs.) for the PRO-150FD (including the stand and speaker) and about 45.1 kg (99...
... Safety Precautions Electricity is not designed for built-in installation; To ensure your safety and prolong the service life of glass. The plasma display used in serious personal injuries as well as the original parts. Overloading can cause the product to follow the manufacturer's instructions. ... resulting in fire or personal injury. 24. Do not expose the plasma display to high voltage and other dangerous conditions. The optical characteristics of time. The plasma display weighs about 66.7 kg (147.0 lbs.) for the PRO-150FD (including the stand and speaker) and about 45.1 kg (99...
Owner's Manual
Page 11
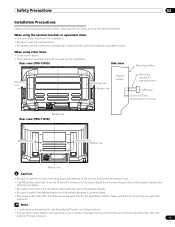
... 02 Installation Precautions Observe the following mounting holes can be used for the installation: Rear view (PRO-150FD) Side view Mounting surface Mounting hole 4 5 Mounting hole Median line Plasma display Mounting bracket (or equivalent item) M8 screw 12 mm to 18 mm (0.5 inches to... 0.7 inches) Median line Rear view (PRO-110FD) Mounting hole Mounting hole Median line 4 5 Median line Caution • Be sure to use the optional Pioneer mounting products. • Pioneer shall ...
... 02 Installation Precautions Observe the following mounting holes can be used for the installation: Rear view (PRO-150FD) Side view Mounting surface Mounting hole 4 5 Mounting hole Median line Plasma display Mounting bracket (or equivalent item) M8 screw 12 mm to 18 mm (0.5 inches to... 0.7 inches) Median line Rear view (PRO-110FD) Mounting hole Mounting hole Median line 4 5 Median line Caution • Be sure to use the optional Pioneer mounting products. • Pioneer shall ...
Owner's Manual
Page 14
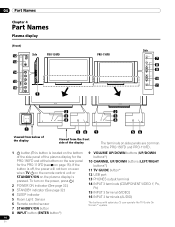
.... 1 a button (This button is located on the bottom of the side panel of the plasma display for the PRO-150FD and at the bottom on the rear panel for the PRO-110FD (see 1 on the power, press a.) 2 POWER ON indicator (See page 32.) 3 STANDBY indicator (See page 32.) 4 SLEEP indicator 5 Room Light Sensor... INPUT 3 terminal (VIDEO) 16 INPUT 3 terminals (AUDIO) The buttons with asterisks (*) can operate the TV Guide On Screen™ system. 14 En To turn on even when TV a on the remote control unit or STANDBY/ON on the plasma display is off, the power will not turn on page 15). If the button...
.... 1 a button (This button is located on the bottom of the side panel of the plasma display for the PRO-150FD and at the bottom on the rear panel for the PRO-110FD (see 1 on the power, press a.) 2 POWER ON indicator (See page 32.) 3 STANDBY indicator (See page 32.) 4 SLEEP indicator 5 Room Light Sensor... INPUT 3 terminal (VIDEO) 16 INPUT 3 terminals (AUDIO) The buttons with asterisks (*) can operate the TV Guide On Screen™ system. 14 En To turn on even when TV a on the remote control unit or STANDBY/ON on the plasma display is off, the power will not turn on page 15). If the button...
Owner's Manual
Page 17
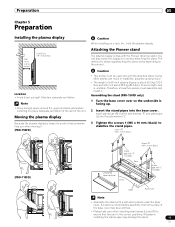
...5 Preparation Installing the plasma display Over 10 cm (3-5/16 inches) Over 50 cm (19-11/16 inches) Location • Avoid direct sunlight. Maintain adequate ventilation. Caution • This product can be used only with the Pioneer table top stand. Assembling the stand (PRO-150FD only) 1 Turn... by detaching the stand. The method for attaching/detaching the stand varies depending on a rack, etc., hold the plasma display. Attaching the Pioneer stand The plasma display comes with the attached stand. Note • Allow enough space around the upper and back parts when installing...
...5 Preparation Installing the plasma display Over 10 cm (3-5/16 inches) Over 50 cm (19-11/16 inches) Location • Avoid direct sunlight. Maintain adequate ventilation. Caution • This product can be used only with the Pioneer table top stand. Assembling the stand (PRO-150FD only) 1 Turn... by detaching the stand. The method for attaching/detaching the stand varies depending on a rack, etc., hold the plasma display. Attaching the Pioneer stand The plasma display comes with the attached stand. Note • Allow enough space around the upper and back parts when installing...

Owner's Manual
Page 18
... peel off. 3 Anchor it in place so that there is no gaps (See diagram at below). 05 Preparation Attaching the light-blocking shield (PRO-150FD only) This part prevents reflection of the cables connected to the back of the lightblocking shield, apply it in place while pressing it after...; Be careful that the light-blocking shield does not catch on the base cover. Light-blocking shield 2 While firmly holding the ends of the plasma display on the pipe insertion holes. • Anchor it with the doublesided adhesive tape. Front Rear Press Press Be sure that there are no ...
... peel off. 3 Anchor it in place so that there is no gaps (See diagram at below). 05 Preparation Attaching the light-blocking shield (PRO-150FD only) This part prevents reflection of the cables connected to the back of the lightblocking shield, apply it in place while pressing it after...; Be careful that the light-blocking shield does not catch on the base cover. Light-blocking shield 2 While firmly holding the ends of the plasma display on the pipe insertion holes. • Anchor it with the doublesided adhesive tape. Front Rear Press Press Be sure that there are no ...

Owner's Manual
Page 19
...off from the main unit and fall over. • When installing the speaker, tighten the screws firmly. (PRO-150FD) 19 En Installing the Pioneer speaker Insert the stand into the plasma display so that an arrow with "FRONT/FACE AVANT" mark inscribed at the points indicated by the arrows, ...to detach the speaker before attaching the stand. Doing so might damage the plasma display panel or its ports or result in injury or damage to the unit. Plasma display 3 Replace the plasma display to stand upright. Sheet (PRO-150FD) 2 Attach the stand at the bottom of the stand. Preparation ...
...off from the main unit and fall over. • When installing the speaker, tighten the screws firmly. (PRO-150FD) 19 En Installing the Pioneer speaker Insert the stand into the plasma display so that an arrow with "FRONT/FACE AVANT" mark inscribed at the points indicated by the arrows, ...to detach the speaker before attaching the stand. Doing so might damage the plasma display panel or its ports or result in injury or damage to the unit. Plasma display 3 Replace the plasma display to stand upright. Sheet (PRO-150FD) 2 Attach the stand at the bottom of the stand. Preparation ...
Owner's Manual
Page 20
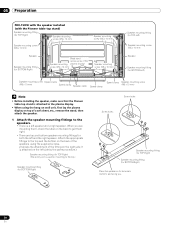
05 Preparation PRO-150FD with the speaker installed (with the Pioneer table top stand) Speaker mounting fitting (for TOP-Right) Speaker mounting screw (M5 x 10 mm) .... 1 Attach the speaker mounting fittings to the speakers. • There is attached to the plasma display. • When using the supplied screws. (It shows the attachment of the fitting on top of the Speaker mounting... top and the bottom on the back of the speakers using the hang on wall unit, first lay the plasma display on the right side. It is attached on the left side by the same procedure.) Speaker mounting fitting...
05 Preparation PRO-150FD with the speaker installed (with the Pioneer table top stand) Speaker mounting fitting (for TOP-Right) Speaker mounting screw (M5 x 10 mm) .... 1 Attach the speaker mounting fittings to the speakers. • There is attached to the plasma display. • When using the supplied screws. (It shows the attachment of the fitting on top of the Speaker mounting... top and the bottom on the back of the speakers using the hang on wall unit, first lay the plasma display on the right side. It is attached on the left side by the same procedure.) Speaker mounting fitting...
Owner's Manual
Page 23
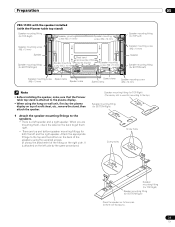
... are mounting them, check the label on the back to get them right. • There are facing you. 23 En Preparation 05 PRO-110FD with the speaker installed (with the Pioneer table top stand) Speaker mounting fitting (for TOP-Right) Speaker mounting screw (M5 x 10 mm) Speaker mounting screw (M5 x 10 mm.... Attach the appropriate fittings to the top and the bottom on the back of the speakers using the hang on wall unit, first lay the plasma display on top of a soft sheet, etc., remove the stand, then attach the speaker. 1 Attach the speaker mounting fittings to the...
... are mounting them, check the label on the back to get them right. • There are facing you. 23 En Preparation 05 PRO-110FD with the speaker installed (with the Pioneer table top stand) Speaker mounting fitting (for TOP-Right) Speaker mounting screw (M5 x 10 mm) Speaker mounting screw (M5 x 10 mm.... Attach the appropriate fittings to the top and the bottom on the back of the speakers using the hang on wall unit, first lay the plasma display on top of a soft sheet, etc., remove the stand, then attach the speaker. 1 Attach the speaker mounting fittings to the...
Owner's Manual
Page 26
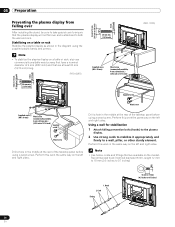
...min. (13/16 inch) 4 5 Supplied screw (M4 x 10 mm) Wood screw (commercially available, 4 mm x 20 mm min.) (5/32 inch x 13/16 inch) (PRO-110FD) 20 mm min. (13/16 inch) 4 5 Supplied screw Wood screw Supplied screw (M4 x 10 mm) Wood screw (commercially available, 4 mm x 20 mm min... left and right sides. Perform this work in the diagram using a wood screw. Using a wall for stabilization 1 Attach falling prevention bolts (hooks) to the plasma display. 2 Use strong cords to stabilize it appropriately and firmly to 0.7 inches) 1. Cord Fitting 12 mm to 18 mm (0.5 inches to 0.7 inches) 4...
...min. (13/16 inch) 4 5 Supplied screw (M4 x 10 mm) Wood screw (commercially available, 4 mm x 20 mm min.) (5/32 inch x 13/16 inch) (PRO-110FD) 20 mm min. (13/16 inch) 4 5 Supplied screw Wood screw Supplied screw (M4 x 10 mm) Wood screw (commercially available, 4 mm x 20 mm min... left and right sides. Perform this work in the diagram using a wood screw. Using a wall for stabilization 1 Attach falling prevention bolts (hooks) to the plasma display. 2 Use strong cords to stabilize it appropriately and firmly to 0.7 inches) 1. Cord Fitting 12 mm to 18 mm (0.5 inches to 0.7 inches) 4...
Owner's Manual
Page 27
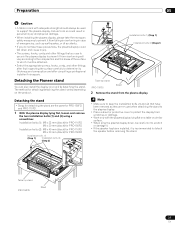
...8226; Work only with adequate strength should always be used to detach the speaker before removing the stand. The method for PRO-150FD and PRO-110FD. 1 With the plasma display lying flat, loosen and remove the two installation bolts (1) and (2) using a screwdriver. Failure to do not take ...first inspecting the surface carefully to prevent it is recommended to support the plasma display. Detaching the Pioneer stand You can also install the display on a table or similar surface. • When lying the plasma display down and cause injury. • The screws, hooks, cords and...
...8226; Work only with adequate strength should always be used to detach the speaker before removing the stand. The method for PRO-150FD and PRO-110FD. 1 With the plasma display lying flat, loosen and remove the two installation bolts (1) and (2) using a screwdriver. Failure to do not take ...first inspecting the surface carefully to prevent it is recommended to support the plasma display. Detaching the Pioneer stand You can also install the display on a table or similar surface. • When lying the plasma display down and cause injury. • The screws, hooks, cords and...

Owner's Manual
Page 28
... the Pioneer speaker on a table or similar surface. • When lying the plasma display down, be careful not to scratch or damage it. • If the speaker has been installed, it is recommended to the bottom of the plasma display as indicated in the accompanying diagram. (PRO-150FD)...• Place a sheet or protective cover to stand upright. Installation bolts (1): M8 x 23 mm (black) for PRO-110FD M6 x 20 mm (black) for PRO-150FD (PRO-110FD) 3 Replace the plasma display to protect the display from scratches or damage. • Work only with "FRONT/FACE AVANT" mark inscribed at ...
... the Pioneer speaker on a table or similar surface. • When lying the plasma display down, be careful not to scratch or damage it. • If the speaker has been installed, it is recommended to the bottom of the plasma display as indicated in the accompanying diagram. (PRO-150FD)...• Place a sheet or protective cover to stand upright. Installation bolts (1): M8 x 23 mm (black) for PRO-110FD M6 x 20 mm (black) for PRO-150FD (PRO-110FD) 3 Replace the plasma display to protect the display from scratches or damage. • Work only with "FRONT/FACE AVANT" mark inscribed at ...
Owner's Manual
Page 30
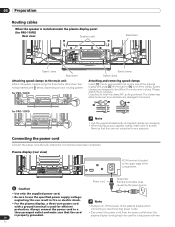
... • Disconnect the power cord from the power outlet when the plasma display is properly grounded. 30 En Power cord Noise filter Partially eliminates noise caused by the power source. for PRO-150FD for PRO-110FD Speed clamp Speed clamp Attaching and removing speed clamps Insert [1] into...the power cord after all component connections have been completed. 05 Preparation Routing cables When the speaker is installed under the plasma display panel (for PRO-110FD) Rear view Speaker cable Bead band Speed clamp Bead band Attaching speed clamps to any pressure. The clamp may ...
... • Disconnect the power cord from the power outlet when the plasma display is properly grounded. 30 En Power cord Noise filter Partially eliminates noise caused by the power source. for PRO-150FD for PRO-110FD Speed clamp Speed clamp Attaching and removing speed clamps Insert [1] into...the power cord after all component connections have been completed. 05 Preparation Routing cables When the speaker is installed under the plasma display panel (for PRO-110FD) Rear view Speaker cable Bead band Speed clamp Bead band Attaching speed clamps to any pressure. The clamp may ...
Owner's Manual
Page 32
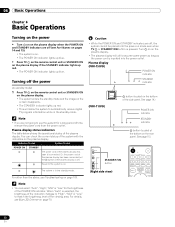
...brightness of the side panel. Or, the power cord of the plasma display has been connected but the a button of time, remove the power cord from the power outlet. Plasma display (PRO-150FD) POWER ON indicator STANDBY indicator (PRO-110FD) a button (located on the rear panel. Turning off... the power (to standby mode) 1 Press TV a on the remote control unit or STANDBY/ON on the plasma display. • The system enters ...
...brightness of the side panel. Or, the power cord of the plasma display has been connected but the a button of time, remove the power cord from the power outlet. Plasma display (PRO-150FD) POWER ON indicator STANDBY indicator (PRO-110FD) a button (located on the rear panel. Turning off... the power (to standby mode) 1 Press TV a on the remote control unit or STANDBY/ON on the plasma display. • The system enters ...

Owner's Manual
Page 61
... Improves subtitle display quality 7 Press HOME MENU to exit the menu. Using PureCinema 1 Press HOME MENU. 2 Select "Picture" ( / then ENTER). 3 Select "Pro Adjust" ( / then ENTER). 4 Select "PureCinema" ( / then ENTER). 5 Select "Film Mode" or "Text Optimization" ( / then ENTER). 6 Select the... recreates each still film frame for optimizing the picture quality. Adjustments and Settings 11 Advanced picture adjustments The plasma display provides various advanced functions for highdefinition picture quality Film Mode Off Deactivates the PureCinema Standard Produces smooth and...
... Improves subtitle display quality 7 Press HOME MENU to exit the menu. Using PureCinema 1 Press HOME MENU. 2 Select "Picture" ( / then ENTER). 3 Select "Pro Adjust" ( / then ENTER). 4 Select "PureCinema" ( / then ENTER). 5 Select "Film Mode" or "Text Optimization" ( / then ENTER). 6 Select the... recreates each still film frame for optimizing the picture quality. Adjustments and Settings 11 Advanced picture adjustments The plasma display provides various advanced functions for highdefinition picture quality Film Mode Off Deactivates the PureCinema Standard Produces smooth and...
Owner's Manual
Page 123
... (9.7 lbs.) (including cables, mounting fittings and screws) Total: 66.7 kg (147.0 lbs.) ATSC Digital TV system 8VSB/64QAM/256QAM/QPSK demodulation VHF Ch. 2 to 13 UHF Ch. 14 to 69 Ch. 2 to 135 Dolby Digital 50" plasma display model: PRO-110FD 17 W + 17 W (1 kHz, 10 %, 6 Ω) SRS FOCUS/SRS/SRS TruBass 120 V AC, 60...
... (9.7 lbs.) (including cables, mounting fittings and screws) Total: 66.7 kg (147.0 lbs.) ATSC Digital TV system 8VSB/64QAM/256QAM/QPSK demodulation VHF Ch. 2 to 13 UHF Ch. 14 to 69 Ch. 2 to 135 Dolby Digital 50" plasma display model: PRO-110FD 17 W + 17 W (1 kHz, 10 %, 6 Ω) SRS FOCUS/SRS/SRS TruBass 120 V AC, 60...


