Owner's Manual
Page 4
After you for buying this Pioneer product. Contents Contents Thank you have finished reading the instructions, put them away in the explanatory drawings. Please read through these operating instructions so you ... Safety Precautions 03 Supplied Accessories Identifying the main units 12 Plasma Display 12 Media Receiver 12 04 Part Names Plasma Display 13 Media Receiver 14 Remote control unit 16 Setting MTS/SAP mode 28 Viewing a channel banner 29 Using the POD service 29 Using the multiscreen functions 29 Splitting the screen 29...
After you for buying this Pioneer product. Contents Contents Thank you have finished reading the instructions, put them away in the explanatory drawings. Please read through these operating instructions so you ... Safety Precautions 03 Supplied Accessories Identifying the main units 12 Plasma Display 12 Media Receiver 12 04 Part Names Plasma Display 13 Media Receiver 14 Remote control unit 16 Setting MTS/SAP mode 28 Viewing a channel banner 29 Using the POD service 29 Using the multiscreen functions 29 Splitting the screen 29...
Owner's Manual
Page 6
...75 Displaying an image from a personal computer 75 Computer compatibility chart 76 G-LINK™ connection 77 Connecting control cords 78 About SR 78 Enjoying through memory cards (Home Gallery function 79 Readable memory cards 79 Readable data...Remote Control Features Learning function of the remote control unit 82 Using the learning function 82 Presetting manufacturer codes ...........82 Manufacture codes 83 Using the remote control unit to control other devices 84 Receiver control buttons 84 Cable control buttons 85 SAT control buttons 86 VCR control buttons 87 DVD/DVR control...
...75 Displaying an image from a personal computer 75 Computer compatibility chart 76 G-LINK™ connection 77 Connecting control cords 78 About SR 78 Enjoying through memory cards (Home Gallery function 79 Readable memory cards 79 Readable data...Remote Control Features Learning function of the remote control unit 82 Using the learning function 82 Presetting manufacturer codes ...........82 Manufacture codes 83 Using the remote control unit to control other devices 84 Receiver control buttons 84 Cable control buttons 85 SAT control buttons 86 VCR control buttons 87 DVD/DVR control...
Owner's Manual
Page 8
...cloth, water droplets on the surface may result in use, the remote controls of nearby equipment may be adversely affected or wireless headphones using the product for a long period of time • If you clean the surface of noise. Pioneer plasma display panels contain a very large number of a 61 inch... from the Plasma Display. • Do not use chemicals such as labels and tape to the rear of its remote control sensor is not coating removal. All Pioneer display panels are visible at that cabinet. Do not attach such items as benzene or thinner to this product. If...
...cloth, water droplets on the surface may result in use, the remote controls of nearby equipment may be adversely affected or wireless headphones using the product for a long period of time • If you clean the surface of noise. Pioneer plasma display panels contain a very large number of a 61 inch... from the Plasma Display. • Do not use chemicals such as labels and tape to the rear of its remote control sensor is not coating removal. All Pioneer display panels are visible at that cabinet. Do not attach such items as benzene or thinner to this product. If...
Owner's Manual
Page 12
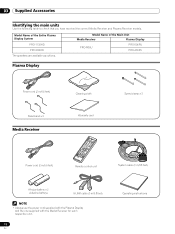
... the Entire Plasma Display System PRO-1130HD PRO-930HD Model Name of the Main Unit Media Receiver Plasma Display PRO-R06U PRO-506PU PRO-436PU The speakers are available as options. Plasma Display Power cord (2 m/6.6 feet) Bead band × 3 Media Receiver Cleaning cloth Warranty card Speed clamp × 3 Power cord (2 m/6.6 feet) Remote control unit System cable (3 m/9.8 feet) AA...
... the Entire Plasma Display System PRO-1130HD PRO-930HD Model Name of the Main Unit Media Receiver Plasma Display PRO-R06U PRO-506PU PRO-436PU The speakers are available as options. Plasma Display Power cord (2 m/6.6 feet) Bead band × 3 Media Receiver Cleaning cloth Warranty card Speed clamp × 3 Power cord (2 m/6.6 feet) Remote control unit System cable (3 m/9.8 feet) AA...
Owner's Manual
Page 13
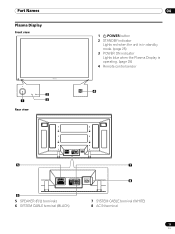
Part Names Part Names Plasma Display Front view 2 1 3 Rear view 04 1 a POWER button 2 STANDBY indicator Lights red when the unit is in standby mode. (page 25) 3 POWER ON indicator Lights blue when the Plasma Display is operating. (page 25) 4 Remote control sensor 4 5 SYSTEM CABLE WHITE BLACK SYSTEM CABLE WHITE BLACK 6 5 SPEAKER (R/L) terminals 6 SYSTEM CABLE terminal (BLACK) 7 8 7 SYSTEM CABLE terminal (WHITE) 8 AC IN terminal 13 En
Part Names Part Names Plasma Display Front view 2 1 3 Rear view 04 1 a POWER button 2 STANDBY indicator Lights red when the unit is in standby mode. (page 25) 3 POWER ON indicator Lights blue when the Plasma Display is operating. (page 25) 4 Remote control sensor 4 5 SYSTEM CABLE WHITE BLACK SYSTEM CABLE WHITE BLACK 6 5 SPEAKER (R/L) terminals 6 SYSTEM CABLE terminal (BLACK) 7 8 7 SYSTEM CABLE terminal (WHITE) 8 AC IN terminal 13 En
Owner's Manual
Page 16
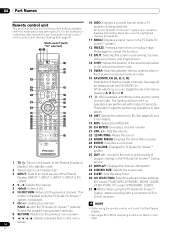
... with "TV" selected) 12 10 INFO: Displays a channel banner when a TV program is displayed. 31 (REC): When using the remote control unit, point it into standby mode. 27 DISPLAY: Displays the channel information. 2 Transmission confirmation LED 28 SCREEN SIZE: Selects the screen size. ...™ system is being watched. i.LINK) (AV mode: STANDARD, DYNAMIC, MOVIE, GAME, 4 0 - 9: Selects the channel. 04 Part Names Remote control unit This section describes the functions of the Plasma 29 SLEEP: Sets the sleep timer. Display. (INPUT 1, INPUT 2, INPUT 3, INPUT 4, PC, 30...
... with "TV" selected) 12 10 INFO: Displays a channel banner when a TV program is displayed. 31 (REC): When using the remote control unit, point it into standby mode. 27 DISPLAY: Displays the channel information. 2 Transmission confirmation LED 28 SCREEN SIZE: Selects the screen size. ...™ system is being watched. i.LINK) (AV mode: STANDARD, DYNAMIC, MOVIE, GAME, 4 0 - 9: Selects the channel. 04 Part Names Remote control unit This section describes the functions of the Plasma 29 SLEEP: Sets the sleep timer. Display. (INPUT 1, INPUT 2, INPUT 3, INPUT 4, PC, 30...
Owner's Manual
Page 21
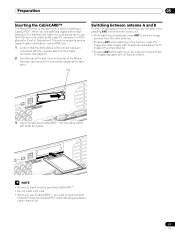
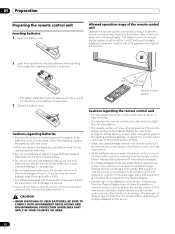
... A and B To watch broadcasts via the two antennas, you can select it goes. See page 20. 2 Hold the tab of the slot cover on the remote control unit. • While watching a broadcast, press ANT to view the image received from the Cable Converter. S400 (TS) R-AUDIO-L DIOGPITTAICLASOLUUBT WOOFER Cable CARD BLACK WHITE...
... A and B To watch broadcasts via the two antennas, you can select it goes. See page 20. 2 Hold the tab of the slot cover on the remote control unit. • While watching a broadcast, press ANT to view the image received from the Cable Converter. S400 (TS) R-AUDIO-L DIOGPITTAICLASOLUUBT WOOFER Cable CARD BLACK WHITE...
Owner's Manual
Page 22
... of the lighting or Plasma Display, or operate the remote control unit closer to properly receive commands from the remote control unit or may shorten allowable distances between the remote control unit and the remote control sensor, the remote control unit may not function. • As the batteries become weak, the remote control unit can shorten the life of the Plasma Display...
... of the lighting or Plasma Display, or operate the remote control unit closer to properly receive commands from the remote control unit or may shorten allowable distances between the remote control unit and the remote control sensor, the remote control unit may not function. • As the batteries become weak, the remote control unit can shorten the life of the Plasma Display...
Owner's Manual
Page 25
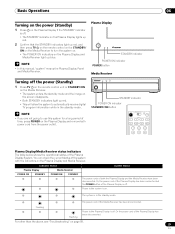
... . • The STANDBY indicator on the Plasma Display lights up red. 2 Confirm that the STANDBY indicators light up red, and then press TV a on the remote control unit or STANDBY/ ON on the Media Receiver to turn the system on. • The POWER ON indicators on the Plasma Display and Media Receiver... Media Receiver has been disconnected. NOTE • If you are not going to the Plasma Display is off the power (Standby) 1 Press TV a on the remote control unit or STANDBY/ON on the Media Receiver. • The system enters the standby mode and the image on the Plasma Display and remove both...
... . • The STANDBY indicator on the Plasma Display lights up red. 2 Confirm that the STANDBY indicators light up red, and then press TV a on the remote control unit or STANDBY/ ON on the Media Receiver to turn the system on. • The POWER ON indicators on the Plasma Display and Media Receiver... Media Receiver has been disconnected. NOTE • If you are not going to the Plasma Display is off the power (Standby) 1 Press TV a on the remote control unit or STANDBY/ON on the Media Receiver. • The system enters the standby mode and the image on the Plasma Display and remove both...

Owner's Manual
Page 26
...appears that you can watch under the current conditions, you cannot tune in emergency situations. Using 0 - 9 and • (dot) on the remote control unit. Press CH RETURN again to restore the currently tuned channel. Media Receiver (front view) STANDBY/ON REC ON STANDBY TIMER TV GUIDE ENTER DOWN... scrolling at the top of program information. 06 Basic Operations Watching TV channels Unless you set to "TV", press ANT on the remote control unit to select antenna A or B. • Make this selection depending on the connections to the antenna input terminals on page 38...
...appears that you can watch under the current conditions, you cannot tune in emergency situations. Using 0 - 9 and • (dot) on the remote control unit. Press CH RETURN again to restore the currently tuned channel. Media Receiver (front view) STANDBY/ON REC ON STANDBY TIMER TV GUIDE ENTER DOWN... scrolling at the top of program information. 06 Basic Operations Watching TV channels Unless you set to "TV", press ANT on the remote control unit to select antenna A or B. • Make this selection depending on the connections to the antenna input terminals on page 38...
Owner's Manual
Page 27
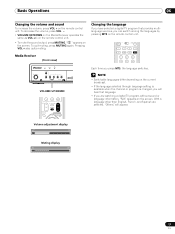
...will hear that provides multilanguage services, you will appear. To decrease the volume, press VOL -. • VOLUME UP/DOWN on the remote control unit. on the screen. With a language other than English, French, and Spanish are watching a digital TV program without sound or ...language information, "N/A" appears on the remote control unit. " " appears on the remote control unit. • To mute the sound output, press MUTING. Basic Operations 06 Changing the volume and sound To increase...
...will hear that provides multilanguage services, you will appear. To decrease the volume, press VOL -. • VOLUME UP/DOWN on the remote control unit. on the screen. With a language other than English, French, and Spanish are watching a digital TV program without sound or ...language information, "N/A" appears on the remote control unit. " " appears on the remote control unit. • To mute the sound output, press MUTING. Basic Operations 06 Changing the volume and sound To increase...
Owner's Manual
Page 40
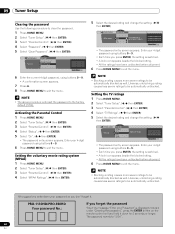
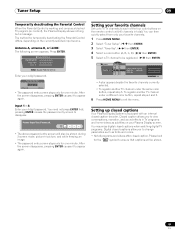
...time you press ENTER, the setting is displayed in step 6 under "Clearing the password", press the ENTER button on the remote control unit and hold it . PRO-1130HD/PRO-930HD Your password No.: If you forget the password When the message "Enter your 4-digit password using buttons 0 - 9. &#.... • All the ratings have been unblocked before shipment. 6 Press HOME MENU to exit the menu. Activating the Parental Control 1 Press HOME MENU. 2 Select "Tuner Setup". ( / then ENTER) 3 Select "Parental Control". ( / then ENTER) 4 Select "Status". ( / then ENTER) 5 Select "On". ( / then ENTER) &#...
...time you press ENTER, the setting is displayed in step 6 under "Clearing the password", press the ENTER button on the remote control unit and hold it . PRO-1130HD/PRO-930HD Your password No.: If you forget the password When the message "Enter your 4-digit password using buttons 0 - 9. &#.... • All the ratings have been unblocked before shipment. 6 Press HOME MENU to exit the menu. Activating the Parental Control 1 Press HOME MENU. 2 Select "Tuner Setup". ( / then ENTER) 3 Select "Parental Control". ( / then ENTER) 4 Select "Status". ( / then ENTER) 5 Select "On". ( / then ENTER) &#...
Owner's Manual
Page 43
Press ENTER. Input 1 - 4: Enter your 4-digit password. Please look for temporarily deactivating the Parental Control differs, depending on the remote control unit (40 channels in total). Antenna A, antenna B, or i.LINK: The following screen appears. B) xxxxxxxxxxxxxxxxxxxxx xxxxxxxxxxxxxxxxxxxxx xxxxxxxxxxxxxxxxxxxxx Enter Disable Parental Control Enter your 4-digit password. You need not press ENTER first; Closed caption allows you...
Press ENTER. Input 1 - 4: Enter your 4-digit password. Please look for temporarily deactivating the Parental Control differs, depending on the remote control unit (40 channels in total). Antenna A, antenna B, or i.LINK: The following screen appears. B) xxxxxxxxxxxxxxxxxxxxx xxxxxxxxxxxxxxxxxxxxx xxxxxxxxxxxxxxxxxxxxx Enter Disable Parental Control Enter your 4-digit password. You need not press ENTER first; Closed caption allows you...
Owner's Manual
Page 47
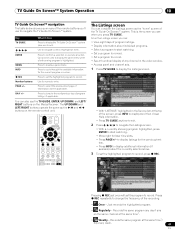
MENU Press to confirm a selection or execute an action. The Listings screen You can consider the Listings screen as the / and / buttons on the remote control unit. DAY +/- You can : • View eight days of program listings. • Display information about the currently selected show. 3 To set...; system. TV Guide On Screen™ System Operation 10 TV Guide On Screen™ navigation The table below shows a summary of the remote buttons you press TV GUIDE. INFO REC Press to the next/previous day of program listings (if applicable). Press to change the...
MENU Press to confirm a selection or execute an action. The Listings screen You can consider the Listings screen as the / and / buttons on the remote control unit. DAY +/- You can : • View eight days of program listings. • Display information about the currently selected show. 3 To set...; system. TV Guide On Screen™ System Operation 10 TV Guide On Screen™ navigation The table below shows a summary of the remote buttons you press TV GUIDE. INFO REC Press to the next/previous day of program listings (if applicable). Press to change the...
Owner's Manual
Page 58
... you to select the desired time. • The timer starts counting. • Each time you cannot select "Contrast", "Brightness", "Color", "Tint", "Sharpness", "Pro Adjust" and "Reset"; You can also use the menu to set the Sleep Timer. 1 Press HOME MENU. 2 Select "Sleep Timer". ( / then ENTER) 3...room brightness), the type of the current TV program, or the type of images input from the six viewing options, depending on the remote control unit to customize settings as possible. Lowers image brightness for each input source. 5 Press HOME MENU to check image materials, for example....
... you to select the desired time. • The timer starts counting. • Each time you cannot select "Contrast", "Brightness", "Color", "Tint", "Sharpness", "Pro Adjust" and "Reset"; You can also use the menu to set the Sleep Timer. 1 Press HOME MENU. 2 Select "Sleep Timer". ( / then ENTER) 3...room brightness), the type of the current TV program, or the type of images input from the six viewing options, depending on the remote control unit to customize settings as possible. Lowers image brightness for each input source. 5 Press HOME MENU to check image materials, for example....
Owner's Manual
Page 64
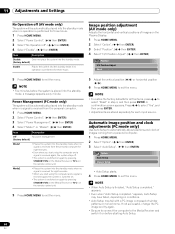
..., the system is switched on. • The system is switched on again by pressing STANDBY/ON on the Media Receiver or TV on the remote control unit. • Places the system into the standby mode when no operation is performed for three hours. NOTE • Five minutes before starting... ENTER) 3 Select "No Operation off . • The system is switched on again by pressing STANDBY/ON on the Media Receiver or TV on the remote control unit. 5 Press HOME MENU to exit the menu. 5 Adjust the vertical position ( / ) or horizontal position ( / ). 6 Press HOME MENU to exit the menu. appears. ...
..., the system is switched on. • The system is switched on again by pressing STANDBY/ON on the Media Receiver or TV on the remote control unit. • Places the system into the standby mode when no operation is performed for three hours. NOTE • Five minutes before starting... ENTER) 3 Select "No Operation off . • The system is switched on again by pressing STANDBY/ON on the Media Receiver or TV on the remote control unit. 5 Press HOME MENU to exit the menu. 5 Adjust the vertical position ( / ) or horizontal position ( / ). 6 Press HOME MENU to exit the menu. appears. ...
Owner's Manual
Page 68
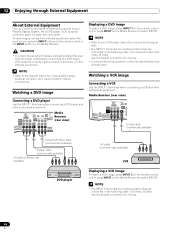
...cable (commercially available) AV cable (commercially available) VCR DVD player Displaying a VCR image To watch a DVD image, press INPUT 1 on the remote control unit or press INPUT on the Media Receiver. Watching a DVD image Connecting a DVD player Use the INPUT 1 terminals when connecting a DVD ...8226; To protect all equipment, always unplug the Media Receiver from external equipment, select the input source using the INPUT buttons on the remote control or the INPUT button on the Media Receiver to your Plasma Display System, like a DVD player, VCR, personal computer, game console, ...
...cable (commercially available) AV cable (commercially available) VCR DVD player Displaying a VCR image To watch a DVD image, press INPUT 1 on the remote control unit or press INPUT on the Media Receiver. Watching a DVD image Connecting a DVD player Use the INPUT 1 terminals when connecting a DVD ...8226; To protect all equipment, always unplug the Media Receiver from external equipment, select the input source using the INPUT buttons on the remote control or the INPUT button on the Media Receiver to your Plasma Display System, like a DVD player, VCR, personal computer, game console, ...
Owner's Manual
Page 69
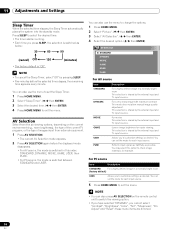
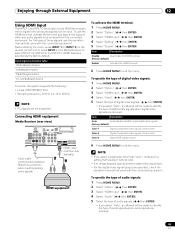
... terminal and specify the types of digital video signals when digital video signals are received. Before starting the menu, press INPUT 1 (or INPUT 3) on the remote control unit or press INPUT on the Media Receiver to which digital video and audio signals can be specified, check the operation manual that came with...
... terminal and specify the types of digital video signals when digital video signals are received. Before starting the menu, press INPUT 1 (or INPUT 3) on the remote control unit or press INPUT on the Media Receiver to which digital video and audio signals can be specified, check the operation manual that came with...
Owner's Manual
Page 70
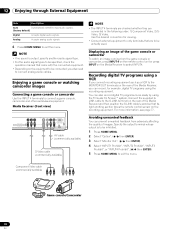
...Component Video cable (commercially available) Game console/Camcorder 70 En You can prevent unwanted feedback from the game console or camcorder, press INPUT 4 on the remote control unit or press INPUT on the Media Receiver to be inhibited. 1 Press HOME MENU. 2 Select "Option". ( / then ENTER) 3 Select "... that came with the connected equipment. • Depending on the equipment to only terminals that its light emitting section faces the remote control sensor on the rear of images. Analog Accepts analog audio signals. 6 Press HOME MENU to connect a game console, camcorder...
...Component Video cable (commercially available) Game console/Camcorder 70 En You can prevent unwanted feedback from the game console or camcorder, press INPUT 4 on the remote control unit or press INPUT on the Media Receiver to be inhibited. 1 Press HOME MENU. 2 Select "Option". ( / then ENTER) 3 Select "... that came with the connected equipment. • Depending on the equipment to only terminals that its light emitting section faces the remote control sensor on the rear of images. Analog Accepts analog audio signals. 6 Press HOME MENU to connect a game console, camcorder...
Owner's Manual
Page 73
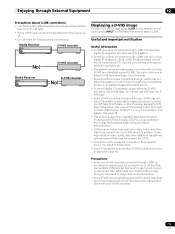
... TIMER PULL OPEN D-VHS recorder Displaying a D-VHS image To watch a D-VHS image, press i.LINK on the remote control unit or press INPUT on this system to control them through the control panel screen, or to record or play back properly. See page 68. • This system supports the Digital ... nor SVHS tape. • Some D-VHS recorders connected though i.LINK may not allow this system. • D-VHS recorders connected through i.LINK can control one D-VHS recorder connected through i.LINK is recording or playing back, do not switch on VHS tape, S-VHS tape, or (if with up to...
... TIMER PULL OPEN D-VHS recorder Displaying a D-VHS image To watch a D-VHS image, press i.LINK on the remote control unit or press INPUT on this system to control them through the control panel screen, or to record or play back properly. See page 68. • This system supports the Digital ... nor SVHS tape. • Some D-VHS recorders connected though i.LINK may not allow this system. • D-VHS recorders connected through i.LINK can control one D-VHS recorder connected through i.LINK is recording or playing back, do not switch on VHS tape, S-VHS tape, or (if with up to...


