

Owner's Manual
Page 2
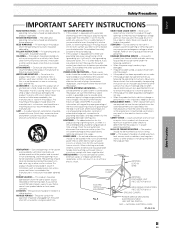
NO USER-SERVICEABLE PARTS INSIDE. REFER SERVICING TO QUALIFIED SERVICE PERSONNEL. WARNING: Handling the cord on a circuit different from that to which can result in severe personal injury or ... that may be determined by one or more of the following symbols are found to comply with the limits for a Class B digital device, pursuant to Part 15 of the FCC Rules. Increase the separation between the equipment and receiver. - THIS IS FOR YOUR SECURITY. D8-10-3a_En ii EN Safety Precautions...
NO USER-SERVICEABLE PARTS INSIDE. REFER SERVICING TO QUALIFIED SERVICE PERSONNEL. WARNING: Handling the cord on a circuit different from that to which can result in severe personal injury or ... that may be determined by one or more of the following symbols are found to comply with the limits for a Class B digital device, pursuant to Part 15 of the FCC Rules. Increase the separation between the equipment and receiver. - THIS IS FOR YOUR SECURITY. D8-10-3a_En ii EN Safety Precautions...
Owner's Manual
Page 3
...cart, stand, tripod, bracket, or table recommended by the operating instructions as they may touch dangerous voltage points or short-out parts that could result in fire, electric shock, or other products (including amplifiers) that they may corrode the cabinet. OVERLOADING - Upon... Article 810 of the National Electrical Code, ANSI/NFPA 70, provides information with a polishing cloth or a soft dry cloth. REPLACEMENT PARTS - An outside antenna system, extreme care should be located in the cabinet are unable to qualified service personnel under the following the operating...
...cart, stand, tripod, bracket, or table recommended by the operating instructions as they may touch dangerous voltage points or short-out parts that could result in fire, electric shock, or other products (including amplifiers) that they may corrode the cabinet. OVERLOADING - Upon... Article 810 of the National Electrical Code, ANSI/NFPA 70, provides information with a polishing cloth or a soft dry cloth. REPLACEMENT PARTS - An outside antenna system, extreme care should be located in the cabinet are unable to qualified service personnel under the following the operating...
Owner's Manual
Page 4
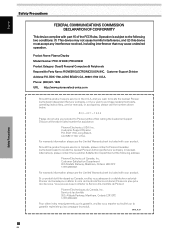
... complies with your product. Product Name: Plasma Display Model Number: PRO-1010HD / PRO-810HD Product Category: Class B Personal Computers & Peripherals Responsible Party Name: PIONEER ELECTRONICS [USA] INC. and you wish to locate the nearest Pioneer Authorized Independent Service Company, or if you wish to purchase replacement parts, operating instructions, service manuals, or accessories, please call the...
... complies with your product. Product Name: Plasma Display Model Number: PRO-1010HD / PRO-810HD Product Category: Class B Personal Computers & Peripherals Responsible Party Name: PIONEER ELECTRONICS [USA] INC. and you wish to locate the nearest Pioneer Authorized Independent Service Company, or if you wish to purchase replacement parts, operating instructions, service manuals, or accessories, please call the...
Owner's Manual
Page 5
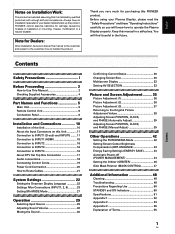
PIONEER cannot assume liabilities for damage caused by qualified personnel with enough skill and competence. You will ... place. Keep this manual in the future. Contents Contents Safety Precautions i Before Proceeding 2 How to Use This Manual 2 Checking Supplied Accessories 4 Part Names and Functions 5 Main Unit 5 Remote Control Unit 6 Connection Panel 8 Installation and Connections 10 Installation of Terms 55 1 EN English Notes...and these "Operating Instructions" carefully so you very much for Dealers: After installation, be sure to deliver this PIONEER product.
PIONEER cannot assume liabilities for damage caused by qualified personnel with enough skill and competence. You will ... place. Keep this manual in the future. Contents Contents Safety Precautions i Before Proceeding 2 How to Use This Manual 2 Checking Supplied Accessories 4 Part Names and Functions 5 Main Unit 5 Remote Control Unit 6 Connection Panel 8 Installation and Connections 10 Installation of Terms 55 1 EN English Notes...and these "Operating Instructions" carefully so you very much for Dealers: After installation, be sure to deliver this PIONEER product.
Owner's Manual
Page 6
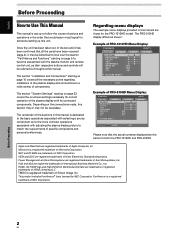
...Proceeding 2 EN The section "Installation and Connections" starting on page 22 covers the on page 10 covers all the parts have been received (page 4), it may not be referred to throughout this manual is dedicated to the basic operations associated...of the sections in this manual. This product includes FontAvenue® fonts licensed by NEC Corporation. The PRO-810HD display differs as their respective buttons and controls will be necessary. FontAvenue is a registered trademark of PRO-810HD Menu Display: S TA N D A R D PICTURE SCREEN CONTRAST BRIGHTNESS COLOR TINT SHARPNESS MPEG ...
...Proceeding 2 EN The section "Installation and Connections" starting on page 22 covers the on page 10 covers all the parts have been received (page 4), it may not be referred to throughout this manual is dedicated to the basic operations associated...of the sections in this manual. This product includes FontAvenue® fonts licensed by NEC Corporation. The PRO-810HD display differs as their respective buttons and controls will be necessary. FontAvenue is a registered trademark of PRO-810HD Menu Display: S TA N D A R D PICTURE SCREEN CONTRAST BRIGHTNESS COLOR TINT SHARPNESS MPEG ...
Owner's Manual
Page 9
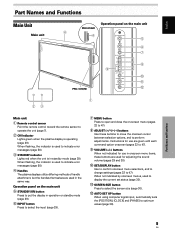
... Part Names and Functions 5 EN Operation panel on the main unit 5 STANDBY/ON button Press to put the display in operation or standby mode (page 29). 6 INPUT button Press to select the input (page 29). 7 MENU button Press to open and close the on the main unit PRO-810HD 4 4 5 6 7 8 9 0 = PRO-...use in onscreen menu items, these buttons to move the onscreen cursor between selection options, and to display the current set status (page 30). - English Part Names and Functions Main Unit Main unit Operation panel on -screen menu (pages 22 to 47). 8 ADJUST ( / / / ) buttons Use these...
... Part Names and Functions 5 EN Operation panel on the main unit 5 STANDBY/ON button Press to put the display in operation or standby mode (page 29). 6 INPUT button Press to select the input (page 29). 7 MENU button Press to open and close the on the main unit PRO-810HD 4 4 5 6 7 8 9 0 = PRO-...use in onscreen menu items, these buttons to move the onscreen cursor between selection options, and to display the current set status (page 30). - English Part Names and Functions Main Unit Main unit Operation panel on -screen menu (pages 22 to 47). 8 ADJUST ( / / / ) buttons Use these...
Owner's Manual
Page 10
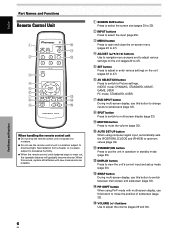
...subscreen (page 32). ! When this occurs, replace all batteries with multi-screen display, use this button to optimum values (page 39). - Part Names and Functions 6 EN STANDBY/ON button Press to put the unit in a place subject to excessive humidity. ¶ When the remote ...control unit's batteries begin to adjust the volume (pages 29 and 30). English Part Names and Functions Remote Control Unit 1 0 - 2 = 3 4 5 6 7 ~ 8 ! 9 @ AXD1496 When handling the remote control unit ¶ Do not drop ...
...subscreen (page 32). ! When this occurs, replace all batteries with multi-screen display, use this button to optimum values (page 39). - Part Names and Functions 6 EN STANDBY/ON button Press to put the unit in a place subject to excessive humidity. ¶ When the remote ...control unit's batteries begin to adjust the volume (pages 29 and 30). English Part Names and Functions Remote Control Unit 1 0 - 2 = 3 4 5 6 7 ~ 8 ! 9 @ AXD1496 When handling the remote control unit ¶ Do not drop ...
Owner's Manual
Page 11
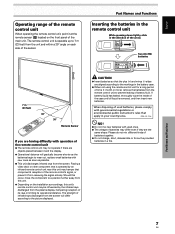
...infrared remote control unit near this unit's remote control unit may differ even if they are aligned according to prevent leaking of battery fluid. Part Names and Functions 7 EN The remote control unit is removed, and then insert new batteries. Should this occur, move the component to... of infrared rays discharged from the screen will gradually become shorter as possible. ¶ This unit discharges infrared rays from the screen. Part Names and Functions Inserting the batteries in the remote control unit While pressing down lightly, slide in the battery case. ¶ When not...
...infrared remote control unit near this unit's remote control unit may differ even if they are aligned according to prevent leaking of battery fluid. Part Names and Functions 7 EN The remote control unit is removed, and then insert new batteries. Should this occur, move the component to... of infrared rays discharged from the screen will gradually become shorter as possible. ¶ This unit discharges infrared rays from the screen. Part Names and Functions Inserting the batteries in the remote control unit While pressing down lightly, slide in the battery case. ¶ When not...
Owner's Manual
Page 12
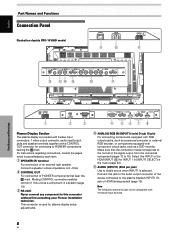
...RGB decoder; Connect this jack to the audio output connector of the signal output from the connected component (pages 12 to PIONEER components bearing the Î mark. POWER OFF ON AC IN 9 0 SPEAKER 8+Ω ~16Ω- L - Select this connector without first... any component to this INPUT or the HDMI INPUT (6) for connecting to 15). Make sure that bear the Î mark. English Part Names and Functions Connection Panel Illustration depicts PRO-1010HD model. S-VIDEO INPUT3 VIDEO INPUT4 INPUT 3/4 AUDIO ANALOG RGB INPUT5 AUDIO = IN OUT R L G(ON SYNC) B R ...
...RGB decoder; Connect this jack to the audio output connector of the signal output from the connected component (pages 12 to PIONEER components bearing the Î mark. POWER OFF ON AC IN 9 0 SPEAKER 8+Ω ~16Ω- L - Select this connector without first... any component to this INPUT or the HDMI INPUT (6) for connecting to 15). Make sure that bear the Î mark. English Part Names and Functions Connection Panel Illustration depicts PRO-1010HD model. S-VIDEO INPUT3 VIDEO INPUT4 INPUT 3/4 AUDIO ANALOG RGB INPUT5 AUDIO = IN OUT R L G(ON SYNC) B R ...

Owner's Manual
Page 13
... set top box, DVD player, etc. Connect these jacks to the audio output connectors of components connected to INPUT5 (page 19). 9 EN Part Names and Functions English Before attempting to connect one end of components that have a digital video output terminal such as a personal computer or external...connected component (pages 12 to 15). $ AUDIO R/L (INPUT5) (RCA Pin jacks) Use to INPUT2 (page 18). or components equipped with the plasma display; Part Names and Functions @ AUDIO R/L (INPUT3/4) (RCA Pin jacks) Use to obtain sound when INPUT3 or INPUT4 is off . 0 AC IN A power cable ...
... set top box, DVD player, etc. Connect these jacks to the audio output connectors of components connected to INPUT5 (page 19). 9 EN Part Names and Functions English Before attempting to connect one end of components that have a digital video output terminal such as a personal computer or external...connected component (pages 12 to 15). $ AUDIO R/L (INPUT5) (RCA Pin jacks) Use to INPUT2 (page 18). or components equipped with the plasma display; Part Names and Functions @ AUDIO R/L (INPUT3/4) (RCA Pin jacks) Use to obtain sound when INPUT3 or INPUT4 is off . 0 AC IN A power cable ...
Owner's Manual
Page 14
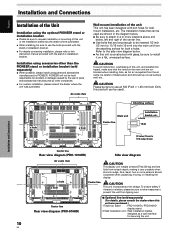
...Center line Rear view diagram (PRO-810HD) CAUTION This display unit weighs at least 67 lbs (30 kg) and has little front-to prevent the unit from the air vents, be careful of deterioration and dirt build up on rear surface wall, etc.. PIONEER will not be held responsible ...stand or installation bracket. ÷ For details concerning installation, please refer to install it very unstable when stood on edge. Installation using parts and accessories manufactured by PIONEER. As a result, two or more locations above and below . ÷ As this unit is expelled from tipping over. 7 Optional ...
...Center line Rear view diagram (PRO-810HD) CAUTION This display unit weighs at least 67 lbs (30 kg) and has little front-to prevent the unit from the air vents, be careful of deterioration and dirt build up on rear surface wall, etc.. PIONEER will not be held responsible ...stand or installation bracket. ÷ For details concerning installation, please refer to install it very unstable when stood on edge. Installation using parts and accessories manufactured by PIONEER. As a result, two or more locations above and below . ÷ As this unit is expelled from tipping over. 7 Optional ...

Owner's Manual
Page 41
... GAMMA1.8 ... HIGH, R. LOW or B. MANUAL/** settings. HIGH, B. Provides a brighter γ setting than standard. HIGH ... Adjusts the blue of dark parts Becomes softer Becomes stronger G. HIGH ... LOW ... HIGH, B. LOW, G. LOW, G. LOW, G. Provides standard brightness γ characteristics. ¶ GAMMA2.2 ... AV SELECTION mode. HIGH, G. Provides darker γ characteristics than standard. ¶ GAMMA2.0 ... Adjusts the blue of bright parts Becomes softer Becomes stronger G. S TA N D A R D PICTURE SCREEN SETUP CONTRAST BRIGHTNESS COLOR TINT SHARPNESS MPEG NR DNR ...
... GAMMA1.8 ... HIGH, R. LOW or B. MANUAL/** settings. HIGH, B. Provides a brighter γ setting than standard. HIGH ... Adjusts the blue of dark parts Becomes softer Becomes stronger G. HIGH ... LOW ... HIGH, B. LOW, G. LOW, G. LOW, G. Provides standard brightness γ characteristics. ¶ GAMMA2.2 ... AV SELECTION mode. HIGH, G. Provides darker γ characteristics than standard. ¶ GAMMA2.0 ... Adjusts the blue of bright parts Becomes softer Becomes stronger G. S TA N D A R D PICTURE SCREEN SETUP CONTRAST BRIGHTNESS COLOR TINT SHARPNESS MPEG NR DNR ...
Owner's Manual
Page 52
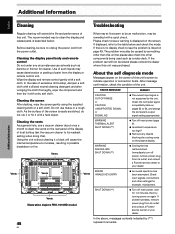
The recommended way to clean the display and related parts is described below and check the mode. Wipe the display and remote control gently ... also check the other components being used such as benzine or thinner for cleaner. Vents Illustration depicts PRO-1010HD model. EN As the surface of such liquids may also be sure to unplug the power cord from...vents on the rear panel of the display of this ). In the case of paint from its outlet, and consult a Pioneer service center or your dealer. Do not use a vacuum cleaner about once a month to clean the vents on the plasma...
The recommended way to clean the display and related parts is described below and check the mode. Wipe the display and remote control gently ... also check the other components being used such as benzine or thinner for cleaner. Vents Illustration depicts PRO-1010HD model. EN As the surface of such liquids may also be sure to unplug the power cord from...vents on the rear panel of the display of this ). In the case of paint from its outlet, and consult a Pioneer service center or your dealer. Do not use a vacuum cleaner about once a month to clean the vents on the plasma...
Owner's Manual
Page 53
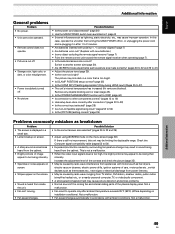
.... • May be caused by surrounding temperature change may cause picture distortion and similar problems. • Normal sound of the cooling fan and internal sliding parts of image appear to be losing their intensity. Not a malfunction. • Fan speed changes automatically in a room that is still no improvement, this case, operate...
.... • May be caused by surrounding temperature change may cause picture distortion and similar problems. • Normal sound of the cooling fan and internal sliding parts of image appear to be losing their intensity. Not a malfunction. • Fan speed changes automatically in a room that is still no improvement, this case, operate...
Owner's Manual
Page 54
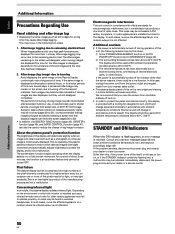
... be used within ambient temperature conditions below 40°C (104°F). 3 The internal temperature has risen abnormally due to reduce the chance of internal electronic parts, or other factors. This is provided with a cooling fan designed to a location where its speed). In such cases, move the affected appliance to turn on...
... be used within ambient temperature conditions below 40°C (104°F). 3 The internal temperature has risen abnormally due to reduce the chance of internal electronic parts, or other factors. This is provided with a cooling fan designed to a location where its speed). In such cases, move the affected appliance to turn on...


