
Owner's Manual
Page 4
...COMMISSION DECLARATION OF CONFORMITY This device complies with part 15 of the FCC Rules. Customer Support Division Address: P.O. iivi PRO-1000HDI / PRO-800HDI Pioneer Electronics [USA] Inc. BOX 1760, Long Beach, CA 90801-1760, U.S.A. Customer Support Division P. Phone: (800)...cause undesired operation. Product Name: Plasma Display Model Number: PRO-1000HDI / PRO-800HDI Product Category: Class B Personal Computers & Peripherals Responsible Party Name: PIONEER ELECTRONICS [USA] INC. Operation is subject to Pioneer without first calling the Customer Support Division at the above ...
...COMMISSION DECLARATION OF CONFORMITY This device complies with part 15 of the FCC Rules. Customer Support Division Address: P.O. iivi PRO-1000HDI / PRO-800HDI Pioneer Electronics [USA] Inc. BOX 1760, Long Beach, CA 90801-1760, U.S.A. Customer Support Division P. Phone: (800)...cause undesired operation. Product Name: Plasma Display Model Number: PRO-1000HDI / PRO-800HDI Product Category: Class B Personal Computers & Peripherals Responsible Party Name: PIONEER ELECTRONICS [USA] INC. Operation is subject to Pioneer without first calling the Customer Support Division at the above ...
Owner's Manual
Page 5
... be sure to deliver this manual to the customer and explain to the customer how to handle the product. Keep this PIONEER product. Note for damage caused by qualified personnel with enough skill and competence. You will know how to operate the Plasma...3 Part Names and Functions 4 Main Unit 4 Remote Control Unit 5 Connection Panel 6 Installation and Connections 8 Installation of Terms 42 1 PRO-1000HDI / PRO-800HDI Always have an installation specialist or your Plasma Display, please carefully read the "Safety Precautions" and these "Operating Instructions" so you very much...
... be sure to deliver this manual to the customer and explain to the customer how to handle the product. Keep this PIONEER product. Note for damage caused by qualified personnel with enough skill and competence. You will know how to operate the Plasma...3 Part Names and Functions 4 Main Unit 4 Remote Control Unit 5 Connection Panel 6 Installation and Connections 8 Installation of Terms 42 1 PRO-1000HDI / PRO-800HDI Always have an installation specialist or your Plasma Display, please carefully read the "Safety Precautions" and these "Operating Instructions" so you very much...

Owner's Manual
Page 10
...Operational distance will gradually become shorter as the batteries begin to wear out, replace weak batteries with a CONTROL IN/OUT connector for connecting to PIONEER components bearing the Î mark. Connect a speaker whose impedance is 8 -16 Ω (page 14). 2 CONTROL IN/OUT (monaural mini ...factory setup. 4 RS-232C DO NOT MAKE ANY CONNECTIONS TO THIS TERMINAL. Note: The video signal will differ according to the picture displayed. 6 PRO-1000HDI / PRO-800HDI 7 m (23 feet) 30˚ 30˚ Remote Sensor This terminal is used in standby mode. (page 11) 7 INPUT2 (BNC jacks)...
...Operational distance will gradually become shorter as the batteries begin to wear out, replace weak batteries with a CONTROL IN/OUT connector for connecting to PIONEER components bearing the Î mark. Connect a speaker whose impedance is 8 -16 Ω (page 14). 2 CONTROL IN/OUT (monaural mini ...factory setup. 4 RS-232C DO NOT MAKE ANY CONNECTIONS TO THIS TERMINAL. Note: The video signal will differ according to the picture displayed. 6 PRO-1000HDI / PRO-800HDI 7 m (23 feet) 30˚ 30˚ Remote Sensor This terminal is used in standby mode. (page 11) 7 INPUT2 (BNC jacks)...
Owner's Manual
Page 12
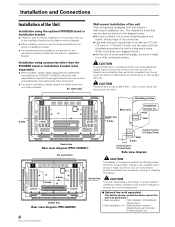
...the Unit Installation using parts and accessories manufactured by PIONEER. The installation holes that are not blocked when installing. Also, as a wall interface for securing the unit. 8 PRO-1000HDI / PRO-800HDI Center line Rear view diagram (PRO-800HDI) 7 Optional line (sold separately) ÷ ...When possible, please install using the optional PIONEER stand or installation bracket ÷ Please be sure to request ...
...the Unit Installation using parts and accessories manufactured by PIONEER. The installation holes that are not blocked when installing. Also, as a wall interface for securing the unit. 8 PRO-1000HDI / PRO-800HDI Center line Rear view diagram (PRO-800HDI) 7 Optional line (sold separately) ÷ ...When possible, please install using the optional PIONEER stand or installation bracket ÷ Please be sure to request ...

Owner's Manual
Page 20
... making control cord connections. If you use a power source converter plug, use a power supply voltage other than that component will no resistance). 16 PRO-1000HDI / PRO-800HDI When the connection is made , remote control operation of that indicated (AC 120 V, 60 Hz) as this unit. Notes ÷ Make sure ...mark is properly grounded. Always be sure to connect the power cord to the CONTROL IN terminal on another unit, the remote sensor of connected PIONEER components that the cord is done through the remote sensor on this unit to this unit. 2 Plug the power cord into a power outlet...
... making control cord connections. If you use a power source converter plug, use a power supply voltage other than that component will no resistance). 16 PRO-1000HDI / PRO-800HDI When the connection is made , remote control operation of that indicated (AC 120 V, 60 Hz) as this unit. Notes ÷ Make sure ...mark is properly grounded. Always be sure to connect the power cord to the CONTROL IN terminal on another unit, the remote sensor of connected PIONEER components that the cord is done through the remote sensor on this unit to this unit. 2 Plug the power cord into a power outlet...
Owner's Manual
Page 39
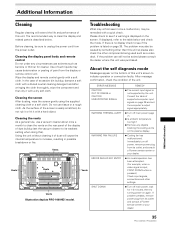
... a soft cloth. If the problem can still not be sure to unplug the power cord from its outlet and consult a Pioneer service center or your dealer. After message confirmation, check the condition of supported computer input signals on the screen. Immediately turn off...the problem is displayed on page 39 and set the vacuum cleaner to its outlet, and consult a Pioneer service center or your dealer. 35 PRO-1000HDI / PRO-800HDI Additional Information Additional Information Cleaning Regular cleaning will cause the internal temperature to increase, resulting in possible breakdown ...
... a soft cloth. If the problem can still not be sure to unplug the power cord from its outlet and consult a Pioneer service center or your dealer. After message confirmation, check the condition of supported computer input signals on the screen. Immediately turn off...the problem is displayed on page 39 and set the vacuum cleaner to its outlet, and consult a Pioneer service center or your dealer. 35 PRO-1000HDI / PRO-800HDI Additional Information Additional Information Cleaning Regular cleaning will cause the internal temperature to increase, resulting in possible breakdown ...


