Owner's Manual
Page 3
...Flat Panel Display 7 1.2.1 Control Buttons and More on the Flat Panel Display 7 1.2.2 Operating the Remote Control ...8 1.2.3 Buttons on purchasing a Pioneer Elite KURO monitor. Please spend some time reading through this owner's guide and manual to learn about sight and sound. We are proud to incorporate...Optional Brackets or Equivalent Items ...13 2.2.1 Check the Location for Suitability ...14 2.2.2 Lift and/or Move Your Panel (the How To's)...14 2.2.3 Mount the Flat Panel Display ...15 2.3 Connect to Other Devices (DVR, Receiver, BDR, etc 17 2.4 Connect the Power Cord to the Panel......
...Flat Panel Display 7 1.2.1 Control Buttons and More on the Flat Panel Display 7 1.2.2 Operating the Remote Control ...8 1.2.3 Buttons on purchasing a Pioneer Elite KURO monitor. Please spend some time reading through this owner's guide and manual to learn about sight and sound. We are proud to incorporate...Optional Brackets or Equivalent Items ...13 2.2.1 Check the Location for Suitability ...14 2.2.2 Lift and/or Move Your Panel (the How To's)...14 2.2.3 Mount the Flat Panel Display ...15 2.3 Connect to Other Devices (DVR, Receiver, BDR, etc 17 2.4 Connect the Power Cord to the Panel......
Owner's Manual
Page 12
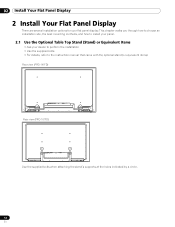
This chapter walks you through how to choose an installation site, the best mounting methods, and how to the instruction manual that came with the optional stand (or equivalent items) Rear view (PRO-141FD) Rear view (PRO-101FD) Use the supplied bolts when attaching the stand's supports at the holes indicated by a circle. 12 En...
This chapter walks you through how to choose an installation site, the best mounting methods, and how to the instruction manual that came with the optional stand (or equivalent items) Rear view (PRO-141FD) Rear view (PRO-101FD) Use the supplied bolts when attaching the stand's supports at the holes indicated by a circle. 12 En...
Owner's Manual
Page 13
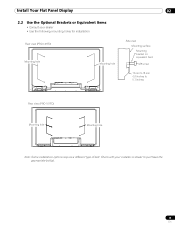
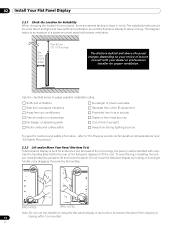
Install Your Flat Panel Display 02 2.2 Use the Optional Brackets or Equivalent Items • Consult your installer or dealer to 0.7 inches) Rear view (PRO-101FD) Mounting hole Mounting hole Note: Some installation options require a different type of bolt. Check with your dealer • Use the following mounting holes for installation Rear view (PRO-141FD) Mounting hole Mounting hole Side view Mounting surface Mounting bracket (or equivalent item) M8 screw 12 mm to 18 mm (0.5 inches to purchase the appropriate bolt(s). 13 En
Install Your Flat Panel Display 02 2.2 Use the Optional Brackets or Equivalent Items • Consult your installer or dealer to 0.7 inches) Rear view (PRO-101FD) Mounting hole Mounting hole Note: Some installation options require a different type of bolt. Check with your dealer • Use the following mounting holes for installation Rear view (PRO-141FD) Mounting hole Mounting hole Side view Mounting surface Mounting bracket (or equivalent item) M8 screw 12 mm to 18 mm (0.5 inches to purchase the appropriate bolt(s). 13 En
Owner's Manual
Page 14
... display is an example of mount. Do not move the panel. To avoid flexing or twisting the unit, you need at least two people to lift and move the flat panel display by holding only a single handle or by dragging the panel by its handles. (PRO-141FD) (PRO-101FD) Note: Do not ...When choosing the location for proper ventilation. The installation site should be handled with your dealer or professional installer for your choice of a stand-mounted panel with proper ventilation. Use the checklist below is built for endurance but because of the technology, the panel must be out of the ...
... display is an example of mount. Do not move the panel. To avoid flexing or twisting the unit, you need at least two people to lift and move the flat panel display by holding only a single handle or by dragging the panel by its handles. (PRO-141FD) (PRO-101FD) Note: Do not ...When choosing the location for proper ventilation. The installation site should be handled with your dealer or professional installer for your choice of a stand-mounted panel with proper ventilation. Use the checklist below is built for endurance but because of the technology, the panel must be out of the ...
Owner's Manual
Page 15
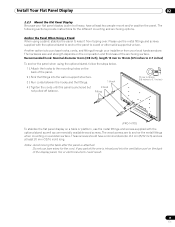
... use the metal fittings and screws supplied with the optional stand as well as commercially available wood screws. Another option is to the mounting holes on the back of the anchoring surface. The following sections provide instructions for the cord. The hardware size and strength depends on...your local hardware store. Do not use the metal fittings and screws supplied with the optional stand to anchor the panel to 0.7 inches) M8 (PRO-141FD) To stabilize the flat panel display on a wooden surface. Fitting 12 mm to 18 mm (0.5 inches to a wall or other solid support ...
... use the metal fittings and screws supplied with the optional stand as well as commercially available wood screws. Another option is to the mounting holes on the back of the anchoring surface. The following sections provide instructions for the cord. The hardware size and strength depends on...your local hardware store. Do not use the metal fittings and screws supplied with the optional stand to anchor the panel to 0.7 inches) M8 (PRO-141FD) To stabilize the flat panel display on a wooden surface. Fitting 12 mm to 18 mm (0.5 inches to a wall or other solid support ...
Owner's Manual
Page 19
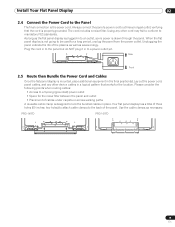
Lay out the power cord, panel cables, and any other device cables in a logical pattern that the cord is mounted, place additional equipment in to the back of the plasma as well as necessary. PRO-141FD PRO-101FD 19 En Rear Front 2.5 Route then Bundle the Power Cord and Cables Once the flat panel display...
Lay out the power cord, panel cables, and any other device cables in a logical pattern that the cord is mounted, place additional equipment in to the back of the plasma as well as necessary. PRO-141FD PRO-101FD 19 En Rear Front 2.5 Route then Bundle the Power Cord and Cables Once the flat panel display...
Owner's Manual
Page 80
...extended lengths to rise, resulting in a possible malfunction. Over the course of the screen diminishes very slowly. Use of accessories other than the Pioneer stand or installation brackets may result in any material such as blankets, loose cloth, or carpeting as ventilation or by a combination of narrow ... surface or inside of factors. A malfunction can be caused by a single issue such as this could block the panel vents. • Use a proper mount or stand rather than leaning the panel against a wall or other support. • Do not place the product on a rug or blanket. 8.2 Physical ...
...extended lengths to rise, resulting in a possible malfunction. Over the course of the screen diminishes very slowly. Use of accessories other than the Pioneer stand or installation brackets may result in any material such as blankets, loose cloth, or carpeting as ventilation or by a combination of narrow ... surface or inside of factors. A malfunction can be caused by a single issue such as this could block the panel vents. • Use a proper mount or stand rather than leaning the panel against a wall or other support. • Do not place the product on a rug or blanket. 8.2 Physical ...


