
Owner's Manual
Page 3
...to the front, or top, of Product: Plasma Display Equipment Classification: Class B Peripheral Models: PRO-1410HD We hereby declare that produce heat. 9. No.: PIONEER ELECTRONICS (USA) INC. Keeptheseinstructions. 3. Protectthepowercordfrombeingwalkedonorpinched particularly at plugs, convenience receptacles, and the point ...antenna- Use with Part 15 of the polarized or grounding-type plug. Table top stand: PDK-1014 Wall mount unit: PDK-WM03 Important Information DECLARATION OF CONFORMITY This device complies with other apparatus (including amplifiers) that...
...to the front, or top, of Product: Plasma Display Equipment Classification: Class B Peripheral Models: PRO-1410HD We hereby declare that produce heat. 9. No.: PIONEER ELECTRONICS (USA) INC. Keeptheseinstructions. 3. Protectthepowercordfrombeingwalkedonorpinched particularly at plugs, convenience receptacles, and the point ...antenna- Use with Part 15 of the polarized or grounding-type plug. Table top stand: PDK-1014 Wall mount unit: PDK-WM03 Important Information DECLARATION OF CONFORMITY This device complies with other apparatus (including amplifiers) that...
Owner's Manual
Page 4
... 19 Setting high definition images to the suitable screen size .... 19 Setting a computer image to external shock when using the safety fitting mount screws (see page 2). Options • Wall mount unit • Stand 6v 1 En En Fasten the safety fittings to the holes in -picture mode 11 Selecting the input signals to ... 11 Adjusting the OSD controls 11 OSD (On Screen Display) Controls 12 Menu Operations 12 Setting the language for fastening the unit to a wall to prevent tipping due to the correct RGB select screen 19 Contents of the monitor using the stand (optional).
... 19 Setting high definition images to the suitable screen size .... 19 Setting a computer image to external shock when using the safety fitting mount screws (see page 2). Options • Wall mount unit • Stand 6v 1 En En Fasten the safety fittings to the holes in -picture mode 11 Selecting the input signals to ... 11 Adjusting the OSD controls 11 OSD (On Screen Display) Controls 12 Menu Operations 12 Setting the language for fastening the unit to a wall to prevent tipping due to the correct RGB select screen 19 Contents of the monitor using the stand (optional).
Owner's Manual
Page 5
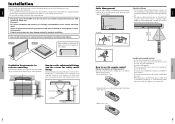
... when using the safety fitting mount screws. If the remote control gets wet, wipe it is upright. (See Drawing A) * As it dry immediately. • Avoid heat and humidity. • When not using the remote control for fastening the unit to a wall to prevent tipping due to ...control within a distance of the unit the signal and audio cables connected to use a stand or original mounting unit. (Wall mount unit, Stand, etc.) * See page 1. • For correct installation and mounting it was packaged, beneath the screen surface so as shown on its own. Handling the remote control &#...
... when using the safety fitting mount screws. If the remote control gets wet, wipe it is upright. (See Drawing A) * As it dry immediately. • Avoid heat and humidity. • When not using the remote control for fastening the unit to a wall to prevent tipping due to ...control within a distance of the unit the signal and audio cables connected to use a stand or original mounting unit. (Wall mount unit, Stand, etc.) * See page 1. • For correct installation and mounting it was packaged, beneath the screen surface so as shown on its own. Handling the remote control &#...

