
Owner's Manual
Page 2
Note to the point of the building, as practical. This reminder is provided to call the CATV system installer's attention to Article 820-40 of the NEC that provides guidelines for proper grounding and, in particular, specifies that the cable ground-shall be connected to the grounding system of cable entry as close to CATV system installer.
Note to the point of the building, as practical. This reminder is provided to call the CATV system installer's attention to Article 820-40 of the NEC that provides guidelines for proper grounding and, in particular, specifies that the cable ground-shall be connected to the grounding system of cable entry as close to CATV system installer.

Owner's Manual
Page 3
... serial number on the rear panel. Product Name: Plasma Display System (Plasma Display) (Media Receiver) Model Number: PDP-5030HD (PDP-503PU) (PDP-R03U) PDP-4330HD (PDP-433PU) (PDP-R03U) Product Category: Class B Personal Computers & Peripherals Responsible Party Name: PIONEER ELECTRONICS (USA), INC., Customer Support Div. WARNING: THE APPARATUS IS NOT WATERPROOFS, TO PREVENT FIRE OR SHOCK HAZARD...
... serial number on the rear panel. Product Name: Plasma Display System (Plasma Display) (Media Receiver) Model Number: PDP-5030HD (PDP-503PU) (PDP-R03U) PDP-4330HD (PDP-433PU) (PDP-R03U) Product Category: Class B Personal Computers & Peripherals Responsible Party Name: PIONEER ELECTRONICS (USA), INC., Customer Support Div. WARNING: THE APPARATUS IS NOT WATERPROOFS, TO PREVENT FIRE OR SHOCK HAZARD...
Owner's Manual
Page 4
... Displaying broadcasts via a Digital tuner 37 Enjoying a game console or viewing camcorder images 38 Connecting a game console or camcorder 38 Displaying an image of the PIONEER product. Dear customer Thank you for your product, please read the IMPORTANT SAFETY INSTRUCTIONS carefully before using this product. To ensure safety and many years...
... Displaying broadcasts via a Digital tuner 37 Enjoying a game console or viewing camcorder images 38 Connecting a game console or camcorder 38 Displaying an image of the PIONEER product. Dear customer Thank you for your product, please read the IMPORTANT SAFETY INSTRUCTIONS carefully before using this product. To ensure safety and many years...
Owner's Manual
Page 5
...hours, or for shorter periods of time over a long period of exceptional quality, this product. Installation guidelines The Pioneer PureVision PDP-5030HD/PDP-4330HD Plasma Display System incorporates a very thin design. For custom installation, please consult the dealer where the unit was purchased..., as well as a photograph or computer image is strongly recommended. However, please limit its lifetime, the luminosity of the Pioneer PDP-5030HD/PDP-4330HD Plasma Display System will automatically power off in the event of the still images and the time they will disappear when ...
...hours, or for shorter periods of time over a long period of exceptional quality, this product. Installation guidelines The Pioneer PureVision PDP-5030HD/PDP-4330HD Plasma Display System incorporates a very thin design. For custom installation, please consult the dealer where the unit was purchased..., as well as a photograph or computer image is strongly recommended. However, please limit its lifetime, the luminosity of the Pioneer PDP-5030HD/PDP-4330HD Plasma Display System will automatically power off in the event of the still images and the time they will disappear when ...
Owner's Manual
Page 6
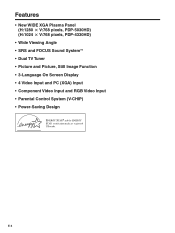
Features • New WIDE XGA Plasma Panel (H:1280 m V:768 pixels, PDP-5030HD) (H:1024 m V:768 pixels, PDP-4330HD) • Wide Viewing Angle • SRS and FOCUS Sound System*1 • Dual TV Tuner • Picture and Picture, Still Image Function • 3-Language On Screen Display • 4 Video Input and PC (XGA) Input • Component Video Input and RGB Video Input • Parental Control System (V-CHIP) • Power-Saving Design E-3
Features • New WIDE XGA Plasma Panel (H:1280 m V:768 pixels, PDP-5030HD) (H:1024 m V:768 pixels, PDP-4330HD) • Wide Viewing Angle • SRS and FOCUS Sound System*1 • Dual TV Tuner • Picture and Picture, Still Image Function • 3-Language On Screen Display • 4 Video Input and PC (XGA) Input • Component Video Input and RGB Video Input • Parental Control System (V-CHIP) • Power-Saving Design E-3

Owner's Manual
Page 7
Supplied accessories Plasma Display Power cord Cleaning cloth Three speed clamps Three bead bands Warranty card A • Always use the power cord supplied with the Plasma Display and the one supplied with the Media Receiver for each respective unit. Media Receiver Power cord Remote control unit Two AA size batteries (Alkaline battery) System cable Operating instruction E-4
Supplied accessories Plasma Display Power cord Cleaning cloth Three speed clamps Three bead bands Warranty card A • Always use the power cord supplied with the Plasma Display and the one supplied with the Media Receiver for each respective unit. Media Receiver Power cord Remote control unit Two AA size batteries (Alkaline battery) System cable Operating instruction E-4

Owner's Manual
Page 8
...8226; Because the Plasma Display is heavy, be used only with model PDK-TS01 stand, use with the stand. Using the optional PIONEER stand • For details on installation refer to ensure ventilation around the upper and back parts when installing in instability causing possible ...injury. Using the optional PIONEER speakers • For details on installation refer to sunlight, • Under strong artificial light, • In high humidity, •...
...8226; Because the Plasma Display is heavy, be used only with model PDK-TS01 stand, use with the stand. Using the optional PIONEER stand • For details on installation refer to ensure ventilation around the upper and back parts when installing in instability causing possible ...injury. Using the optional PIONEER speakers • For details on installation refer to sunlight, • Under strong artificial light, • In high humidity, •...

Owner's Manual
Page 9
... CORD. 2. Connecting the system cable and the power cord to the Plasma Display Plasma Display (rear view) (bottom view) (WHITE) (GRAY) For details on optional PIONEER speaker installation refer to the Media Receiver System cable (GRAY) (WHITE) Media Receiver (rear view) A B COMPONENT VIDEO INPUT 3 Y PB PR RGB INPUT OUT ANT/CABLE...
... CORD. 2. Connecting the system cable and the power cord to the Plasma Display Plasma Display (rear view) (bottom view) (WHITE) (GRAY) For details on optional PIONEER speaker installation refer to the Media Receiver System cable (GRAY) (WHITE) Media Receiver (rear view) A B COMPONENT VIDEO INPUT 3 Y PB PR RGB INPUT OUT ANT/CABLE...

Owner's Manual
Page 10
Once properly bunched, follow the steps below to the main unit Connect the speed clamps using the 4 holes marked with • below, depending on the rear of the Plasma Display and snap 2 into a bunch, secure with this System for bunching cables. Speed clamps are included with provided bead bands A • Cables can be difficult to fix the clamp. System cable To the right Speed clamps Bead bands Speaker cable Speaker cable Speed clamps Bead bands System cable Bunch cables using provided speed clamps Attaching speed clamps to route the cables. Attaching and removing speed ...
Once properly bunched, follow the steps below to the main unit Connect the speed clamps using the 4 holes marked with • below, depending on the rear of the Plasma Display and snap 2 into a bunch, secure with this System for bunching cables. Speed clamps are included with provided bead bands A • Cables can be difficult to fix the clamp. System cable To the right Speed clamps Bead bands Speaker cable Speaker cable Speed clamps Bead bands System cable Bunch cables using provided speed clamps Attaching speed clamps to route the cables. Attaching and removing speed ...

Owner's Manual
Page 11
In addition, do not expose the remote control unit to liquids, and do not plan to use manganese batteries. Inserting the batteries If the remote control unit fails to the (e) and (f) indicators. • Do not mix batteries of different types. When you replace the batteries, use of batteries can shorten the life of time, remove the batteries from batteries can cause a rash. Mixing old and new batteries can result in an area with their terminals corresponding to the remote sensor window. If you do not place in chemical leakage or explosion. Cautions regarding remote control ...
In addition, do not expose the remote control unit to liquids, and do not plan to use manganese batteries. Inserting the batteries If the remote control unit fails to the (e) and (f) indicators. • Do not mix batteries of different types. When you replace the batteries, use of batteries can shorten the life of time, remove the batteries from batteries can cause a rash. Mixing old and new batteries can result in an area with their terminals corresponding to the remote sensor window. If you do not place in chemical leakage or explosion. Cautions regarding remote control ...
Owner's Manual
Page 13
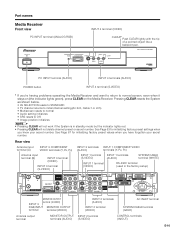
... preset values when you know your secret number. See Page 67 for initializing factory preset settings when you have forgotten your secret number. MEDIA RECEIVER PDP-R03U PC INPUT terminal (AUDIO) INPUT 4 terminals (AUDIO) POWER button INPUT 4 terminal (S-VIDEO) * If you're having problems operating the Media Receiver and want to...
... preset values when you know your secret number. See Page 67 for initializing factory preset settings when you have forgotten your secret number. MEDIA RECEIVER PDP-R03U PC INPUT terminal (AUDIO) INPUT 4 terminals (AUDIO) POWER button INPUT 4 terminal (S-VIDEO) * If you're having problems operating the Media Receiver and want to...
Owner's Manual
Page 14
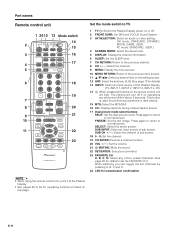
SELECT: Select the active screen. This button is used for operating buttons not listed on this page. SUB INPUT: Select an input source of four preset channels. (See page 25 for ditails to set the FAVORITE CH.) While watching you can toggle the set channels by pressing A, B, C and D. 24 LED for transmission confirmation A • When using the remote control unit, point it at the Plasma Display. • See pages 56 to 63 for performing operations in dark places. 15 MTS: Select the MTS/SAP. 16 CC: Display captions during closed-caption source. 17 Dual picture mode select buttons ...
SELECT: Select the active screen. This button is used for operating buttons not listed on this page. SUB INPUT: Select an input source of four preset channels. (See page 25 for ditails to set the FAVORITE CH.) While watching you can toggle the set channels by pressing A, B, C and D. 24 LED for transmission confirmation A • When using the remote control unit, point it at the Plasma Display. • See pages 56 to 63 for performing operations in dark places. 15 MTS: Select the MTS/SAP. 16 CC: Display captions during closed-caption source. 17 Dual picture mode select buttons ...
Owner's Manual
Page 15
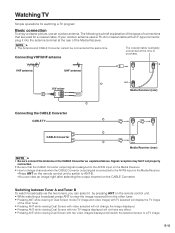
A • The Antenna and CABLE Converter cannot be connected at the time of connections that the CABLE Converter output signal is a brief explanation of the types of purchase. Switching between Tuner A and Tuner B To watch broadcasts via the two tuners, you can view an image right after selecting the output channel on the Media Receiver. • How to change the image displayed. • Pressing ANT while viewing Dual Screen with two TV images displayed will switch the selected screen to the ANT-B input on the CABLE Converter. If your outdoor antenna uses a 75-ohm coaxial ...
A • The Antenna and CABLE Converter cannot be connected at the time of connections that the CABLE Converter output signal is a brief explanation of the types of purchase. Switching between Tuner A and Tuner B To watch broadcasts via the two tuners, you can view an image right after selecting the output channel on the Media Receiver. • How to change the image displayed. • Pressing ANT while viewing Dual Screen with two TV images displayed will switch the selected screen to the ANT-B input on the CABLE Converter. If your outdoor antenna uses a 75-ohm coaxial ...
Owner's Manual
Page 16
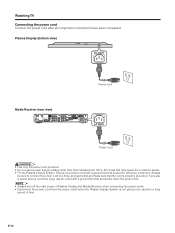
Plasma Display (bottom view) AC INLET Power cord Media Receiver (rear view) A B COMPONENT VIDEO INPUT 3 Y PB PR RGB INPUT OUT ANT/CABLE 75Ω MONITOR OUTPUT S-VIDEO VIDEO R-AUDIO-L COMPONENT VIDEO Y PB PR INPUT 1 RS-232C SYSTEM CABLE (GRAY) S-VIDEO INPUT 2 VIDEO R-AUDIO-L IN OUT CONTROL (WHITE) AC INLET AC INLET Power cord L • Use only the power cord provided. • Do not use an outlet with a ground terminal is not going to a three-pronged outlet and make sure that indicated (AC 120 V, 60 Hz) as this may cause fire or electric shock. • For the ...
Plasma Display (bottom view) AC INLET Power cord Media Receiver (rear view) A B COMPONENT VIDEO INPUT 3 Y PB PR RGB INPUT OUT ANT/CABLE 75Ω MONITOR OUTPUT S-VIDEO VIDEO R-AUDIO-L COMPONENT VIDEO Y PB PR INPUT 1 RS-232C SYSTEM CABLE (GRAY) S-VIDEO INPUT 2 VIDEO R-AUDIO-L IN OUT CONTROL (WHITE) AC INLET AC INLET Power cord L • Use only the power cord provided. • Do not use an outlet with a ground terminal is not going to a three-pronged outlet and make sure that indicated (AC 120 V, 60 Hz) as this may cause fire or electric shock. • For the ...
Owner's Manual
Page 17
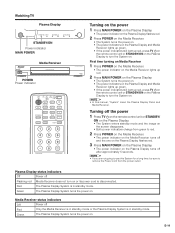
... Display STANDBY/ON STANDBY/ON INPUT CHANNEL STANDBY/ON Power indicator MAIN POWER VOLUME STANDBY/ON POWER Media Receiver PLASMA DISPLAY SYSTEM PUSH MEDIA RECEIVER PDP-R03U POWER Power indicator TV CBL VCR DVD TV /SAT /LD /DTV ANT INPUT FRONT AV SURR MTS CC SELECTION SPLIT SELECT ...
... Display STANDBY/ON STANDBY/ON INPUT CHANNEL STANDBY/ON Power indicator MAIN POWER VOLUME STANDBY/ON POWER Media Receiver PLASMA DISPLAY SYSTEM PUSH MEDIA RECEIVER PDP-R03U POWER Power indicator TV CBL VCR DVD TV /SAT /LD /DTV ANT INPUT FRONT AV SURR MTS CC SELECTION SPLIT SELECT ...
Owner's Manual
Page 18
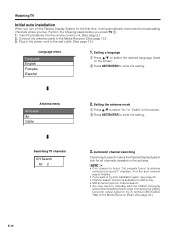
Plug in the set area. Antenna menu Air/Cable Air Cable 2. Automatic channel searching Channel auto search makes the Plasma Display System look for all channels viewable in the power cord to enter the setting. A • If no channel is available for the first time, it will automatically memorize the broadcasting channels where you live. displays. Setting the antenna mode 1 Press a/b to select "Air" or "Cable" on the screen. 2 Press SET/ENTER to the wall outlet. (See page 13.) Language menu Language English Français Español 1. Searching TV channels CH Search Air 2 3. ...
Plug in the set area. Antenna menu Air/Cable Air Cable 2. Automatic channel searching Channel auto search makes the Plasma Display System look for all channels viewable in the power cord to enter the setting. A • If no channel is available for the first time, it will automatically memorize the broadcasting channels where you live. displays. Setting the antenna mode 1 Press a/b to select "Air" or "Cable" on the screen. 2 Press SET/ENTER to the wall outlet. (See page 13.) Language menu Language English Français Español 1. Searching TV channels CH Search Air 2 3. ...

Owner's Manual
Page 19
Using 0 - 9 on the remote control unit Press CH RETURN to switch the currently tuned channel to 9. Press CH RETURN again to switch back to 9. Using CH RETURN on the remote control unit Select the channels directly by 8. • You can tune in channels more quickly if you press CH ENTER after pressing 0 to the previously tuned channel. E-16 a • To select channel 8, a 1-digit channel, press 8. • To select channel 38, a 2-digit channel, press 3, followed by 8. • To select channel 138, a 3-digit channel, press 1, then 3, followed by pressing buttons 0 to the...
Using 0 - 9 on the remote control unit Press CH RETURN to switch the currently tuned channel to 9. Press CH RETURN again to switch back to 9. Using CH RETURN on the remote control unit Select the channels directly by 8. • You can tune in channels more quickly if you press CH ENTER after pressing 0 to the previously tuned channel. E-16 a • To select channel 8, a 1-digit channel, press 8. • To select channel 38, a 2-digit channel, press 3, followed by 8. • To select channel 138, a 3-digit channel, press 1, then 3, followed by pressing buttons 0 to the...
Owner's Manual
Page 20
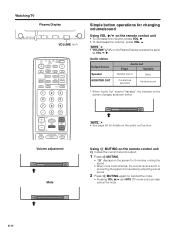
A • VOLUME s/r on the remote control unit • To increase the volume, press VOL k. • To decrease the volume, press VOL l. E-17 Audio status Output device Audio out Fixed Variable Speaker Variable sound Mute MONITOR OUT Constant as specified Variable sound * When "Audio Out" is set to "Variable", the indicator on the screen changes as VOL l/k. Using e MUTING on the remote control unit e mutes the current sound output. 1 Press e MUTING. • "M" displays on the audio out function. Watching TV Plasma Display STANDBY/ON STANDBY/ON INPUT CHANNEL ...
A • VOLUME s/r on the remote control unit • To increase the volume, press VOL k. • To decrease the volume, press VOL l. E-17 Audio status Output device Audio out Fixed Variable Speaker Variable sound Mute MONITOR OUT Constant as specified Variable sound * When "Audio Out" is set to "Variable", the indicator on the screen changes as VOL l/k. Using e MUTING on the remote control unit e mutes the current sound output. 1 Press e MUTING. • "M" displays on the audio out function. Watching TV Plasma Display STANDBY/ON STANDBY/ON INPUT CHANNEL ...

Owner's Manual
Page 21
SRS sound options • SRS (Sound Retrieval System): Creates a more optimal listening position or height without moving them. • FOCUS e SRS: Produces both SRS and FOCUS effects. • Off: Outputs the normal sound. Each time you press FRONT SURR (SURROUND), the mode changes among SRS, FOCUS, FOCUS e SRS and Off. E-18 Watching TV TV CBL VCR DVD TV /SAT /LD /DTV ANT INPUT FRONT AV SURR MTS CC SELECTION SPLIT SELECT SCREEN MODE FREEZE SUB SUB CH INPUT DISPLAY SLEEP EDIT/ LEARN 123 456 789 0 CH ENTER : Off : SRS :...
SRS sound options • SRS (Sound Retrieval System): Creates a more optimal listening position or height without moving them. • FOCUS e SRS: Produces both SRS and FOCUS effects. • Off: Outputs the normal sound. Each time you press FRONT SURR (SURROUND), the mode changes among SRS, FOCUS, FOCUS e SRS and Off. E-18 Watching TV TV CBL VCR DVD TV /SAT /LD /DTV ANT INPUT FRONT AV SURR MTS CC SELECTION SPLIT SELECT SCREEN MODE FREEZE SUB SUB CH INPUT DISPLAY SLEEP EDIT/ LEARN 123 456 789 0 CH ENTER : Off : SRS :...
Owner's Manual
Page 22
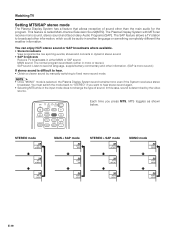
The SAP feature allows a TV station to hear stereo sound again. • Selecting MTS while in either in another language or something completely different like live sporting events, shows and concerts in dynamic stereo sound. • SAP broadcasts Receive TV broadcasts in the input mode does not change the type of sound other than the main audio for the program. MAIN sound: The normal program soundtrack (either MAIN or SAP sound. SAP sound: Listen to fixed mono-sound mode. You can receive mono sound, stereo sound and Secondary Audio Programs (SAP). A • Once "MONO" mode...
The SAP feature allows a TV station to hear stereo sound again. • Selecting MTS while in either in another language or something completely different like live sporting events, shows and concerts in dynamic stereo sound. • SAP broadcasts Receive TV broadcasts in the input mode does not change the type of sound other than the main audio for the program. MAIN sound: The normal program soundtrack (either MAIN or SAP sound. SAP sound: Listen to fixed mono-sound mode. You can receive mono sound, stereo sound and Secondary Audio Programs (SAP). A • Once "MONO" mode...