Owner's Manual
Page 4
...03 Operational Precautions 04 Supplied Accessories Plasma Display 11 Media Receiver 11 05 Part Names Plasma Display 12 Media Receiver 12 Remote control unit 14 06 Preparation Installing the Plasma Display 15 Installing the Media Receiver 16 Installing the Media Receiver vertically 16 ...outlet may sometimes differ from that shown in a safe place for buying this Pioneer product. In some countries or regions, the shape of the remote control unit 20 Cautions regarding the remote control unit 20 Cable connections for watching digital and/or conventional TV channels 21 Connecting...
...03 Operational Precautions 04 Supplied Accessories Plasma Display 11 Media Receiver 11 05 Part Names Plasma Display 12 Media Receiver 12 Remote control unit 14 06 Preparation Installing the Plasma Display 15 Installing the Media Receiver 16 Installing the Media Receiver vertically 16 ...outlet may sometimes differ from that shown in a safe place for buying this Pioneer product. In some countries or regions, the shape of the remote control unit 20 Cautions regarding the remote control unit 20 Cable connections for watching digital and/or conventional TV channels 21 Connecting...

Owner's Manual
Page 5
... chart 58 Connecting the VCR controller 59 The lists of controllable recording equipment manufactures 60 Connecting control cords 61 About SR 61 13 Useful Remote Control Features Learning function of the remote control unit 62 Using the learning ...function 62 Presetting manufacture codes 62 Manufacture codes 63 Using the remote control unit to control other devices 64 Receiver control buttons 64 Cable control buttons 65 SAT control buttons 66 VCR control buttons 67 DVD/DVR control...
... chart 58 Connecting the VCR controller 59 The lists of controllable recording equipment manufactures 60 Connecting control cords 61 About SR 61 13 Useful Remote Control Features Learning function of the remote control unit 62 Using the learning ...function 62 Presetting manufacture codes 62 Manufacture codes 63 Using the remote control unit to control other devices 64 Receiver control buttons 64 Cable control buttons 65 SAT control buttons 66 VCR control buttons 67 DVD/DVR control...
Owner's Manual
Page 10
.... the supplied cleaning cloth or other similar cloths (e.g., cotton and flannel). Depending on how the Plasma Display is in use, the remote controls of the product may be interfered. Fan motor noise When ambient temperature of the Media Receiver becomes high, the rotation speed of the... from a wall outlet. The fan motor keeps running until condensation disappears. Do not move the Plasma Display by noise. 03 Operational Precautions PIONEER bears no responsibility for any damages arising from a cold place to a warm place or just after a heater is switched on in winter...
.... the supplied cleaning cloth or other similar cloths (e.g., cotton and flannel). Depending on how the Plasma Display is in use, the remote controls of the product may be interfered. Fan motor noise When ambient temperature of the Media Receiver becomes high, the rotation speed of the... from a wall outlet. The fan motor keeps running until condensation disappears. Do not move the Plasma Display by noise. 03 Operational Precautions PIONEER bears no responsibility for any damages arising from a cold place to a warm place or just after a heater is switched on in winter...

Owner's Manual
Page 11
... cloth Speed clamp × 3 Warranty card Speaker cushion × 3 (For PDP-5045HD/4345HD only) (Use when installing the optional speakers at the bottom of the Plasma Display.) Power cord (2 m/6.6 feet) Remote control unit System cable (3 m/9.8 feet) AA size battery × 2 (Alkaline battery...) Stand Screw × 4 (for stand) Screw hole cap × 4 VCR controller (1.8 m/5.9 feet) Operating Instructions Instruction guide • Always...
... cloth Speed clamp × 3 Warranty card Speaker cushion × 3 (For PDP-5045HD/4345HD only) (Use when installing the optional speakers at the bottom of the Plasma Display.) Power cord (2 m/6.6 feet) Remote control unit System cable (3 m/9.8 feet) AA size battery × 2 (Alkaline battery...) Stand Screw × 4 (for stand) Screw hole cap × 4 VCR controller (1.8 m/5.9 feet) Operating Instructions Instruction guide • Always...
Owner's Manual
Page 12
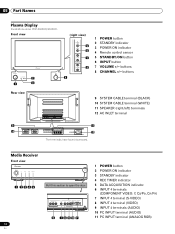
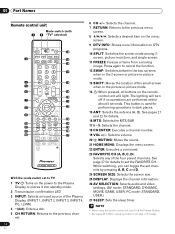
05 Part Names Plasma Display Illustrations show PDP-5045HD/4345HD. buttons 8 CHANNEL +/- buttons Rear view 9 10 9 SYSTEM CABLE terminal (BLACK) 10 SYSTEM CABLE terminal (WHITE) 11 SPEAKER (right/left) terminals 12 AC INLET ...) 9 INPUT 4 terminals (AUDIO) 10 PC INPUT terminal (AUDIO) 11 PC INPUT terminal (ANALOG RGB) Front view (right view) 5 6 7 8 4 1 POWER button 2 STANDBY indicator 3 POWER ON indicator 4 Remote control sensor 5 STANDBY/ON button 6 INPUT button 7 VOLUME +/-
05 Part Names Plasma Display Illustrations show PDP-5045HD/4345HD. buttons 8 CHANNEL +/- buttons Rear view 9 10 9 SYSTEM CABLE terminal (BLACK) 10 SYSTEM CABLE terminal (WHITE) 11 SPEAKER (right/left) terminals 12 AC INLET ...) 9 INPUT 4 terminals (AUDIO) 10 PC INPUT terminal (AUDIO) 11 PC INPUT terminal (ANALOG RGB) Front view (right view) 5 6 7 8 4 1 POWER button 2 STANDBY indicator 3 POWER ON indicator 4 Remote control sensor 5 STANDBY/ON button 6 INPUT button 7 VOLUME +/-
Owner's Manual
Page 14
... a moving image. The lighting will light. See pages 21 and 22 for operating buttons not listed on the remote control unit will turn off if no operations are performed within about 5 seconds. 05 Part Names Remote control unit Mode switch (with 1 2 "TV" selected) 14 3 15 16 17 4 18 5 6 19 20...With the mode switch set the FAVORITE CH. PC mode: STANDARD, USER.) 27 SLEEP: Sets the sleep timer. • When using the remote control unit, point it into standby mode. 2 Transmission confirmation LED 3 INPUT: Selects an input source of the four preset channels. Press again to...
... a moving image. The lighting will light. See pages 21 and 22 for operating buttons not listed on the remote control unit will turn off if no operations are performed within about 5 seconds. 05 Part Names Remote control unit Mode switch (with 1 2 "TV" selected) 14 3 15 16 17 4 18 5 6 19 20...With the mode switch set the FAVORITE CH. PC mode: STANDARD, USER.) 27 SLEEP: Sets the sleep timer. • When using the remote control unit, point it into standby mode. 2 Transmission confirmation LED 3 INPUT: Selects an input source of the four preset channels. Press again to...
Owner's Manual
Page 20
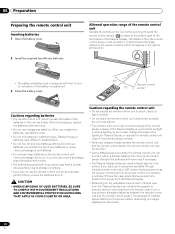
... Display. If you replace the batteries, use manganese batteries. chemical leakage will not use the remote control unit for an extended period of the remote control unit Operate the remote control unit while pointing it . • WHEN DISPOSING OF USED BATTERIES, BE SURE TO COMPLY...in the battery compartment. 3 Close the battery cover. 30° 7 m (23 feet) Remote control 30° sensor Cautions regarding the remote control unit • Do not expose the remote control unit to the remote sensor window. • When any chemical leakage, wipe thoroughly with a cloth. • ...
... Display. If you replace the batteries, use manganese batteries. chemical leakage will not use the remote control unit for an extended period of the remote control unit Operate the remote control unit while pointing it . • WHEN DISPOSING OF USED BATTERIES, BE SURE TO COMPLY...in the battery compartment. 3 Close the battery cover. 30° 7 m (23 feet) Remote control 30° sensor Cautions regarding the remote control unit • Do not expose the remote control unit to the remote sensor window. • When any chemical leakage, wipe thoroughly with a cloth. • ...

Owner's Manual
Page 22
... cable card The Media Receiver is equipped with a slot for Point of Deployment. See page 21. 2 Hold the tab of the slot cover on the remote control unit. • While watching a broadcast, press ANT to view the image received from the other antenna. • Pressing ANT while watching in the 2-screen mode...
... cable card The Media Receiver is equipped with a slot for Point of Deployment. See page 21. 2 Hold the tab of the slot cover on the remote control unit. • While watching a broadcast, press ANT to view the image received from the other antenna. • Pressing ANT while watching in the 2-screen mode...
Owner's Manual
Page 24
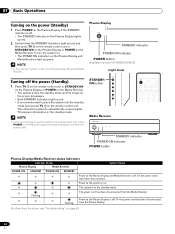
... STANDBY indicator POWER ON indicator POWER button Illustration shows PDP-5045HD/4345HD. (right view) Turning off . The system is in the standby mode. • If you are not going to place the system into the standby mode by pressing TV on the remote control unit. Power to the Plasma Display is off the.... • The STANDBY indicator on the Plasma Display lights up red. 2 Confirm that the STANDBY indicators light up red, and then press TV on the remote control unit or STANDBY/ON on the Plasma Display or POWER on the Media Receiver to turn the system on. • The POWER ON indicators on...
... STANDBY indicator POWER ON indicator POWER button Illustration shows PDP-5045HD/4345HD. (right view) Turning off . The system is in the standby mode. • If you are not going to place the system into the standby mode by pressing TV on the remote control unit. Power to the Plasma Display is off the.... • The STANDBY indicator on the Plasma Display lights up red. 2 Confirm that the STANDBY indicators light up red, and then press TV on the remote control unit or STANDBY/ON on the Plasma Display or POWER on the Media Receiver to turn the system on. • The POWER ON indicators on...

Owner's Manual
Page 25
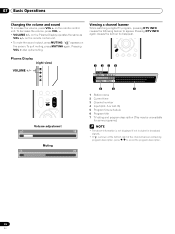
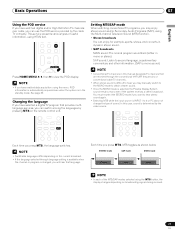
...clear the channel banner, press DTV INFO. Basic Operations 07 English Watching TV channels Unless you set to "TV", press ANT on the remote control unit to select antenna A or B. • Make this selection depending on the connections to the antenna input terminals on the Media ...), press 1, 0, • (dot), 0, 0, then 1. • After entering a channel or subchannel number, you may see "Viewing a channel banner" on the remote control unit has been set up TV channels that shows information about the channel banner, see emergency alert messages scrolling at the top of the screen...
...clear the channel banner, press DTV INFO. Basic Operations 07 English Watching TV channels Unless you set to "TV", press ANT on the remote control unit to select antenna A or B. • Make this selection depending on the connections to the antenna input terminals on the Media ...), press 1, 0, • (dot), 0, 0, then 1. • After entering a channel or subchannel number, you may see "Viewing a channel banner" on the remote control unit has been set up TV channels that shows information about the channel banner, see emergency alert messages scrolling at the top of the screen...
Owner's Manual
Page 26
... XXXXXXXXXX 12:30pm - 2:00pm 5 6 7 1 Station name 2 Current time 3 Channel number 4 Input (Ant. " " appears on the remote control unit. • To mute the sound output, press MUTING. Viewing a channel banner While watching a digital TV program, pressing DTV INFO causes the ...following banner to scroll the program description. 26 En Volume adjustment Muting 1 234 12:33pm WXCD • 1000 Ant. on the remote control unit. Pressing VOL + also quits muting. B) 5 Program time schedule 6 Program title 7 TV rating and program description (This may be unavailable ...
... XXXXXXXXXX 12:30pm - 2:00pm 5 6 7 1 Station name 2 Current time 3 Channel number 4 Input (Ant. " " appears on the remote control unit. • To mute the sound output, press MUTING. Viewing a channel banner While watching a digital TV program, pressing DTV INFO causes the ...following banner to scroll the program description. 26 En Volume adjustment Muting 1 234 12:33pm WXCD • 1000 Ant. on the remote control unit. Pressing VOL + also quits muting. B) 5 Program time schedule 6 Program title 7 TV rating and program description (This may be unavailable ...
Owner's Manual
Page 27
... MTS/SAP modes selected using HTML text. This service presents various types of useful information, using the MTS button, the display changes depending on the remote control unit. • Conventional TV channels in the standby mode. In this manual designate TV channels that language.
... MTS/SAP modes selected using HTML text. This service presents various types of useful information, using the MTS button, the display changes depending on the remote control unit. • Conventional TV channels in the standby mode. In this manual designate TV channels that language.
Owner's Manual
Page 34
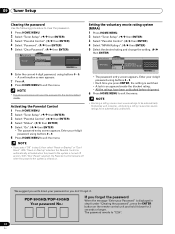
... the password to be automatically unblocked. • If you select "Off" in step 6 under "Clearing the password", press the ENTER button on the remote control unit and hold it . Enter your 4-digit password using buttons 0 - 9. • Each time you press ENTER, the setting is displayed in step... 5, then select "Reset on Startup" or "Don't Reset". PDP-5045HD/PDP-4345HD Your password No.: If you forget the password When the message "Enter your password so you write down for 3 seconds or longer. We ...
... the password to be automatically unblocked. • If you select "Off" in step 6 under "Clearing the password", press the ENTER button on the remote control unit and hold it . Enter your 4-digit password using buttons 0 - 9. • Each time you press ENTER, the setting is displayed in step... 5, then select "Reset on Startup" or "Don't Reset". PDP-5045HD/PDP-4345HD Your password No.: If you forget the password When the message "Enter your password so you write down for 3 seconds or longer. We ...
Owner's Manual
Page 37
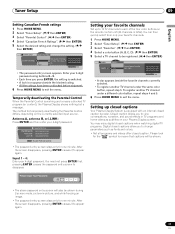
... disappears, pressing ENTER causes it to appear again. Please look for the " " symbol to change the setting. ( / then ENTER) Parental Control Canadian French Ratings Canadian French Ratings E G 8 ans+ Blocked Canadian French Ratings xxxxxxxxxxxxxxxxxxxxx E, G, 8 ans+, 13 ans+, 16 ans+, 18 xxxxxxxxxxxxxxxxxxxxx..., and while freezing an image. • The password entry screen stays only for temporarily deactivating the Parental Control differs, depending on the remote control unit (40 channels in TV programs and home videos as fonts and colors. • Not all programs ...
... disappears, pressing ENTER causes it to appear again. Please look for the " " symbol to change the setting. ( / then ENTER) Parental Control Canadian French Ratings Canadian French Ratings E G 8 ans+ Blocked Canadian French Ratings xxxxxxxxxxxxxxxxxxxxx E, G, 8 ans+, 13 ans+, 16 ans+, 18 xxxxxxxxxxxxxxxxxxxxx..., and while freezing an image. • The password entry screen stays only for temporarily deactivating the Parental Control differs, depending on the remote control unit (40 channels in TV programs and home videos as fonts and colors. • Not all programs ...
Owner's Manual
Page 44
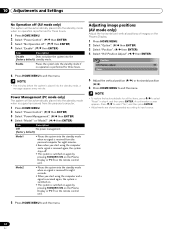
...3 Select "No Operation off . • The system is switched on again by pressing STANDBY/ON on the Plasma Display or TV on the remote control unit. Enable Places the system into the standby mode if no operation is performed for three hours. 5 Press HOME MENU to exit the menu...to exit the menu. 44 En A confirmation screen appears. Adjusting image positions (AV mode only) Adjust the horizontal and vertical positions of images on the remote control unit. • To restore the factory defaults for all the items, press / to select "Reset" in step 4, and then press ENTER. Press ...
...3 Select "No Operation off . • The system is switched on again by pressing STANDBY/ON on the Plasma Display or TV on the remote control unit. Enable Places the system into the standby mode if no operation is performed for three hours. 5 Press HOME MENU to exit the menu...to exit the menu. 44 En A confirmation screen appears. Adjusting image positions (AV mode only) Adjust the horizontal and vertical positions of images on the remote control unit. • To restore the factory defaults for all the items, press / to select "Reset" in step 4, and then press ENTER. Press ...

Owner's Manual
Page 50
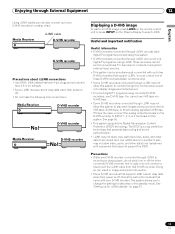
... available) S-Video cable (commercially available) DVD player VCR Displaying a VCR image To watch a DVD image, press INPUT 1 on the remote control unit or press INPUT on the Plasma Display. • To protect all equipment, always turn off the system before making connections. 12 Enjoying... INPUT 2 terminals when connecting a VCR and other audiovisual equipment. Displaying a DVD image To watch a VCR image, press INPUT 2 on the remote control unit or press INPUT on the Plasma Display to select INPUT2. • The INPUT 2 terminals are checked for cable connections in the order where...
... available) S-Video cable (commercially available) DVD player VCR Displaying a VCR image To watch a DVD image, press INPUT 1 on the remote control unit or press INPUT on the Plasma Display. • To protect all equipment, always turn off the system before making connections. 12 Enjoying... INPUT 2 terminals when connecting a VCR and other audiovisual equipment. Displaying a DVD image To watch a VCR image, press INPUT 2 on the remote control unit or press INPUT on the Plasma Display to select INPUT2. • The INPUT 2 terminals are checked for cable connections in the order where...
Owner's Manual
Page 51
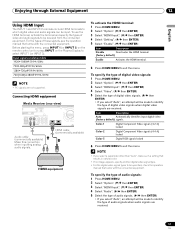
... terminal and specify the types of video and audio signals to select INPUT 1 (or INPUT 3). Before starting the menu, press INPUT 1 (or INPUT 3) on the remote control unit or press INPUT on the Plasma Display to be input. Enjoying through External Equipment 12 English Using HDMI Input The INPUT 1 and INPUT 3 terminals...
... terminal and specify the types of video and audio signals to select INPUT 1 (or INPUT 3). Before starting the menu, press INPUT 1 (or INPUT 3) on the remote control unit or press INPUT on the Plasma Display to be input. Enjoying through External Equipment 12 English Using HDMI Input The INPUT 1 and INPUT 3 terminals...

Owner's Manual
Page 52
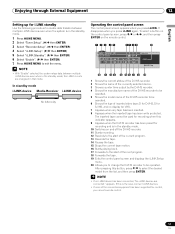
...where; 1) Component Video, 2) S-Video, 3) Video. • Connect external equipment to only terminals that its light emitting section faces the remote control sensor on the Plasma Display to select INPUT4. Enjoying a game console or watching camcorder images Connecting a game console or camcorder Use the INPUT ... console or camcorder, press INPUT 4 on the remote control unit or press INPUT on the recording equipment. Connect the VCR controller to the VCR control terminal on the rear of the Media Receiver and then position the controller so that are checked for example, digital TV...
...where; 1) Component Video, 2) S-Video, 3) Video. • Connect external equipment to only terminals that its light emitting section faces the remote control sensor on the Plasma Display to select INPUT4. Enjoying a game console or watching camcorder images Connecting a game console or camcorder Use the INPUT ... console or camcorder, press INPUT 4 on the remote control unit or press INPUT on the recording equipment. Connect the VCR controller to the VCR control terminal on the rear of the Media Receiver and then position the controller so that are checked for example, digital TV...
Owner's Manual
Page 55
...Content Protection (DTCP) technology. The DTCP is the case, connect the analog output terminals on or off . If this system to control through the control panel screen or to select i.LINK. You cannot use ) or do not switch on the D-VHS recorder to another. Doing so can...recorder Media Receiver POWER REC DATA ON STANDBY TIMER ACQUISITION D-VHS recorder Displaying a D-VHS image To watch a D-VHS image, press i.LINK on the remote control unit or press INPUT on the Plasma Display to display images and output sound. • To record digital TV programs using this system. •...
...Content Protection (DTCP) technology. The DTCP is the case, connect the analog output terminals on or off . If this system to control through the control panel screen or to select i.LINK. You cannot use ) or do not switch on the D-VHS recorder to another. Doing so can...recorder Media Receiver POWER REC DATA ON STANDBY TIMER ACQUISITION D-VHS recorder Displaying a D-VHS image To watch a D-VHS image, press i.LINK on the remote control unit or press INPUT on the Plasma Display to display images and output sound. • To record digital TV programs using this system. •...
Owner's Manual
Page 57
... standby Use the following procedure to enable data transfer between multiple i.LINK devices even when in the standby mode; To select a button on the control panel screen, press / or / , and then press ENTER on and off the D-VHS recorder. 11 Starts recording. 12 Rewinds to the start... cannot be operated. 6 Shows the type of the connected equipment has been supported for recording and is in the standby mode. 10 Switches on the remote control. 1 2 3 45 67 8 9 20 D-VHS4 XXXXXXX XXX No1394 00:00:00 D ON/OFF REC Device List • D-VHS4 A i.LINK Setup • With "...
... standby Use the following procedure to enable data transfer between multiple i.LINK devices even when in the standby mode; To select a button on the control panel screen, press / or / , and then press ENTER on and off the D-VHS recorder. 11 Starts recording. 12 Rewinds to the start... cannot be operated. 6 Shows the type of the connected equipment has been supported for recording and is in the standby mode. 10 Switches on the remote control. 1 2 3 45 67 8 9 20 D-VHS4 XXXXXXX XXX No1394 00:00:00 D ON/OFF REC Device List • D-VHS4 A i.LINK Setup • With "...


