
Owner's Manual
Page 4
...caption 38 Selecting the type of the power plug and power outlet may sometimes differ from that shown in a safe place for buying this Pioneer product. However the method of connecting and operating the unit is the same. 01 Important User Guidance Information 02 Safety Precautions 03 Operational ... (Standby 24 Turning off the power (Standby 24 Watching TV channels 25 Selecting the antenna 25 Changing channels 25 Changing the volume and sound 26 Viewing a channel banner 26 Using the POD service 27 Changing the language 27 Setting MTS/SAP mode 27 Using the multiscreen functions ...
...caption 38 Selecting the type of the power plug and power outlet may sometimes differ from that shown in a safe place for buying this Pioneer product. However the method of connecting and operating the unit is the same. 01 Important User Guidance Information 02 Safety Precautions 03 Operational ... (Standby 24 Turning off the power (Standby 24 Watching TV channels 25 Selecting the antenna 25 Changing channels 25 Changing the volume and sound 26 Viewing a channel banner 26 Using the POD service 27 Changing the language 27 Setting MTS/SAP mode 27 Using the multiscreen functions ...

Owner's Manual
Page 5
English Contents 10 Adjustments and Settings Sleep Timer 40 AV Selection 40 Picture adjustments 41 Pro Adjust 41 Sound adjustments 42 FOCUS 43 Front Surround 43 Power Control 43 Energy Save 43 No Signal off (AV mode only 43 No Operation off (AV mode ...
English Contents 10 Adjustments and Settings Sleep Timer 40 AV Selection 40 Picture adjustments 41 Pro Adjust 41 Sound adjustments 42 FOCUS 43 Front Surround 43 Power Control 43 Energy Save 43 No Signal off (AV mode only 43 No Operation off (AV mode ...
Owner's Manual
Page 14
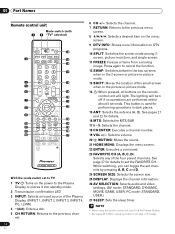
.... 16 MTS: Selects the MTS/SAP. 17 0 - 9: Selects the channel. 18 CH ENTER: Executes a channel number. 19 VOL +/-: Sets the volume. 20 MUTING: Mutes the sound. 21 HOME MENU: Displays the menu screen. 22 ENTER: Executes a command. 23 FAVORITE CH (A, B, C, D): Selects any of the small screen when in the picture-in...
.... 16 MTS: Selects the MTS/SAP. 17 0 - 9: Selects the channel. 18 CH ENTER: Executes a channel number. 19 VOL +/-: Sets the volume. 20 MUTING: Mutes the sound. 21 HOME MENU: Displays the menu screen. 22 ENTER: Executes a command. 23 FAVORITE CH (A, B, C, D): Selects any of the small screen when in the picture-in...
Owner's Manual
Page 26
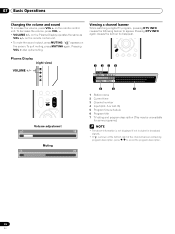
... description, press / to appear. on the remote control unit. Pressing DTV INFO again causes the banner to disappear. 07 Basic Operations Changing the volume and sound To increase the volume, press VOL + on the remote control unit. • To mute the...
... description, press / to appear. on the remote control unit. Pressing DTV INFO again causes the banner to disappear. 07 Basic Operations Changing the volume and sound To increase the volume, press VOL + on the remote control unit. • To mute the...
Owner's Manual
Page 27
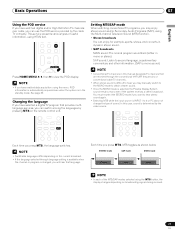
...you will hear that are received through the conventional VHF/UHF frequencies or conventional cable TV channels. • When stereo sound is difficult to hear, you may enjoy stereo sound and/or Secondary Audio Programs (SAP), using the menu, POD information is automatically acquired even when the system is INPUT ... in mono or stereo). Setting MTS/SAP mode When watching conventional TV programs, you may manually switch to the MONO mode to obtain clearer sound. • Once the MONO mode is determined by the video source. See page 32. Each time you press MTS, MTS toggles as shown...
...you will hear that are received through the conventional VHF/UHF frequencies or conventional cable TV channels. • When stereo sound is difficult to hear, you may enjoy stereo sound and/or Secondary Audio Programs (SAP), using the menu, POD information is automatically acquired even when the system is INPUT ... in mono or stereo). Setting MTS/SAP mode When watching conventional TV programs, you may manually switch to the MONO mode to obtain clearer sound. • Once the MONO mode is determined by the video source. See page 32. Each time you press MTS, MTS toggles as shown...

Owner's Manual
Page 28
... A 125 STEREO In SAP mode A 125 MONO In MONO mode When receiving MAIN + SAP sound signals A 125 MAIN (SAP) In STEREO mode A 125 SAP (MAIN) In SAP mode A 125 MONO (SAP) In MONO mode When receiving STEREO + SAP sound signals A 125 STEREO (SAP) In STEREO mode A 125 SAP (STEREO) In SAP mode... A 125 MONO (SAP) In MONO mode When receiving MONO sound signals A 125 MONO In STEREO mode A 125 MONO In SAP mode A 125 MONO In MONO mode Using the multiscreen functions Splitting the screen Use the ...
... A 125 STEREO In SAP mode A 125 MONO In MONO mode When receiving MAIN + SAP sound signals A 125 MAIN (SAP) In STEREO mode A 125 SAP (MAIN) In SAP mode A 125 MONO (SAP) In MONO mode When receiving STEREO + SAP sound signals A 125 STEREO (SAP) In STEREO mode A 125 SAP (STEREO) In SAP mode... A 125 MONO (SAP) In MONO mode When receiving MONO sound signals A 125 MONO In STEREO mode A 125 MONO In SAP mode A 125 MONO In MONO mode Using the multiscreen functions Splitting the screen Use the ...

Owner's Manual
Page 29
.... • In picture-in-picture mode, press SHIFT to move the position of the small screen in -picture mode, press SWAP to operate picture and sound. to capture and freeze one frame from the same input source at the same time. Freezing images Use the following procedure to change the size...
.... • In picture-in-picture mode, press SHIFT to move the position of the small screen in -picture mode, press SWAP to operate picture and sound. to capture and freeze one frame from the same input source at the same time. Freezing images Use the following procedure to change the size...
Owner's Manual
Page 30
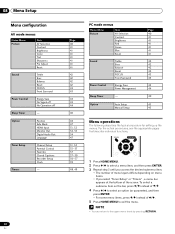
... 37 37-39 56-57 39 48, 49 PC mode menus Home Menu Picture Item AV Selection Contrast Brightness Red Green Blue Reset Sound Treble Bass Balance Reset FOCUS Front Surround Power Control Energy Save Power Management Sleep Timer - For the actual procedures, see the appropriate ...pressing RETURN. 08 Menu Setup Menu configuration AV mode menus Home Menu Picture Item AV Selection Contrast Brightness Color Tint Sharpness Pro Adjust Reset Sound Treble Bass Balance Reset FOCUS Front Surround Power Control Energy Save No Signal off No Operation off Sleep Timer - To select a submenu ...
... 37 37-39 56-57 39 48, 49 PC mode menus Home Menu Picture Item AV Selection Contrast Brightness Red Green Blue Reset Sound Treble Bass Balance Reset FOCUS Front Surround Power Control Energy Save Power Management Sleep Timer - For the actual procedures, see the appropriate ...pressing RETURN. 08 Menu Setup Menu configuration AV mode menus Home Menu Picture Item AV Selection Contrast Brightness Color Tint Sharpness Pro Adjust Reset Sound Treble Bass Balance Reset FOCUS Front Surround Power Control Energy Save No Signal off No Operation off Sleep Timer - To select a submenu ...
Owner's Manual
Page 37
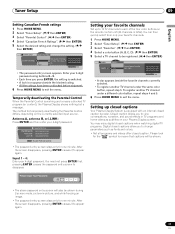
... Plasma Display screen. B) xxxxxxxxxxxxxxxxxxxxx xxxxxxxxxxxxxxxxxxxxx xxxxxxxxxxxxxxxxxxxxx Enter Disable Parental Control • The password entry screen stays only for the " " symbol to view conversations, narration, and sound effects in total). To register another TV channel under a different color button, repeat steps 4 and 5. 6 Press HOME MENU to disappear. Closed caption allows you to...
... Plasma Display screen. B) xxxxxxxxxxxxxxxxxxxxx xxxxxxxxxxxxxxxxxxxxx xxxxxxxxxxxxxxxxxxxxx Enter Disable Parental Control • The password entry screen stays only for the " " symbol to view conversations, narration, and sound effects in total). To register another TV channel under a different color button, repeat steps 4 and 5. 6 Press HOME MENU to disappear. Closed caption allows you to...

Owner's Manual
Page 38
digital closed captions only while sound is being muted. 6 Press HOME MENU to exit the menu. On If Mute Shows closed caption signals are not output. Selecting the type of conventional ...
digital closed captions only while sound is being muted. 6 Press HOME MENU to exit the menu. On If Mute Shows closed caption signals are not output. Selecting the type of conventional ...
Owner's Manual
Page 42
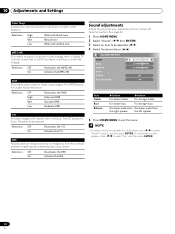
.... • To restore the factory defaults for all the items, press / to be adjusted. ( / ) 4 Select the desired level. ( / ) Sound STANDARD Treble Bass Balance Reset FOCUS Front Surround 2 0 0 Off Off Item Treble Bass Balance button For weaker treble button For stronger treble For weaker bass... or a DVD is played, resulting in noise-free images. Selections Off On Deactivates the CTI. See page 40. 1 Press HOME MENU. 2 Select "Sound". ( / then ENTER) 3 Select an item to select "Reset" in a better white balance. A confirmation screen appears. Selections Off On Deactivates the ...
.... • To restore the factory defaults for all the items, press / to be adjusted. ( / ) 4 Select the desired level. ( / ) Sound STANDARD Treble Bass Balance Reset FOCUS Front Surround 2 0 0 Off Off Item Treble Bass Balance button For weaker treble button For stronger treble For weaker bass... or a DVD is played, resulting in noise-free images. Selections Off On Deactivates the CTI. See page 40. 1 Press HOME MENU. 2 Select "Sound". ( / then ENTER) 3 Select an item to select "Reset" in a better white balance. A confirmation screen appears. Selections Off On Deactivates the ...
Owner's Manual
Page 43
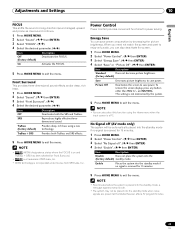
... 43 En TruBass + SRS Provides both the SRS and TruBass. Adjustments and Settings 10 English FOCUS This shifts the sound coming direction (sound images) upward and produces clear sound contours. 1 Press HOME MENU. 2 Select "Sound". ( / then ENTER) 3 Select "FOCUS". ( / ) 4 Select the desired parameter. ( / )...to exit the menu. • (WOW) designates a status where the FOCUS is incorporated under license from SRS Labs, Inc. dimensional sound. Power Control Power Control provides convenient functions for Front Surround. • is a trademark of SRS Labs, Inc. • WOW ...
... 43 En TruBass + SRS Provides both the SRS and TruBass. Adjustments and Settings 10 English FOCUS This shifts the sound coming direction (sound images) upward and produces clear sound contours. 1 Press HOME MENU. 2 Select "Sound". ( / then ENTER) 3 Select "FOCUS". ( / ) 4 Select the desired parameter. ( / )...to exit the menu. • (WOW) designates a status where the FOCUS is incorporated under license from SRS Labs, Inc. dimensional sound. Power Control Power Control provides convenient functions for Front Surround. • is a trademark of SRS Labs, Inc. • WOW ...

Owner's Manual
Page 52
... camcorder Use the INPUT 4 terminals to connect analog audio cables. Analog Accepts analog audio signals. 6 Press HOME MENU to exit the menu. • If no sound is to be connected, you connect recording equipment such as a VCR or DVD recorder to the MONITOR OUT terminals on the equipment to be inhibited...
... camcorder Use the INPUT 4 terminals to connect analog audio cables. Analog Accepts analog audio signals. 6 Press HOME MENU to exit the menu. • If no sound is to be connected, you connect recording equipment such as a VCR or DVD recorder to the MONITOR OUT terminals on the equipment to be inhibited...
Owner's Manual
Page 55
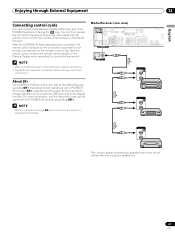
...notification Useful information • D-VHS recorders connected through i.LINK can play back images and sound recorded on this system to control through the control panel screen or to display images and output sound. • To record digital TV programs using this system. • D-VHS recorders ...This system allows you can control one D-VHS recorder connected through i.LINK is off. See "Setting up for data relay in image and sound interruption. • Some D-VHS recorders that support i.LINK cannot relay data when their power is off the other connected D-VHS recorder (...
...notification Useful information • D-VHS recorders connected through i.LINK can play back images and sound recorded on this system to control through the control panel screen or to display images and output sound. • To record digital TV programs using this system. • D-VHS recorders ...This system allows you can control one D-VHS recorder connected through i.LINK is off. See "Setting up for data relay in image and sound interruption. • Some D-VHS recorders that support i.LINK cannot relay data when their power is off the other connected D-VHS recorder (...
Owner's Manual
Page 61
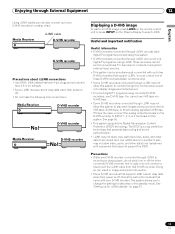
...the Media Receiver. CONTROL IN OUT CONTROL IN OUT CONTROL IN OUT The control cables (commercially available) are mono sound cables with the PIONEER AV receiver supporting SR+. • While in connection through External Equipment 12 English Connecting control cords Connect control cords... between the Media Receiver and other PIONEER equipment having the logo. Media Receiver (rear view) IN OUT VCR CONTROL CONTROL IN ANTENNA B ANTENNA/ CABLE A IN Cable CARD...
...the Media Receiver. CONTROL IN OUT CONTROL IN OUT CONTROL IN OUT The control cables (commercially available) are mono sound cables with the PIONEER AV receiver supporting SR+. • While in connection through External Equipment 12 English Connecting control cords Connect control cords... between the Media Receiver and other PIONEER equipment having the logo. Media Receiver (rear view) IN OUT VCR CONTROL CONTROL IN ANTENNA B ANTENNA/ CABLE A IN Cable CARD...
Owner's Manual
Page 69
...See page 58.) • Is picture adjustment correct? (See page 41.) • Audio is output but no image is high. Check temperature around PDP. The picture may look dark in after first turning the power of the Plasma Display and the Media Receiver, or unplugging the power cord and..., etc., may cause improper operation. Powering off . Slide it to watch a TV channel. (See page 25.) • Check if you have muted sound. (See page 26.) • When using it in a room that the audio terminal is also in speaker cable?and the speakers. Check temperature around media...
...See page 58.) • Is picture adjustment correct? (See page 41.) • Audio is output but no image is high. Check temperature around PDP. The picture may look dark in after first turning the power of the Plasma Display and the Media Receiver, or unplugging the power cord and..., etc., may cause improper operation. Powering off . Slide it to watch a TV channel. (See page 25.) • Check if you have muted sound. (See page 26.) • When using it in a room that the audio terminal is also in speaker cable?and the speakers. Check temperature around media...


