
Technical Manual
Page 4
... to the same location. ] PDK-50HW2A PDK-50HW3 Changes made to PDK-50HW3 Pen stand modifications a) The pen stand has been modified. Changes in the driver a) New driver (CBdrv = CBdrvU) b) New icon ] CBdrv CBdrvU c) Menu changes • Current Resolution • Calibration • Disable COM port • Properties • Test Mode Test indication...
... to the same location. ] PDK-50HW2A PDK-50HW3 Changes made to PDK-50HW3 Pen stand modifications a) The pen stand has been modified. Changes in the driver a) New driver (CBdrv = CBdrvU) b) New icon ] CBdrv CBdrvU c) Menu changes • Current Resolution • Calibration • Disable COM port • Properties • Test Mode Test indication...
Technical Manual
Page 6
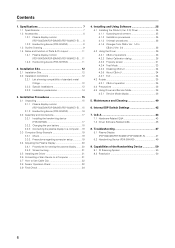
... 22 3.8 Sensor Operation Check 22 3.9 Final Check 24 4. Q & A 43 7.1 Hardware-Related Q&A 43 7.2 Driver Software-Related Q&A 45 8. Maintenance and Cleaning 40 6. Capabilities of standard metal fittings 12 2.2.2 Special installations 13 2.2.3 Installation precautions 14 3. Specifications 7 1.1 Specifications 7 1.2 Accessories 8 1.2.1 Plasma display monitor (PDP-504CMX/PDP-50MXE1/PDP-50MXE1-S) ..... 8 1.2.2 Handwriting device (PDK-50HW3 8 1.3 Outline Drawing 9 1.4 Name and Function of Parts...
... 22 3.8 Sensor Operation Check 22 3.9 Final Check 24 4. Q & A 43 7.1 Hardware-Related Q&A 43 7.2 Driver Software-Related Q&A 45 8. Maintenance and Cleaning 40 6. Capabilities of standard metal fittings 12 2.2.2 Special installations 13 2.2.3 Installation precautions 14 3. Specifications 7 1.1 Specifications 7 1.2 Accessories 8 1.2.1 Plasma display monitor (PDP-504CMX/PDP-50MXE1/PDP-50MXE1-S) ..... 8 1.2.2 Handwriting device (PDK-50HW3 8 1.3 Outline Drawing 9 1.4 Name and Function of Parts...

Technical Manual
Page 7
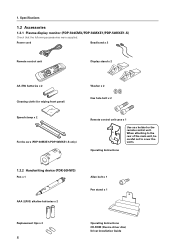
... Pen 1 AAA (LR03) alkaline batteries 2 Replacement tips 2 Allen bolt 1 Pen stand 1 Operating Instructions 1 CD-ROM (Device driver disc 1 Driver Installation Guide 1 ¶ Specifications and appearance may vary, depending on the installation method. (Refer to the PDP-504CMX. Separate handwriting device (PDK-50HW3) specifications Scan device Scanning system Infrared scanning Power indicator LED Current consumption...
... Pen 1 AAA (LR03) alkaline batteries 2 Replacement tips 2 Allen bolt 1 Pen stand 1 Operating Instructions 1 CD-ROM (Device driver disc 1 Driver Installation Guide 1 ¶ Specifications and appearance may vary, depending on the installation method. (Refer to the PDP-504CMX. Separate handwriting device (PDK-50HW3) specifications Scan device Scanning system Infrared scanning Power indicator LED Current consumption...
Technical Manual
Page 8
... monitor (PDP-504CMX/PDP-50MXE1/PDP-50MXE1-S) Check that the following accessories were supplied. When attaching to the rear of the main unit, be careful not to cover the vents. Operating Instructions 1.2.2 Handwriting device (PDK-50HW3) Pen x 1 AAA (LR03) alkaline batteries x 2 Allen bolt x 1 Pen stand x 1 Replacement tips x 2 8 Operating Instructions CD-ROM (Device driver disc) Driver Installation...
... monitor (PDP-504CMX/PDP-50MXE1/PDP-50MXE1-S) Check that the following accessories were supplied. When attaching to the rear of the main unit, be careful not to cover the vents. Operating Instructions 1.2.2 Handwriting device (PDK-50HW3) Pen x 1 AAA (LR03) alkaline batteries x 2 Allen bolt x 1 Pen stand x 1 Replacement tips x 2 8 Operating Instructions CD-ROM (Device driver disc) Driver Installation...
Technical Manual
Page 11
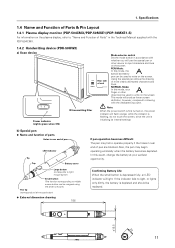
..., since the unit is depressed fully, an LED indicator will use the special pen or other object can be assigned using the driver software.) Pen tip (corresponds to write on the screen. In this mode, the special accessory pen can be used to left mouse... (The function corresponding to write on the screen. Specifications 1.4 Name and Function of Parts & Pin Layout 1.4.1 Plasma display monitor (PDP-504CMX/PDP-50MXE1/PDP-50MXE1-S) For information on , the power indicator will produce lower screen definition, however, compared to input characters and lines on the screen. 1....
..., since the unit is depressed fully, an LED indicator will use the special pen or other object can be assigned using the driver software.) Pen tip (corresponds to write on the screen. In this mode, the special accessory pen can be used to left mouse... (The function corresponding to write on the screen. Specifications 1.4 Name and Function of Parts & Pin Layout 1.4.1 Plasma display monitor (PDP-504CMX/PDP-50MXE1/PDP-50MXE1-S) For information on , the power indicator will produce lower screen definition, however, compared to input characters and lines on the screen. 1....

Technical Manual
Page 13
... may look deviated. 2. The foreign object may tend to prevent it , the hem of the user's necktie or shirt in the Technical Manual of the driver cannot be tilted in its installation. Always take ventilation of the plasma display monitor in consideration. ¶ When the handwriting device is installed horizontally so...
... may look deviated. 2. The foreign object may tend to prevent it , the hem of the user's necktie or shirt in the Technical Manual of the driver cannot be tilted in its installation. Always take ventilation of the plasma display monitor in consideration. ¶ When the handwriting device is installed horizontally so...

Technical Manual
Page 16
... the instructions on top of the box. 3. Description 1 Pen 2 AAA (LR03) alkaline batteries 3 Replacement Tips 4 Allen Bolt 5 Pen Stand 6 Operating Instructions 7 CD-ROM (Device driver disc) 8 Driver Installation Guide 9 Packing Set 16 PDK-50HW3 Air Cap Sheet (150 x 100) Air Cap Bag 2 (75 x 100) Pink Pad White Pad Installation Procedures 3.1.2 Handwriting device...
... the instructions on top of the box. 3. Description 1 Pen 2 AAA (LR03) alkaline batteries 3 Replacement Tips 4 Allen Bolt 5 Pen Stand 6 Operating Instructions 7 CD-ROM (Device driver disc) 8 Driver Installation Guide 9 Packing Set 16 PDK-50HW3 Air Cap Sheet (150 x 100) Air Cap Bag 2 (75 x 100) Pink Pad White Pad Installation Procedures 3.1.2 Handwriting device...

Technical Manual
Page 21
... are no requirements regarding power on page 25. 2. Installation Procedures 3.4.2 Screen burning Refer to provide 500mA current. Install CBdrvU. Refer to "Installing the CBdrvU (Ver. 2.0) Driver" on /off operation. 21 There are being made during this time. Do not touch the screen while the indicator is connected, the accompanying screen message...
... are no requirements regarding power on page 25. 2. Installation Procedures 3.4.2 Screen burning Refer to provide 500mA current. Install CBdrvU. Refer to "Installing the CBdrvU (Ver. 2.0) Driver" on /off operation. 21 There are being made during this time. Do not touch the screen while the indicator is connected, the accompanying screen message...

Technical Manual
Page 22
...factory default.) 2. b) Check in PEN mode 1. In the pop-up menu that appears, select "Test Mode" under "Hardware Information" to "Using Driver and Service Mode" on the rear of the scan device to "NORMAL". ("NORMAL" is set to [PEN]. 3. Make sure that this manual. ...to CBdrvU Help. *1 4. USB cable Cable clip 3.8 Sensor Operation Check a) Check in the task tray. Touch the plasma display to check that driver information and "L", "M" and "R" under system information correctly recognizes the input. 4. Press the small pen button to check that plasma display locations are...
...factory default.) 2. b) Check in PEN mode 1. In the pop-up menu that appears, select "Test Mode" under "Hardware Information" to "Using Driver and Service Mode" on the rear of the scan device to "NORMAL". ("NORMAL" is set to [PEN]. 3. Make sure that this manual. ...to CBdrvU Help. *1 4. USB cable Cable clip 3.8 Sensor Operation Check a) Check in the task tray. Touch the plasma display to check that driver information and "L", "M" and "R" under system information correctly recognizes the input. 4. Press the small pen button to check that plasma display locations are...
Technical Manual
Page 25
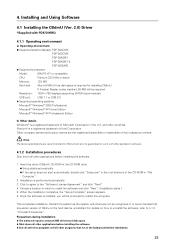
...the software, refer to work with PDK-50HW3 4.1.1 Operating environment a) Operating environment ¶ Supported plasma displays: PDP-504CMX PDP-503CMX PDP-50MXE1 PDP-50MXE1-S PDP-503MXE ¶ Supported computers Model: IBM PC-AT or compatible CPU: Pentium 333 MHz or better Memory:... disk space is performed automatically. 3. This completes installation. Installing and Using Software 4.1 Installing the CBdrvU (Ver. 2.0) Driver *Supplied with other application software. 4.1.2 Installation procedures Shut down all other applications before installing the software. ¶ Exit...
...the software, refer to work with PDK-50HW3 4.1.1 Operating environment a) Operating environment ¶ Supported plasma displays: PDP-504CMX PDP-503CMX PDP-50MXE1 PDP-50MXE1-S PDP-503MXE ¶ Supported computers Model: IBM PC-AT or compatible CPU: Pentium 333 MHz or better Memory:... disk space is performed automatically. 3. This completes installation. Installing and Using Software 4.1 Installing the CBdrvU (Ver. 2.0) Driver *Supplied with other application software. 4.1.2 Installation procedures Shut down all other applications before installing the software. ¶ Exit...
Technical Manual
Page 26
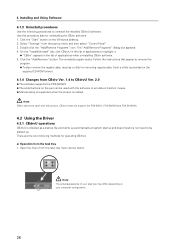
...Double click the "Add/Remove Programs" icon. CBdrvU does not support the PDK-50W1, PDK-50HW2 and PDK-50HW2A. 4.2 Using the Driver 4.2.1 CBdrvU operations CBdrvU is installed as a startup file and starts up automatically at system startup and does therefore not need to be used.... 5. Follow the instructions that appear to emulate a 3-button mouse. ¶ Manual setup is supported when the screen is provided on the supplied CD-ROM (driver). 4.1.4 Changes from the pop-up . Click the "Add/Remove" button. Open the menu from the task tray 1. Use this product. Click the "Start"...
...Double click the "Add/Remove Programs" icon. CBdrvU does not support the PDK-50W1, PDK-50HW2 and PDK-50HW2A. 4.2 Using the Driver 4.2.1 CBdrvU operations CBdrvU is installed as a startup file and starts up automatically at system startup and does therefore not need to be used.... 5. Follow the instructions that appear to emulate a 3-button mouse. ¶ Manual setup is supported when the screen is provided on the supplied CD-ROM (driver). 4.1.4 Changes from the pop-up . Click the "Add/Remove" button. Open the menu from the task tray 1. Use this product. Click the "Start"...

Technical Manual
Page 33
... device service information and DIP switch information. a) State display This screen shows results of hardware checks and the state of the driver and the operating system (Windows). [Function overview] ¶ Driver Software Ver: Pen Button (small): Service Ver: Firmware Ver: ¶ System Buttons: L: R: M: Mouse pos: Angle: IP... shown below. Click "Test Mode" under "Hardware Information" in the Property screen Indicate the version of the USB filter driver Indicate the version of the scan device firmware G : Correctly recognized ✻ : Not correctly recognized (during normal operation.
... device service information and DIP switch information. a) State display This screen shows results of hardware checks and the state of the driver and the operating system (Windows). [Function overview] ¶ Driver Software Ver: Pen Button (small): Service Ver: Firmware Ver: ¶ System Buttons: L: R: M: Mouse pos: Angle: IP... shown below. Click "Test Mode" under "Hardware Information" in the Property screen Indicate the version of the USB filter driver Indicate the version of the scan device firmware G : Correctly recognized ✻ : Not correctly recognized (during normal operation.

Technical Manual
Page 34
...appearance varies with computer environment. b) Enabling CBdrvU Unchecking the "Disable CBdrvU" checkbox enables CBdrvU and the pen becomes available. 4.2.6 About CBdrvU Check driver version. The scan device cannot be used after exiting the application. a) Disabling CBdrvU Checking the "Disable CBdrvU" checkbox displays the following message. The... then changes as shown below. Installing and Using Software 4.2.5 Disabling CBdrvU Enable/disable CBdrvU. To use the application again, restart the driver using the mouse. 34 Note: The pen cannot be used when CBdrvU is disabled. Have the...
...appearance varies with computer environment. b) Enabling CBdrvU Unchecking the "Disable CBdrvU" checkbox enables CBdrvU and the pen becomes available. 4.2.6 About CBdrvU Check driver version. The scan device cannot be used after exiting the application. a) Disabling CBdrvU Checking the "Disable CBdrvU" checkbox displays the following message. The... then changes as shown below. Installing and Using Software 4.2.5 Disabling CBdrvU Enable/disable CBdrvU. To use the application again, restart the driver using the mouse. 34 Note: The pen cannot be used when CBdrvU is disabled. Have the...
Technical Manual
Page 36
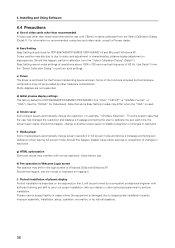
...personnel to perform installation. d) Initial plasma display settings The factory default for PDP-504CMX/PDP-50MXE1/PDP-50MXE1-S is used. Thus the system assumes the user has changed the ..., disable visual effect settings or recognition of Windows 2000 and Windows XP. c) Driver The driver is optimized for logging in. Should this happen, change the resolution, for Cyberboard... in cases where the equipment is described on recommended computers and video cards, consult a Pioneer dealer. Pioneer cannot accept liability in resolution. Should this happen, use . Use the "WXGA" for...
...personnel to perform installation. d) Initial plasma display settings The factory default for PDP-504CMX/PDP-50MXE1/PDP-50MXE1-S is used. Thus the system assumes the user has changed the ..., disable visual effect settings or recognition of Windows 2000 and Windows XP. c) Driver The driver is optimized for logging in. Should this happen, change the resolution, for Cyberboard... in cases where the equipment is described on recommended computers and video cards, consult a Pioneer dealer. Pioneer cannot accept liability in resolution. Should this happen, use . Use the "WXGA" for...

Technical Manual
Page 38
... handwriting device. [Displayed service information] LED/Sens Area: Test board number (See figure below . When LED and Sens are both "0". Installing and Using Software 4.5 Using Driver and Service Mode 4.5.1 Service Mode display Press the Service Mode button in the lower half of screen) shows no data. Do not touch the screen...
... handwriting device. [Displayed service information] LED/Sens Area: Test board number (See figure below . When LED and Sens are both "0". Installing and Using Software 4.5 Using Driver and Service Mode 4.5.1 Service Mode display Press the Service Mode button in the lower half of screen) shows no data. Do not touch the screen...

Technical Manual
Page 45
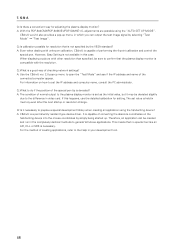
...it is set it does not remain stable during writing. Q: Why is it is released are almost identical thanks to the NORMAL mode. 7.2 Driver Software-Related Q&A Q: Which are used , the adjacent system may interfere with the special pen operation, those positions are installed in Excel, ...adjacent systems. In this setting because, if it possible to select a cell in different folders. Q: Can the CBdrvU and its predecessor CBdrv drivers coexist? If they are not always identical and Windows often regards such an operation as IE (Internet Explorer), clicking with Unix, Linux and ...
...it is set it does not remain stable during writing. Q: Why is it is released are almost identical thanks to the NORMAL mode. 7.2 Driver Software-Related Q&A Q: Which are used , the adjacent system may interfere with the special pen operation, those positions are installed in Excel, ...adjacent systems. In this setting because, if it possible to select a cell in different folders. Q: Can the CBdrvU and its predecessor CBdrv drivers coexist? If they are not always identical and Windows often regards such an operation as IE (Internet Explorer), clicking with Unix, Linux and ...
Technical Manual
Page 46
A: With the PDP-504CMX/PDP-50MXE1/PDP-50MXE1-S, adjustments are possible using the handwriting device? A: Even when dealing with unknown calibration, CBdrvU is a good way of checking network settings? Q: What is capable ... next startup or resolution change. CBdrvU ver.2.0 also provides a pop-up menu, in your development tool. 46 However, Easy Setting is a permanently resident type device driver. The set value is deviated? A: Use the CBdrvU ver. 2.0 pop-up . Q: What to do if the position of performing the 4-point calibration and control the...
A: With the PDP-504CMX/PDP-50MXE1/PDP-50MXE1-S, adjustments are possible using the handwriting device? A: Even when dealing with unknown calibration, CBdrvU is a good way of checking network settings? Q: What is capable ... next startup or resolution change. CBdrvU ver.2.0 also provides a pop-up menu, in your development tool. 46 However, Easy Setting is a permanently resident type device driver. The set value is deviated? A: Use the CBdrvU ver. 2.0 pop-up . Q: What to do if the position of performing the 4-point calibration and control the...

Technical Manual
Page 49
...USB cable is loose or has been disconnected. disconnect and reconnect USB connector. • Change power-saving mode as required. • Install driver software correctly. • Use the plasma display's calibration mode to adjust the vertical and horizontal position. • Depending on screen. The ...by computer when connected. Or resolution has been changed. • The plasma display's screen display size setting has been changed. • Driver software is not installed properly. • The plasma display's screen display position has shifted. • The plasma display's AUTO SET UP...
...USB cable is loose or has been disconnected. disconnect and reconnect USB connector. • Change power-saving mode as required. • Install driver software correctly. • Use the plasma display's calibration mode to adjust the vertical and horizontal position. • Depending on screen. The ...by computer when connected. Or resolution has been changed. • The plasma display's screen display size setting has been changed. • Driver software is not installed properly. • The plasma display's screen display position has shifted. • The plasma display's AUTO SET UP...
