Technical Manual
Page 1
... Before installation and preparatory work to qualified personnel, or consult the nearest PIONEER dealer for assistance. ÷ We accept no responsibility for losses resulting from...are assembled and adjusted as described in this manual are subject to read instructions indicated by experienced, qualified experts. CAUTION Exclamation marks placed within triangles are...Ver. 1.0) HANDWRITING DEVICE: PDK-50HW3 Supported plasma displays: PDP-504CMX PDP-503CMX PDP-50MXE1 PDP-50MXE1-S PDP-503MXE This manual provides precautions and information for installation, preparation, and handling of ...
... Before installation and preparatory work to qualified personnel, or consult the nearest PIONEER dealer for assistance. ÷ We accept no responsibility for losses resulting from...are assembled and adjusted as described in this manual are subject to read instructions indicated by experienced, qualified experts. CAUTION Exclamation marks placed within triangles are...Ver. 1.0) HANDWRITING DEVICE: PDK-50HW3 Supported plasma displays: PDP-504CMX PDP-503CMX PDP-50MXE1 PDP-50MXE1-S PDP-503MXE This manual provides precautions and information for installation, preparation, and handling of ...

Technical Manual
Page 7
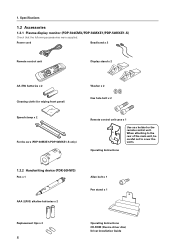
...Infrared scanning Power indicator LED Current consumption (DC 5 V) 0.5 A max. Note 1 Allow for 400 W 400 VA of the PDP-504CMX plasma display. External dimensions (not including plasma display and pen stand) 1258 (W) x 758 (H) x 74 (D) mm Weight (Not ...Allen bolt 1 Pen stand 1 Operating Instructions 1 CD-ROM (Device driver disc 1 Driver Installation Guide 1 ¶ Specifications and appearance may vary, depending on the installation method. (Refer to "Installation Site Requirements" in the Technical Manual of packaging Plasma display (PDP-504CMX) 1341 (W) x 846 (H) x 424...
...Infrared scanning Power indicator LED Current consumption (DC 5 V) 0.5 A max. Note 1 Allow for 400 W 400 VA of the PDP-504CMX plasma display. External dimensions (not including plasma display and pen stand) 1258 (W) x 758 (H) x 74 (D) mm Weight (Not ...Allen bolt 1 Pen stand 1 Operating Instructions 1 CD-ROM (Device driver disc 1 Driver Installation Guide 1 ¶ Specifications and appearance may vary, depending on the installation method. (Refer to "Installation Site Requirements" in the Technical Manual of packaging Plasma display (PDP-504CMX) 1341 (W) x 846 (H) x 424...
Technical Manual
Page 8
...wiping front panel) Washer x 2 Hex hole bolt x 2 Speed clamp x 2 Ferrite core (PDP-50MXE1/PDP-50MXE1-S only) Remote control unit case x 1 Use as a holder for the remote control unit. Operating Instructions 1.2.2 Handwriting device (PDK-50HW3) Pen x 1 AAA (LR03) alkaline batteries x 2 Allen bolt ...tips x 2 8 Operating Instructions CD-ROM (Device driver disc) Driver Installation Guide 1. When attaching to the rear of the main unit, be careful not to cover the vents. Specifications 1.2 Accessories 1.2.1 Plasma display monitor (PDP-504CMX/PDP-50MXE1/PDP-50MXE1-S) Check that the ...
...wiping front panel) Washer x 2 Hex hole bolt x 2 Speed clamp x 2 Ferrite core (PDP-50MXE1/PDP-50MXE1-S only) Remote control unit case x 1 Use as a holder for the remote control unit. Operating Instructions 1.2.2 Handwriting device (PDK-50HW3) Pen x 1 AAA (LR03) alkaline batteries x 2 Allen bolt ...tips x 2 8 Operating Instructions CD-ROM (Device driver disc) Driver Installation Guide 1. When attaching to the rear of the main unit, be careful not to cover the vents. Specifications 1.2 Accessories 1.2.1 Plasma display monitor (PDP-504CMX/PDP-50MXE1/PDP-50MXE1-S) Check that the ...
Technical Manual
Page 15
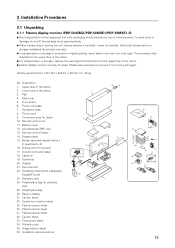
...is also indicated on the upper face of the carton. ¶ For transportation or storage, observe the warnings and instructions on the upper face of the carton 3. Please take precations to prevent it vertically - Remote control unit 11....Power cord case 7. Installation Procedures 3.1 Unpacking 3.1.1 Plasma display monitor (PDP-504CMX/PDP-50MXE1/PDP-50MXE1-S) ¶ Any transportation of the unopened unit in original packing, never stack more persons. Miller mat 5 Front sheet 6. Operating instructions (Japanese/ English/French) 23. Polyethylene bag 26. 3. Horizontal ...
...is also indicated on the upper face of the carton. ¶ For transportation or storage, observe the warnings and instructions on the upper face of the carton 3. Please take precations to prevent it vertically - Remote control unit 11....Power cord case 7. Installation Procedures 3.1 Unpacking 3.1.1 Plasma display monitor (PDP-504CMX/PDP-50MXE1/PDP-50MXE1-S) ¶ Any transportation of the unopened unit in original packing, never stack more persons. Miller mat 5 Front sheet 6. Operating instructions (Japanese/ English/French) 23. Polyethylene bag 26. 3. Horizontal ...

Technical Manual
Page 16
... not stack more than four boxes on the outside of each other. Description 1 Pen 2 AAA (LR03) alkaline batteries 3 Replacement Tips 4 Allen Bolt 5 Pen Stand 6 Operating Instructions 7 CD-ROM (Device driver disc) 8 Driver Installation Guide 9 Packing Set 16 PDK-50HW3 Air Cap Sheet (150 x 100) Air Cap Bag 2 (75 x 100) Pink Pad... x 75) 7 1 4 86 5 2 Mirror Mat (350 x 550) Warranty Card 9 Mirror Mat (1400 x 1800) vinyl tie Air Cap Sheet (150 x 100) vinyl tie No. 3. Strictly observe the instructions on top of the box.
... not stack more than four boxes on the outside of each other. Description 1 Pen 2 AAA (LR03) alkaline batteries 3 Replacement Tips 4 Allen Bolt 5 Pen Stand 6 Operating Instructions 7 CD-ROM (Device driver disc) 8 Driver Installation Guide 9 Packing Set 16 PDK-50HW3 Air Cap Sheet (150 x 100) Air Cap Bag 2 (75 x 100) Pink Pad... x 75) 7 1 4 86 5 2 Mirror Mat (350 x 550) Warranty Card 9 Mirror Mat (1400 x 1800) vinyl tie Air Cap Sheet (150 x 100) vinyl tie No. 3. Strictly observe the instructions on top of the box.

Technical Manual
Page 18
... should not be recharged, shortcircuited, disassembled, or disposed of in fire. ¶ When disposing of used batteries, please comply with governmental regulations or environmental public instruction's rules that apply in your country / area. 18 Installation Procedures 3. Use the locking fixture on the battery case. ¶ To prevent damage from battery leakage...
... should not be recharged, shortcircuited, disassembled, or disposed of in fire. ¶ When disposing of used batteries, please comply with governmental regulations or environmental public instruction's rules that apply in your country / area. 18 Installation Procedures 3. Use the locking fixture on the battery case. ¶ To prevent damage from battery leakage...

Technical Manual
Page 19
... Be sure to INPUT 1 or INPUT 2. 2. Make sure that the PC supports "WXGA". ¶ Select "Display Properties" = "Effects" = "Visual effects"= "Display icons in the Operating Instructions supplied with computer type. Refer to section 4.1.1, "Operating environment" for information on connecting the plasma display to a computer, refer to "Installation and Connections" in full...
... Be sure to INPUT 1 or INPUT 2. 2. Make sure that the PC supports "WXGA". ¶ Select "Display Properties" = "Effects" = "Visual effects"= "Display icons in the Operating Instructions supplied with computer type. Refer to section 4.1.1, "Operating environment" for information on connecting the plasma display to a computer, refer to "Installation and Connections" in full...
Technical Manual
Page 20
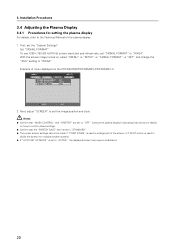
...smaller screens. ¶ If "AUTO SET UP MODE" is set the image position and clock. Consult the plasma display's Operating Instructions for setting the plasma display For details, refer to the Technical Manual of the screen, or if SPLIT button is used to ..."ORBITER" are set to enlarge part of the plasma display. 1. Installation Procedures 3.4 Adjusting the Plasma Display 3.4.1 Procedures for details on the PDP-504CMX/PDP-50MXE1/PDP-50MXE1-S MENU INPUT1 PICTURE SCREEN SETUP OPTION POWER MANAGEMENT CLAMP POSITION SIGNAL FORMAT : OFF : AUTO : XGA SET ENTER MENU EXIT 2. With...
...smaller screens. ¶ If "AUTO SET UP MODE" is set the image position and clock. Consult the plasma display's Operating Instructions for setting the plasma display For details, refer to the Technical Manual of the screen, or if SPLIT button is used to ..."ORBITER" are set to enlarge part of the plasma display. 1. Installation Procedures 3.4 Adjusting the Plasma Display 3.4.1 Procedures for details on the PDP-504CMX/PDP-50MXE1/PDP-50MXE1-S MENU INPUT1 PICTURE SCREEN SETUP OPTION POWER MANAGEMENT CLAMP POSITION SIGNAL FORMAT : OFF : AUTO : XGA SET ENTER MENU EXIT 2. With...

Technical Manual
Page 23
... cursor aligns properly with a finger or other sharp objects should always be scratched as follows: 1 Using your mouse, left-click on "Calibration...". 3 Follow the calibration instructions that of the pen tip. Pen tip Mouse cursor (screen display position) If the cursor position differs from that appear onscreen. Note: Input to the...
... cursor aligns properly with a finger or other sharp objects should always be scratched as follows: 1 Using your mouse, left-click on "Calibration...". 3 Follow the calibration instructions that of the pen tip. Pen tip Mouse cursor (screen display position) If the cursor position differs from that appear onscreen. Note: Input to the...
Technical Manual
Page 26
... the task tray menu shown below. Note: The actual appearance of applications when uninstalling CBdrv software. 5. Use this product. The uninstall program starts. Follow the instructions that appear to remove the program. ¶ To also remove the registry data, requires a utility for uninstalling the CBdrv software. 1. The "Add/Remove Programs" dialog...
... the task tray menu shown below. Note: The actual appearance of applications when uninstalling CBdrv software. 5. Use this product. The uninstall program starts. Follow the instructions that appear to remove the program. ¶ To also remove the registry data, requires a utility for uninstalling the CBdrv software. 1. The "Add/Remove Programs" dialog...

Technical Manual
Page 29
... 2) 4:3 mode 3) DOT BY DOT mode Notes: ¶ Check the screen mode before making settings. Follow the on-screen calibration instructions and accurately touch the center of screen items depends on current screen resolution. Use one of the plasma display. (Read the initial setup... instructions for which the value was set calibration is stored and is not available. The following calibration methods. 1) Detail-1 (4-point calibration) 2) ...
... 2) 4:3 mode 3) DOT BY DOT mode Notes: ¶ Check the screen mode before making settings. Follow the on-screen calibration instructions and accurately touch the center of screen items depends on current screen resolution. Use one of the plasma display. (Read the initial setup... instructions for which the value was set calibration is stored and is not available. The following calibration methods. 1) Detail-1 (4-point calibration) 2) ...

Technical Manual
Page 30
... the screen modes that are available at the center of the screen as shown below but disappears automatically after setup. Follow the on-screen calibration instructions and touch the points in the upper and lower half of the screen drops during calibration using Detail-2, it is available atsubsequent startups. ¶ Although...
... the screen modes that are available at the center of the screen as shown below but disappears automatically after setup. Follow the on-screen calibration instructions and touch the points in the upper and lower half of the screen drops during calibration using Detail-2, it is available atsubsequent startups. ¶ Although...

Technical Manual
Page 33
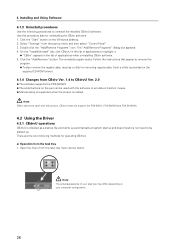
... up. ¶ Use the supplied remote control to adjust plasma display settings. b) Test chart display This is a service mode. For details, refer to the Operating Instructions. ¶ Press the [Esc] key or use the pen to open the screen shown below. 4. Installing and Using Software 4.2.4 Test Mode This is a service mode...
... up. ¶ Use the supplied remote control to adjust plasma display settings. b) Test chart display This is a service mode. For details, refer to the Operating Instructions. ¶ Press the [Esc] key or use the pen to open the screen shown below. 4. Installing and Using Software 4.2.4 Test Mode This is a service mode...

Technical Manual
Page 40
..., slightly moisten the cloth with neutral detergent, diluted with tissue paper or hard abrasive materials. Maintenance and Cleaning Periodical maintenance is recommended to the Operating Instructions supplied with its lowest suction setting. In case of White Balance The unit uses phosphor elements, as benzene or thinner, which can discolor the screen...
..., slightly moisten the cloth with neutral detergent, diluted with tissue paper or hard abrasive materials. Maintenance and Cleaning Periodical maintenance is recommended to the Operating Instructions supplied with its lowest suction setting. In case of White Balance The unit uses phosphor elements, as benzene or thinner, which can discolor the screen...
