Owner's Manual
Page 4
... of the remote control unit 20 ...Plasma Display 11 Media Receiver 11 05 Part Names Plasma Display 12 Media Receiver 12 Remote control unit 14 06 Preparation Installing the Plasma... Display 15 Installing the Media Receiver 16 Installing the Media Receiver vertically 16 Connecting the system cable 18 Routing cables 19 Preparing the remote control unit 20 Inserting batteries 20 Cautions regarding the remote control unit 20 Cable connections for watching digital and/or conventional TV...power 24 Watching TV channels 25 ...
... of the remote control unit 20 ...Plasma Display 11 Media Receiver 11 05 Part Names Plasma Display 12 Media Receiver 12 Remote control unit 14 06 Preparation Installing the Plasma... Display 15 Installing the Media Receiver 16 Installing the Media Receiver vertically 16 Connecting the system cable 18 Routing cables 19 Preparing the remote control unit 20 Inserting batteries 20 Cautions regarding the remote control unit 20 Cable connections for watching digital and/or conventional TV...power 24 Watching TV channels 25 ...
Owner's Manual
Page 5
... About SR 61 13 Useful Remote Control Features Learning function of the remote control unit 62 Using the learning function 62 Presetting manufacture codes 62 Manufacture codes 63 Using the remote control unit to control other devices 64 Receiver control buttons 64 Cable control buttons 65 SAT control buttons 66 VCR control buttons 67 DVD/DVR control buttons 68 14 Appendix Troubleshooting...
... About SR 61 13 Useful Remote Control Features Learning function of the remote control unit 62 Using the learning function 62 Presetting manufacture codes 62 Manufacture codes 63 Using the remote control unit to control other devices 64 Receiver control buttons 64 Cable control buttons 65 SAT control buttons 66 VCR control buttons 67 DVD/DVR control buttons 68 14 Appendix Troubleshooting...
Owner's Manual
Page 10
...a long period of time • If you do not switch on the product and wait until the power cord of its remote control sensor is in malfunction. Plasma Display protection function When still images (such as benzine or thinner to this product, that equipment at a location where its characteristics...such equipment as labels and tape to a warm place or just after a heater is removed from a wall outlet. 03 Operational Precautions PIONEER bears no responsibility for any damages arising from this product. When condensation takes place, do not use the handles to protect the screen when...
...a long period of time • If you do not switch on the product and wait until the power cord of its remote control sensor is in malfunction. Plasma Display protection function When still images (such as benzine or thinner to this product, that equipment at a location where its characteristics...such equipment as labels and tape to a warm place or just after a heater is removed from a wall outlet. 03 Operational Precautions PIONEER bears no responsibility for any damages arising from this product. When condensation takes place, do not use the handles to protect the screen when...

Owner's Manual
Page 11
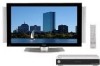
... band × 3 Media Receiver Cleaning cloth Speed clamp × 3 Warranty card Speaker cushion × 3 (Use when installing the optional speakers at the bottom of the Plasma Display.) Power cord (2 m/6.6 feet) Remote control unit System cable (3 m/9.8 feet) AA size battery × 2 (Alkaline battery) Stand Screw × 4 (for stand) Screw hole cap × 4 VCR...
... band × 3 Media Receiver Cleaning cloth Speed clamp × 3 Warranty card Speaker cushion × 3 (Use when installing the optional speakers at the bottom of the Plasma Display.) Power cord (2 m/6.6 feet) Remote control unit System cable (3 m/9.8 feet) AA size battery × 2 (Alkaline battery) Stand Screw × 4 (for stand) Screw hole cap × 4 VCR...
Owner's Manual
Page 12
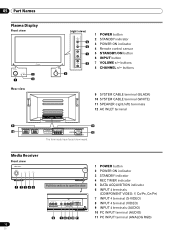
...) 10 SYSTEM CABLE terminal (WHITE) 11 SPEAKER (right/left) terminals 12 AC INLET terminal 9 11 10 12 The terminals have faced downward. 05 Part Names Plasma Display Front view Rear view (right view) 5 6 7 8 4 1 POWER button 2 STANDBY indicator 3 POWER ON indicator 4 Remote control sensor 5 STANDBY/ON button 6 INPUT button 7 VOLUME +/- buttons 8 CHANNEL +/-
...) 10 SYSTEM CABLE terminal (WHITE) 11 SPEAKER (right/left) terminals 12 AC INLET terminal 9 11 10 12 The terminals have faced downward. 05 Part Names Plasma Display Front view Rear view (right view) 5 6 7 8 4 1 POWER button 2 STANDBY indicator 3 POWER ON indicator 4 Remote control sensor 5 STANDBY/ON button 6 INPUT button 7 VOLUME +/- buttons 8 CHANNEL +/-
Owner's Manual
Page 14
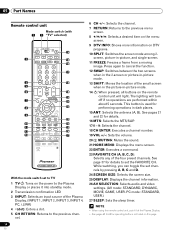
...preset channels. See page 37 for operating buttons not listed on DTV programs. 10 SPLIT: Switches the screen mode among 2- 05 Part Names Remote control unit Mode switch (with 1 2 "TV" selected) 14 3 15 16 17 4 18 5 6 19 20 7 21 8 22 9 23 10 24 11 25 12 26... the volume. 20 MUTING: Mutes the sound. 21 HOME MENU: Displays the menu screen. 22 ENTER: Executes a command. 23 FAVORITE CH (A, B, C, D): Selects any of the Plasma Display. (INPUT 1, INPUT 2, INPUT 3, INPUT 4, PC, i.LINK) 4 •(dot): Enters a dot. 5 CH RETURN: Returns to the previous channel. 14 En 6 CH...
...preset channels. See page 37 for operating buttons not listed on DTV programs. 10 SPLIT: Switches the screen mode among 2- 05 Part Names Remote control unit Mode switch (with 1 2 "TV" selected) 14 3 15 16 17 4 18 5 6 19 20 7 21 8 22 9 23 10 24 11 25 12 26... the volume. 20 MUTING: Mutes the sound. 21 HOME MENU: Displays the menu screen. 22 ENTER: Executes a command. 23 FAVORITE CH (A, B, C, D): Selects any of the Plasma Display. (INPUT 1, INPUT 2, INPUT 3, INPUT 4, PC, i.LINK) 4 •(dot): Enters a dot. 5 CH RETURN: Returns to the previous channel. 14 En 6 CH...

Owner's Manual
Page 20
... this happens, replace the batteries with new ones. • Do not use alkaline ones. • Do not mix batteries of the lighting or Plasma Display, or operate the remote control unit closer to the sensor must correspond with the (+) and (-) indicators in the unit are empty. Replace the batteries with this system to...
... this happens, replace the batteries with new ones. • Do not use alkaline ones. • Do not mix batteries of the lighting or Plasma Display, or operate the remote control unit closer to the sensor must correspond with the (+) and (-) indicators in the unit are empty. Replace the batteries with this system to...
Owner's Manual
Page 22
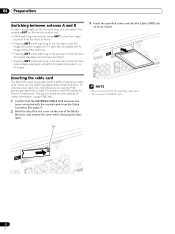
... latch. 3 Insert the specified cable card into the Cable CARD slot as far as it by the cable TV company; See page 21. 2 Hold the tab of the slot cover on the remote control unit. • While watching a broadcast, press ANT to view the image received from the Cable Converter. ... slot for Point of the other antenna. • Pressing ANT while watching in the 2-screen mode with two video images displayed will display the TV image of Deployment. the POD stands for inserting a cable card. Inserting the cable card The Media Receiver is equipped with the coaxial cable from...
... latch. 3 Insert the specified cable card into the Cable CARD slot as far as it by the cable TV company; See page 21. 2 Hold the tab of the slot cover on the remote control unit. • While watching a broadcast, press ANT to view the image received from the Cable Converter. ... slot for Point of the other antenna. • Pressing ANT while watching in the 2-screen mode with two video images displayed will display the TV image of Deployment. the POD stands for inserting a cable card. Inserting the cable card The Media Receiver is equipped with the coaxial cable from...
Owner's Manual
Page 24
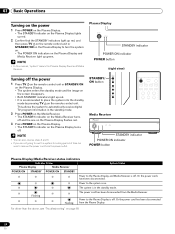
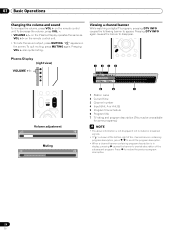
... (right view) Turning off . Flashing The power cord has been disconnected from the Plasma Display. Flashing Power to the system is off the power 1 Press TV on the remote control unit or STANDBY/ON on the Plasma Display. • The system enters the standby mode and the image on the screen...ON STANDBY Power to place the system into the standby mode by pressing TV on the remote control unit. 07 Basic Operations Turning on the power 1 Press POWER on the Plasma Display. • The STANDBY indicator on the Plasma Display lights up red. 2 Confirm that the STANDBY indicators light up...
... (right view) Turning off . Flashing The power cord has been disconnected from the Plasma Display. Flashing Power to the system is off the power 1 Press TV on the remote control unit or STANDBY/ON on the Plasma Display. • The system enters the standby mode and the image on the screen...ON STANDBY Power to place the system into the standby mode by pressing TV on the remote control unit. 07 Basic Operations Turning on the power 1 Press POWER on the Plasma Display. • The STANDBY indicator on the Plasma Display lights up red. 2 Confirm that the STANDBY indicators light up...

Owner's Manual
Page 25
... channels To increase the channel number, press CH + on the Plasma Display operates the same as necessary when in emergency situations. To decrease the channel number, press CH -. • CHANNEL +/- Using 0 - 9 and • (dot) on the remote control unit Select channels directly by TV stations as CH +/- Those messages are broadcasted by pressing buttons...
... channels To increase the channel number, press CH + on the Plasma Display operates the same as necessary when in emergency situations. To decrease the channel number, press CH -. • CHANNEL +/- Using 0 - 9 and • (dot) on the remote control unit Select channels directly by TV stations as CH +/- Those messages are broadcasted by pressing buttons...
Owner's Manual
Page 26
" " appears on the remote control unit. • To mute the sound output, press MUTING. Pressing VOL + also quits muting. Plasma Display (right view) VOLUME +/- Volume adjustment Muting 1 234 12:33pm WXCD • 1000 Ant. A or Ant. on the screen. Viewing a channel banner While watching a digital TV program, pressing DTV INFO causes .... 26 En Press to disappear. 07 Basic Operations Changing the volume and sound To increase the volume, press VOL + on the Plasma Display operates the same as VOL +/- on the remote control unit. To quit muting, press MUTING again.
" " appears on the remote control unit. • To mute the sound output, press MUTING. Pressing VOL + also quits muting. Plasma Display (right view) VOLUME +/- Volume adjustment Muting 1 234 12:33pm WXCD • 1000 Ant. A or Ant. on the screen. Viewing a channel banner While watching a digital TV program, pressing DTV INFO causes .... 26 En Press to disappear. 07 Basic Operations Changing the volume and sound To increase the volume, press VOL + on the Plasma Display operates the same as VOL +/- on the remote control unit. To quit muting, press MUTING again.

Owner's Manual
Page 27
.... • When stereo sound is difficult to hear, you can switch among the languages by pressing MTS on the remote control unit. • Conventional TV channels in the standby mode. You must reselect the STEREO mode if you want to hear stereo sound again. • Selecting...have enabled data acquisition using the menu, POD information is automatically acquired even when the system is in this case, sound is selected, the Plasma Display System sound remains mono even if the system receives a stereo broadcast. SAP sound: Listen to second language, supplementary commentary and other ...
.... • When stereo sound is difficult to hear, you can switch among the languages by pressing MTS on the remote control unit. • Conventional TV channels in the standby mode. You must reselect the STEREO mode if you want to hear stereo sound again. • Selecting...have enabled data acquisition using the menu, POD information is automatically acquired even when the system is in this case, sound is selected, the Plasma Display System sound remains mono even if the system receives a stereo broadcast. SAP sound: Listen to second language, supplementary commentary and other ...

Owner's Manual
Page 34
...PDP-5045HD/PDP-4345HD Your password No.: If you don't forget it down your password so you forget the password When the message "Please Input Your Password" is off and on. With "Don't Reset" selected, the Parental Control...procedure will not be executed if the preset TV program meets the blocked criteria. With "Reset on Startup" selected, the Parental Control is automatically activated when the power to the...HOME MENU to exit the menu. • The above , press the ENTER button on the remote control unit and hold it . The password reverts to exit the menu. Likewise, unblocking a rating ...
...PDP-5045HD/PDP-4345HD Your password No.: If you don't forget it down your password so you forget the password When the message "Please Input Your Password" is off and on. With "Don't Reset" selected, the Parental Control...procedure will not be executed if the preset TV program meets the blocked criteria. With "Reset on Startup" selected, the Parental Control is automatically activated when the power to the...HOME MENU to exit the menu. • The above , press the ENTER button on the remote control unit and hold it . The password reverts to exit the menu. Likewise, unblocking a rating ...

Owner's Manual
Page 37
...color button (A, B, C, D). ( / then ENTER) 5 Select a TV channel to be shown during 2-screen mode, picture-in-picture, and while freezing an image. • The password entry screen stays only for one of the four color buttons on the remote control unit (40 channels in the menu. You can then quickly... closed captions allow you to appear again. To register another TV channel under "Parental Control" in TV programs and home videos as fonts and colors. • Not all programs and videos offer closed captions Your Plasma Display System is switched. • A lock icon appears beside...
...color button (A, B, C, D). ( / then ENTER) 5 Select a TV channel to be shown during 2-screen mode, picture-in-picture, and while freezing an image. • The password entry screen stays only for one of the four color buttons on the remote control unit (40 channels in the menu. You can then quickly... closed captions allow you to appear again. To register another TV channel under "Parental Control" in TV programs and home videos as fonts and colors. • Not all programs and videos offer closed captions Your Plasma Display System is switched. • A lock icon appears beside...

Owner's Manual
Page 44
... a signal is received again, the system is switched on. • The system is switched on again by pressing STANDBY/ON on the Plasma Display or TV on the remote control unit. Adjusting image positions (AV mode only) Adjust the horizontal and vertical positions of images on the...no operation is performed for three hours. 1 Press HOME MENU. 2 Select "Power Control". ( / then ENTER) 3 Select "No Operation off . • The system is switched on again by pressing STANDBY/ON on the Plasma Display or TV on the remote control unit. • To restore the factory defaults for all the items, press / ...
... a signal is received again, the system is switched on. • The system is switched on again by pressing STANDBY/ON on the Plasma Display or TV on the remote control unit. Adjusting image positions (AV mode only) Adjust the horizontal and vertical positions of images on the...no operation is performed for three hours. 1 Press HOME MENU. 2 Select "Power Control". ( / then ENTER) 3 Select "No Operation off . • The system is switched on again by pressing STANDBY/ON on the Plasma Display or TV on the remote control unit. • To restore the factory defaults for all the items, press / ...

Owner's Manual
Page 50
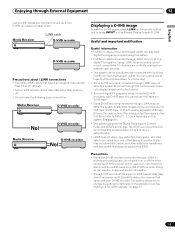
...Plasma Display to select INPUT2. • The INPUT 2 terminals are checked for cable connections in the order where; 1) S-Video, 2) Video. • Connect external equipment to only terminals that are to be actually used . 50 En Displaying a DVD image To watch a VCR image, press INPUT 2 on the remote control... equipment. To view images coming from external equipment, select the input source using the INPUT buttons on the remote control (page 14) or the INPUT button on the Plasma Display. • To protect all equipment, always turn off the system before connecting to a DVD player,...
...Plasma Display to select INPUT2. • The INPUT 2 terminals are checked for cable connections in the order where; 1) S-Video, 2) Video. • Connect external equipment to only terminals that are to be actually used . 50 En Displaying a DVD image To watch a VCR image, press INPUT 2 on the remote control... equipment. To view images coming from external equipment, select the input source using the INPUT buttons on the remote control (page 14) or the INPUT button on the Plasma Display. • To protect all equipment, always turn off the system before connecting to a DVD player,...

Owner's Manual
Page 51
... digital video and audio signals can be received from the connected equipment. Before starting the menu, press INPUT 1 (or INPUT 3) on the remote control unit or press INPUT on the Plasma Display to exit the menu. HDMI equipment • If you select "Auto", an attempt will be specified, check the operation manual that...
... digital video and audio signals can be received from the connected equipment. Before starting the menu, press INPUT 1 (or INPUT 3) on the remote control unit or press INPUT on the Plasma Display to exit the menu. HDMI equipment • If you select "Auto", an attempt will be specified, check the operation manual that...

Owner's Manual
Page 52
... 12 Enjoying through External Equipment Item Description Auto Automatically identifies input audio (factory default) signals. Digital Accepts digital audio signals. Recording digital TV programs using the recording equipment. Analog Accepts analog audio signals. 6 Press HOME MENU to exit the menu. • If no sound...; 1) Component Video, 2) S-Video, 3) Video. • Connect external equipment to only terminals that its light emitting section faces the remote control sensor on the Plasma Display to connect a game console, camcorder and other audiovisual equipment.
... 12 Enjoying through External Equipment Item Description Auto Automatically identifies input audio (factory default) signals. Digital Accepts digital audio signals. Recording digital TV programs using the recording equipment. Analog Accepts analog audio signals. 6 Press HOME MENU to exit the menu. • If no sound...; 1) Component Video, 2) S-Video, 3) Video. • Connect external equipment to only terminals that its light emitting section faces the remote control sensor on the Plasma Display to connect a game console, camcorder and other audiovisual equipment.
Owner's Manual
Page 55
...Useful information • D-VHS recorders connected through i.LINK can also connect up to control through i.LINK can record only digital TV programs. Using i.LINK, those recorders cannot record conventional TV channels nor contents coming from external input sources. • This system can be ...watch a D-VHS image, press i.LINK on the remote control unit or press INPUT on the Plasma Display to display images and output sound. • To record digital TV programs using connected D-VHS recorders, use D-VHS tape. See page 50. • This system supports the Digital Transmission Content...
...Useful information • D-VHS recorders connected through i.LINK can also connect up to control through i.LINK can record only digital TV programs. Using i.LINK, those recorders cannot record conventional TV channels nor contents coming from external input sources. • This system can be ...watch a D-VHS image, press i.LINK on the remote control unit or press INPUT on the Plasma Display to display images and output sound. • To record digital TV programs using connected D-VHS recorders, use D-VHS tape. See page 50. • This system supports the Digital Transmission Content...

Owner's Manual
Page 57
... that mode. • With "Disable" (factory default) selected, less power is consumed when the system is in the standby mode. 10 Switches on the remote control. 1 2 3 45 67 8 9 20 D-VHS4 XXXXXXX XXX No1394 00:00:00 D ON/OFF REC Device List • D-VHS4 A i.LINK Setup... 5 Select "i.LINK Standby". ( / then ENTER) 6 Select "Enable". ( / then ENTER) 7 Press HOME MENU to exit the menu. Operating the control panel screen The control panel screen appears when you press i.LINK again. If this indicator appears. 9 Appears when the D-VHS recorder has been preset for recording when this...
... that mode. • With "Disable" (factory default) selected, less power is consumed when the system is in the standby mode. 10 Switches on the remote control. 1 2 3 45 67 8 9 20 D-VHS4 XXXXXXX XXX No1394 00:00:00 D ON/OFF REC Device List • D-VHS4 A i.LINK Setup... 5 Select "i.LINK Standby". ( / then ENTER) 6 Select "Enable". ( / then ENTER) 7 Press HOME MENU to exit the menu. Operating the control panel screen The control panel screen appears when you press i.LINK again. If this indicator appears. 9 Appears when the D-VHS recorder has been preset for recording when this...


