Owner's Manual
Page 3
.... This is located on this equipment (such as the power cord is off all power. If you to lead, a chemical known to the State of a set-top box. Since the power cord serves as the main disconnect device for your security. To prevent electromagnetic interference with liquid near this product or...
.... This is located on this equipment (such as the power cord is off all power. If you to lead, a chemical known to the State of a set-top box. Since the power cord serves as the main disconnect device for your security. To prevent electromagnetic interference with liquid near this product or...
Owner's Manual
Page 4
...unit 12 05 Preparation Installing the Plasma Display 14 Preventing the Plasma Display from that shown in a safe place for buying this Pioneer product. Please read through External Equipment About External Equipment 38 Connecting HDMI equipment 38 Displaying an image of HDMI 38 Connecting Component ...(Standby 18 Watching TV channels 19 Selecting the analog and digital channels 19 Changing channels 19 Changing the volume and sound 20 Setting MTS/SAP mode 20 Changing the language 20 Displaying Information 21 Using the multiscreen functions 21 07 Menu Setup Menu configuration 23 ...
...unit 12 05 Preparation Installing the Plasma Display 14 Preventing the Plasma Display from that shown in a safe place for buying this Pioneer product. Please read through External Equipment About External Equipment 38 Connecting HDMI equipment 38 Displaying an image of HDMI 38 Connecting Component ...(Standby 18 Watching TV channels 19 Selecting the analog and digital channels 19 Changing channels 19 Changing the volume and sound 20 Setting MTS/SAP mode 20 Changing the language 20 Displaying Information 21 Using the multiscreen functions 21 07 Menu Setup Menu configuration 23 ...
Owner's Manual
Page 5
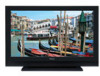
... and satisfactory results from this Pioneer PureVision PDP-5016HD/PDP-4216HD Plasma Display System, please first read this information carefully. By following are no exception to obtain maximum enjoyment from your Pioneer Plasma Display System for an equal or greater amount of time. • When playing a game, the "Game" mode setting within "AV Selection" is best...
... and satisfactory results from this Pioneer PureVision PDP-5016HD/PDP-4216HD Plasma Display System, please first read this information carefully. By following are no exception to obtain maximum enjoyment from your Pioneer Plasma Display System for an equal or greater amount of time. • When playing a game, the "Game" mode setting within "AV Selection" is best...
Owner's Manual
Page 7
... are as follows: • Do not display static images for the after -image lag • Displaying the same images such as image retention, can be set to disappear depends on a display for several hours, or for long periods should be corrected by displaying bright images for a long time may occur. This...
... are as follows: • Do not display static images for the after -image lag • Displaying the same images such as image retention, can be set to disappear depends on a display for several hours, or for long periods should be corrected by displaying bright images for a long time may occur. This...
Owner's Manual
Page 12
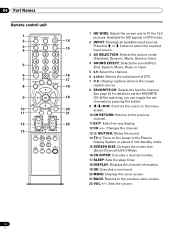
... (dot): Selects the subchannel of DTV. 7 C.C.: Display captions while in DTV mode. 2 INPUT: Displays all available input sources. Available for details to set channels by pressing the button. 9 c/d/[/\: Controls the cursor on the menu screen. 10 CH RETURN: Returns to the previous channel. 11 EXIT: Exits from...into standby mode. 15 SCREEN SIZE: Changes the screen size (Zoom/Cinema/Full/4:3/Wide). 16 CH ENTER: Executes a channel number. 17 SLEEP: Sets the sleep timer. 18 DISPLAY: Displays the channel information. 19 OK: Executes a command. 20 MENU: Displays the menu screen. 21 BACK: Returns...
... (dot): Selects the subchannel of DTV. 7 C.C.: Display captions while in DTV mode. 2 INPUT: Displays all available input sources. Available for details to set channels by pressing the button. 9 c/d/[/\: Controls the cursor on the menu screen. 10 CH RETURN: Returns to the previous channel. 11 EXIT: Exits from...into standby mode. 15 SCREEN SIZE: Changes the screen size (Zoom/Cinema/Full/4:3/Wide). 16 CH ENTER: Executes a channel number. 17 SLEEP: Sets the sleep timer. 18 DISPLAY: Displays the channel information. 19 OK: Executes a command. 20 MENU: Displays the menu screen. 21 BACK: Returns...
Owner's Manual
Page 18
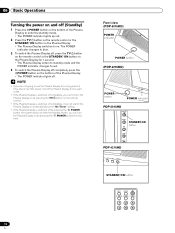
...the remote control. • If the Plasma Display is switched off completely, it cannot switch the Plasma Display on automatically by the "On Timer" setting. • If the Plasma Display is switched off (Standby) 1 Press the POWER button on the bottom of the Plasma Display to enter the ... to on by pressing the POWER button the next time. 18 En Front view (PDP-5016HD) POWER indicator POWER button (PDP-4216HD) POWER button POWER indicator PDP-5016HD STANDBY /ON INPUT STANDBY/ON button OK MENU VOL+ PDP-4216HD OK INPUT STANDBY/ON STANDBY/ON button TV INPUT HD WIDE AV SELECTION SOUND ...
...the remote control. • If the Plasma Display is switched off completely, it cannot switch the Plasma Display on automatically by the "On Timer" setting. • If the Plasma Display is switched off (Standby) 1 Press the POWER button on the bottom of the Plasma Display to enter the ... to on by pressing the POWER button the next time. 18 En Front view (PDP-5016HD) POWER indicator POWER button (PDP-4216HD) POWER button POWER indicator PDP-5016HD STANDBY /ON INPUT STANDBY/ON button OK MENU VOL+ PDP-4216HD OK INPUT STANDBY/ON STANDBY/ON button TV INPUT HD WIDE AV SELECTION SOUND ...

Owner's Manual
Page 19
...dot), then 1. • To select subchannel 10-15, press 1, 0, •(dot), 1, then 5. • After entering a channel or subchannel number, you may see "Setting up TV channels that you can watch a TV program, first select "ANALOG CH" or "DIGITAL CH" by pressing the INPUT button. FAVORITE CH SLEEP DISPLAY...• CHANNEL +/- For the procedure, see emergency alert messages scrolling at the top of the screen. Basic Operations Watching TV channels Unless you set up TV channels" on page 24. • When watching a digital TV program, you may press CH ENTER to tune in the channel ...
...dot), then 1. • To select subchannel 10-15, press 1, 0, •(dot), 1, then 5. • After entering a channel or subchannel number, you may see "Setting up TV channels that you can watch a TV program, first select "ANALOG CH" or "DIGITAL CH" by pressing the INPUT button. FAVORITE CH SLEEP DISPLAY...• CHANNEL +/- For the procedure, see emergency alert messages scrolling at the top of the screen. Basic Operations Watching TV channels Unless you set up TV channels" on page 24. • When watching a digital TV program, you may press CH ENTER to tune in the channel ...
Owner's Manual
Page 20
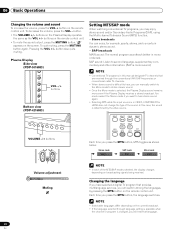
... MTS button, the language switches. • Switchable languages differ depending on the current broadcast. • If the language selected through language setting is available when the channel or program is in VIDEO, COMPONENT or HDMI does not change the type of the MTS/SAP modes selected,... Basic Operations Changing the volume and sound To increase the volume, press the VOL + button on the screen. Plasma Display Side view (PDP-5016HD) Setting MTS/SAP mode When watching conventional TV programs, you may enjoy stereo sound and/or Secondary Audio Programs (SAP), using the Multi-channel ...
... MTS button, the language switches. • Switchable languages differ depending on the current broadcast. • If the language selected through language setting is available when the channel or program is in VIDEO, COMPONENT or HDMI does not change the type of the MTS/SAP modes selected,... Basic Operations Changing the volume and sound To increase the volume, press the VOL + button on the screen. Plasma Display Side view (PDP-5016HD) Setting MTS/SAP mode When watching conventional TV programs, you may enjoy stereo sound and/or Secondary Audio Programs (SAP), using the Multi-channel ...
Owner's Manual
Page 21
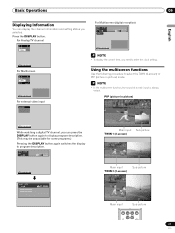
... 8 : 30 am 8 : 30 For Multiscreen TV C9 M ono DTV 3 xx-01 am 8 : 30 While watching a digital TV channel, you can display the channel information and setting status you need to enter the clock...
... 8 : 30 am 8 : 30 For Multiscreen TV C9 M ono DTV 3 xx-01 am 8 : 30 While watching a digital TV channel, you can display the channel information and setting status you need to enter the clock...
Owner's Manual
Page 22
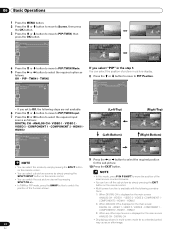
... to select the required input source as follows: Off - TWIN2 PIP/TWIN PIP/TWIN Mode PIP/TWIN Input PIP Position PIP DIGITAL CH If you set to Off, the following combinations: 1) When DIGITAL CH is displayed on the remote control. • Multi screen function is available with the following steps are...
... to select the required input source as follows: Off - TWIN2 PIP/TWIN PIP/TWIN Mode PIP/TWIN Input PIP Position PIP DIGITAL CH If you set to Off, the following combinations: 1) When DIGITAL CH is displayed on the remote control. • Multi screen function is available with the following steps are...

Owner's Manual
Page 23
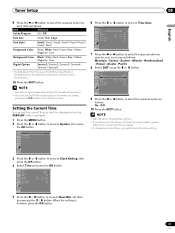
... Temp Sound Effect Bass Treble Balance Auto Volume Level SRS TruSurround XT Digital Audio Out Screen Screen Size PIP/TWIN Screen Saver System Language Clock Setting Parental Control Closed Caption Display Analog CC DTV CC Page 24 24 25 25 32 33 33 33 33 33 33 33 34 34 34... 35 35 35 21, 22 36 36 31 26 - 30 30, 31 30, 31 30, 31 Menu operations The following describes the typical procedure for setting up the menus. FAVORITE CH SLEEP DISPLAY OK CH RETURN EXIT BACK MENU CH MUTING VOL 1 Press the MENU button. 2 Press c or d to select a menu...
... Temp Sound Effect Bass Treble Balance Auto Volume Level SRS TruSurround XT Digital Audio Out Screen Screen Size PIP/TWIN Screen Saver System Language Clock Setting Parental Control Closed Caption Display Analog CC DTV CC Page 24 24 25 25 32 33 33 33 33 33 33 33 34 34 34... 35 35 35 21, 22 36 36 31 26 - 30 30, 31 30, 31 30, 31 Menu operations The following describes the typical procedure for setting up the menus. FAVORITE CH SLEEP DISPLAY OK CH RETURN EXIT BACK MENU CH MUTING VOL 1 Press the MENU button. 2 Press c or d to select a menu...
Owner's Manual
Page 24
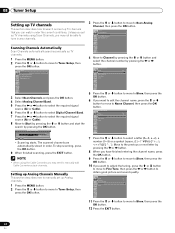
... pressing the [ or \ button. Tuner Setup Scan Channels Scan Analog Channel Scan Digital Channel Edit Channel List Scanning Channels Automatically Scan Channels automatically searches and sets up TV channels. 1 Press the MENU button. 2 Press the c or d button to move to Store, then press the OK button. 12 Press the... button. 10 If you want to adjust the tuning, press the c or d button to move to Name Channel, then press the OK button. Unless you set up Analog channels. 1 Press the MENU button. 2 Press the c or d button to move to Tuner Setup, then press the OK button. 5 Press the c or...
... pressing the [ or \ button. Tuner Setup Scan Channels Scan Analog Channel Scan Digital Channel Edit Channel List Scanning Channels Automatically Scan Channels automatically searches and sets up TV channels. 1 Press the MENU button. 2 Press the c or d button to move to Store, then press the OK button. 12 Press the... button. 10 If you want to adjust the tuning, press the c or d button to move to Name Channel, then press the OK button. Unless you set up Analog channels. 1 Press the MENU button. 2 Press the c or d button to move to Tuner Setup, then press the OK button. 5 Press the c or...
Owner's Manual
Page 25
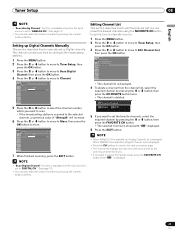
...channel, a numerical value of "Strength" will increase. 6 Press the c or d button to move to Store, then press the OK button to store. Setting up Digital channels. Scan Digital Channel Channel Store 6 - 1 Strength DTV 6 30% 7 When finished scanning, press the EXIT button. Tuner Setup Scan Channels...channel list, select the required channel by pressing the numeric buttons directly. 25 En Editing Channel List This section describes how to manually set up Digital Channels Manually This section describes how to edit the Channel List. Tuner Setup 08 English • "Scan Analog Channel"...
...channel, a numerical value of "Strength" will increase. 6 Press the c or d button to move to Store, then press the OK button to store. Setting up Digital channels. Scan Digital Channel Channel Store 6 - 1 Strength DTV 6 30% 7 When finished scanning, press the EXIT button. Tuner Setup Scan Channels...channel list, select the required channel by pressing the numeric buttons directly. 25 En Editing Channel List This section describes how to manually set up Digital Channels Manually This section describes how to edit the Channel List. Tuner Setup 08 English • "Scan Analog Channel"...
Owner's Manual
Page 26
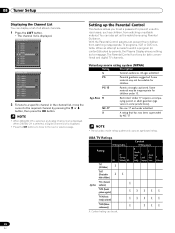
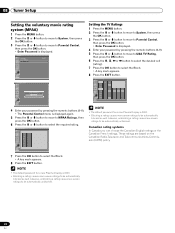
.... Voluntary movie rating system (MPAA) Rating G Description General audiences. Some material may be inappropriate for children under admitted. Setting up the restrictions using Parental Guidance. Under 17 requires accompanying parent or adult guardian (age varies in the channel list, ...When ANALOG CH is selected, an Analog Channel List is displayed. 08 Tuner Setup Displaying the Channel List You can be set. You can prevent their children from watching unsuitable material. PG-13 Parents strongly cautioned. Content TV Rating-General D (Sexually ...
.... Voluntary movie rating system (MPAA) Rating G Description General audiences. Some material may be inappropriate for children under admitted. Setting up the restrictions using Parental Guidance. Under 17 requires accompanying parent or adult guardian (age varies in the channel list, ...When ANALOG CH is selected, an Analog Channel List is displayed. 08 Tuner Setup Displaying the Channel List You can be set. You can prevent their children from watching unsuitable material. PG-13 Parents strongly cautioned. Content TV Rating-General D (Sexually ...
Owner's Manual
Page 27
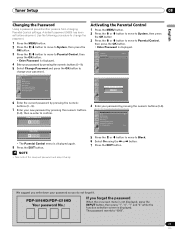
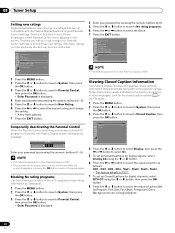
PDP-5016HD/PDP-4216HD Your password No.: If you do not forget...displayed again. 8 Press the EXIT button. 5 Press the c or d button to move to confirm. System Language Clock Setting Parental Control English Parental Control Enter Password 6 Enter the current password by pressing the numeric buttons (0 - 9). 7 Enter ... displayed. Tuner Setup 08 English Changing the Password Using a password prevents other persons from changing Parental Control settings. We suggest you write down your password by pressing the numeric buttons (0-9). Parental Control Change Password Block ...
PDP-5016HD/PDP-4216HD Your password No.: If you do not forget...displayed again. 8 Press the EXIT button. 5 Press the c or d button to move to confirm. System Language Clock Setting Parental Control English Parental Control Enter Password 6 Enter the current password by pressing the numeric buttons (0 - 9). 7 Enter ... displayed. Tuner Setup 08 English Changing the Password Using a password prevents other persons from changing Parental Control settings. We suggest you write down your password by pressing the numeric buttons (0-9). Parental Control Change Password Block ...
Owner's Manual
Page 28
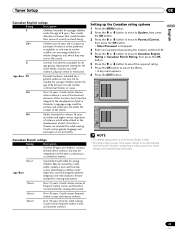
...the Canadian English ratings or the Canadian French ratings. Likewise, unblocking a rating causes less severe ratings to be automatically unblocked. 08 Tuner Setup Setting the voluntary movie rating system (MPAA) 1 Press the MENU button. 2 Press the c or d button to move to System, then ... Enter Password is 0000. • Blocking a rating causes more severe ratings to be automatically blocked as well. System Language Clock Setting Parental Control English Parental Control Setting the TV Ratings 1 Press the MENU button. 2 Press the c or d button to move to System, then press the ...
...the Canadian English ratings or the Canadian French ratings. Likewise, unblocking a rating causes less severe ratings to be automatically unblocked. 08 Tuner Setup Setting the voluntary movie rating system (MPAA) 1 Press the MENU button. 2 Press the c or d button to move to System, then ... Enter Password is 0000. • Blocking a rating causes more severe ratings to be automatically blocked as well. System Language Clock Setting Parental Control English Parental Control Setting the TV Ratings 1 Press the MENU button. 2 Press the c or d button to move to System, then press the ...
Owner's Manual
Page 29
C8+ Children over 8 years old: Contains no portrayal of violence as well. Appropriate viewing for adult viewing. Setting up the Canadian rating systems 1 Press the MENU button. 2 Press the c or d button to move to System, then press the OK button. 3 Press the c or d ...
C8+ Children over 8 years old: Contains no portrayal of violence as well. Appropriate viewing for adult viewing. Setting up the Canadian rating systems 1 Press the MENU button. 2 Press the c or d button to move to System, then press the OK button. 3 Press the c or d ...
Owner's Manual
Page 30
...the c or d button to move to New Rating. 6 Press the [ or \ to select the desired rating and change your Parental Control settings to Parental Control, then press the OK button. • Enter Password is working and senses a blocked TV program (or content), the Plasma ...Display shows nothing but a message. Text1 - Otherwise, ratings you must change the setting. • A key mark appears. 7 Press the EXIT button. Temporarily deactivating the Parental Control When the Parental Control is displayed. 4 Press the c...
...the c or d button to move to New Rating. 6 Press the [ or \ to select the desired rating and change your Parental Control settings to Parental Control, then press the OK button. • Enter Password is working and senses a blocked TV program (or content), the Plasma ...Display shows nothing but a message. Text1 - Otherwise, ratings you must change the setting. • A key mark appears. 7 Press the EXIT button. Temporarily deactivating the Parental Control When the Parental Control is displayed. 4 Press the c...
Owner's Manual
Page 31
...7 : 00 On am 11 : 00 On Off 7 Press the [ or \ button to Time Zone. Alaska - button on the broadcasting service. • You can set the current time so that it is displayed when the DISPLAY button is pressed. 1 Press the MENU button. 2 Press the c or d button to move to... area as follows: On - Tuner Setup 08 English 9 Press the [ or \ button to select the required option for each item as follows: Item Selection Set by Program On/ Off Font Size Small/ Mid/ Large Font Style1 Font0/ Font1/ Font2/ Font3/ Font4/ Font5/ Font6/ Font7 Foreground Color Black/ White/ Red...
...7 : 00 On am 11 : 00 On Off 7 Press the [ or \ button to Time Zone. Alaska - button on the broadcasting service. • You can set the current time so that it is displayed when the DISPLAY button is pressed. 1 Press the MENU button. 2 Press the c or d button to move to... area as follows: On - Tuner Setup 08 English 9 Press the [ or \ button to select the required option for each item as follows: Item Selection Set by Program On/ Off Font Size Small/ Mid/ Large Font Style1 Font0/ Font1/ Font2/ Font3/ Font4/ Font5/ Font6/ Font7 Foreground Color Black/ White/ Red...

Owner's Manual
Page 32
... user to select the preset time interval as follows: Off - 10 min - 20 min - 30 min - 60 min - 120 min 180 min - 240 min Clock Setting Time Time Zone DST On Timer Off Timer Auto Power Off Sleep Timer am 9 : 30 Hawaii On On am 7 : 00 On am 11 : 00 On... press the OK button. 3 Press the c or d button to move to System, then press the OK button. Movie - You can set the mode for easier viewing. Game - 09 Adjustments and Settings Sleep Timer You can select a time period of images input from the five viewing options, depending on the remote control. System...
... user to select the preset time interval as follows: Off - 10 min - 20 min - 30 min - 60 min - 120 min 180 min - 240 min Clock Setting Time Time Zone DST On Timer Off Timer Auto Power Off Sleep Timer am 9 : 30 Hawaii On On am 7 : 00 On am 11 : 00 On... press the OK button. 3 Press the c or d button to move to System, then press the OK button. Movie - You can set the mode for easier viewing. Game - 09 Adjustments and Settings Sleep Timer You can select a time period of images input from the five viewing options, depending on the remote control. System...


