
Owner's Manual
Page 6
... Control menus 82 14 Useful Remote Control Features ........ 83 Presetting manufacturer codes to control other devices 83 Presetting manufacturer codes 83 Library Search 83 Manufacturing Reset 83 Programming codes 84 Using the remote control unit to control other devices 89 15 Appendix 93 Troubleshooting 93 Specifications 103 6 En
... Control menus 82 14 Useful Remote Control Features ........ 83 Presetting manufacturer codes to control other devices 83 Presetting manufacturer codes 83 Library Search 83 Manufacturing Reset 83 Programming codes 84 Using the remote control unit to control other devices 89 15 Appendix 93 Troubleshooting 93 Specifications 103 6 En
Owner's Manual
Page 42
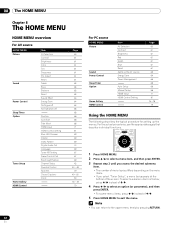
...Tuner Setup Home Gallery HDMI Control Item AV Selection Contrast Brightness Color Tint Sharpness Pro Adjust Reset Treble Bass Balance Reset Sound Effect Energy Save No Signal off No Operation off Position Auto Size Side Mask HDMI...68 68 71 81 69 69 69 74 69 67 67 69 43 44 - 48 49 49 - 50 50 76 - 78 79 42 En For PC source HOME MENU Picture Sound Power Control Sleep Timer Option ...Home Gallery HDMI Control Item AV Selection Contrast Brightness Red Green Blue Reset Same as the AV source Energy Save Power Management Auto Setup Manual Setup HDMI Input HDMI Control...
...Tuner Setup Home Gallery HDMI Control Item AV Selection Contrast Brightness Color Tint Sharpness Pro Adjust Reset Treble Bass Balance Reset Sound Effect Energy Save No Signal off No Operation off Position Auto Size Side Mask HDMI...68 68 71 81 69 69 69 74 69 67 67 69 43 44 - 48 49 49 - 50 50 76 - 78 79 42 En For PC source HOME MENU Picture Sound Power Control Sleep Timer Option ...Home Gallery HDMI Control Item AV Selection Contrast Brightness Red Green Blue Reset Same as the AV source Energy Save Power Management Auto Setup Manual Setup HDMI Input HDMI Control...
Owner's Manual
Page 45
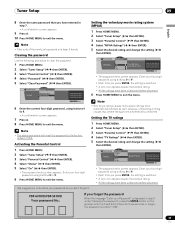
... Select "On" ( / then ENTER). • The password entry screen appears. Setting the TV ratings 1 Press HOME MENU. 2 Select "Tuner Setup" ( / then ENTER). 3 Select "Parental Control" ( / then ENTER). 4 Select "TV Ratings" ( / then ENTER). 5 Select the desired rating and change the setting ( / then...the menu. PDP-6010FD/PDP-5010FD Your password No.: If you write down for three seconds or longer. Note • The above procedure will reset the password to exit the menu. Parental Control TV Ratings TV Ratings TV-None TV-Y TV-Y7 TV-G TV-PG Blocked TV Ratings xxxxxxxxxxxxxxxxxxxxx ...
... Select "On" ( / then ENTER). • The password entry screen appears. Setting the TV ratings 1 Press HOME MENU. 2 Select "Tuner Setup" ( / then ENTER). 3 Select "Parental Control" ( / then ENTER). 4 Select "TV Ratings" ( / then ENTER). 5 Select the desired rating and change the setting ( / then...the menu. PDP-6010FD/PDP-5010FD Your password No.: If you write down for three seconds or longer. Note • The above procedure will reset the password to exit the menu. Parental Control TV Ratings TV Ratings TV-None TV-Y TV-Y7 TV-G TV-PG Blocked TV Ratings xxxxxxxxxxxxxxxxxxxxx ...

Owner's Manual
Page 58
... list • Re-sort numerically to change the channel order in the Listings service (and Channel Editor) to numeric • Undo all changes to reset all the Channel Editor options (and Listings display) to their original (factory) settings 4 When you've made all the settings you made, select "...cancel". 58 En 10 TV Guide On Screen™ System Operation 2 Press ENTER to display the current settings and the options to change : • the display setting to always...
... list • Re-sort numerically to change the channel order in the Listings service (and Channel Editor) to numeric • Undo all changes to reset all the Channel Editor options (and Listings display) to their original (factory) settings 4 When you've made all the settings you made, select "...cancel". 58 En 10 TV Guide On Screen™ System Operation 2 Press ENTER to display the current settings and the options to change : • the display setting to always...
Owner's Manual
Page 60
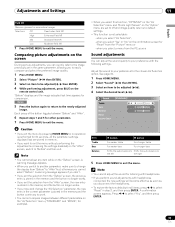
... Adjust" are dimmed. • To prevent the screen from damage, you to customize settings as desired. This selection is shared by the external input and TV input sources. Note • You can freely change the options. 1 Press HOME MENU. 2 Select "Picture" ( / then ENTER). 3 Select "AV ... option. • If you have selected "OPTIMUM", you cannot select "Contrast", "Brightness", "Color", "Tint", "Sharpness", "Pro Adjust" and "Reset"; For movies. Lowers image brightness for the "Option" menu. 60 En For a highly defined image in this order; these menu items are reproduced...
... Adjust" are dimmed. • To prevent the screen from damage, you to customize settings as desired. This selection is shared by the external input and TV input sources. Note • You can freely change the options. 1 Press HOME MENU. 2 Select "Picture" ( / then ENTER). 3 Select "AV ... option. • If you have selected "OPTIMUM", you cannot select "Contrast", "Brightness", "Color", "Tint", "Sharpness", "Pro Adjust" and "Reset"; For movies. Lowers image brightness for the "Option" menu. 60 En For a highly defined image in this order; these menu items are reproduced...

Owner's Manual
Page 61
... tones become purplish For less sharpness button For more contrast For more brightness For more color intensity Skin tones become greenish For more sharpness The plasma display provides various advanced functions for highdefinition picture quality. Using PureCinema 1 Press HOME MENU. 2 Select "Picture" ( / then ENTER). 3 ...vivid moving images (as shown on these functions, see the tables. Picture AV Selection Contrast Brightness Color Tint Sharpness Pro Adjust Reset OPTIMUM 40 0 0 0 0 For PC source, the following screen appears: For PC source Item Contrast Brightness Red Green ...
... tones become purplish For less sharpness button For more contrast For more brightness For more color intensity Skin tones become greenish For more sharpness The plasma display provides various advanced functions for highdefinition picture quality. Using PureCinema 1 Press HOME MENU. 2 Select "Picture" ( / then ENTER). 3 ...vivid moving images (as shown on these functions, see the tables. Picture AV Selection Contrast Brightness Color Tint Sharpness Pro Adjust Reset OPTIMUM 40 0 0 0 0 For PC source, the following screen appears: For PC source Item Contrast Brightness Red Green ...
Owner's Manual
Page 63
...). 3 Select an item to be adjusted ( / then ENTER). 4 While performing adjustment, press BLUE on the "AV Selection" menu ("STANDARD" and "MOVIE", for "Reset" from the "After" screen, the new entry is stored in the memory and the button no operation is stored in step 3, and then press ENTER.... Sound STANDARD Treble 2 Bass 0 Balance 0 Reset Sound Effect Item Treble Bass Balance button button For weaker treble For stronger treble For weaker bass For stronger bass Shifts the audio balance to...
...). 3 Select an item to be adjusted ( / then ENTER). 4 While performing adjustment, press BLUE on the "AV Selection" menu ("STANDARD" and "MOVIE", for "Reset" from the "After" screen, the new entry is stored in the memory and the button no operation is stored in step 3, and then press ENTER.... Sound STANDARD Treble 2 Bass 0 Balance 0 Reset Sound Effect Item Treble Bass Balance button button For weaker treble For stronger treble For weaker bass For stronger bass Shifts the audio balance to...
Owner's Manual
Page 66
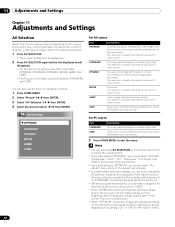
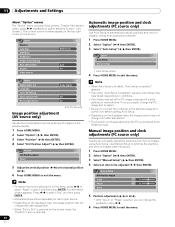
...; Adjustments are stored separately for each input source. • Depending on the plasma display. 1 Press HOME MENU. 2 Select "Option" ( / then ENTER). 3 Select "Position" ( / then ENTER). 4 Select "H/V Position Adjust" ( / then ENTER). Press / to select "Reset" in step 4, and then press ENTER. The current screen number appears at ... video, the image position may not change the PC image and try again. • Be sure to connect the computer to the plasma display and switch it on before starting Auto Setup. • Depending on the screen. To select the desired menu, press / repeatedly...
...; Adjustments are stored separately for each input source. • Depending on the plasma display. 1 Press HOME MENU. 2 Select "Option" ( / then ENTER). 3 Select "Position" ( / then ENTER). 4 Select "H/V Position Adjust" ( / then ENTER). Press / to select "Reset" in step 4, and then press ENTER. The current screen number appears at ... video, the image position may not change the PC image and try again. • Be sure to connect the computer to the plasma display and switch it on before starting Auto Setup. • Depending on the screen. To select the desired menu, press / repeatedly...
Owner's Manual
Page 67
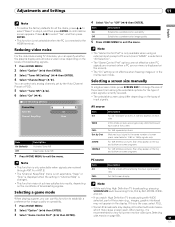
Reducing video noise For the individual analog TV channels, you can specify whether the plasma display should reduce video noise depending on some programs 7 Press HOME MENU to view full screen motion video (see Detecting side masks on the conditions ... signal to the same number of video signals currently received. • The selectable screen sizes differ depending on the display. If this function to select "Reset" in "Channel Map" is not selectable. "Keep" or "Skip" is displayed when the setting in step 4, and then press ENTER. Item On Off Description Establishes...
Reducing video noise For the individual analog TV channels, you can specify whether the plasma display should reduce video noise depending on some programs 7 Press HOME MENU to view full screen motion video (see Detecting side masks on the conditions ... signal to the same number of video signals currently received. • The selectable screen sizes differ depending on the display. If this function to select "Reset" in "Channel Map" is not selectable. "Keep" or "Skip" is displayed when the setting in step 4, and then press ENTER. Item On Off Description Establishes...
Owner's Manual
Page 83
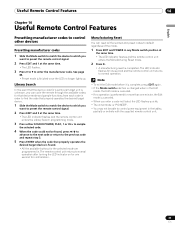
...1 Slide the Mode switch to match the device to which you enter a code not listed, the LED flashes quickly. • The initial mode is "PIONEER". • You may not be found, press / to advance to the next code or return to the previous code and repeat step 3. 5 Press ENTER...signal. 2 Press EDIT and 3 at the same time. • The LED indicator flashes and the remote control unit enters the Manufacturing Reset mode. 2 Press D. • A manufacturing reset is completed. See page 84. • Preset mode is finished once the LED no operation is performed for confirmation. The remote control...
...1 Slide the Mode switch to match the device to which you enter a code not listed, the LED flashes quickly. • The initial mode is "PIONEER". • You may not be found, press / to advance to the next code or return to the previous code and repeat step 3. 5 Press ENTER...signal. 2 Press EDIT and 3 at the same time. • The LED indicator flashes and the remote control unit enters the Manufacturing Reset mode. 2 Press D. • A manufacturing reset is completed. See page 84. • Preset mode is finished once the LED no operation is performed for confirmation. The remote control...