

Owner's Manual
Page 2
... THE POINT OF CABLE ENTRY AS PRACTICAL. a plug that may require the use attachments/accessories specified by the manufacturer. 12) Use only with the cart, stand, tripod, bracket, or table specified by operating the equipment on or pinched particularly at plugs, convenience receptacles, and the point where they exit from tip...
... THE POINT OF CABLE ENTRY AS PRACTICAL. a plug that may require the use attachments/accessories specified by the manufacturer. 12) Use only with the cart, stand, tripod, bracket, or table specified by operating the equipment on or pinched particularly at plugs, convenience receptacles, and the point where they exit from tip...
Owner's Manual
Page 4
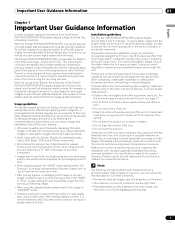
... the Pioneer stand 28 Cable connections for watching digital and/or conventional TV channels 30 Inserting the CableCARD 30 Routing cables 31 Connecting the power cord 31 Preparing the remote control unit 32 Allowed operation range of the remote control unit 32 06 Basic Operations 33 Turning on wall unit (PDP-5010FD 26 Preventing the plasma...
... the Pioneer stand 28 Cable connections for watching digital and/or conventional TV channels 30 Inserting the CableCARD 30 Routing cables 31 Connecting the power cord 31 Preparing the remote control unit 32 Allowed operation range of the remote control unit 32 06 Basic Operations 33 Turning on wall unit (PDP-5010FD 26 Preventing the plasma...
Owner's Manual
Page 7
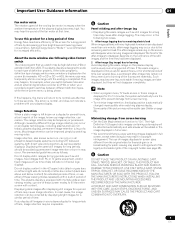
...Pioneer PDP-6010FD/PDP-5010FD, you can ensure longer and satisfactory results from a TV, VCR, DVD player or any still image, it is best to view a normal moving picture in the event of the unit to remove dust build-up by Pioneer... electrical circuit humming/glass panel buzzing 7 En Installation guidelines The Pioneer PDP-6010FD/PDP-5010FD plasma display incorporates a very thin design. To ensure correct installation, ...over three times longer than the Pioneer stand or installation bracket may cause uneven wear. To achieve images of the plasma panel, which have static portions...
...Pioneer PDP-6010FD/PDP-5010FD, you can ensure longer and satisfactory results from a TV, VCR, DVD player or any still image, it is best to view a normal moving picture in the event of the unit to remove dust build-up by Pioneer... electrical circuit humming/glass panel buzzing 7 En Installation guidelines The Pioneer PDP-6010FD/PDP-5010FD plasma display incorporates a very thin design. To ensure correct installation, ...over three times longer than the Pioneer stand or installation bracket may cause uneven wear. To achieve images of the plasma panel, which have static portions...
Owner's Manual
Page 9
...size after -image lagging may be improved simply by displaying bright images for long periods (such as still images, fixed images from PC or TV game equipment, and/or fixed images such as permanent image retention or burn-in the 4:3 aspect ratio (black or gray bars on left...or SD → HD), the menu size may remain on page 69). If the same image is automatically changed imperceptibly when watching plasma display. USE ONLY WITH A CART, STAND, TRIPOD, BRACKET, OR TABLE RECOMMENDED BY THE MANUFACTURER, OR SOLD WITH THE PRODUCT. A PRODUCT AND CART COMBINATION SHOULD BE MOVED WITH...
...size after -image lagging may be improved simply by displaying bright images for long periods (such as still images, fixed images from PC or TV game equipment, and/or fixed images such as permanent image retention or burn-in the 4:3 aspect ratio (black or gray bars on left...or SD → HD), the menu size may remain on page 69). If the same image is automatically changed imperceptibly when watching plasma display. USE ONLY WITH A CART, STAND, TRIPOD, BRACKET, OR TABLE RECOMMENDED BY THE MANUFACTURER, OR SOLD WITH THE PRODUCT. A PRODUCT AND CART COMBINATION SHOULD BE MOVED WITH...
Owner's Manual
Page 10
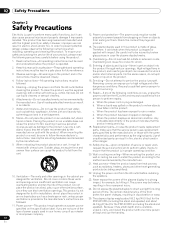
... request a qualified service person to perform repairs. Do not place the product on the product. 4. Do not expose the plasma display to direct sunlight for future reference. 3. The optical characteristics of objects and liquids-Never insert an object into the product... shock and/or other soft cloth (e.g., cotton, flannel). Use of unauthorized parts can expose you are designed for the PDP-5010FD (including the stand and speaker). generating products (including amplifiers). 10. Power source-This product must be sure to follow the manufacturer's instructions...
... request a qualified service person to perform repairs. Do not place the product on the product. 4. Do not expose the plasma display to direct sunlight for future reference. 3. The optical characteristics of objects and liquids-Never insert an object into the product... shock and/or other soft cloth (e.g., cotton, flannel). Use of unauthorized parts can expose you are designed for the PDP-5010FD (including the stand and speaker). generating products (including amplifiers). 10. Power source-This product must be sure to follow the manufacturer's instructions...
Owner's Manual
Page 12
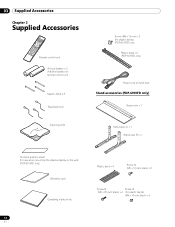
...; 3 Bead band × 3 Cleaning cloth Screw (M4 x 10 mm) x 2 (for plastic bands) (PDP-5010FD only) Plastic band x 2 (PDP-5010FD only) Power cord (2 m/6.6 feet) Stand accessories (PDP-6010FD only) Base cover x 1 Stand pipe (L) x 1 Stand pipe (R) x 1 Terminal position sheet (for use when mounting the plasma display on the wall) (PDP-6010FD only) Warranty card Operating instructions 12 En Plastic band x 4 Screw ➀...
...; 3 Bead band × 3 Cleaning cloth Screw (M4 x 10 mm) x 2 (for plastic bands) (PDP-5010FD only) Plastic band x 2 (PDP-5010FD only) Power cord (2 m/6.6 feet) Stand accessories (PDP-6010FD only) Base cover x 1 Stand pipe (L) x 1 Stand pipe (R) x 1 Terminal position sheet (for use when mounting the plasma display on the wall) (PDP-6010FD only) Warranty card Operating instructions 12 En Plastic band x 4 Screw ➀...
Owner's Manual
Page 17
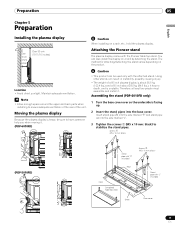
...: black) (PDP-5010FD) Stand pipe with "R" inscribed Screws ➀ (M5 x 10 mm: black) Rear Front Completed Table top stand Stand pipe with the Pioneer table top stand. Assembling the stand (PDP-6010FD only) 1 Turn the base cover over so the underside is unstable. Preparation 05 English Chapter 5 Preparation Installing the plasma display Over 10 cm (3 15/16 inches) Over 50 cm...
...: black) (PDP-5010FD) Stand pipe with "R" inscribed Screws ➀ (M5 x 10 mm: black) Rear Front Completed Table top stand Stand pipe with the Pioneer table top stand. Assembling the stand (PDP-6010FD only) 1 Turn the base cover over so the underside is unstable. Preparation 05 English Chapter 5 Preparation Installing the plasma display Over 10 cm (3 15/16 inches) Over 50 cm...
Owner's Manual
Page 18
... (see "Installing the Pioneer speaker". For speaker installation, see illustrations on page 22 for PDP-6010FD and on page 26 for PDP-6010FD and PDP-5010FD (use excessive amplifier volume. Mistakenly installing the stand pipes may result in warping of the stand indicates downward. (PDP-6010FD) • Please handle the speaker with anything other than the plasma display. Caution...
... (see "Installing the Pioneer speaker". For speaker installation, see illustrations on page 22 for PDP-6010FD and on page 26 for PDP-6010FD and PDP-5010FD (use excessive amplifier volume. Mistakenly installing the stand pipes may result in warping of the stand indicates downward. (PDP-6010FD) • Please handle the speaker with anything other than the plasma display. Caution...
Owner's Manual
Page 19
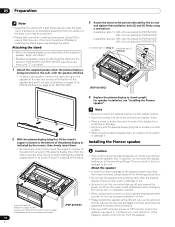
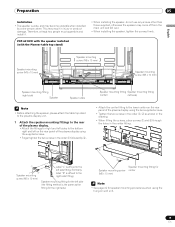
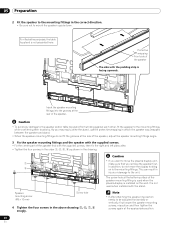
...8226; See page 22 for speaker mounting procedures when using the hung on the rear panel of the plasma display. • Attach the fittings for right and left sides to the rear of the plasma display using the two supplied screws. • Tighten the two screws in the order , as shown ... wide, and may come off from the main unit and fall over. • When installing the speaker, tighten the screws firmly. PDP-6010FD with the speaker installed (with the Pioneer table top stand) Speaker mounting screw (M5 x 10 mm) Speaker mounting screw (M5 x 10 mm) Speaker mounting screw (M5 x 10 mm) ...
...8226; See page 22 for speaker mounting procedures when using the hung on the rear panel of the plasma display. • Attach the fittings for right and left sides to the rear of the plasma display using the two supplied screws. • Tighten the two screws in the order , as shown ... wide, and may come off from the main unit and fall over. • When installing the speaker, tighten the screws firmly. PDP-6010FD with the speaker installed (with the Pioneer table top stand) Speaker mounting screw (M5 x 10 mm) Speaker mounting screw (M5 x 10 mm) Speaker mounting screw (M5 x 10 mm) ...
Owner's Manual
Page 20
...speaker mounting fittings and the speaker with the supplied screws. • Fix the center part of the speaker. It is not used when the plasma display is not presented here. Insert the speaker mounting fittings into the grooves at the appropriate position. 20 En Note • If after ...the display holding on the wall. Caution • If you may easily strike the stand, use the protective wrapping in which the speaker was wrapped between the speaker and stand. • When the speaker mounting fittings do not move the plasma display unit, make sure that you remove the speaker first.
...speaker mounting fittings and the speaker with the supplied screws. • Fix the center part of the speaker. It is not used when the plasma display is not presented here. Insert the speaker mounting fittings into the grooves at the appropriate position. 20 En Note • If after ...the display holding on the wall. Caution • If you may easily strike the stand, use the protective wrapping in which the speaker was wrapped between the speaker and stand. • When the speaker mounting fittings do not move the plasma display unit, make sure that you remove the speaker first.
Owner's Manual
Page 22
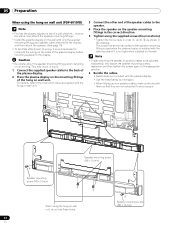
... the back of the plasma display. 2 Place the plasma display on the mounting fittings of the hung on wall unit. 05 Preparation When using the hung on wall unit (PDP-6010FD) Note • First lay the plasma display on top of a soft sheet etc., remove the stand, then attach the speaker... mounting fittings. • Install the plasma display on the wall with only the speaker mounting fittings and ...
... the back of the plasma display. 2 Place the plasma display on the mounting fittings of the hung on wall unit. 05 Preparation When using the hung on wall unit (PDP-6010FD) Note • First lay the plasma display on top of a soft sheet etc., remove the stand, then attach the speaker... mounting fittings. • Install the plasma display on the wall with only the speaker mounting fittings and ...
Owner's Manual
Page 23
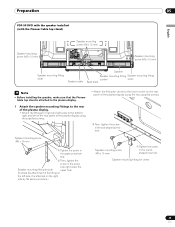
Preparation 05 English PDP-5010FD with the speaker installed (with the Pioneer table top stand) Speaker mounting screw (M5 x 10 mm) Speaker mounting screw (M5 x 10 mm) 4 5 Speaker mounting screw (M5 x 10 mm) Speaker mounting fitting (side) Speaker cable Speaker ... upper screw hole first. ➁ Then, tighten the screw in the roundshaped hole first. It is attached to the plasma display. 1 Attach the speaker mounting fittings to the rear of the plasma display. • Attach the fittings for right and left sides to the bottom right and left on the rear panel...
Preparation 05 English PDP-5010FD with the speaker installed (with the Pioneer table top stand) Speaker mounting screw (M5 x 10 mm) Speaker mounting screw (M5 x 10 mm) 4 5 Speaker mounting screw (M5 x 10 mm) Speaker mounting fitting (side) Speaker cable Speaker ... upper screw hole first. ➁ Then, tighten the screw in the roundshaped hole first. It is attached to the plasma display. 1 Attach the speaker mounting fittings to the rear of the plasma display. • Attach the fittings for right and left sides to the bottom right and left on the rear panel...

Owner's Manual
Page 24
... mm) 1 Speaker mounting screw When using the (M5 x 10 mm) table top stand, do not move the plasma display, make sure that you remove the speaker first. For illustrative purposes, the table top stand is facing upwards. 05 Preparation 2 Fit the speaker to the mounting fittings in the correct... direction. • Be sure not to move the plasma display holding on the back of the speaker The side with the stand. This can result in injury or damage to the mounting fittings while confirming their locations. In 3 addition...
... mm) 1 Speaker mounting screw When using the (M5 x 10 mm) table top stand, do not move the plasma display, make sure that you remove the speaker first. For illustrative purposes, the table top stand is facing upwards. 05 Preparation 2 Fit the speaker to the mounting fittings in the correct... direction. • Be sure not to move the plasma display holding on the back of the speaker The side with the stand. This can result in injury or damage to the mounting fittings while confirming their locations. In 3 addition...
Owner's Manual
Page 26
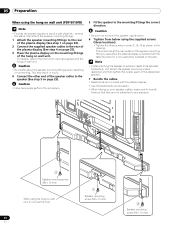
...speaker mounting fittings when installing or connecting. 05 Preparation When using the hung on wall unit (PDP-5010FD) Note • First lay the plasma display on top of a soft sheet etc., remove the stand, then attach the speaker mounting fittings. 1 Attach the speaker mounting fittings to the rear of... the plasma display (See step 1 on page 23). 2 Connect the supplied speaker cables to the rear of the plasma display (See step 4 on page 25). 3 Place the plasma display on the...
...speaker mounting fittings when installing or connecting. 05 Preparation When using the hung on wall unit (PDP-5010FD) Note • First lay the plasma display on top of a soft sheet etc., remove the stand, then attach the speaker mounting fittings. 1 Attach the speaker mounting fittings to the rear of... the plasma display (See step 1 on page 23). 2 Connect the supplied speaker cables to the rear of the plasma display (See step 4 on page 25). 3 Place the plasma display on the...

Owner's Manual
Page 27
...adequate strength should always be sure to take these precautions, the plasma display could fall over After installing the stand, be used to support the plasma display. Perform this work the same way on a table or rack Stabilize the plasma display as earthquakes, or of the tabletop panel before using a... of 4 mm (5/32 inch) and that are at least 20 mm (13/16 inch) long. (PDP-6010FD) 20 mm (13/16 inch) min. Note • To stabilize the plasma display on the left and right sides. (PDP-5010FD) 4 5 Supplied screw Wood screw (M4 x 10 mm: black) (commercially available, 4 mm x 20...
...adequate strength should always be sure to take these precautions, the plasma display could fall over After installing the stand, be used to support the plasma display. Perform this work the same way on a table or rack Stabilize the plasma display as earthquakes, or of the tabletop panel before using a... of 4 mm (5/32 inch) and that are at least 20 mm (13/16 inch) long. (PDP-6010FD) 20 mm (13/16 inch) min. Note • To stabilize the plasma display on the left and right sides. (PDP-5010FD) 4 5 Supplied screw Wood screw (M4 x 10 mm: black) (commercially available, 4 mm x 20...
Owner's Manual
Page 28
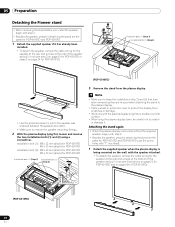
...the Pioneer stand • When removing the stand before you install the speaker, begin with the speaker attached. • To detach the speaker, remove the cable wiring for the speaker at the rear and screws at the rear of the speaker and pull it . Attaching the stand again • When the plasma ...display is being mounted on page 26 for PDP-5010FD). (PDP-6010FD) 28 En Note • Make sure to keep the installation bolts (1) and (2) that have been ...
...the Pioneer stand • When removing the stand before you install the speaker, begin with the speaker attached. • To detach the speaker, remove the cable wiring for the speaker at the rear and screws at the rear of the speaker and pull it . Attaching the stand again • When the plasma ...display is being mounted on page 26 for PDP-5010FD). (PDP-6010FD) 28 En Note • Make sure to keep the installation bolts (1) and (2) that have been ...
Owner's Manual
Page 29
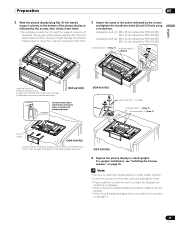
... "Installing the Pioneer speaker" on a table or similar surface. • When lying the plasma display down, be careful not to stand upright. Note • Be sure to install the plasma display in the accompanying diagram. (PDP-6010FD) Screw hole with "T" inscribed Installation bolts (1) (Step 2) Installation bolts (2) (Step 1) Plasma display (PDP-5010FD) Insert the stand into the plasma display so that...
... "Installing the Pioneer speaker" on a table or similar surface. • When lying the plasma display down, be careful not to stand upright. Note • Be sure to install the plasma display in the accompanying diagram. (PDP-6010FD) Screw hole with "T" inscribed Installation bolts (1) (Step 2) Installation bolts (2) (Step 1) Plasma display (PDP-5010FD) Insert the stand into the plasma display so that...
Owner's Manual
Page 30
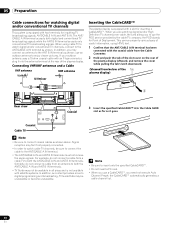
.../UHF antennas and a Cable VHF antenna UHF antenna Inserting the CableCARD™ The plasma display is equipped with two terminals for inputting TV broadcasting signals: ANT/CABLE A IN and ANT B IN. Coaxial Cable TV Note • Be sure to connect coaxial cables as shown; When you are ... antenna uses a 75-ohm coaxial cable with satellite systems. In addition, as shown. the POD stands for Point of useful information, using cable TV to watch digital and/or conventional TV channels, connect to the ANT/CABLE A IN terminal as content providers move to digital programming and ...
.../UHF antennas and a Cable VHF antenna UHF antenna Inserting the CableCARD™ The plasma display is equipped with two terminals for inputting TV broadcasting signals: ANT/CABLE A IN and ANT B IN. Coaxial Cable TV Note • Be sure to connect coaxial cables as shown; When you are ... antenna uses a 75-ohm coaxial cable with satellite systems. In addition, as shown. the POD stands for Point of useful information, using cable TV to watch digital and/or conventional TV channels, connect to the ANT/CABLE A IN terminal as content providers move to digital programming and ...
Owner's Manual
Page 62
...( / then ENTER). Selections High White with bluish tone Mid Natural tone Low White with clearer color contours. The CTI stands for "Game Control Pref" on images so that the difference between brightness and darkness becomes more distinct Selections Off Deactivates Black ... "3DNR" or "Field NR". 6 Select the desired parameter ( / then ENTER). 3DNR Eliminates video noise for clean crisp images. 3DNR stands for images Selections Off Deactivates ACL On Activates ACL Enhancer Mode Selects processing of the image's high frequency (detailed) areas Selections 1 Selects Hard...
...( / then ENTER). Selections High White with bluish tone Mid Natural tone Low White with clearer color contours. The CTI stands for "Game Control Pref" on images so that the difference between brightness and darkness becomes more distinct Selections Off Deactivates Black ... "3DNR" or "Field NR". 6 Select the desired parameter ( / then ENTER). 3DNR Eliminates video noise for clean crisp images. 3DNR stands for images Selections Off Deactivates ACL On Activates ACL Enhancer Mode Selects processing of the image's high frequency (detailed) areas Selections 1 Selects Hard...
Owner's Manual
Page 103
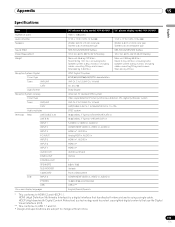
... INPUT INPUT 5 INPUT 6 INPUT 7 AUDIO OUT DIGITAL OUT CONTROL OUT SPEAKERS SUB WOOFER CableCARD Side INPUT 3 PHONES USB On-screen display languages 60" plasma display model: PDP-6010FD 50" plasma display model: PDP-5010FD 1920 × 1080 pixels 17 W + 17 W (1 kHz, 10 %, 6 Ω) 17 W + 17 W (1 kHz, 10 %, 6 ...145.9 lbs.) Main unit: 38.5 kg (84.9 lbs.) Stand: 2.2 kg (4.9 lbs.) (including bolts) Speaker system: 3.3 kg (7.3 lbs.) (including cables, mounting fittings and screws) Total: 44.0 kg (97 lbs.) ATSC Digital TV system 8VSB/64QAM/256QAM/QPSK demodulation VHF Ch. 2 to 13...
... INPUT INPUT 5 INPUT 6 INPUT 7 AUDIO OUT DIGITAL OUT CONTROL OUT SPEAKERS SUB WOOFER CableCARD Side INPUT 3 PHONES USB On-screen display languages 60" plasma display model: PDP-6010FD 50" plasma display model: PDP-5010FD 1920 × 1080 pixels 17 W + 17 W (1 kHz, 10 %, 6 Ω) 17 W + 17 W (1 kHz, 10 %, 6 ...145.9 lbs.) Main unit: 38.5 kg (84.9 lbs.) Stand: 2.2 kg (4.9 lbs.) (including bolts) Speaker system: 3.3 kg (7.3 lbs.) (including cables, mounting fittings and screws) Total: 44.0 kg (97 lbs.) ATSC Digital TV system 8VSB/64QAM/256QAM/QPSK demodulation VHF Ch. 2 to 13...


