Operating Instructions
Page 6
... (USA) Inc. iivi En Safety Precautions Operation is subject to Pioneer without first calling the Customer Support Division at the above listed number for assistance. BOX 1760, Long Beach, CA.... English Safety Precautions FEDERAL COMMUNICATIONS COMMISSION DECLARATION OF CONFORMITY This device complies with Video Card Model Number: PDP-503CMX / PDP-433CMX (Plasma Display) PDA-5002 (Video Card) Product Category: Class B Personal Computers & Peripherals Responsible Party Name: PIONEER ELECTRONICS (USA) INC. Customer Support Division P. O. Customer Support Division Address: P.O.
... (USA) Inc. iivi En Safety Precautions Operation is subject to Pioneer without first calling the Customer Support Division at the above listed number for assistance. BOX 1760, Long Beach, CA.... English Safety Precautions FEDERAL COMMUNICATIONS COMMISSION DECLARATION OF CONFORMITY This device complies with Video Card Model Number: PDP-503CMX / PDP-433CMX (Plasma Display) PDA-5002 (Video Card) Product Category: Class B Personal Computers & Peripherals Responsible Party Name: PIONEER ELECTRONICS (USA) INC. Customer Support Division P. O. Customer Support Division Address: P.O.
Operating Instructions
Page 9
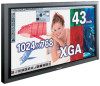
The PDP-433CMX display differs as their respective buttons and controls will be necessary. L EVEL G. L E V E L B. Screen Displays The example screen displays provided in this manual is set up ... the PDP-503CMX model. The remainder of the sections in this manual are the same for both horizontal directions. R. ENHANCE :0 :0 : +60 : +60 : +60 :0 :0 SET UP INPUT1 OPTION RE S ET SELECT SET ENTER MENU EXIT Example of PDP-433CMX Screen Display: ÷ The PDP-433CMX screen display fills the display area in both the PDP-503CMX and PDP-433CMX. E NHANCE...
The PDP-433CMX display differs as their respective buttons and controls will be necessary. L EVEL G. L E V E L B. Screen Displays The example screen displays provided in this manual is set up ... the PDP-503CMX model. The remainder of the sections in this manual are the same for both horizontal directions. R. ENHANCE :0 :0 : +60 : +60 : +60 :0 :0 SET UP INPUT1 OPTION RE S ET SELECT SET ENTER MENU EXIT Example of PDP-433CMX Screen Display: ÷ The PDP-433CMX screen display fills the display area in both the PDP-503CMX and PDP-433CMX. E NHANCE...
Operating Instructions
Page 15
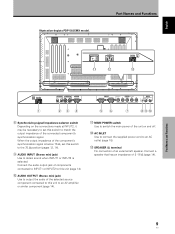
... may be necessary to set this unit to an AC outlet (page 15). ~ SPEAKER (L) terminal For connection of 8 -16 Ω (page 14). English Illustration depicts PDP-503CMX model. Part Names and Functions 9 En Part Names and Functions AC INLET - = 8Ω ~16Ω SPEAKER + -
... may be necessary to set this unit to an AC outlet (page 15). ~ SPEAKER (L) terminal For connection of 8 -16 Ω (page 14). English Illustration depicts PDP-503CMX model. Part Names and Functions 9 En Part Names and Functions AC INLET - = 8Ω ~16Ω SPEAKER + -

Operating Instructions
Page 19
... SYNC connections, do not make any connections to an external monitor or other component from the OUTPUT (INPUT1) terminal when the main power of computer model being connected, a conversion connector or adapter etc. When connecting to INPUT1 INPUT1 OUTPUT ANALOG RGB (ANALOG RGB) Connect the cable corresponding to the shape of...
... SYNC connections, do not make any connections to an external monitor or other component from the OUTPUT (INPUT1) terminal when the main power of computer model being connected, a conversion connector or adapter etc. When connecting to INPUT1 INPUT1 OUTPUT ANALOG RGB (ANALOG RGB) Connect the cable corresponding to the shape of...

Operating Instructions
Page 22
... of the unit, then snap 2 into an appropriate hole on the situation. Speed clamps are included with this unit for bunching cables together. Illustration depicts PDP-503CMX model. Insert 1 into the back of the display. 1 2 1 Organize cables together using the 4 holes marked with the provided bead bands. Note Cables can be damaged...
... of the unit, then snap 2 into an appropriate hole on the situation. Speed clamps are included with this unit for bunching cables together. Illustration depicts PDP-503CMX model. Insert 1 into the back of the display. 1 2 1 Organize cables together using the 4 holes marked with the provided bead bands. Note Cables can be damaged...

Operating Instructions
Page 37
...try turning power on pages 35 - 36 and set the vacuum cleaner to see if a warning is displayed on page 32. Vents Illustration depicts PDP-503CMX model. Before cleaning, be remedied with a dry soft cloth. Cleaning the display panel body and remote control Do not under any objects blocking the ... of this unit's screen to unplug the power cord from its outlet, and consult a Pioneer service center or your dealer. 31 En If there is no display check to its outlet and consult a Pioneer service center or your dealer. After message confirmation, check the condition of such liquids may ...
...try turning power on pages 35 - 36 and set the vacuum cleaner to see if a warning is displayed on page 32. Vents Illustration depicts PDP-503CMX model. Before cleaning, be remedied with a dry soft cloth. Cleaning the display panel body and remote control Do not under any objects blocking the ... of this unit's screen to unplug the power cord from its outlet, and consult a Pioneer service center or your dealer. 31 En If there is no display check to its outlet and consult a Pioneer service center or your dealer. After message confirmation, check the condition of such liquids may ...