
Operating Instructions
Page 3
PIONEER cannot assume liabilities for Dealers: After installation, be sure to deliver this manual in a safe place. Notes on Installation Work: This product is marketed assuming that it useful in the future. English Français Safety Precautions ...have an installation specialist or your Plasma Display, please read the "Safety Precautions" and these "Operating Instructions" carefully so you very much for purchasing this PIONEER product. i En Before using your dealer install and set up the product. You will know how to handle the product. Note for damage caused ...
PIONEER cannot assume liabilities for Dealers: After installation, be sure to deliver this manual in a safe place. Notes on Installation Work: This product is marketed assuming that it useful in the future. English Français Safety Precautions ...have an installation specialist or your Plasma Display, please read the "Safety Precautions" and these "Operating Instructions" carefully so you very much for purchasing this PIONEER product. i En Before using your dealer install and set up the product. You will know how to handle the product. Note for damage caused ...

Operating Instructions
Page 7
English Contents Safety Precautions i Features 2 Before Proceeding 3 How to Use This Manual 3 Checking Supplied Accessories 5 Part Names and Functions 6 Main Unit 6 Remote Control Unit 7 Connection Panel 8 Installation and Connections 10 Installation of the Unit ...ZOOM 23 Automatic Power OFF 24 Display Panel Adjustments 25 Adjusting the Picture Quality 25 Adjusting the Image Position and Clock (Automatic Adjustment 26 Manual Adjustment of Screen Position and Clock 27 Other Operations 28 Rewriting the Input Display (INPUT LABEL 28 Power Control Function 29 AUTO FUNCTION 29 ...
English Contents Safety Precautions i Features 2 Before Proceeding 3 How to Use This Manual 3 Checking Supplied Accessories 5 Part Names and Functions 6 Main Unit 6 Remote Control Unit 7 Connection Panel 8 Installation and Connections 10 Installation of the Unit ...ZOOM 23 Automatic Power OFF 24 Display Panel Adjustments 25 Adjusting the Picture Quality 25 Adjusting the Image Position and Clock (Automatic Adjustment 26 Manual Adjustment of Screen Position and Clock 27 Other Operations 28 Rewriting the Input Display (INPUT LABEL 28 Power Control Function 29 AUTO FUNCTION 29 ...
Operating Instructions
Page 9
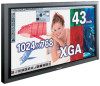
...+60 : +60 : +60 :0 :0 SET UP INPUT1 OPTION RE S ET SELECT SET ENTER MENU EXIT Example of PDP-433CMX Screen Display: ÷ The PDP-433CMX screen display fills the display area in this manual. E NHANCE V. L EV EL G. The section "Setting Up the System" starting on page 17 covers the necessary on ... requirements of specific components and personal preferences. Before Proceeding 3 En The PDP-433CMX display differs as their respective buttons and controls will be referred to throughout this manual are the same for the PDP-503CMX model. Once the unit has been taken out of the display...
...+60 : +60 : +60 :0 :0 SET UP INPUT1 OPTION RE S ET SELECT SET ENTER MENU EXIT Example of PDP-433CMX Screen Display: ÷ The PDP-433CMX screen display fills the display area in this manual. E NHANCE V. L EV EL G. The section "Setting Up the System" starting on page 17 covers the necessary on ... requirements of specific components and personal preferences. Before Proceeding 3 En The PDP-433CMX display differs as their respective buttons and controls will be referred to throughout this manual are the same for the PDP-503CMX model. Once the unit has been taken out of the display...

Operating Instructions
Page 10
... control on the main unit has the same or similar name as that on the main unit. Please familiarize yourself with the rest of this manual. 1 Press MENU to display the menu screen. L EVEL H. POS I T I ON : 0 ADJUST MENU SET EXIT SET 5 Press 5/∞/2/3 to select SCREEN. ... 5/∞ to select the item to display the adjustment screen for the selected item. English Before Proceeding About operations in this manual Operations in this manual are written in reference to the remote control unit unless the button or control is proceeding as it should. MAIN MENU PICTURE ...
... control on the main unit has the same or similar name as that on the main unit. Please familiarize yourself with the rest of this manual. 1 Press MENU to display the menu screen. L EVEL H. POS I T I ON : 0 ADJUST MENU SET EXIT SET 5 Press 5/∞/2/3 to select SCREEN. ... 5/∞ to select the item to display the adjustment screen for the selected item. English Before Proceeding About operations in this manual Operations in this manual are written in reference to the remote control unit unless the button or control is proceeding as it should. MAIN MENU PICTURE ...
Operating Instructions
Page 17
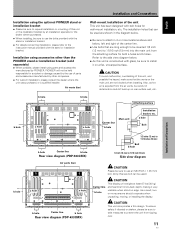
PIONEER will not be used .) Center line b hole CAUTION This display unit weighs at least 67 lbs (30 kg) and has little front-to the instruction manual provided with glass, be sure to install it very unstable when stood on rear surface wall, etc.. Installation using accessories ...or installing the display. a hole Bolt Installation and Connections b hole b hole Center line b hole Rear view diagram (PDP-503CMX) Air vents (fan) a hole a hole b hole Center line b hole Rear view diagram (PDP-433CMX) 1/2 inches (12 mm) to 11/16 inches (18 mm) Bolt b hole 1/2 inch (12 mm) to ...
PIONEER will not be used .) Center line b hole CAUTION This display unit weighs at least 67 lbs (30 kg) and has little front-to the instruction manual provided with glass, be sure to install it very unstable when stood on rear surface wall, etc.. Installation using accessories ...or installing the display. a hole Bolt Installation and Connections b hole b hole Center line b hole Rear view diagram (PDP-503CMX) Air vents (fan) a hole a hole b hole Center line b hole Rear view diagram (PDP-433CMX) 1/2 inches (12 mm) to 11/16 inches (18 mm) Bolt b hole 1/2 inch (12 mm) to ...
Operating Instructions
Page 18
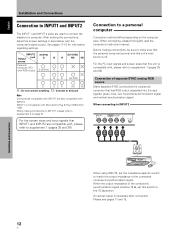
... is off. See pages 17-18 for a personal computer that this switch to the 75 Ω position. When connecting, please thoroughly read the computer's instruction manual. Before making connections, be sure to make sure that INPUT1 and INPUT2 are used to connect the display to a computer. After making connections to INPUT1...
... is off. See pages 17-18 for a personal computer that this switch to the 75 Ω position. When connecting, please thoroughly read the computer's instruction manual. Before making connections, be sure to make sure that INPUT1 and INPUT2 are used to connect the display to a computer. After making connections to INPUT1...

Operating Instructions
Page 19
... connections for a personal computer with the computer or sold separately may be output from the OUTPUT (INPUT1) terminal. For details, please read your PC's instruction manual or consult the maker or nearest dealer of your computer. Secure by tightening the terminal screws on -screen setup is necessary after connection. Note When...
... connections for a personal computer with the computer or sold separately may be output from the OUTPUT (INPUT1) terminal. For details, please read your PC's instruction manual or consult the maker or nearest dealer of your computer. Secure by tightening the terminal screws on -screen setup is necessary after connection. Note When...

Operating Instructions
Page 23
No manual setup is necessary for signals with other refresh rates, since adjustments are input, selecting PC AUTO will cause the screen resolution to be displayed). 1 Switch ... automatically switch between VGA/WVGA or XGA/WXGA. When using the above PC input signals, screen resolution will not be set the screen display mode manually. 8 When the setup is necessary. MAIN MENU PICTURE SCREEN CONT RAST BR I NG : VGA SELECT SET ENTER MENU EXIT 7 Press 2/3 to select SETTING, then press...
No manual setup is necessary for signals with other refresh rates, since adjustments are input, selecting PC AUTO will cause the screen resolution to be displayed). 1 Switch ... automatically switch between VGA/WVGA or XGA/WXGA. When using the above PC input signals, screen resolution will not be set the screen display mode manually. 8 When the setup is necessary. MAIN MENU PICTURE SCREEN CONT RAST BR I NG : VGA SELECT SET ENTER MENU EXIT 7 Press 2/3 to select SETTING, then press...

Operating Instructions
Page 24
... "CLAMP POSITION" to LOCKED. ÷ Normally, leave this setup, be sure to carefully check the signal output of CLAMP POSITION 1 Press MENU to the instruction manual supplied with a whitish or greenish cast. E NHANCE V. For details, please refer to display the menu screen. L EVEL H. MAIN MENU INPUT1 PICTURE SCREEN SET UP OPTION...
... "CLAMP POSITION" to LOCKED. ÷ Normally, leave this setup, be sure to carefully check the signal output of CLAMP POSITION 1 Press MENU to the instruction manual supplied with a whitish or greenish cast. E NHANCE V. For details, please refer to display the menu screen. L EVEL H. MAIN MENU INPUT1 PICTURE SCREEN SET UP OPTION...

Operating Instructions
Page 32
... remote control unit will adjust the screen position and clock to make more precise adjustments. Note Perform this case, follow the instructions in the section "Manual Adjustment of signals.
... remote control unit will adjust the screen position and clock to make more precise adjustments. Note Perform this case, follow the instructions in the section "Manual Adjustment of signals.

Operating Instructions
Page 33
... unit's internal clock signal frequency that can be displayed properly. POSITION H.POSITION Adjust the picture's position to display the menu screen. Display Panel Adjustments H. English Manual Adjustment of Screen Position and Clock 1 Press MENU to the left or right. Note Make these adjustments for the adjustments of V.POSITION and PHASE. CLOCK...
... unit's internal clock signal frequency that can be displayed properly. POSITION H.POSITION Adjust the picture's position to display the menu screen. Display Panel Adjustments H. English Manual Adjustment of Screen Position and Clock 1 Press MENU to the left or right. Note Make these adjustments for the adjustments of V.POSITION and PHASE. CLOCK...