Owner's Manual
Page 4
... Watching TV channels 19 Selecting the analog and digital channels 19 Changing channels 19 Changing the volume and sound 20 Displaying Information 20 Setting MTS/SAP mode 21 Changing the language 21 Using the multiscreen functions 21 07 Menu Setup Menu configuration 23 Menu operations 23 08 Tuner...Screen Size 35 Viewing the Input Source 35 Setting for the language of on-screen display 35 Setting for the prior audio language of the power plug and power outlet may sometimes differ from that shown in a safe place for buying this Pioneer product. Contents Thank you will know how ...
... Watching TV channels 19 Selecting the analog and digital channels 19 Changing channels 19 Changing the volume and sound 20 Displaying Information 20 Setting MTS/SAP mode 21 Changing the language 21 Using the multiscreen functions 21 07 Menu Setup Menu configuration 23 Menu operations 23 08 Tuner...Screen Size 35 Viewing the Input Source 35 Setting for the language of on-screen display 35 Setting for the prior audio language of the power plug and power outlet may sometimes differ from that shown in a safe place for buying this Pioneer product. Contents Thank you will know how ...
Owner's Manual
Page 5
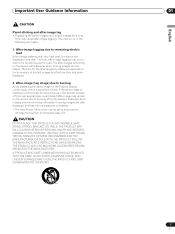
... should not be installed by using only parts and accessories designed by using a vacuum cleaner set to its lifetime, the luminosity of the Pioneer PDP-42A3HD/PDP-4214HD Plasma Display System will automatically power off in the "Wide" or "Full" screen setting for over 3 times longer than 2 hours at a time. • After playing a game, or any...
... should not be installed by using only parts and accessories designed by using a vacuum cleaner set to its lifetime, the luminosity of the Pioneer PDP-42A3HD/PDP-4214HD Plasma Display System will automatically power off in the "Wide" or "Full" screen setting for over 3 times longer than 2 hours at a time. • After playing a game, or any...
Owner's Manual
Page 7
... SHOULD BE MOVED WITH THE CARE. The after-images remaining on the screen will not disappear completely. • The Auto Power Off function can be set to help prevent damage from screen burning (see page 37). USE ONLY WITH A CART, STAND, TRIPOD, BRACKET, OR TABLE RECOMMENDED BY THE MANUFACTURER, OR SOLD...
... SHOULD BE MOVED WITH THE CARE. The after-images remaining on the screen will not disappear completely. • The Auto Power Off function can be set to help prevent damage from screen burning (see page 37). USE ONLY WITH A CART, STAND, TRIPOD, BRACKET, OR TABLE RECOMMENDED BY THE MANUFACTURER, OR SOLD...

Owner's Manual
Page 12
...2 INPUT: Displays all available input sources. To turn the sound back on -screen menu. 21 BACK: Returns to the previous menu screen. 22 VOL +/-: Sets the volume. 12 En LIST CH DELETE 1 HD WIDE: Adjusts the picture to select the required input source. 3 AV SELECTION: Selects the picture mode ...). 5 0-9: Select the channel. 6 ÷ (dot): Selects the sub-channel of the screen (Zoom/Cinema/Full/4:3/Wide). 16 CH ENTER: Enters channels. 17 SLEEP: Sets the sleep timer. 18 DISPLAY: Shows the display. 19 OK: Executes a command. 20 MENU: Displays the on , press the MUTING, VOL + or VOL - 04...
...2 INPUT: Displays all available input sources. To turn the sound back on -screen menu. 21 BACK: Returns to the previous menu screen. 22 VOL +/-: Sets the volume. 12 En LIST CH DELETE 1 HD WIDE: Adjusts the picture to select the required input source. 3 AV SELECTION: Selects the picture mode ...). 5 0-9: Select the channel. 6 ÷ (dot): Selects the sub-channel of the screen (Zoom/Cinema/Full/4:3/Wide). 16 CH ENTER: Enters channels. 17 SLEEP: Sets the sleep timer. 18 DISPLAY: Shows the display. 19 OK: Executes a command. 20 MENU: Displays the on , press the MUTING, VOL + or VOL - 04...

Owner's Manual
Page 18
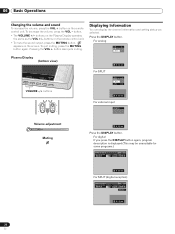
... control or the STANDBY/ ON button on the bottom of the Plasma Display. • The Plasma Display switches to on automatically by the "On Timer" setting. 06 Basic Operations Turning the power on and off completely, it cannot switch the Plasma Display on .
... control or the STANDBY/ ON button on the bottom of the Plasma Display. • The Plasma Display switches to on automatically by the "On Timer" setting. 06 Basic Operations Turning the power on and off completely, it cannot switch the Plasma Display on .

Owner's Manual
Page 19
... tune in emergency situations. TV INPUT HD WIDE AV SELECTION SOUND EFFECT SCREEN SIZE 123 456 789 0 CH ENTER C.C. For the procedure, see "Setting up TV channels that you can select the input mode between analog and digital channels by TV stations as CH +/- Those messages are broadcast by...press the CH + button on the remote control unit. To decrease the channel number, press the CH - Basic Operations Watching TV channels Unless you set up TV channels" on page 24. • When watching a digital TV program, you may see emergency alert messages scrolling at the top of the...
... tune in emergency situations. TV INPUT HD WIDE AV SELECTION SOUND EFFECT SCREEN SIZE 123 456 789 0 CH ENTER C.C. For the procedure, see "Setting up TV channels that you can select the input mode between analog and digital channels by TV stations as CH +/- Those messages are broadcast by...press the CH + button on the remote control unit. To decrease the channel number, press the CH - Basic Operations Watching TV channels Unless you set up TV channels" on page 24. • When watching a digital TV program, you may see emergency alert messages scrolling at the top of the...
Owner's Manual
Page 20
... VOLUME +/- Pressing the VOL + button also quits muting. To quit muting, press the MUTING button again. Displaying Information You can display the channel information and setting status you press the DISPLAY button again, program description is displayed.(This may be unavailable for some programs.) DTV 11-2 NBC Sports 8 : 30 am For...
... VOLUME +/- Pressing the VOL + button also quits muting. To quit muting, press the MUTING button again. Displaying Information You can display the channel information and setting status you press the DISPLAY button again, program description is displayed.(This may be unavailable for some programs.) DTV 11-2 NBC Sports 8 : 30 am For...

Owner's Manual
Page 21
... to second language, supplementary commentary and other information. (SAP is changed, you will hear that language. • As for the language setting ,refer to "Setting for example, sports, shows, and concerts in dynamic stereo sound. • SAP broadcasts MAIN sound: The normal program soundtrack (either in... watching TV or another video input. Changing the language If you have selected a digital TV program that are received through language setting is available when the channel or program is mono sound.) Using the multiscreen functions You can display a sub-picture within the main...
... to second language, supplementary commentary and other information. (SAP is changed, you will hear that language. • As for the language setting ,refer to "Setting for example, sports, shows, and concerts in dynamic stereo sound. • SAP broadcasts MAIN sound: The normal program soundtrack (either in... watching TV or another video input. Changing the language If you have selected a digital TV program that are received through language setting is available when the channel or program is mono sound.) Using the multiscreen functions You can display a sub-picture within the main...
Owner's Manual
Page 22
... the \ or OK button. TWIN1 - TWIN2 PIP/TWIN PIP/TWIN Mode PIP/TWIN Input PIP Position PIP DIGITAL CH Off PIP TWIN1 TWIN2 If you set to Off, the following combinations: DIGITAL CH - ANALOG CH - S-VIDEO 1 - S-VIDEO 3 COMPONENT 1 - COMPONENT 2 - ANALOG CH DIGITAL CH/ANALOG CH - VIDEO1/2/3, S-VIDEO1/2/3, COMPONENT1/2 or HDMI 22...
... the \ or OK button. TWIN1 - TWIN2 PIP/TWIN PIP/TWIN Mode PIP/TWIN Input PIP Position PIP DIGITAL CH Off PIP TWIN1 TWIN2 If you set to Off, the following combinations: DIGITAL CH - ANALOG CH - S-VIDEO 1 - S-VIDEO 3 COMPONENT 1 - COMPONENT 2 - ANALOG CH DIGITAL CH/ANALOG CH - VIDEO1/2/3, S-VIDEO1/2/3, COMPONENT1/2 or HDMI 22...

Owner's Manual
Page 23
... Balance Auto Volume Level SRS TruSurround XT Digital Audio Out Screen Screen Size Main Input PIP/TWIN Screen Saver System Menu Language Audio Language Clock Setting Parental Control Closed Caption Display Analog CC DTV CC Page 24 24 25 25 31 32 32 32 32 32 32 33 33 34 34... 34 34 34 35 35 21, 22 36 35 36 30 26 - 29 29 29 29 Menu operations The following describes the typical procedure for setting up the menus. C.C.
... Balance Auto Volume Level SRS TruSurround XT Digital Audio Out Screen Screen Size Main Input PIP/TWIN Screen Saver System Menu Language Audio Language Clock Setting Parental Control Closed Caption Display Analog CC DTV CC Page 24 24 25 25 31 32 32 32 32 32 32 33 33 34 34... 34 34 34 35 35 21, 22 36 35 36 30 26 - 29 29 29 29 Menu operations The following describes the typical procedure for setting up the menus. C.C.

Owner's Manual
Page 24
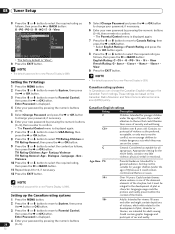
... OK button. 10 If you want to adjust the tuning, press the c or d button to move to obtain good picture and sound quality. Unless you set up TV channels using the Cable Converter, you can automatically scan channels for the frequency ranges available. 1 Press the MENU button. 2 Press the c or... d button to move to Tuner Setup, then press the \ or OK button. Scan Channels Analog Channel Now Searching... 08 Tuner Setup Setting up TV channels that you may not be able to tune in order. To stop scanning, press the BACK button. 7 When finished scanning, press the...
... OK button. 10 If you want to adjust the tuning, press the c or d button to move to obtain good picture and sound quality. Unless you set up TV channels using the Cable Converter, you can automatically scan channels for the frequency ranges available. 1 Press the MENU button. 2 Press the c or... d button to move to Tuner Setup, then press the \ or OK button. Scan Channels Analog Channel Now Searching... 08 Tuner Setup Setting up TV channels that you may not be able to tune in order. To stop scanning, press the BACK button. 7 When finished scanning, press the...

Owner's Manual
Page 25
...FAV " displayed. Tuner Setup 08 English 12 Press the EXIT button. • "Scan Analog Channel" function is available only when the input source is set to scan. Scan Digital Channel Channel 6 Store Level 30% Quality 30% Move Adjust Return 5 Press the [ or \ button to select the channel ...mode, press the FAVORITE CH button while " FAV " is displayed. • "Scan Digital Channel" function is available only the input source is set to "ANALOG CH". (See page 19.) • You can scan through the digital channels manually. Press the FAVORITE CH button repeatedly to EXIT ...
...FAV " displayed. Tuner Setup 08 English 12 Press the EXIT button. • "Scan Analog Channel" function is available only when the input source is set to scan. Scan Digital Channel Channel 6 Store Level 30% Quality 30% Move Adjust Return 5 Press the [ or \ button to select the channel ...mode, press the FAVORITE CH button while " FAV " is displayed. • "Scan Digital Channel" function is available only the input source is set to "ANALOG CH". (See page 19.) • You can scan through the digital channels manually. Press the FAVORITE CH button repeatedly to EXIT ...

Owner's Manual
Page 26
... restrictions using Parental Guidance. You can be set up the Parental Control This feature allows you to set a password to prevent unauthorized users, such as children, from watching inappropriate TV programs, VCR or DVD contents. PG-13 Parents strongly cautioned. Age-Base ... Parental Control functions for children. PG Parental guidance suggested ) X TV-14 (Parents strongly cautioned) X TV-MA (Mature audience only) X X: Content rating can also set . FAV 010 Fashion Plus Digital TV 001 C01 002 C02 003 C03 FAV FAV 004 KBS 005 MBS FAV FAV 006 CNN Internati FAV 007...
... restrictions using Parental Guidance. You can be set up the Parental Control This feature allows you to set a password to prevent unauthorized users, such as children, from watching inappropriate TV programs, VCR or DVD contents. PG-13 Parents strongly cautioned. Age-Base ... Parental Control functions for children. PG Parental guidance suggested ) X TV-14 (Parents strongly cautioned) X TV-MA (Mature audience only) X X: Content rating can also set . FAV 010 Fashion Plus Digital TV 001 C01 002 C02 003 C03 FAV FAV 004 KBS 005 MBS FAV FAV 006 CNN Internati FAV 007...

Owner's Manual
Page 27
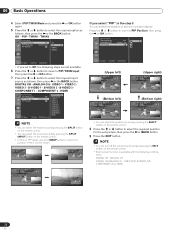
...) 1 Press the MENU button. 2 Press the c or d button to move to Block, then press the \ or OK button. 6 Select the desired setting (On or Off). 7 Press the EXIT button. Change Password New Password Confirm _ _ _ _ 6 Enter your new password by pressing the numeric buttons (0~9),...screen menu is not displayed, press the INPUT button, then press "7", "2", "7" and "4" while the function selection screen is displayed again. PDP-42A3HD/PDP-4214HD Your password No.: If you write down your password, if necessary. Enter Password is displayed. Cancel 4 Enter your password by pressing ...
...) 1 Press the MENU button. 2 Press the c or d button to move to Block, then press the \ or OK button. 6 Select the desired setting (On or Off). 7 Press the EXIT button. Change Password New Password Confirm _ _ _ _ 6 Enter your new password by pressing the numeric buttons (0~9),...screen menu is not displayed, press the INPUT button, then press "7", "2", "7" and "4" while the function selection screen is displayed again. PDP-42A3HD/PDP-4214HD Your password No.: If you write down your password, if necessary. Enter Password is displayed. Cancel 4 Enter your password by pressing ...
Owner's Manual
Page 28
... - Children TV Rating - View French Rating: G - 8ans+ - 13ans+ - 16ans+ - 18ans+ View 9 Press the EXIT button. Setting the TV Ratings • The default password for viewers 18 years and older and might contain depictions of violence, which they may not be profane... to System, then press the \ or OK button. 3 Press the c or d button to move to Parental Control, then press the \ or OK button. Setting up the Canadian rating systems Canadian rating systems In Canada you can choose the Canadian English ratings or the Canadian French ratings. G General: Considered acceptable...
... - Children TV Rating - View French Rating: G - 8ans+ - 13ans+ - 16ans+ - 18ans+ View 9 Press the EXIT button. Setting the TV Ratings • The default password for viewers 18 years and older and might contain depictions of violence, which they may not be profane... to System, then press the \ or OK button. 3 Press the c or d button to move to Parental Control, then press the \ or OK button. Setting up the Canadian rating systems Canadian rating systems In Canada you can choose the Canadian English ratings or the Canadian French ratings. G General: Considered acceptable...
Owner's Manual
Page 29
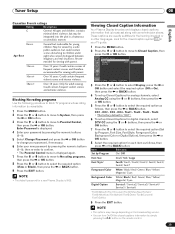
.... 8ans+ Age-Base General but could contain scenes disturbing to select the required option as follows, then press [ or the BACK button: Item Selection Set by Program On/ Off Font Size Small/ Mid/ Large Font Style1 Font0/ Font1/ Font2/ Font3/ Font4/ Font5/ Font6/ Font7 Foreground Color White/...16ans+ Over 16 years: Could contain frequent violent scenes and intense violence. 18ans+ Over 18 years: Only for a new Plasma Display is "CC1". 6 To set up Closed Captions for digital channels, select DTV CC using the c or d buttons, then press the \ or OK button. 5 Press the c or d...
.... 8ans+ Age-Base General but could contain scenes disturbing to select the required option as follows, then press [ or the BACK button: Item Selection Set by Program On/ Off Font Size Small/ Mid/ Large Font Style1 Font0/ Font1/ Font2/ Font3/ Font4/ Font5/ Font6/ Font7 Foreground Color White/...16ans+ Over 16 years: Could contain frequent violent scenes and intense violence. 18ans+ Over 18 years: Only for a new Plasma Display is "CC1". 6 To set up Closed Captions for digital channels, select DTV CC using the c or d buttons, then press the \ or OK button. 5 Press the c or d...

Owner's Manual
Page 30
Off On Timer 00 : 00 am Off Timer 00 : 00 am Off Off Adjust Move Return 8 Press the [ or \ button to move to Hour/Min, set them by pressing the c or d button. 6 When you have finished, press the OK button. 7 Press the c or d button to move to Day, Mon (month) and ... 05/OCT/2004 Time 09 : 30 am Off Off Mountain Central Eastern Atlantic Newfoundland Hawaii Alaska Pacific Adjust Return 30 En Clock Setting Date Time Time Zone D.S.T. Alaska - Pacific Clock Setting Date Time Time Zone D.S.T. Press the c or d button to move to Time Zone, then press the \ or OK button. 10 Press...
Off On Timer 00 : 00 am Off Timer 00 : 00 am Off Off Adjust Move Return 8 Press the [ or \ button to move to Hour/Min, set them by pressing the c or d button. 6 When you have finished, press the OK button. 7 Press the c or d button to move to Day, Mon (month) and ... 05/OCT/2004 Time 09 : 30 am Off Off Mountain Central Eastern Atlantic Newfoundland Hawaii Alaska Pacific Adjust Return 30 En Clock Setting Date Time Time Zone D.S.T. Alaska - Pacific Clock Setting Date Time Time Zone D.S.T. Press the c or d button to move to Time Zone, then press the \ or OK button. 10 Press...
Owner's Manual
Page 31
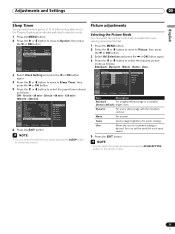
Off On Timer 07 : 00 am Off Timer 11 : 00 am Time Zone Hawaii D.S.T. Dynamic - User Allows the user to customize setting as follows: Standard - Adjustments and Settings 09 English Sleep Timer You can select a time period of 10 to 240 minutes after which the Plasma Display automatically switches to standby mode. 1 Press... move to select the preset time interval as follows: Off - 10 min - 20 min - 30 min - 60 min - 120 min 180 min - 240 min Clock Setting Date 05/OCT/2004 Time 09 : 30 am Auto Power Off Off Sleep Timer Off Off 10 min 20 min 30 min 60 min 120...
Off On Timer 07 : 00 am Off Timer 11 : 00 am Time Zone Hawaii D.S.T. Dynamic - User Allows the user to customize setting as follows: Standard - Adjustments and Settings 09 English Sleep Timer You can select a time period of 10 to 240 minutes after which the Plasma Display automatically switches to standby mode. 1 Press... move to select the preset time interval as follows: Off - 10 min - 20 min - 30 min - 60 min - 120 min 180 min - 240 min Clock Setting Date 05/OCT/2004 Time 09 : 30 am Auto Power Off Off Sleep Timer Off Off 10 min 20 min 30 min 60 min 120...

Owner's Manual
Page 32
Press the b or a button until you reach the optimal setting. Using the Noise Reduction Feature 1 Press the MENU button. 2 Press the c or d button to move to Picture, then press the a or OK button. 3 Press the c ... A horizontal bar is automatically switched to User. 32 En Brightness - To select other options, press the c or d button. 09 Adjustments and Settings Customizing the Picture Settings This Plasma Display has several setting options that allow you to control the picture quality. 1 Press the MENU button. 2 Press the c or d button to move to Noise...
Press the b or a button until you reach the optimal setting. Using the Noise Reduction Feature 1 Press the MENU button. 2 Press the c or d button to move to Picture, then press the a or OK button. 3 Press the c ... A horizontal bar is automatically switched to User. 32 En Brightness - To select other options, press the c or d button. 09 Adjustments and Settings Customizing the Picture Settings This Plasma Display has several setting options that allow you to control the picture quality. 1 Press the MENU button. 2 Press the c or d button to move to Noise...

Owner's Manual
Page 33
Adjustments and Settings 09 English Setting the Color Temperature You can enjoy sound effects like in a (factory default) movie theater. Mid - Speech Suitable for the music program. Movie You can change ... Movie R 1 Off Music On User PCM Move Enter Return Item Description Flat Flat and pure sound. Higt - Speech - User Allows the user to customize the setting as desired. 5 Press the EXIT button. • You can select the sound effect to be used. 1 Press the MENU button. 2 Press the c or d button to...
Adjustments and Settings 09 English Setting the Color Temperature You can enjoy sound effects like in a (factory default) movie theater. Mid - Speech Suitable for the music program. Movie You can change ... Movie R 1 Off Music On User PCM Move Enter Return Item Description Flat Flat and pure sound. Higt - Speech - User Allows the user to customize the setting as desired. 5 Press the EXIT button. • You can select the sound effect to be used. 1 Press the MENU button. 2 Press the c or d button to...


