
User Manual
Page 4
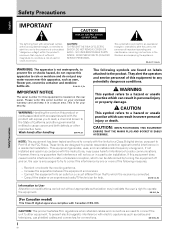
... the operators and service personnel of this serial number on the rear panel. Reorient or relocate the receiving antenna. - NO USER-SERVICEABLE PARTS INSIDE. D3-4-2-1-3_En IMPORTANT NOTICE The serial number for this equipment is not waterproofs, to prevent fire or shocks hazard, do not expose... water source near this apparatus, such as radios and televisions, use shielded cables and connectors for a Class B digital device, pursuant to Part 15 of the FCC Rules. However, there is no guarantee that to which can radiate radio frequency energy and, if not installed and ...
... the operators and service personnel of this serial number on the rear panel. Reorient or relocate the receiving antenna. - NO USER-SERVICEABLE PARTS INSIDE. D3-4-2-1-3_En IMPORTANT NOTICE The serial number for this equipment is not waterproofs, to prevent fire or shocks hazard, do not expose... water source near this apparatus, such as radios and televisions, use shielded cables and connectors for a Class B digital device, pursuant to Part 15 of the FCC Rules. However, there is no guarantee that to which can radiate radio frequency energy and, if not installed and ...
User Manual
Page 5
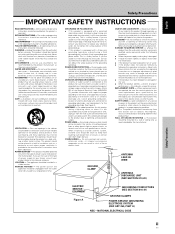
...810-20) ELECTRIC SERVICE EQUIPMENT Figure A GROUNDING CONDUCTORS (NEC SECTION 810-21) GROUND CLAMPS POWER SERVICE GROUNDING ELECTRODE SYSTEM (NEC ART 250, PART H) NEC - in fire, electric shock, or other products (including amplifiers) that could result in a stable location. The product may cause ... taken to service this product yourself as this product from heat sources such as they may result in installation such as the original part. SERVICING - CLEANING - The product should still fail to fit, contact your obsolete outlet. Use only with the product. NONUSE...
...810-20) ELECTRIC SERVICE EQUIPMENT Figure A GROUNDING CONDUCTORS (NEC SECTION 810-21) GROUND CLAMPS POWER SERVICE GROUNDING ELECTRODE SYSTEM (NEC ART 250, PART H) NEC - in fire, electric shock, or other products (including amplifiers) that could result in a stable location. The product may cause ... taken to service this product yourself as this product from heat sources such as they may result in installation such as the original part. SERVICING - CLEANING - The product should still fail to fit, contact your obsolete outlet. Use only with the product. NONUSE...
User Manual
Page 6
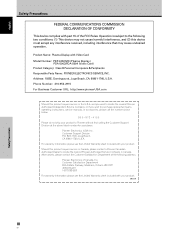
..., or if you wish to purchase replacement parts, operating instructions, service manuals, or accessories, please call the number shown below. 8 0 0 - 8 7 2 - 4 1 5 9 Please do not ship your product to locate the nearest Pioneer Authorized Service Company in Canada. Alternatively, please... please see the Limited Warranty sheet included with Video Card Model Number: PDP-425CMX (Plasma Display) PDA-5003/PDA-5004 (Video Card) Product Category: Class B Personal Computers & Peripherals Responsible Party Name: PIONEER ELECTRONICS SERVICE, INC. Dominguez st., Logn Beach, CA. 90801-1760,...
..., or if you wish to purchase replacement parts, operating instructions, service manuals, or accessories, please call the number shown below. 8 0 0 - 8 7 2 - 4 1 5 9 Please do not ship your product to locate the nearest Pioneer Authorized Service Company in Canada. Alternatively, please... please see the Limited Warranty sheet included with Video Card Model Number: PDP-425CMX (Plasma Display) PDA-5003/PDA-5004 (Video Card) Product Category: Class B Personal Computers & Peripherals Responsible Party Name: PIONEER ELECTRONICS SERVICE, INC. Dominguez st., Logn Beach, CA. 90801-1760,...
User Manual
Page 7
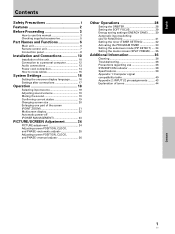
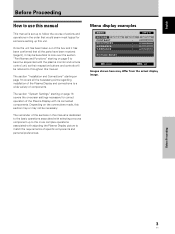
English Contents Safety Precautions i Features 2 Before Proceeding 3 How to use this manual 3 Checking supplied accessories 5 Part Names and Functions 6 Main unit 6 Remote control unit 7 Connection panel 8 Installation and Connections 10 Installation of the unit 10 Connection to a... 18 Selecting input source 18 Adjusting sound volume 19 Muting the sound 19 Confirming current status 19 Changing screen size 20 Enlarging one part of the screen (POINT ZOOM 21 Multiscreen display 22 Automatic power-off (POWER MANAGEMENT 23 PICTURE/SCREEN Adjustment 24 PICTURE adjustment 24 ...
English Contents Safety Precautions i Features 2 Before Proceeding 3 How to use this manual 3 Checking supplied accessories 5 Part Names and Functions 6 Main unit 6 Remote control unit 7 Connection panel 8 Installation and Connections 10 Installation of the unit 10 Connection to a... 18 Selecting input source 18 Adjusting sound volume 19 Muting the sound 19 Confirming current status 19 Changing screen size 20 Enlarging one part of the screen (POINT ZOOM 21 Multiscreen display 22 Automatic power-off (POWER MANAGEMENT 23 PICTURE/SCREEN Adjustment 24 PICTURE adjustment 24 ...
User Manual
Page 9
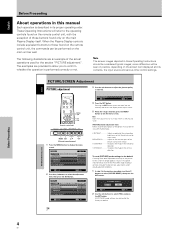
...this manual This manual is dedicated to the basic operations associated with its connected components. Depending on page 10 covers all the parts have been received (page 5), it has been confirmed that all the necessary points regarding installation of the Plasma Display and ... H A N C E PICTURE RESET SETUP : : : : INPUT1 OPTION 0 0 0 0 SET ENTER MENU EXIT Images shown here may be beneficial to look over the section "Part Names and Functions" starting on page 16 covers the on page 6 to become acquainted with adjusting the Plasma Display picture to throughout this unit. The...
...this manual This manual is dedicated to the basic operations associated with its connected components. Depending on page 10 covers all the parts have been received (page 5), it has been confirmed that all the necessary points regarding installation of the Plasma Display and ... H A N C E PICTURE RESET SETUP : : : : INPUT1 OPTION 0 0 0 0 SET ENTER MENU EXIT Images shown here may be beneficial to look over the section "Part Names and Functions" starting on page 16 covers the on page 6 to become acquainted with adjusting the Plasma Display picture to throughout this unit. The...
User Manual
Page 10
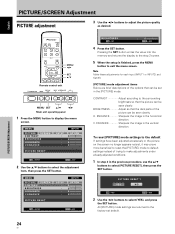
... EXIT 2 Use the 5/∞ buttons to select [YES], and press the SET button. MENU PICTURE SCREEN CONTRAST BRIGHTNESS H.ENHANCE V. BRIGHTNESS Adjust so that the dark parts of trying to make adjustments under already adjusted conditions. 1 In step 2 in its contents, the input source and various other control settings. ENHANCE Sharpens the...
... EXIT 2 Use the 5/∞ buttons to select [YES], and press the SET button. MENU PICTURE SCREEN CONTRAST BRIGHTNESS H.ENHANCE V. BRIGHTNESS Adjust so that the dark parts of trying to make adjustments under already adjusted conditions. 1 In step 2 in its contents, the input source and various other control settings. ENHANCE Sharpens the...
User Manual
Page 12
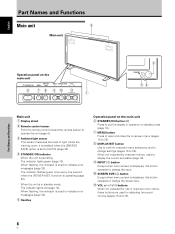
... and Functions Main unit 5 Main unit Part Names and Functions Operation panel on the main unit 6 STANDBY/ON button ( ) Press to change the screen size. - VOL + 90 - 1 STANDBY ON 2 34 Main unit 1 ...
... and Functions Main unit 5 Main unit Part Names and Functions Operation panel on the main unit 6 STANDBY/ON button ( ) Press to change the screen size. - VOL + 90 - 1 STANDBY ON 2 34 Main unit 1 ...
User Manual
Page 13
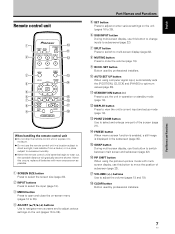
...view the unit's current input and setup mode (page 19). ~ POINT ZOOM button Use to select and enlarge one part of subscreen (page 22). $ VOLUME (+/-) buttons Use to 35). Part Names and Functions 5 SET button Press to adjust or enter various settings on the unit (pages 16 to adjust the... volume (pages 18 and 19). % CLEAR button Button used by professional installers. 7 En Part Names and Functions English FREEZE button When memo screen function is enabled, a still image is displayed in the subscreen (page 35). @ SWAP button During...
...view the unit's current input and setup mode (page 19). ~ POINT ZOOM button Use to select and enlarge one part of subscreen (page 22). $ VOLUME (+/-) buttons Use to 35). Part Names and Functions 5 SET button Press to adjust or enter various settings on the unit (pages 16 to adjust the... volume (pages 18 and 19). % CLEAR button Button used by professional installers. 7 En Part Names and Functions English FREEZE button When memo screen function is enabled, a still image is displayed in the subscreen (page 35). @ SWAP button During...
User Manual
Page 14
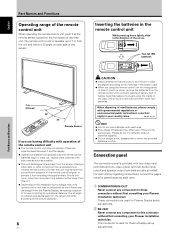
... unit's remote control unit may be influenced by an infrared remote control unit near this connector without first consulting your Pioneer installation technician. English Part Names and Functions Operating range of the remote control unit When operating the remote control unit, point it at the ...the plus (+) and minus (-) sides are the same shape. Should this occur, move the component to these connectors without first consulting your Pioneer installation technician. When disposing of used for a long period of time (1 month or more), remove the batteries from the unit and within...
... unit's remote control unit may be influenced by an infrared remote control unit near this connector without first consulting your Pioneer installation technician. English Part Names and Functions Operating range of the remote control unit When operating the remote control unit, point it at the ...the plus (+) and minus (-) sides are the same shape. Should this occur, move the component to these connectors without first consulting your Pioneer installation technician. When disposing of used for a long period of time (1 month or more), remove the batteries from the unit and within...
User Manual
Page 15
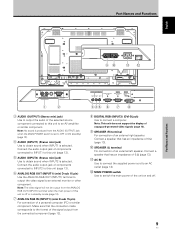
... does not support the display of copyguard-protected video signals (page 12). 9 SPEAKER (R) terminal For connection of a personal computer (PC) or similar component. Part Names and Functions English Part Names and Functions 90 -= IN OUT COMBINATION RS-232C 1 2 3 AUDIO (OUTPUT) (Stereo mini jack) Use to output the audio of the selected source...
... does not support the display of copyguard-protected video signals (page 12). 9 SPEAKER (R) terminal For connection of a personal computer (PC) or similar component. Part Names and Functions English Part Names and Functions 90 -= IN OUT COMBINATION RS-232C 1 2 3 AUDIO (OUTPUT) (Stereo mini jack) Use to output the audio of the selected source...
User Manual
Page 16
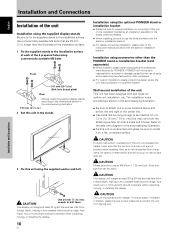
...PIONEER stand or installation bracket ÷ Please be sure to request installation or mounting of the center line. ÷ Use bolts that the vents on edge. As a result, two or more persons should cooperate when unpacking, moving , or installing the display. 10 En Installation using parts... the display. As a result, two or more locations above and below, left and right of this unit or the installation bracket by PIONEER. Installation using accessories other companies. ÷ For custom installation, please consult the dealer where the unit was purchased, or a qualified installer...
...PIONEER stand or installation bracket ÷ Please be sure to request installation or mounting of the center line. ÷ Use bolts that the vents on edge. As a result, two or more persons should cooperate when unpacking, moving , or installing the display. 10 En Installation using parts... the display. As a result, two or more locations above and below, left and right of this unit or the installation bracket by PIONEER. Installation using accessories other companies. ÷ For custom installation, please consult the dealer where the unit was purchased, or a qualified installer...
User Manual
Page 27
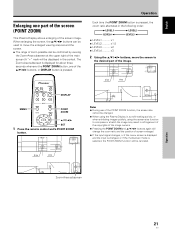
...;/2/3 buttons, move the enlarged viewing area around the screen. ÷ The range of zoom possible can be used to move the screen to the desired part of the image. 24 R12 DISPLAY MENU POINT ZOOM 5/∞/2/3 SET 1 Press the remote control unit's POINT ZOOM button. 66.0 24 R12 Notes ¶ During... is pressed, the zoom ratio alternates in the center). The Zoom-Area subscreen is displayed for about three seconds whenever the POINT ZOOM button, one part of the screen (POINT ZOOM) This Plasma Display allows enlarging of the screen image.
...;/2/3 buttons, move the enlarged viewing area around the screen. ÷ The range of zoom possible can be used to move the screen to the desired part of the image. 24 R12 DISPLAY MENU POINT ZOOM 5/∞/2/3 SET 1 Press the remote control unit's POINT ZOOM button. 66.0 24 R12 Notes ¶ During... is pressed, the zoom ratio alternates in the center). The Zoom-Area subscreen is displayed for about three seconds whenever the POINT ZOOM button, one part of the screen (POINT ZOOM) This Plasma Display allows enlarging of the screen image.
User Manual
Page 30
... adjustment 3 Use the 2/3 buttons to the factory set in the horizontal direction. All [PICTURE] mode settings are brief descriptions of the options that the dark parts of trying to make adjustments under already adjusted conditions. 1 In step 2 in the vertical direction. MENU PICTURE SCREEN CONTRAST BRIGHTNESS H.ENHANCE V. E N H A N C E PICTURE RESET SETUP : : : : INPUT1...
... adjustment 3 Use the 2/3 buttons to the factory set in the horizontal direction. All [PICTURE] mode settings are brief descriptions of the options that the dark parts of trying to make adjustments under already adjusted conditions. 1 In step 2 in the vertical direction. MENU PICTURE SCREEN CONTRAST BRIGHTNESS H.ENHANCE V. E N H A N C E PICTURE RESET SETUP : : : : INPUT1...
User Manual
Page 42
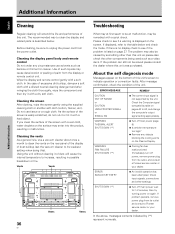
... As the surface of paint from its weakest setting when doing this). If the problem can still not be sure to its outlet and consult a Pioneer service center or your dealer. ¶ An invalid operation has been attempted. Do not use solvents such as a video deck. Vents Vents Vents ...to increase, resulting in malfunction. About the self diagnosis mode Messages appear on page 37. The recommended way to clean the display and related parts is displayed on the surface may also be remedied with a quick check. Before cleaning, be solved please consult the dealer where this unit so...
... As the surface of paint from its weakest setting when doing this). If the problem can still not be sure to its outlet and consult a Pioneer service center or your dealer. ¶ An invalid operation has been attempted. Do not use solvents such as a video deck. Vents Vents Vents ...to increase, resulting in malfunction. About the self diagnosis mode Messages appear on page 37. The recommended way to clean the display and related parts is displayed on the surface may also be remedied with a quick check. Before cleaning, be solved please consult the dealer where this unit so...

User Manual
Page 43
...) Problems commonly mistaken as lightning, static electricity, etc., may cause picture distortion and similar problems. • Normal sound of the cooling fan and internal sliding parts of image appear to be losing intensity. • Speckles or noise appears on screen. • Stripes appear on the screen. • Sound is heard from...
...) Problems commonly mistaken as lightning, static electricity, etc., may cause picture distortion and similar problems. • Normal sound of the cooling fan and internal sliding parts of image appear to be losing intensity. • Speckles or noise appears on screen. • Stripes appear on the screen. • Sound is heard from...
User Manual
Page 44
... or little screen movement for several days, a permanent after -images remaining on the screen due to the display. Depending on , some parts of the display may retain heat and the display may also be produced after extended multi-hour use, or recurrent daily use Panel sticking... using this indicator conditions flashing red, a malfunction may be involved (pages 20 and 21), it nonetheless may produce a low level of internal electronic parts, or other than 1 minute, after -image lagging. This is not affected. In such cases, move the affected appliance to a location where it...
... or little screen movement for several days, a permanent after -images remaining on the screen due to the display. Depending on , some parts of the display may retain heat and the display may also be produced after extended multi-hour use, or recurrent daily use Panel sticking... using this indicator conditions flashing red, a malfunction may be involved (pages 20 and 21), it nonetheless may produce a low level of internal electronic parts, or other than 1 minute, after -image lagging. This is not affected. In such cases, move the affected appliance to a location where it...


