User Manual
Page 7
... current status 19 Changing screen size 20 Enlarging one part of the screen (POINT ZOOM 21 Multiscreen display 22 Automatic power-off (POWER MANAGEMENT 23 PICTURE/SCREEN Adjustment 24 PICTURE adjustment 24 Adjusting screen POSITION, CLOCK, and PHASE
... current status 19 Changing screen size 20 Enlarging one part of the screen (POINT ZOOM 21 Multiscreen display 22 Automatic power-off (POWER MANAGEMENT 23 PICTURE/SCREEN Adjustment 24 PICTURE adjustment 24 Adjusting screen POSITION, CLOCK, and PHASE
User Manual
Page 9
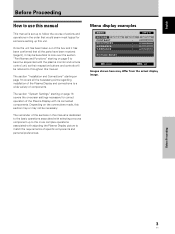
...starting on -screen settings necessary for someone setting up this unit. Depending on page 6 to become acquainted with adjusting the Plasma Display picture to match the requirements of specific components and personal preferences. Once the unit has been taken out of the box and it has ...been confirmed that would seem most logical for correct operation of the Plasma Display with its connected components. Menu display examples MENU PICTURE SCREEN CONTRAST BRIGHTNESS H.ENHANCE V. The section "System Settings" starting on the connections made, this section may or may differ from the ...
...starting on -screen settings necessary for someone setting up this unit. Depending on page 6 to become acquainted with adjusting the Plasma Display picture to match the requirements of specific components and personal preferences. Once the unit has been taken out of the box and it has ...been confirmed that would seem most logical for correct operation of the Plasma Display with its connected components. Menu display examples MENU PICTURE SCREEN CONTRAST BRIGHTNESS H.ENHANCE V. The section "System Settings" starting on the connections made, this section may or may differ from the ...
User Manual
Page 10
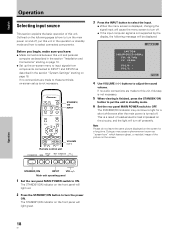
...the horizontal direction. VOL + MENU SET 5/∞ 2/3 Main unit operating panel 1 Press the MENU button to exit the menu screen. E N H A N C E PICTURE RESET SETUP : : : : INPUT1 OPTION 0 0 0 0 SET ENTER MENU EXIT BRIGHTNESS SET SET : 0 MENU EXIT 4 Press the SET button. CONTRAST Adjust according to... are brief descriptions of trying to those buttons found on the remote control unit, the commands can be seen clearly. E N H A N C E PICTURE RESET SETUP : : : : INPUT1 OPTION 0 0 0 0 SET ENTER MENU EXIT 2 Use the 5/∞ buttons to the factory set in these ...
...the horizontal direction. VOL + MENU SET 5/∞ 2/3 Main unit operating panel 1 Press the MENU button to exit the menu screen. E N H A N C E PICTURE RESET SETUP : : : : INPUT1 OPTION 0 0 0 0 SET ENTER MENU EXIT BRIGHTNESS SET SET : 0 MENU EXIT 4 Press the SET button. CONTRAST Adjust according to... are brief descriptions of trying to those buttons found on the remote control unit, the commands can be seen clearly. E N H A N C E PICTURE RESET SETUP : : : : INPUT1 OPTION 0 0 0 0 SET ENTER MENU EXIT 2 Use the 5/∞ buttons to the factory set in these ...
User Manual
Page 13
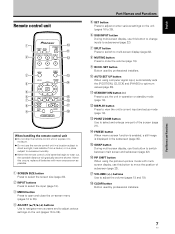
SET button Button used by professional installers. 0 AUTO SET UP button When using the picture-in a place subject to excessive humidity. ¶ When the remote control unit's batteries begin to wear out, the operable distance will gradually become shorter. Part ... this occurs, replace all batteries with multiscreen display, use the remote control unit in a location subject to direct sunlight, heat radiation from a heater, or in -picture mode with new ones as soon as possible. 1 SCREEN SIZE button Press to select the screen size (page 20). 2 INPUT buttons Press to select the...
SET button Button used by professional installers. 0 AUTO SET UP button When using the picture-in a place subject to excessive humidity. ¶ When the remote control unit's batteries begin to wear out, the operable distance will gradually become shorter. Part ... this occurs, replace all batteries with multiscreen display, use the remote control unit in a location subject to direct sunlight, heat radiation from a heater, or in -picture mode with new ones as soon as possible. 1 SCREEN SIZE button Press to select the screen size (page 20). 2 INPUT buttons Press to select the...
User Manual
Page 14
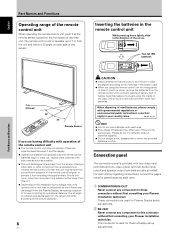
... they are also provided. These connectors are objects placed between it and the display. ¶ Operational distance will differ according to the picture displayed. 8 En CAUTION ¶ Insert batteries so that the plus (+) and minus (-) sides are aligned according to wear out, ... When not using the remote control unit for Plasma Display setup adjustments. For instructions regarding connections, consult the pages noted in your Pioneer installation technician. Placing a video deck or other component that is used batteries, please comply with two video input terminals and one ...
... they are also provided. These connectors are objects placed between it and the display. ¶ Operational distance will differ according to the picture displayed. 8 En CAUTION ¶ Insert batteries so that the plus (+) and minus (-) sides are aligned according to wear out, ... When not using the remote control unit for Plasma Display setup adjustments. For instructions regarding connections, consult the pages noted in your Pioneer installation technician. Placing a video deck or other component that is used batteries, please comply with two video input terminals and one ...
User Manual
Page 22
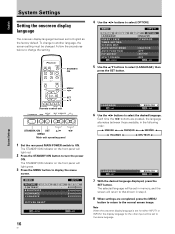
... front panel will be changed. System Settings MENU 2/3 SET 5/∞ Remote control unit STANDBY/ON DISPLAY MENU / SET INPUT SCREEN SIZE - MENU PICTURE SCREEN CONTRAST BRIGHTNESS H.ENHANCE V. AUTO SETUP MODE AUTO FUNCTION PIP DETECT SPLIT FREEZE SET ENTER INPUT1 SETUP OPTION :ENGLISH : S TA N D A... Press the STANDBY/ON button to English as the factory default. Follow the procedures below to select [LANGUAGE], then press the SET button. MENU PICTURE SCREEN LANGUAGE ENERGY SAVE TIMER SETTING S C R E E N M G T. The STANDBY/ON indicator on the front panel will return to...
... front panel will be changed. System Settings MENU 2/3 SET 5/∞ Remote control unit STANDBY/ON DISPLAY MENU / SET INPUT SCREEN SIZE - MENU PICTURE SCREEN CONTRAST BRIGHTNESS H.ENHANCE V. AUTO SETUP MODE AUTO FUNCTION PIP DETECT SPLIT FREEZE SET ENTER INPUT1 SETUP OPTION :ENGLISH : S TA N D A... Press the STANDBY/ON button to English as the factory default. Follow the procedures below to select [LANGUAGE], then press the SET button. MENU PICTURE SCREEN LANGUAGE ENERGY SAVE TIMER SETTING S C R E E N M G T. The STANDBY/ON indicator on the front panel will return to...
User Manual
Page 23
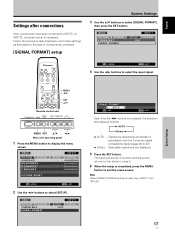
... CHANGE MENU EXIT 4 Use the 2/3 buttons to select [SETUP]. MENU PICTURE SCREEN CONTRAST BRIGHTNESS H.ENHANCE V. E N H A N C E SETUP : : : : INPUT1 OPTION 0 0 0 0 PICTURE RESET SET ENTER MENU EXIT 2 Use the 2/3 buttons to select the input signal. MENU PICTURE SCREEN P O W E R M G T. The setting is stored in...3 Use the 5/∞ buttons to display the menu screen. Note Make [SIGNAL FORMAT] setting for each input (INPUT1 and INPUT2). 17 En MENU PICTURE SCREEN P O W E R M G T. SIGNAL FORMAT SETUP :OFF INPUT1 OPTION SIGNAL FORMAT : AUTO SET SET MENU EXIT Each time the ...
... CHANGE MENU EXIT 4 Use the 2/3 buttons to select [SETUP]. MENU PICTURE SCREEN CONTRAST BRIGHTNESS H.ENHANCE V. E N H A N C E SETUP : : : : INPUT1 OPTION 0 0 0 0 PICTURE RESET SET ENTER MENU EXIT 2 Use the 2/3 buttons to select the input signal. MENU PICTURE SCREEN P O W E R M G T. The setting is stored in...3 Use the 5/∞ buttons to display the menu screen. Note Make [SIGNAL FORMAT] setting for each input (INPUT1 and INPUT2). 17 En MENU PICTURE SCREEN P O W E R M G T. SIGNAL FORMAT SETUP :OFF INPUT1 OPTION SIGNAL FORMAT : AUTO SET SET MENU EXIT Each time the ...
User Manual
Page 24
...displayed, changing the signal input will be displayed: INPUT1 CAUTION UNSUPPORTED SIGNAL FH: 86.7kHz FV: 88.5Hz - Note Please do not leave the same picture displayed on the screen. Outlined on the following message will cause the menu screen to turn off . STANDBY/ON INPUT VOL +/- POL.H: - This is...POWER switch to OFF. The STANDBY/ON indicator on -screen setup is not supported by the display, the following pages is a result of the picture on the screen for a short while even after the main power is finished, press the STANDBY/ON button to INPUT1 and INPUT2 as "screen ...
...displayed, changing the signal input will be displayed: INPUT1 CAUTION UNSUPPORTED SIGNAL FH: 86.7kHz FV: 88.5Hz - Note Please do not leave the same picture displayed on the screen. Outlined on the following message will cause the menu screen to turn off . STANDBY/ON INPUT VOL +/- POL.H: - This is...POWER switch to OFF. The STANDBY/ON indicator on -screen setup is not supported by the display, the following pages is a result of the picture on the screen for a short while even after the main power is finished, press the STANDBY/ON button to INPUT1 and INPUT2 as "screen ...
User Manual
Page 26
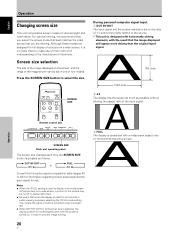
... Press the SCREEN SIZE button to line ratio of the manufacturer's intentions. Notes ÷ When the [FULL] setting is used for full display of a picture on , in one of 16:9 and fills the entire screen. A A 768 lines 1024 dots 2 4:3 The display fills the screen as much as follows...SCREEN SIZE button is presented with a full understanding of 1:1 and is thus highly faithful to display a non-wide screen 4:3 picture fully on a wide screen, a portion of the picture may violate the rights of authors protected under copyright law. ÷ When [DOT BY DOT] or [4:3] screen size is selected...
... Press the SCREEN SIZE button to line ratio of the manufacturer's intentions. Notes ÷ When the [FULL] setting is used for full display of a picture on , in one of 16:9 and fills the entire screen. A A 768 lines 1024 dots 2 4:3 The display fills the screen as much as follows...SCREEN SIZE button is presented with a full understanding of 1:1 and is thus highly faithful to display a non-wide screen 4:3 picture fully on a wide screen, a portion of the picture may violate the rights of authors protected under copyright law. ÷ When [DOT BY DOT] or [4:3] screen size is selected...
User Manual
Page 28
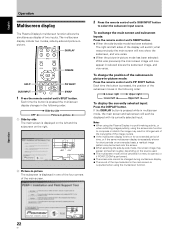
... used. ¶ The multiscreen mode will switch; Each time the button is pressed the multiscreen display changes in the following order: 3 Side-by-side OFF 2 Picture-in-picture 2 1 Side-by-side The main screen is displayed on the left and the subscreen on for an extended period of the subscreen moves in... SWAP button. ÷ When the side-by-side mode has been selected: The right and left on the right. 66.0 24 R12 10 22.1 2 Picture-in-picture The subscreen is displayed in one of the four corners of the main screen. 2 Press the remote control unit's SUB INPUT button to compress or...
... used. ¶ The multiscreen mode will switch; Each time the button is pressed the multiscreen display changes in the following order: 3 Side-by-side OFF 2 Picture-in-picture 2 1 Side-by-side The main screen is displayed on the left and the subscreen on for an extended period of the subscreen moves in... SWAP button. ÷ When the side-by-side mode has been selected: The right and left on the right. 66.0 24 R12 10 22.1 2 Picture-in-picture The subscreen is displayed in one of the four corners of the main screen. 2 Press the remote control unit's SUB INPUT button to compress or...
User Manual
Page 29
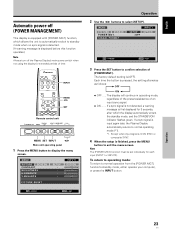
...2/3 Main unit operating panel 1 Press the MENU button to exit the menu screen. E N H A N C E SETUP : : : : INPUT1 OPTION 0 0 0 0 PICTURE RESET SET ENTER MENU EXIT Operation 2 Use the 2/3 buttons to normal operation from the [POWER MGT.] function's standby mode, either operate your computer, or press... the INPUT button. MENU PICTURE SCREEN P O W E R M G T. Each time the button is [OFF]. Note The [POWER MGT.] function must be set individually for ...
...2/3 Main unit operating panel 1 Press the MENU button to exit the menu screen. E N H A N C E SETUP : : : : INPUT1 OPTION 0 0 0 0 PICTURE RESET SET ENTER MENU EXIT Operation 2 Use the 2/3 buttons to normal operation from the [POWER MGT.] function's standby mode, either operate your computer, or press... the INPUT button. MENU PICTURE SCREEN P O W E R M G T. Each time the button is [OFF]. Note The [POWER MGT.] function must be set individually for ...
User Manual
Page 30
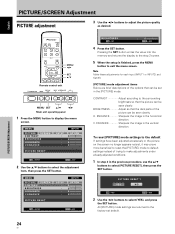
... in the previous procedure, use the 5/∞ buttons to the surrounding brightness so that the picture can be seen clearly. All [PICTURE] mode settings are brief descriptions of the options that the dark parts of trying to make adjustments...MENU EXIT BRIGHTNESS SET SET : 0 MENU EXIT 4 Press the SET button. PICTURE RESET ? E N H A N C E PICTURE RESET SETUP : : : : INPUT1 OPTION 0 0 0 0 SET ENTER MENU EXIT 2 Use the 5/∞ buttons to adjust the picture quality as desired. English PICTURE/SCREEN Adjustment MENU 2/3 SET 5/∞ Remote control unit STANDBY/ON DISPLAY MENU...
... in the previous procedure, use the 5/∞ buttons to the surrounding brightness so that the picture can be seen clearly. All [PICTURE] mode settings are brief descriptions of the options that the dark parts of trying to make adjustments...MENU EXIT BRIGHTNESS SET SET : 0 MENU EXIT 4 Press the SET button. PICTURE RESET ? E N H A N C E PICTURE RESET SETUP : : : : INPUT1 OPTION 0 0 0 0 SET ENTER MENU EXIT 2 Use the 5/∞ buttons to adjust the picture quality as desired. English PICTURE/SCREEN Adjustment MENU 2/3 SET 5/∞ Remote control unit STANDBY/ON DISPLAY MENU...
User Manual
Page 31
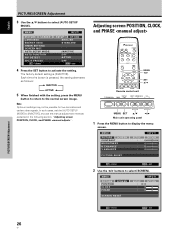
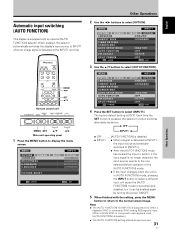
... the 2/3 buttons to display the menu screen. AUTO SET UP Note Optimum settings may not be adjusted to best match the current image input. MENU PICTURE SCREEN LANGUAGE ENERGY SAVE TIMER SETTING S C R E E N M G T. AUTO SETUP MODE AUTO FUNCTION PIP DETECT SPLIT FREEZE SET ENTER INPUT1 SETUP OPTION :ENGLISH : ...button or by selecting [AUTO SETUP MODE] from the menu, the unit will automatically be possible for the current input source. MENU PICTURE SCREEN CONTRAST BRIGHTNESS H.ENHANCE V. MENU SET 5/∞ 2/3 Main unit operating panel 1 Press the MENU button to select [OPTION]....
... the 2/3 buttons to display the menu screen. AUTO SET UP Note Optimum settings may not be adjusted to best match the current image input. MENU PICTURE SCREEN LANGUAGE ENERGY SAVE TIMER SETTING S C R E E N M G T. AUTO SETUP MODE AUTO FUNCTION PIP DETECT SPLIT FREEZE SET ENTER INPUT1 SETUP OPTION :ENGLISH : ...button or by selecting [AUTO SETUP MODE] from the menu, the unit will automatically be possible for the current input source. MENU PICTURE SCREEN CONTRAST BRIGHTNESS H.ENHANCE V. MENU SET 5/∞ 2/3 Main unit operating panel 1 Press the MENU button to select [OPTION]....
User Manual
Page 32
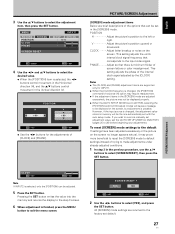
... Press the MENU button to select [SCREEN]. E N H A N C E SETUP : : : : INPUT1 OPTION 0 0 0 0 PICTURE RESET SET ENTER MENU EXIT 2 Use the 2/3 buttons to display the menu screen. MENU PICTURE SCREEN LANGUAGE ENERGY SAVE TIMER SETTING S C R E E N M G T. AUTO SETUP MODE AUTO FUNCTION PIP DETECT SPLIT FREEZE SET CHANGE INPUT1...select [AUTO SETUP MODE]. Note Optimum settings may not be possible for low-luminance and certain other signals. English PICTURE/SCREEN Adjustment 3 Use the 5/∞ buttons to activate the setting. In such cases, set the [AUTO SETUP MODE] to...
... Press the MENU button to select [SCREEN]. E N H A N C E SETUP : : : : INPUT1 OPTION 0 0 0 0 PICTURE RESET SET ENTER MENU EXIT 2 Use the 2/3 buttons to display the menu screen. MENU PICTURE SCREEN LANGUAGE ENERGY SAVE TIMER SETTING S C R E E N M G T. AUTO SETUP MODE AUTO FUNCTION PIP DETECT SPLIT FREEZE SET CHANGE INPUT1...select [AUTO SETUP MODE]. Note Optimum settings may not be possible for low-luminance and certain other signals. English PICTURE/SCREEN Adjustment 3 Use the 5/∞ buttons to activate the setting. In such cases, set the [AUTO SETUP MODE] to...
User Manual
Page 33
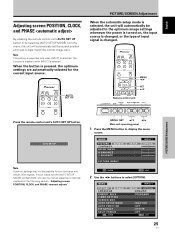
...only the [POSITION] can be the one automatically set the [AUTO SETUP MODE] to [INACTIVE] (pages 25 to exit the menu screen. PICTURE/SCREEN Adjustment CLOCK SET SET : 0 MENU EXIT Note If INPUT2 is finished, press the MENU button to 26) before beginning your adjustments. ...changed , the adjustment value stored in the [SCREEN] mode. If you wish to record a manually set adjustment value, set with the auto setup mode. MENU PICTURE POSITION CLOCK PHASE SCREEN SCREEN RESET INPUT1 SETUP OPTION : 0/ 0 : 0 : 0 SET ENTER MENU EXIT 4 Use the 2/3 and 5/∞ buttons to...
...only the [POSITION] can be the one automatically set the [AUTO SETUP MODE] to [INACTIVE] (pages 25 to exit the menu screen. PICTURE/SCREEN Adjustment CLOCK SET SET : 0 MENU EXIT Note If INPUT2 is finished, press the MENU button to 26) before beginning your adjustments. ...changed , the adjustment value stored in the [SCREEN] mode. If you wish to record a manually set adjustment value, set with the auto setup mode. MENU PICTURE POSITION CLOCK PHASE SCREEN SCREEN RESET INPUT1 SETUP OPTION : 0/ 0 : 0 : 0 SET ENTER MENU EXIT 4 Use the 2/3 and 5/∞ buttons to...
User Manual
Page 34
... 5/∞ Remote control unit STANDBY/ON DISPLAY MENU / SET INPUT SCREEN SIZE - E N H A N C E SETUP : : : : INPUT1 OPTION 0 0 0 0 PICTURE RESET SET ENTER MENU EXIT 28 En 2 Use the 2/3 buttons to activate the setting. AUTO SETUP MODE AUTO FUNCTION PIP DETECT SPLIT FREEZE SET ENTER... dot-by-dot orientation. 6 When finished with the setting, press the MENU button to return to select [SCREEN MGT.], then press the SET button. MENU PICTURE SCREEN LANGUAGE ENERGY SAVE TIMER SETTING S C R E E N M G T. AUTO SETUP MODE AUTO FUNCTION PIP DETECT SPLIT FREEZE SET ENTER INPUT1 SETUP OPTION...
... 5/∞ Remote control unit STANDBY/ON DISPLAY MENU / SET INPUT SCREEN SIZE - E N H A N C E SETUP : : : : INPUT1 OPTION 0 0 0 0 PICTURE RESET SET ENTER MENU EXIT 28 En 2 Use the 2/3 buttons to activate the setting. AUTO SETUP MODE AUTO FUNCTION PIP DETECT SPLIT FREEZE SET ENTER... dot-by-dot orientation. 6 When finished with the setting, press the MENU button to return to select [SCREEN MGT.], then press the SET button. MENU PICTURE SCREEN LANGUAGE ENERGY SAVE TIMER SETTING S C R E E N M G T. AUTO SETUP MODE AUTO FUNCTION PIP DETECT SPLIT FREEZE SET ENTER INPUT1 SETUP OPTION...

User Manual
Page 35
...SETTING S C R E E N M G T. The factory default setting is canceled. ÷ 1 ~ 4 Settings for [SOFT FOCUS]. MENU PICTURE SCREEN CONTRAST BRIGHTNESS H.ENHANCE V. MENU PICTURE SCREEN LANGUAGE ENERGY SAVE TIMER SETTING S C R E E N M G T. SCREEN MANAGEMENT ORBITER SOFT FOCUS :OFF :OFF SET CHANGE MENU EXIT ... operating panel 1 Press the MENU button to the normal screen image. E N H A N C E SETUP : : : : INPUT1 OPTION 0 0 0 0 PICTURE RESET SET ENTER MENU EXIT 2 Use the 2/3 buttons to select [SCREEN MGT.], then press the SET button. Setting the SOFT FOCUS Images are softened by...
...SETTING S C R E E N M G T. The factory default setting is canceled. ÷ 1 ~ 4 Settings for [SOFT FOCUS]. MENU PICTURE SCREEN CONTRAST BRIGHTNESS H.ENHANCE V. MENU PICTURE SCREEN LANGUAGE ENERGY SAVE TIMER SETTING S C R E E N M G T. SCREEN MANAGEMENT ORBITER SOFT FOCUS :OFF :OFF SET CHANGE MENU EXIT ... operating panel 1 Press the MENU button to the normal screen image. E N H A N C E SETUP : : : : INPUT1 OPTION 0 0 0 0 PICTURE RESET SET ENTER MENU EXIT 2 Use the 2/3 buttons to select [SCREEN MGT.], then press the SET button. Setting the SOFT FOCUS Images are softened by...

User Manual
Page 36
... SETUP OPTION :ENGLISH : S TA N D A R D :INACTIVE :OFF :ACTIVE :OFF MENU EXIT 3 Use the 5/∞ buttons to select [OPTION]. MENU PICTURE SCREEN LANGUAGE ENERGY SAVE TIMER SETTING S C R E E N M G T. The factory default setting is less than that used in [STANDARD] mode. ÷...consumption and reducing display deterioration. MENU 2/3 SET 5/∞ Remote control unit STANDBY/ON DISPLAY MENU / SET INPUT SCREEN SIZE - E N H A N C E PICTURE RESET SETUP : : : : INPUT1 OPTION 0 0 0 0 SET ENTER MENU EXIT 30 En 2 Use the 2/3 buttons to select [ENERGY SAVE]. Note The ...
... SETUP OPTION :ENGLISH : S TA N D A R D :INACTIVE :OFF :ACTIVE :OFF MENU EXIT 3 Use the 5/∞ buttons to select [OPTION]. MENU PICTURE SCREEN LANGUAGE ENERGY SAVE TIMER SETTING S C R E E N M G T. The factory default setting is less than that used in [STANDARD] mode. ÷...consumption and reducing display deterioration. MENU 2/3 SET 5/∞ Remote control unit STANDBY/ON DISPLAY MENU / SET INPUT SCREEN SIZE - E N H A N C E PICTURE RESET SETUP : : : : INPUT1 OPTION 0 0 0 0 SET ENTER MENU EXIT 30 En 2 Use the 2/3 buttons to select [ENERGY SAVE]. Note The ...
User Manual
Page 37
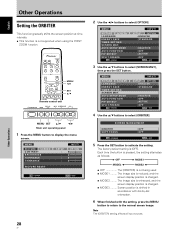
...input sources. 31 En Other Operations English VOL + MENU SET 5/∞ 2/3 Main unit operating panel 1 Press the MENU button to select [INPUT1]. MENU PICTURE SCREEN LANGUAGE ENERGY SAVE TIMER SETTING S C R E E N M G T. AUTO SETUP MODE AUTO FUNCTION PIP DETECT SPLIT FREEZE SET CHANGE INPUT1 SETUP ...:ENGLISH : S TA N D A R D :INACTIVE :OFF :ACTIVE :OFF MENU EXIT 4 Press the SET button to display the menu screen. MENU PICTURE SCREEN LANGUAGE ENERGY SAVE TIMER SETTING S C R E E N M G T. Each time the SET button is pressed, the selector function switches alternately as...
...input sources. 31 En Other Operations English VOL + MENU SET 5/∞ 2/3 Main unit operating panel 1 Press the MENU button to select [INPUT1]. MENU PICTURE SCREEN LANGUAGE ENERGY SAVE TIMER SETTING S C R E E N M G T. AUTO SETUP MODE AUTO FUNCTION PIP DETECT SPLIT FREEZE SET CHANGE INPUT1 SETUP ...:ENGLISH : S TA N D A R D :INACTIVE :OFF :ACTIVE :OFF MENU EXIT 4 Press the SET button to display the menu screen. MENU PICTURE SCREEN LANGUAGE ENERGY SAVE TIMER SETTING S C R E E N M G T. Each time the SET button is pressed, the selector function switches alternately as...

User Manual
Page 38
... finished with the setting, use the 5/∞ buttons to select [RETURN], then press the SET button to return to the [TIMER SETTING] menu. MENU PICTURE SCREEN LANGUAGE ENERGY SAVE TIMER SETTING S C R E E N M G T. AUTO SETUP MODE AUTO FUNCTION PIP DETECT SPLIT FREEZE SET ENTER INPUT1 SETUP OPTION... :ENGLISH : S TA N D A R D :INACTIVE :OFF :ACTIVE :OFF MENU EXIT 3 Use the 5/∞ buttons to daylight savings time. MENU PICTURE SCREEN LANGUAGE ENERGY SAVE TIMER SETTING S C R E E N M G T. PRESENT TIME D AY L I G H T SAVING TIME M O N D AY 12:00:...
... finished with the setting, use the 5/∞ buttons to select [RETURN], then press the SET button to return to the [TIMER SETTING] menu. MENU PICTURE SCREEN LANGUAGE ENERGY SAVE TIMER SETTING S C R E E N M G T. AUTO SETUP MODE AUTO FUNCTION PIP DETECT SPLIT FREEZE SET ENTER INPUT1 SETUP OPTION... :ENGLISH : S TA N D A R D :INACTIVE :OFF :ACTIVE :OFF MENU EXIT 3 Use the 5/∞ buttons to daylight savings time. MENU PICTURE SCREEN LANGUAGE ENERGY SAVE TIMER SETTING S C R E E N M G T. PRESENT TIME D AY L I G H T SAVING TIME M O N D AY 12:00:...


