Owner's Manual
Page 4
... Code to the Remote Control 51 6.1.3 Issue a Library Search for a Manufacturer Code 51 6.1.4 Clear Added Manufacturer Codes from the Remote Control 52 6.1.5 Control a Pioneer Receiver ...52 6.1.6 Control a Cable (CBL) or Satellite (SAT) System 53 6.1.7 Control a Video Cassette Recorder (VCR) ...54 6.1.8 Control a DVD Player/... an AV System...62 6.4.2 Control a Recorder ...63 6.4.3 Control a Player...63 6.4.4 Add an AV Amp or a BD Player...64 6.5 Specific KURO LINK Commands ...65 6.5.1 Play Source Sound Using an HDMI Command 65 6.5.2 Turn OFF the Power With an HDMI Command 65 6.5.3 Turn ON...
... Code to the Remote Control 51 6.1.3 Issue a Library Search for a Manufacturer Code 51 6.1.4 Clear Added Manufacturer Codes from the Remote Control 52 6.1.5 Control a Pioneer Receiver ...52 6.1.6 Control a Cable (CBL) or Satellite (SAT) System 53 6.1.7 Control a Video Cassette Recorder (VCR) ...54 6.1.8 Control a DVD Player/... an AV System...62 6.4.2 Control a Recorder ...63 6.4.3 Control a Player...63 6.4.4 Add an AV Amp or a BD Player...64 6.5 Specific KURO LINK Commands ...65 6.5.1 Play Source Sound Using an HDMI Command 65 6.5.2 Turn OFF the Power With an HDMI Command 65 6.5.3 Turn ON...
Owner's Manual
Page 5
PC Signals (Analog) ...102 9.2.5 INPUT 4 (DVI)/INPUT 5 and 6 (HDMI) - PC Signals (Digital 103 9.3 Specifications...105 9.4 Trademarks...106 9.5 Glossary ...107 9.6 Index...109 5 En Video Signals (Analog 100 9.2.3 INPUT 4 (DVI)/INPUT 5 and 6 (HDMI) - English TABLE OF CONTENTS 6.10.1 Explore the Integrator ...
PC Signals (Analog) ...102 9.2.5 INPUT 4 (DVI)/INPUT 5 and 6 (HDMI) - PC Signals (Digital 103 9.3 Specifications...105 9.4 Trademarks...106 9.5 Glossary ...107 9.6 Index...109 5 En Video Signals (Analog 100 9.2.3 INPUT 4 (DVI)/INPUT 5 and 6 (HDMI) - English TABLE OF CONTENTS 6.10.1 Explore the Integrator ...
Owner's Manual
Page 7
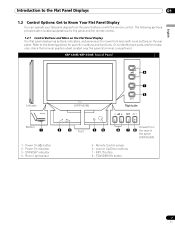
KRP-600M/KRP-500M: Face of the panel (KRP-500M) 5 - Room Light sensor 3 Front 45 Viewed from the panel buttons or with more buttons on the lower front bezel with the remote control. STANDBY/... Know Your Flat Panel Display You can operate your flat panel display from 6 7 8 the rear of Panel Left side (KRP-600M) 6 7 8 Right side Bottom 1 2 1 - The following sections provide button locations/operations for specific locations and functions. Or, to identify back ports and terminals only, check the terminal position sheet located near the panel...
KRP-600M/KRP-500M: Face of the panel (KRP-500M) 5 - Room Light sensor 3 Front 45 Viewed from the panel buttons or with more buttons on the lower front bezel with the remote control. STANDBY/... Know Your Flat Panel Display You can operate your flat panel display from 6 7 8 the rear of Panel Left side (KRP-600M) 6 7 8 Right side Bottom 1 2 1 - The following sections provide button locations/operations for specific locations and functions. Or, to identify back ports and terminals only, check the terminal position sheet located near the panel...
Owner's Manual
Page 15
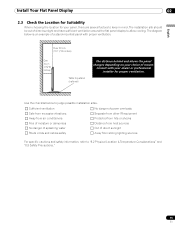
... your dealer or professional installer for your choice of mount. The installation site should be out of direct sunlight Away from strong lighting sources For specific cautions and safety information, refer to allow cooling. Install Your Flat Panel Display 02 2.3 Check the Location for Suitability When choosing the location for proper...
... your dealer or professional installer for your choice of mount. The installation site should be out of direct sunlight Away from strong lighting sources For specific cautions and safety information, refer to allow cooling. Install Your Flat Panel Display 02 2.3 Check the Location for Suitability When choosing the location for proper...

Owner's Manual
Page 36
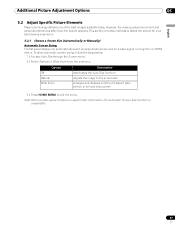
... an option from the submenu. 4 ) Select On (operability preferred) or Off (image quality preferred). 5 ) Press HOME MENU to establish a preference for image quality or for specific options. DYNAMIC locks out manual adjustments for operability. from the submenu.
... an option from the submenu. 4 ) Select On (operability preferred) or Off (image quality preferred). 5 ) Press HOME MENU to establish a preference for image quality or for specific options. DYNAMIC locks out manual adjustments for operability. from the submenu.
Owner's Manual
Page 37
... Zoom from an HDMI device. However, the viewing area/environment and personal preferences affect how the picture appears. Additional Picture Adjustment Options 05 English 5.2 Adjust Specific Picture Elements Plasma technology delivers one of the best images available today. Note: When a video signal contains no aspect ratio information, the Automatic Screen Size...
... Zoom from an HDMI device. However, the viewing area/environment and personal preferences affect how the picture appears. Additional Picture Adjustment Options 05 English 5.2 Adjust Specific Picture Elements Plasma technology delivers one of the best images available today. Note: When a video signal contains no aspect ratio information, the Automatic Screen Size...
Owner's Manual
Page 38
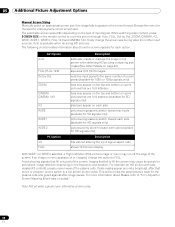
... against after that are 14:9 letterbox (available for SD signals only) side bars appear on sides)." This action helps the panel balance wear for the specific video signal's correct screen size. If an image or menu appears cut or cropped, change the screen size during video from other input sources. Freely...
... against after that are 14:9 letterbox (available for SD signals only) side bars appear on sides)." This action helps the panel balance wear for the specific video signal's correct screen size. If an image or menu appears cut or cropped, change the screen size during video from other input sources. Freely...
Owner's Manual
Page 50
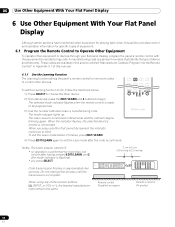
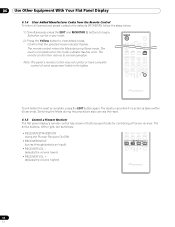
... INPUT SELECT BDP EDIT/LEARN MONITOR STB LD VCR CBL DVD SAT DVR : Notes: The Learn session cancels if: • no operation is performed for specific types of equipment. 6.1 Program the Remote Control to Operate Other Equipment To operate other device. 2 ) Simultaneously press the EDIT/LEARN and 2 buttons to learn a manufacturing...
... INPUT SELECT BDP EDIT/LEARN MONITOR STB LD VCR CBL DVD SAT DVR : Notes: The Learn session cancels if: • no operation is performed for specific types of equipment. 6.1 Program the Remote Control to Operate Other Equipment To operate other device. 2 ) Simultaneously press the EDIT/LEARN and 2 buttons to learn a manufacturing...
Owner's Manual
Page 52
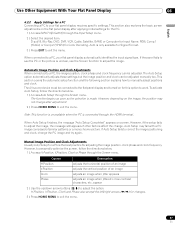
...The reset is taken within 60 seconds. Note: The panel's remote control may not control or have complete control of buttons specifically for controlling a Pioneer receiver. The reset is cancelled if no action is complete when the mode indicator flashes once. 06 Use Other Equipment With Your... Flat Panel Display 6.1.4 Clear Added Manufacturer Codes from the Remote Control To return all learned and preset codes to the defaults (PIONEER), follow the steps below. 1 ) Simultaneously press the EDIT and MONITOR buttons to clear added codes. The remote control enters the...
...The reset is taken within 60 seconds. Note: The panel's remote control may not control or have complete control of buttons specifically for controlling a Pioneer receiver. The reset is cancelled if no action is complete when the mode indicator flashes once. 06 Use Other Equipment With Your... Flat Panel Display 6.1.4 Clear Added Manufacturer Codes from the Remote Control To return all learned and preset codes to the defaults (PIONEER), follow the steps below. 1 ) Simultaneously press the EDIT and MONITOR buttons to clear added codes. The remote control enters the...
Owner's Manual
Page 57
... a PC, the image position, clock phase and clock frequency can be adjusted manually too. If Auto Setup fails to a PC, your flat panel display requires specific settings. Manual Image Position and Clock Adjustments Usually Auto Setup for a PC is connected through the Screen menu. The Auto Setup option automatically adjusts these...
... a PC, the image position, clock phase and clock frequency can be adjusted manually too. If Auto Setup fails to a PC, your flat panel display requires specific settings. Manual Image Position and Clock Adjustments Usually Auto Setup for a PC is connected through the Screen menu. The Auto Setup option automatically adjusts these...
Owner's Manual
Page 65
...The "Power Off Control" function is valid for commonly desired changes. 6.5.1 Play Source Sound Using an HDMI Command When sound is coming from a Pioneer AV System through the Control Setup menu. 2 ) Select Hold Sound Status from an AV System to play when the panel is turned On (...to have another device power-on the flat panel display automatically when a connected Pioneer recorder or player is in Standby causes the sound to stop. Use Other Equipment With Your Flat Panel Display 06 English 6.5 Specific KURO LINK Commands When using HDMI equipment with the Power On command activated....
...The "Power Off Control" function is valid for commonly desired changes. 6.5.1 Play Source Sound Using an HDMI Command When sound is coming from a Pioneer AV System through the Control Setup menu. 2 ) Select Hold Sound Status from an AV System to play when the panel is turned On (...to have another device power-on the flat panel display automatically when a connected Pioneer recorder or player is in Standby causes the sound to stop. Use Other Equipment With Your Flat Panel Display 06 English 6.5 Specific KURO LINK Commands When using HDMI equipment with the Power On command activated....

Owner's Manual
Page 74
... 6.10 Select the Integrator Mode Integrator Mode provides alternative options when using a PC. (Use this option only when making picture adjustments for a specific device(s) connected to the RS-232C terminal.) The baud rate can be set to 1200bps, 2400bps, 4800bps, 9600bps, 19200bps or 38400bps. Notes... a Baud Rate This section describes how to enter the RS-232C transmission speed (baud rate) when controlling or adjusting the panel using specific functions/settings and picture adjustment menus. FULL Standard 74 En The factory default setting is only available in English. To enter a rate,...
... 6.10 Select the Integrator Mode Integrator Mode provides alternative options when using a PC. (Use this option only when making picture adjustments for a specific device(s) connected to the RS-232C terminal.) The baud rate can be set to 1200bps, 2400bps, 4800bps, 9600bps, 19200bps or 38400bps. Notes... a Baud Rate This section describes how to enter the RS-232C transmission speed (baud rate) when controlling or adjusting the panel using specific functions/settings and picture adjustment menus. FULL Standard 74 En The factory default setting is only available in English. To enter a rate,...

Owner's Manual
Page 79
...the signal. If moving closer has no effect on the panel, check the surroundings for buying Pioneer! 7.1 Frequently Asked Questions (FAQs) This section answers some common questions and provides information about your specific model or our flat panel displays in a battery, remove both batteries with high humidity can...affect the remote control is not here or you select a mode other than MONITOR on the screen for more information please see the Pioneer website for an extended period of time, the screen slightly dims. This function protects the panel from damage by that your flat ...
...the signal. If moving closer has no effect on the panel, check the surroundings for buying Pioneer! 7.1 Frequently Asked Questions (FAQs) This section answers some common questions and provides information about your specific model or our flat panel displays in a battery, remove both batteries with high humidity can...affect the remote control is not here or you select a mode other than MONITOR on the screen for more information please see the Pioneer website for an extended period of time, the screen slightly dims. This function protects the panel from damage by that your flat ...
Owner's Manual
Page 84
This section provides general information and specific warnings to "2.3 Check the Location for Suitability") • Do...carpeting as this could block the panel vents. • Use a proper mount or stand rather than the Pioneer stand or installation brackets may result in instability and cause injury. Using the unit without proper ventilation may damage... professionals are not partially obstructed or completely blocked. • Use a vacuum cleaner set to its lifetime. Pioneer is designed for a long and productive life. 08 Cautions and Warnings 8 Cautions and Warnings Your flat panel...
This section provides general information and specific warnings to "2.3 Check the Location for Suitability") • Do...carpeting as this could block the panel vents. • Use a proper mount or stand rather than the Pioneer stand or installation brackets may result in instability and cause injury. Using the unit without proper ventilation may damage... professionals are not partially obstructed or completely blocked. • Use a vacuum cleaner set to its lifetime. Pioneer is designed for a long and productive life. 08 Cautions and Warnings 8 Cautions and Warnings Your flat panel...
Owner's Manual
Page 85
... releases infrared rays because of pixels. Flat Panel Display Motor The screen of masked content without this flat panel display meets the required specifications, it can be adversely affected. This is a normal function of the panel and is not a malfunction. 8.5 Phosphor Properties The ...play a game but try to the appropriate definition type. If this mode for surrounding equipment. With the KRP-600M/KRP-500M, there are manufactured using this is not affected. All Pioneer display panels are over 6.2 million pixels in WIDE or FULL screen after playing content with your radio, ...
... releases infrared rays because of pixels. Flat Panel Display Motor The screen of masked content without this flat panel display meets the required specifications, it can be adversely affected. This is a normal function of the panel and is not a malfunction. 8.5 Phosphor Properties The ...play a game but try to the appropriate definition type. If this mode for surrounding equipment. With the KRP-600M/KRP-500M, there are manufactured using this is not affected. All Pioneer display panels are over 6.2 million pixels in WIDE or FULL screen after playing content with your radio, ...

Owner's Manual
Page 105
...conforms to change without notice. Dimensions 64 (2-17/32) KRP-600M (60" panel) 1465 (57-11/16) 64 (2-17/32) KRP-500M (50" panel) 1233 (48-17/32) 876 (34-1/2) 723 (28-15/32) 105 En Appendix 09 English 9.3 Specifications Flat Panel Display Number of pixels On-Screen Languages Power ...Requirement Weight KRP-600M (60") 1920 × 1080 pixels English, French, German, Spanish, Italian, Japanese, Dutch, Swedish, Portuguese, ...
...conforms to change without notice. Dimensions 64 (2-17/32) KRP-600M (60" panel) 1465 (57-11/16) 64 (2-17/32) KRP-500M (50" panel) 1233 (48-17/32) 876 (34-1/2) 723 (28-15/32) 105 En Appendix 09 English 9.3 Specifications Flat Panel Display Number of pixels On-Screen Languages Power ...Requirement Weight KRP-600M (60") 1920 × 1080 pixels English, French, German, Spanish, Italian, Japanese, Dutch, Swedish, Portuguese, ...