Owner's Manual
Page 3
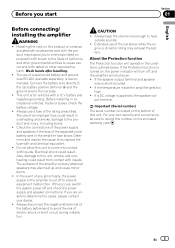
...this occurs, switch the system power off , and the amplifier will operate in the conditions outlined below. If the speaker output terminal and speaker wire is applied to the product and injury, including burns. ! For your dealer. ! Handling the cord on , the power indicator will turn off...at rest or idling may also heat up and cause minor burns. ! The surfaces of this product or cords associated with accessories sold battery wire or the amplifier fuse blows. Important (Serial number) The serial number is recommended. Determine and resolve the cause, then replace the fuse with...
...this occurs, switch the system power off , and the amplifier will operate in the conditions outlined below. If the speaker output terminal and speaker wire is applied to the product and injury, including burns. ! For your dealer. ! Handling the cord on , the power indicator will turn off...at rest or idling may also heat up and cause minor burns. ! The surfaces of this product or cords associated with accessories sold battery wire or the amplifier fuse blows. Important (Serial number) The serial number is recommended. Determine and resolve the cause, then replace the fuse with...
Owner's Manual
Page 4
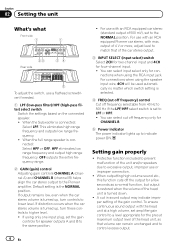
...car stereo volume is restored when the volume of the unit and/or speakers due to higher level. ! For connections when using the speaker input wire, 4CH will be used automatically no matter which switch setting is selected. 4 FREQ (cut off frequency selectable from 40 Hz to 500 Hz if...-pass filter) select switch Switch the settings based on the connected speaker. ! When the full range speaker is turned up , turn controls to the Pioneer amplifier. If output remains low, even when the car stereo volume is connected: Select HPF or OFF. Section 02 Setting the unit What's what Front...
...car stereo volume is restored when the volume of the unit and/or speakers due to higher level. ! For connections when using the speaker input wire, 4CH will be used automatically no matter which switch setting is selected. 4 FREQ (cut off frequency selectable from 40 Hz to 500 Hz if...-pass filter) select switch Switch the settings based on the connected speaker. ! When the full range speaker is turned up , turn controls to the Pioneer amplifier. If output remains low, even when the car stereo volume is connected: Select HPF or OFF. Section 02 Setting the unit What's what Front...
Owner's Manual
Page 6
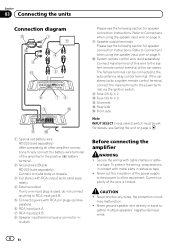
... separately) 4 External output If only one input plug is limited. Refer to Connections when using the speaker input wire on page 4. 1 Special red battery wire RD-223 (sold separately) After completing all other equipment. If the car stereo lacks a system remote control terminal...the following section for speaker connection instructions. Refer to other amplifier connections, finally connect the battery wire terminal of the amplifier to the positive (+) battery terminal. 2 Ground wire (Black) RD-223 (sold separately) Connect to the auto-antenna relay control terminal. For ...
... separately) 4 External output If only one input plug is limited. Refer to Connections when using the speaker input wire on page 4. 1 Special red battery wire RD-223 (sold separately) After completing all other equipment. If the car stereo lacks a system remote control terminal...the following section for speaker connection instructions. Refer to other amplifier connections, finally connect the battery wire terminal of the amplifier to the positive (+) battery terminal. 2 Ground wire (Black) RD-223 (sold separately) Connect to the auto-antenna relay control terminal. For ...
Owner's Manual
Page 7
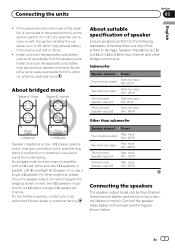
..., which may result in parallel for a 4 W load or a single 4 W speaker per channel. For any further enquiries, contact your local authorized Pioneer dealer or customer service. input: Min. 120 W Three-channel Speaker output B Max. For other bridge connections. En 7 Speaker impedance is max. 4... shown on the mode and the figures shown below. Connecting the units Section 03 English ! If the system remote control wire of fire, smoke or damage. About bridged mode About suitable specification of speaker Ensure speakers conform to the following standards, ...
..., which may result in parallel for a 4 W load or a single 4 W speaker per channel. For any further enquiries, contact your local authorized Pioneer dealer or customer service. input: Min. 120 W Three-channel Speaker output B Max. For other bridge connections. En 7 Speaker impedance is max. 4... shown on the mode and the figures shown below. Connecting the units Section 03 English ! If the system remote control wire of fire, smoke or damage. About bridged mode About suitable specification of speaker Ensure speakers conform to the following standards, ...
Owner's Manual
Page 9
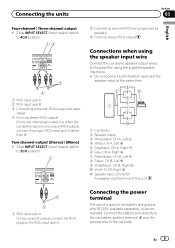
...: CH B, Left + 9 Violet/black: CH B, Right * a Violet: CH B, Right + b Speaker input connector To speaker input terminal of a special red battery and ground wire RD-223, available separately, is used, e.g. rately) 4 From car stereo (RCA output) If only one output (RCA output), connect the plug to RCA input jack... A. En 9 Slide INPUT SELECT (input select) switch to 4CH position. 12 3 4 1 RCA input jack A 2 RCA input jack B 3 Connecting wires with RCA pin plugs (sold sepa- Connecting the power terminal The use of this unit. 2 3 1 RCA input jack A For two-channel output, connect...
...: CH B, Left + 9 Violet/black: CH B, Right * a Violet: CH B, Right + b Speaker input connector To speaker input terminal of a special red battery and ground wire RD-223, available separately, is used, e.g. rately) 4 From car stereo (RCA output) If only one output (RCA output), connect the plug to RCA input jack... A. En 9 Slide INPUT SELECT (input select) switch to 4CH position. 12 3 4 1 RCA input jack A 2 RCA input jack B 3 Connecting wires with RCA pin plugs (sold sepa- Connecting the power terminal The use of this unit. 2 3 1 RCA input jack A For two-channel output, connect...
Owner's Manual
Page 10
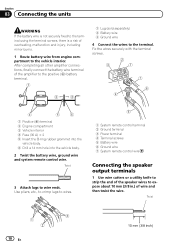
... Twist 10 En After completing all other amplifier connections, finally connect the battery wire terminal of wire and then twist the wire. Section 03 Connecting the units WARNING If the battery wire is not securely fixed to the terminal using the terminal screws, there is ...a risk of overheating, malfunction and injury, including minor burns. 1 Route battery wire from engine compartment to wire ends. Fix the wires securely with the terminal screws. 1 Positive (+) terminal 2 Engine compartment 3 Vehicle interior 4 Fuse (30 A) × 2 ...
... Twist 10 En After completing all other amplifier connections, finally connect the battery wire terminal of wire and then twist the wire. Section 03 Connecting the units WARNING If the battery wire is not securely fixed to the terminal using the terminal screws, there is ...a risk of overheating, malfunction and injury, including minor burns. 1 Route battery wire from engine compartment to wire ends. Fix the wires securely with the terminal screws. 1 Positive (+) terminal 2 Engine compartment 3 Vehicle interior 4 Fuse (30 A) × 2 ...
Owner's Manual
Page 11
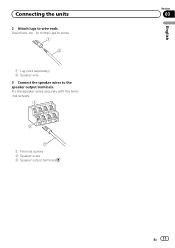
Fix the speaker wires securely with the terminal screws. 1 Terminal screws 2 Speaker wires 3 Speaker output terminals English Section 03 En 11 Use pliers, etc., to crimp lugs to wires. 1 Lug (sold separately) 2 Speaker wire 3 Connect the speaker wires to wire ends. Connecting the units 2 Attach lugs to the speaker output terminals.
Fix the speaker wires securely with the terminal screws. 1 Terminal screws 2 Speaker wires 3 Speaker output terminals English Section 03 En 11 Use pliers, etc., to crimp lugs to wires. 1 Lug (sold separately) 2 Speaker wire 3 Connect the speaker wires to wire ends. Connecting the units 2 Attach lugs to the speaker output terminals.
Owner's Manual
Page 12
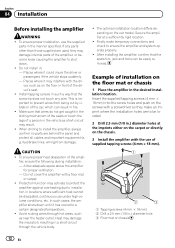
...on the floor in front of a person in the sliding mechanism of the seats or touch the legs of the driver's seat. ! Make sure that wires do not get caught in the vehicle as near the heater outlet. g. To ensure proper heat dissipation of installation on the chassis. 3 Install the amplifier... system operate properly. ! Insert the supplied tapping screws (4 mm × 18 mm) into the screw holes and push on the car model. fuel/brake lines, wiring) from being cut by vibration of the amplifier, or become loose causing the amplifier to shut down until it may activate to protect the amplifier...
...on the floor in front of a person in the sliding mechanism of the seats or touch the legs of the driver's seat. ! Make sure that wires do not get caught in the vehicle as near the heater outlet. g. To ensure proper heat dissipation of installation on the chassis. 3 Install the amplifier... system operate properly. ! Insert the supplied tapping screws (4 mm × 18 mm) into the screw holes and push on the car model. fuel/brake lines, wiring) from being cut by vibration of the amplifier, or become loose causing the amplifier to shut down until it may activate to protect the amplifier...
Owner's Manual
Page 13
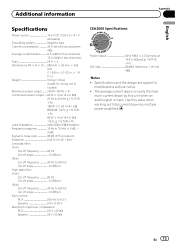
... 25 A × 2 Dimensions (W × H × D) ... 289 mm × 62 mm × 349 mm (11-3/8 in. ×2-1/2 in. × 1 ft. 2 in.) Weight 3.3 kg (7.3 lbs) (Leads for wiring not included) Maximum power output ....... 760 W (190 W × 4) Continuous power output ... 60 W × 4 (at 14.4 V, 4 W, 20 Hz to 20 kHz ≦ 1 % THD +N) 180 W × 2 (at...
... 25 A × 2 Dimensions (W × H × D) ... 289 mm × 62 mm × 349 mm (11-3/8 in. ×2-1/2 in. × 1 ft. 2 in.) Weight 3.3 kg (7.3 lbs) (Leads for wiring not included) Maximum power output ....... 760 W (190 W × 4) Continuous power output ... 60 W × 4 (at 14.4 V, 4 W, 20 Hz to 20 kHz ≦ 1 % THD +N) 180 W × 2 (at...


