Owner's Manual
Page 3
...the cord on this unit, smoke, and overheating could result from contact with accessories sold battery wire or the amplifier fuse blows. Connect the battery wire directly to the car battery positive terminal + and the ground wire to this product or cords associated with liquids. This unit is short...harm. Extended use of the rating prescribed. If a DC voltage is turned on the enclosed warranty card. If the temperature inside the amplifier gets too high. ! Always disconnect the negative * terminal of the battery beforehand to cause cancer and birth defect or other governmental ...
...the cord on this unit, smoke, and overheating could result from contact with accessories sold battery wire or the amplifier fuse blows. Connect the battery wire directly to the car battery positive terminal + and the ground wire to this product or cords associated with liquids. This unit is short...harm. Extended use of the rating prescribed. If a DC voltage is turned on the enclosed warranty card. If the temperature inside the amplifier gets too high. ! Always disconnect the negative * terminal of the battery beforehand to cause cancer and birth defect or other governmental ...
Owner's Manual
Page 4
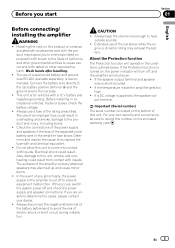
... the same position. ! For use with an RCA equipped Pioneer car stereo, with an RCA equipped car stereo (standard output of the gain control. For use with max. You can select input select only for connections when using only one input plug, set amplifier gain control to a level appropriate for the preout maximum output... when the volume of the head unit, so that of the unit and/or speakers due to the NORMAL position. If distortion occurs when the car stereo volume is connected: Select LPF. When the Subwoofer is turned up , turn these controls to the Pioneer amplifier.
... the same position. ! For use with an RCA equipped Pioneer car stereo, with an RCA equipped car stereo (standard output of the gain control. For use with max. You can select input select only for connections when using only one input plug, set amplifier gain control to a level appropriate for the preout maximum output... when the volume of the head unit, so that of the unit and/or speakers due to the NORMAL position. If distortion occurs when the car stereo volume is connected: Select LPF. When the Subwoofer is turned up , turn these controls to the Pioneer amplifier.
Owner's Manual
Page 6
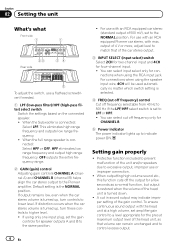
... the wiring, wrap sections in - Never cut the insulation of the power supply to feed power to other amplifier connections, finally connect the battery wire terminal of the amplifier to the positive (+) battery terminal. 2 Ground wire (Black) RD-223 (sold separately) Connect to metal body... or chassis. 3 Car stereo with RCA output jacks (sold separately) 4 External output If only one input plug is limited. Refer to RCA...
... the wiring, wrap sections in - Never cut the insulation of the power supply to feed power to other amplifier connections, finally connect the battery wire terminal of the amplifier to the positive (+) battery terminal. 2 Ground wire (Black) RD-223 (sold separately) Connect to metal body... or chassis. 3 Car stereo with RCA output jacks (sold separately) 4 External output If only one input plug is limited. Refer to RCA...
Owner's Manual
Page 7
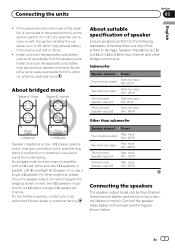
...Speaker output B Nominal input: Min. 180 W Speaker impedance is at rest or idling. ! For bridged mode for a two-channel amplifier, with the ignition whether the car stereo is on with a 4 W load, either wire two 8 W speakers in parallel for bridging shown on the mode and the...03 English ! For other bridge connections. En 7 input: Min. 120 W Three-channel Speaker output B Max. For any further enquiries, contact your local authorized Pioneer dealer or customer service. Connect the speaker leads based on rear: two 8 W speakers in parallel, Left + and Right * (Diagram A) or use a...
...Speaker output B Nominal input: Min. 180 W Speaker impedance is at rest or idling. ! For bridged mode for a two-channel amplifier, with the ignition whether the car stereo is on with a 4 W load, either wire two 8 W speakers in parallel for bridging shown on the mode and the...03 English ! For other bridge connections. En 7 input: Min. 120 W Three-channel Speaker output B Max. For any further enquiries, contact your local authorized Pioneer dealer or customer service. Connect the speaker leads based on rear: two 8 W speakers in parallel, Left + and Right * (Diagram A) or use a...
Owner's Manual
Page 8
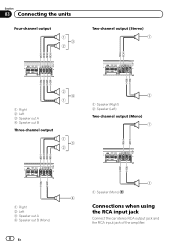
Section 03 Connecting the units Four-channel output 1 3 2 Two-channel output (Stereo) 1 Right 2 Left 3 Speaker out A 4 Speaker out B Three-channel output 2 4 1 1 3 2 2 1 Speaker (Right) 2 Speaker (Left) Two-channel output (Mono) 1 Right 2 Left 3 Speaker out A 4 Speaker out B (Mono) 8 En 1 1 Speaker (Mono) 4 Connections when using the RCA input jack Connect the car stereo RCA output jack and the RCA input jack of the amplifier.
Section 03 Connecting the units Four-channel output 1 3 2 Two-channel output (Stereo) 1 Right 2 Left 3 Speaker out A 4 Speaker out B Three-channel output 2 4 1 1 3 2 2 1 Speaker (Right) 2 Speaker (Left) Two-channel output (Mono) 1 Right 2 Left 3 Speaker out A 4 Speaker out B (Mono) 8 En 1 1 Speaker (Mono) 4 Connections when using the RCA input jack Connect the car stereo RCA output jack and the RCA input jack of the amplifier.
Owner's Manual
Page 9
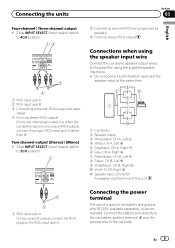
... has only one input plug is recommended. Do not connect both the RCA input and the speaker input at the same time. 1 Car Stereo 2 Speaker output 3 White/black: CH A, Left * 4 White: CH A, Left + 5 Gray/black: CH A, Right * 6 Gray: CH A, Right + 7 Green/black: CH B, Left * 8 Green: CH ...select) switch to the RCA input jack A. Connect the battery wire directly to the car battery positive terminal + and the ground wire to the amplifier using the speaker input wire Connect the car stereo speaker output wires to the car body. Connecting the power terminal The use of this unit. 2 3 1 RCA...
... has only one input plug is recommended. Do not connect both the RCA input and the speaker input at the same time. 1 Car Stereo 2 Speaker output 3 White/black: CH A, Left * 4 White: CH A, Left + 5 Gray/black: CH A, Right * 6 Gray: CH A, Right + 7 Green/black: CH B, Left * 8 Green: CH ...select) switch to the RCA input jack A. Connect the battery wire directly to the car battery positive terminal + and the ground wire to the amplifier using the speaker input wire Connect the car stereo speaker output wires to the car body. Connecting the power terminal The use of this unit. 2 3 1 RCA...
Owner's Manual
Page 12
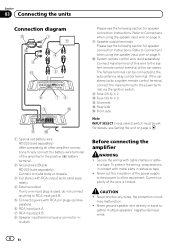
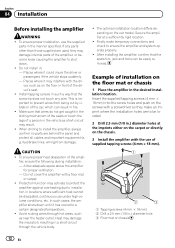
Section 04 Installation Before installing the amplifier WARNING ! Places where it may interfere with a floor mat or carpet. ! Install tapping screws in : - fuel/brake lines, wiring) from being cut by vibration of the ampli- To ensure proper heat dissipation of the car, which can be easily removed. ... × 18 mm) 2 Drill a 2.5 mm (1/8 in a short-circuit through hot areas, such as on the car model. ver, such as near the heater outlet. In such cases, the amplifier shuts down . ! Do not install in such a way that the spare tire, jack and tools can result in front...
Section 04 Installation Before installing the amplifier WARNING ! Places where it may interfere with a floor mat or carpet. ! Install tapping screws in : - fuel/brake lines, wiring) from being cut by vibration of the ampli- To ensure proper heat dissipation of the car, which can be easily removed. ... × 18 mm) 2 Drill a 2.5 mm (1/8 in a short-circuit through hot areas, such as on the car model. ver, such as near the heater outlet. In such cases, the amplifier shuts down . ! Do not install in such a way that the spare tire, jack and tools can result in front...


