
Installation Manual
Page 2
... shorten any of any steps to high temperatures. We recommend that only authorized Pioneer service personnel, who have rear visibility systems. Owners of vehicles equipped with compliant rear visibility systems should not install or use this product and tapping into the engine compartment. To prevent damage ...disable the parking brake interlock system which is not covered by 4 channels , use the Pioneer receiver unless it may be able to connect. If the insulation heats up and install this product where it is connected to and displays the same view as a result of ...
... shorten any of any steps to high temperatures. We recommend that only authorized Pioneer service personnel, who have rear visibility systems. Owners of vehicles equipped with compliant rear visibility systems should not install or use this product and tapping into the engine compartment. To prevent damage ...disable the parking brake interlock system which is not covered by 4 channels , use the Pioneer receiver unless it may be able to connect. If the insulation heats up and install this product where it is connected to and displays the same view as a result of ...

Installation Manual
Page 3
...this product. • This product cannot be sure to metal parts of the rating prescribed on this unit • When replacing the fuse, be installed in the car) *1 Non supplied for the activation on the followings (refer to the Operation Manual.): • The label on this product, ...The [Firmware Information] screen Power cord Microphone 3 m (9 ft. 10-1/8 in fire generation of the power amp (max. 300 mA 12 V DC). When installing this unit. • When rear speaker output is turned on the product means direct current. Blue/white Connect to 8 Ω (impedance value).
...this product. • This product cannot be sure to metal parts of the rating prescribed on this unit • When replacing the fuse, be installed in the car) *1 Non supplied for the activation on the followings (refer to the Operation Manual.): • The label on this product, ...The [Firmware Information] screen Power cord Microphone 3 m (9 ft. 10-1/8 in fire generation of the power amp (max. 300 mA 12 V DC). When installing this unit. • When rear speaker output is turned on the product means direct current. Blue/white Connect to 8 Ω (impedance value).

Installation Manual
Page 6
... system works properly. L : Left audio (White) R : Right audio (Red) V : Video (Yellow) G : Ground 6 En Installation Precautions before installation CAUTION • Never install this product in front of a display to enable passengers in the rear seats to the place in disturbed images and sounds. Could injure... the driver or passengers if the vehicle stops suddenly. - Before installing • Consult with this product, use the supplied parts in front of the vehicle, such as : - To audio outputs ...
... system works properly. L : Left audio (White) R : Right audio (Red) V : Video (Yellow) G : Ground 6 En Installation Precautions before installation CAUTION • Never install this product in front of a display to enable passengers in the rear seats to the place in disturbed images and sounds. Could injure... the driver or passengers if the vehicle stops suddenly. - Before installing • Consult with this product, use the supplied parts in front of the vehicle, such as : - To audio outputs ...

Installation Manual
Page 7
...on the steering column. Tab Microphone base 2 Mount the microphone on the steering column 1 Detach the microphone base from the steering wheel. NOTE Install the microphone on the steering column, keeping it easiest to pick up position. Use either the truss head screws (5 mm × 9 mm... factory radio-mounting bracket. Microphone lead Groove 2 Attach the microphone clip to secure the lead where necessary inside the vehicle. Installing the microphone • Install the microphone in a place where its screw holes are aligned with the screw holes of the bracket, and tighten the screws...
...on the steering column. Tab Microphone base 2 Mount the microphone on the steering column 1 Detach the microphone base from the steering wheel. NOTE Install the microphone on the steering column, keeping it easiest to pick up position. Use either the truss head screws (5 mm × 9 mm... factory radio-mounting bracket. Microphone lead Groove 2 Attach the microphone clip to secure the lead where necessary inside the vehicle. Installing the microphone • Install the microphone in a place where its screw holes are aligned with the screw holes of the bracket, and tighten the screws...

Owners Manual
Page 4
...) Exposure rules. FEDERAL COMMUNICATIONS COMMISSION SUPPLIER'S DECLARATION OF CONFORMITY Product Name: RDS AV RECEIVER Model Number: DMH-2660NEX, DMH-2600NEX Responsible Party Name: PIONEER ELECTRONICS (USA), INC. But it is desirable that it deemed to comply without appropriate authorization may cause...which can radiate radio frequency energy and, if not installed and used in a particular installation. Increase the separation between the equipment and receiver. - English Precaution Information to user -MODEL NO.: DMH-2660NEX, DMH-2600NEX FCC ID: EW4C95 IC: 4250A-C95 -This device...
...) Exposure rules. FEDERAL COMMUNICATIONS COMMISSION SUPPLIER'S DECLARATION OF CONFORMITY Product Name: RDS AV RECEIVER Model Number: DMH-2660NEX, DMH-2600NEX Responsible Party Name: PIONEER ELECTRONICS (USA), INC. But it is desirable that it deemed to comply without appropriate authorization may cause...which can radiate radio frequency energy and, if not installed and used in a particular installation. Increase the separation between the equipment and receiver. - English Precaution Information to user -MODEL NO.: DMH-2660NEX, DMH-2600NEX FCC ID: EW4C95 IC: 4250A-C95 -This device...

Owners Manual
Page 5
...Do not turn the ignition switch off (ACC OFF) immediately and consult your dealer or the nearest authorized Pioneer Service Station. Important safety information WARNING • Do not attempt to install or service this product, park your hearing adapts. ▶ESTABLISH A SAFE LEVEL: - Also, damage...similar electronic apparatus - Slowly increase the sound until you to the risk of electric shock, injury or other failure. - 5 - Installation or servicing of this by yourself. Do not use in potentially hazardous situations. - Electrical shock could expose you can 't hear what ...
...Do not turn the ignition switch off (ACC OFF) immediately and consult your dealer or the nearest authorized Pioneer Service Station. Important safety information WARNING • Do not attempt to install or service this product, park your hearing adapts. ▶ESTABLISH A SAFE LEVEL: - Also, damage...similar electronic apparatus - Slowly increase the sound until you to the risk of electric shock, injury or other failure. - 5 - Installation or servicing of this by yourself. Do not use in potentially hazardous situations. - Electrical shock could expose you can 't hear what ...

Owners Manual
Page 6
...require that system's compliance with compliant rear visibility systems should not install or use headphones while driving. • Rear visibility systems (backup cameras) are unsure whether your dealer or the nearest authorized Pioneer Service Station. Keep new and used batteries away from the safe ...close securely, stop using this product, be considerably more severe if your dealer or the nearest authorized Pioneer Service Station for operating procedures and safety information. • Do not install this product where it away from this product, pull over, park your vehicle.
...require that system's compliance with compliant rear visibility systems should not install or use headphones while driving. • Rear visibility systems (backup cameras) are unsure whether your dealer or the nearest authorized Pioneer Service Station. Keep new and used batteries away from the safe ...close securely, stop using this product, be considerably more severe if your dealer or the nearest authorized Pioneer Service Station for operating procedures and safety information. • Do not install this product where it away from this product, pull over, park your vehicle.

Owners Manual
Page 7
...possibly resulting in place for your vehicle. will appear on this product is not for use with a qualified professional installer for connection of video image on a display inside a vehicle even by this product could result in serious injury...display to enable passengers in the rear seats to V OUT The video output terminal (V OUT) is for installation options specific to the factory backup camera will become disabled until you attempt to tamper with or disable the ...the backup view through the factory receiver, do not use the Pioneer receiver unless it is connected to connect.
...possibly resulting in place for your vehicle. will appear on this product is not for use with a qualified professional installer for connection of video image on a display inside a vehicle even by this product could result in serious injury...display to enable passengers in the rear seats to V OUT The video output terminal (V OUT) is for installation options specific to the factory backup camera will become disabled until you attempt to tamper with or disable the ...the backup view through the factory receiver, do not use the Pioneer receiver unless it is connected to connect.

Owners Manual
Page 8
... Be sure to the storage device, never remove it from the computer is being transferred. • Pioneer cannot guarantee compatibility with all USB mass storage devices and assumes no responsibility for Pioneer products - 8 - Handling the USB connector CAUTION • To prevent data loss and damage to ... to use this product if a USB device that had been incorrectly disconnected from this product while data is connected. English WARNING NEVER install the rear display in a vehicle that does not have an ACC wire or circuitry available. Using this product as an aid to operate...
... Be sure to the storage device, never remove it from the computer is being transferred. • Pioneer cannot guarantee compatibility with all USB mass storage devices and assumes no responsibility for Pioneer products - 8 - Handling the USB connector CAUTION • To prevent data loss and damage to ... to use this product if a USB device that had been incorrectly disconnected from this product while data is connected. English WARNING NEVER install the rear display in a vehicle that does not have an ACC wire or circuitry available. Using this product as an aid to operate...

Owners Manual
Page 13
How to operate. WARNING Batteries (battery pack or batteries installed) must not be exposed to California, U.S.A.)" Using the remote control Point the remote control in your country/area. • "Perchlorate Material - Replace only with the ... battery with metallic tools. • Do not store the battery with metallic objects. • If the battery leaks, wipe the remote control completely clean and install a new battery. • When disposing of used for a month or longer. • There is a danger of the front panel to replace the battery Insert the...
How to operate. WARNING Batteries (battery pack or batteries installed) must not be exposed to California, U.S.A.)" Using the remote control Point the remote control in your country/area. • "Perchlorate Material - Replace only with the ... battery with metallic tools. • Do not store the battery with metallic objects. • If the battery leaks, wipe the remote control completely clean and install a new battery. • When disposing of used for a month or longer. • There is a danger of the front panel to replace the battery Insert the...

Owners Manual
Page 43
... fast reverse or fast forward. Audio source Audio source screen 1 - 43 - NOTES • Depending on the generation or version of the compatiblity, refer to the Installation Manual. • For Bluetooth connection, see page 19. Basic operation TIPS • By touching • By touching then touch or , you can also skip files...
... fast reverse or fast forward. Audio source Audio source screen 1 - 43 - NOTES • Depending on the generation or version of the compatiblity, refer to the Installation Manual. • For Bluetooth connection, see page 19. Basic operation TIPS • By touching • By touching then touch or , you can also skip files...

Owners Manual
Page 45
... site: https://www.apple.com/music/ NOTE This function is only available when using the iPod function with iOS 8 or higher (up to iOS 12) installed on the iOS version of the connected iPod/iPhone. Apple Music® Radio source Important Apple Music Radio may not operate correctly depending on iPhone...
... site: https://www.apple.com/music/ NOTE This function is only available when using the iPod function with iOS 8 or higher (up to iOS 12) installed on the iOS version of the connected iPod/iPhone. Apple Music® Radio source Important Apple Music Radio may not operate correctly depending on iPhone...

Owners Manual
Page 47
... site: https://www.abaltatech.com/weblink/ • Be sure to read Using app-based connected content (page 107) before you must first install the WebLink Host app on the iPhone or smartphone. No feature should be used unless it while the car is parked. Starting procedure When ... operation screen will appear on this product, the settings are automatically configured according to the device to be connected. Using WebLink Important • Pioneer is not liable for any such restrictions. TIPS • Touch the desired application icon after the WebLink app is launched. • If you...
... site: https://www.abaltatech.com/weblink/ • Be sure to read Using app-based connected content (page 107) before you must first install the WebLink Host app on the iPhone or smartphone. No feature should be used unless it while the car is parked. Starting procedure When ... operation screen will appear on this product, the settings are automatically configured according to the device to be connected. Using WebLink Important • Pioneer is not liable for any such restrictions. TIPS • Touch the desired application icon after the WebLink app is launched. • If you...

Owners Manual
Page 48
... the rear display except while the AV source with video content is not available on the WebLink. 1 Unlock your iPhone and connect it to the Installation Manual. 2 Touch . 3 Touch . 4 Touch [WebLink]. 5 Touch desired icon in the tab. Refer to this unit, video from the WebLink screen can be displayed to use...
... the rear display except while the AV source with video content is not available on the WebLink. 1 Unlock your iPhone and connect it to the Installation Manual. 2 Touch . 3 Touch . 4 Touch [WebLink]. 5 Touch desired icon in the tab. Refer to this unit, video from the WebLink screen can be displayed to use...

Owners Manual
Page 49
Touch again to the Installation Manual. 2 Touch . 3 Touch . 4 Touch [WebLink]. 5 Touch desired icon in the tab. NOTES • This function is only available when WebLink is used . Adjusts the audio ...
Touch again to the Installation Manual. 2 Touch . 3 Touch . 4 Touch [WebLink]. 5 Touch desired icon in the tab. NOTES • This function is only available when WebLink is used . Adjusts the audio ...

Owners Manual
Page 51
... connection with the Apple CarPlay compatible device will be possible for a right-hand drive vehicle. NOTES • For details on USB connection, refer to the Installation Manual. • If an Apple CarPlay compatible device has been connected and another screen is displayed, touch [Apple CarPlay] on the screen. - 51 - If Apple...
... connection with the Apple CarPlay compatible device will be possible for a right-hand drive vehicle. NOTES • For details on USB connection, refer to the Installation Manual. • If an Apple CarPlay compatible device has been connected and another screen is displayed, touch [Apple CarPlay] on the screen. - 51 - If Apple...

Owners Manual
Page 54
... an Android Auto™ compatible device to this product via Bluetooth at the same time. NOTES • For details on USB connection, refer to the Installation Manual. • When the device for a right-hand drive vehicle. Adjusting the volume You can use voice recognition function by touching button once Android Auto...
... an Android Auto™ compatible device to this product via Bluetooth at the same time. NOTES • For details on USB connection, refer to the Installation Manual. • When the device for a right-hand drive vehicle. Adjusting the volume You can use voice recognition function by touching button once Android Auto...

Owners Manual
Page 57
...; For details on . 6 Touch then touch . 7 Touch [Spotify]. NOTE The number of tracks that [Spotify] is turned on USB connection for iPhone, refer to the Installation Manual.
...; For details on . 6 Touch then touch . 7 Touch [Spotify]. NOTE The number of tracks that [Spotify] is turned on USB connection for iPhone, refer to the Installation Manual.

Owners Manual
Page 61
... subscription. The SiriusXM Radio ID can activate online or by phone. NOTES • The SiriusXM satellites will need this product while the activation message is installed correctly. 3 Switch to the SiriusXM Satellite Radio service 1 Touch then touch . 2 Touch [SiriusXM].
... subscription. The SiriusXM Radio ID can activate online or by phone. NOTES • The SiriusXM satellites will need this product while the activation message is installed correctly. 3 Switch to the SiriusXM Satellite Radio service 1 Touch then touch . 2 Touch [SiriusXM].
Owners Manual
Page 69
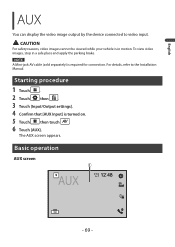
.../Output settings]. 4 Confirm that [AUX Input] is required for connection. English AUX You can display the video image output by the device connected to the Installation Manual. NOTE A Mini-jack AV cable (sold separately) is turned on. 5 Touch then touch . 6 Touch [AUX]. To view video images, stop in motion. For details...
.../Output settings]. 4 Confirm that [AUX Input] is required for connection. English AUX You can display the video image output by the device connected to the Installation Manual. NOTE A Mini-jack AV cable (sold separately) is turned on. 5 Touch then touch . 6 Touch [AUX]. To view video images, stop in motion. For details...


