Owner's Manual
Page 4
... performance. [For Canadian model] CAUTION: TO PREVENT ELECTRIC SHOCK DO NOT USE THIS (POLARIZED) PLUG WITH AN EXTENSION CORD. Min. 3cm. 4 In cases like this unit, since these will not be able to stand for about an hour or raise the room temperature gradually. RECEPTACLE OR OTHER OUTLET... near cookers etc., where the unit may be exposed to oily smoke, steam or heat.) ÷ When the unit is used inside a carrying case or DJ booth, separate it will corrode the surfaces. Do not use furniture wax or cleaners. ÷ Never use thinners, benzene, insecticide sprays or other ...
... performance. [For Canadian model] CAUTION: TO PREVENT ELECTRIC SHOCK DO NOT USE THIS (POLARIZED) PLUG WITH AN EXTENSION CORD. Min. 3cm. 4 In cases like this unit, since these will not be able to stand for about an hour or raise the room temperature gradually. RECEPTACLE OR OTHER OUTLET... near cookers etc., where the unit may be exposed to oily smoke, steam or heat.) ÷ When the unit is used inside a carrying case or DJ booth, separate it will corrode the surfaces. Do not use furniture wax or cleaners. ÷ Never use thinners, benzene, insecticide sprays or other ...
Owner's Manual
Page 14
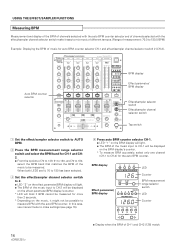
...CH-1 CD1/LINE LINE PROFESSIONAL CH-2 CH-3 CD2/LINE PHONO 1 LINE PHONO 2 DJ MIXER DJM-600 CH-4 MASTER LINE SUB MIC /PHONO 3 MONO STEREO POWER MIC LEVEL - ∞...SINGLE ECHO LOOP DELAY STRETCH AUTO BPM 4 3 REC BEAT SAMPLER MIC CF. A 2 CF. In this case, use manual mode to make settings (see page 15). 4 Press auto BPM counter selector CH-1. ÷... ∞ 0dB ON/OFF TAP BPM display Effect parameter/ BPM display Effect/sampler selector switch Effect/sampler channel selector switch Tap switch 1 Set the effect/sampler selector switch to AUTO BPM. 2 Press the BPM ...
...CH-1 CD1/LINE LINE PROFESSIONAL CH-2 CH-3 CD2/LINE PHONO 1 LINE PHONO 2 DJ MIXER DJM-600 CH-4 MASTER LINE SUB MIC /PHONO 3 MONO STEREO POWER MIC LEVEL - ∞...SINGLE ECHO LOOP DELAY STRETCH AUTO BPM 4 3 REC BEAT SAMPLER MIC CF. A 2 CF. In this case, use manual mode to make settings (see page 15). 4 Press auto BPM counter selector CH-1. ÷... ∞ 0dB ON/OFF TAP BPM display Effect parameter/ BPM display Effect/sampler selector switch Effect/sampler channel selector switch Tap switch 1 Set the effect/sampler selector switch to AUTO BPM. 2 Press the BPM ...
Owner's Manual
Page 15
... pan, auto trans, filter and flanger operations (pages 16 and 17), or during effect or sampler operations, the BPM display's counter will blink. In such a case, change the effect/ sampler selector switch to AUTO BPM and use the tap switch for more than 2 seconds during sampler operations (pages 20 and 21...
... pan, auto trans, filter and flanger operations (pages 16 and 17), or during effect or sampler operations, the BPM display's counter will blink. In such a case, change the effect/ sampler selector switch to AUTO BPM and use the tap switch for more than 2 seconds during sampler operations (pages 20 and 21...

Owner's Manual
Page 17
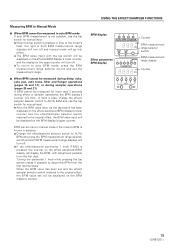
... Delayed Sound Levels ÷ The balance between original and delayed sound levels is pressed, effect sound can be confirmed via headphone output. Turning this case, use manual mode to make settings (see page 15). 3 Set the parameter value. BPM display 1234 AUTO BPM COUNTER 70-139 BPM 91-... in time to the beat, the effect's cycle will also start on the beat display if delay time is lit orange). Precautions: ÷ If the channel has been changed with the effect/ sampler parameter 1 knob (TIME). ÷ As "1/2" will light on the beat. 1 Set the effect/sampler selector ...
... Delayed Sound Levels ÷ The balance between original and delayed sound levels is pressed, effect sound can be confirmed via headphone output. Turning this case, use manual mode to make settings (see page 15). 3 Set the parameter value. BPM display 1234 AUTO BPM COUNTER 70-139 BPM 91-... in time to the beat, the effect's cycle will also start on the beat display if delay time is lit orange). Precautions: ÷ If the channel has been changed with the effect/ sampler parameter 1 knob (TIME). ÷ As "1/2" will light on the beat. 1 Set the effect/sampler selector ...
Owner's Manual
Page 20
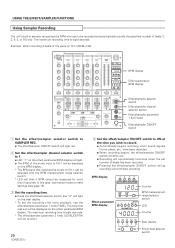
... eight seconds. MIC CH-1 CD1/LINE LINE PROFESSIONAL CH-2 CH-3 CD2/LINE PHONO 1 LINE PHONO 2 DJ MIXER DJM-600 CH-4 MASTER LINE SUB MIC /PHONO 3 MONO STEREO POWER MIC LEVEL - ∞ 0dB HI -12dB... automatically terminate when the set the recording time more than 2 seconds. In this case, use manual mode to 1. ÷ LED "1" on the effect parameter/BPM ...8734; 0dB ON/OFF TAP BPM display Effect parameter/ BPM display Effect/sampler selector switch Effect/sampler channel selector switch Effect/sampler parameter 1 & 2 knobs Effect/sampler ON/OFF switch 1 Set the effect...
... eight seconds. MIC CH-1 CD1/LINE LINE PROFESSIONAL CH-2 CH-3 CD2/LINE PHONO 1 LINE PHONO 2 DJ MIXER DJM-600 CH-4 MASTER LINE SUB MIC /PHONO 3 MONO STEREO POWER MIC LEVEL - ∞ 0dB HI -12dB... automatically terminate when the set the recording time more than 2 seconds. In this case, use manual mode to 1. ÷ LED "1" on the effect parameter/BPM ...8734; 0dB ON/OFF TAP BPM display Effect parameter/ BPM display Effect/sampler selector switch Effect/sampler channel selector switch Effect/sampler parameter 1 & 2 knobs Effect/sampler ON/OFF switch 1 Set the effect...
Owner's Manual
Page 21
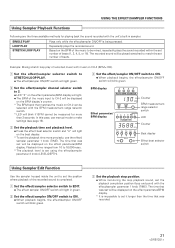
Playback time ranges from 10 to match the set it longer than 2 seconds. In this case, use the effect/ sampler parameter 1 knob (TIME). The time that was set will be mixed, repeatedly plays the sound recorded within the set number of ... the effect/sampler ON/OFF switch to ON. ¶ When playback begins, the effect/sampler ON/OFF switch will blink green. 2 Set the effect/sampler channel selector switch to 2. ÷ LED "2" on the effect parameter/BPM display will light. ÷ The BPM of beats (1, 2, 4, 8, or 16). BPM display 1234 AUTO BPM...
Playback time ranges from 10 to match the set it longer than 2 seconds. In this case, use the effect/ sampler parameter 1 knob (TIME). The time that was set will be mixed, repeatedly plays the sound recorded within the set number of ... the effect/sampler ON/OFF switch to ON. ¶ When playback begins, the effect/sampler ON/OFF switch will blink green. 2 Set the effect/sampler channel selector switch to 2. ÷ LED "2" on the effect parameter/BPM display will light. ÷ The BPM of beats (1, 2, 4, 8, or 16). BPM display 1234 AUTO BPM...

Owner's Manual
Page 24
...measured in some cases, depending on the music. ÷ Adjust the TRIM knob so that the input level approaches 0dB on again. 24 Can't use cross fading. ÷ ASSIGN A & B haven't been set BPM manually. To restore normal operation, turn on CD. ÷ Because of other channels to approach ...247; Input level is too high or too low. ÷ BPM can't be rectified even after checking the following items, contact your dealer or nearest PIONEER service center. There is little or no sound. ÷ The input selector switch is in use CH-4's PHONO 3 ÷ A sub-microphone has...
...measured in some cases, depending on the music. ÷ Adjust the TRIM knob so that the input level approaches 0dB on again. 24 Can't use cross fading. ÷ ASSIGN A & B haven't been set BPM manually. To restore normal operation, turn on CD. ÷ Because of other channels to approach ...247; Input level is too high or too low. ÷ BPM can't be rectified even after checking the following items, contact your dealer or nearest PIONEER service center. There is little or no sound. ÷ The input selector switch is in use CH-4's PHONO 3 ÷ A sub-microphone has...