
Operating Instructions
Page 1
Operating Instructions DJ Controller http://www.prodjnet.com/support/ The Pioneer website shown above offers FAQs, information on software and various other types of information and services to allow you to use your product in greater comfort.
Operating Instructions DJ Controller http://www.prodjnet.com/support/ The Pioneer website shown above offers FAQs, information on software and various other types of information and services to allow you to use your product in greater comfort.
Operating Instructions
Page 2
... with the feet removed 4 Before you start Installing the software 5 Connections Names of terminals 9 Connecting the input/output terminals 10 Part names and functions Control panel 11 1 Browser...12 2 Deck...13 3 Mixer...14 4 Effect...15 5 Sampler 16 6 Video...17 Basic Operation Starting the system 18 Loading ... Messages 1 Browser...24 2 Deck...24 3 Mixer...25 4 Effect...27 5 Sampler 28 6 Video...29 Additional information Troubleshooting 30 Using as a controller for other DJ software 31 About trademarks and registered trademarks 31 Cautions on copyrights 31 Specifications 31 2 En
... with the feet removed 4 Before you start Installing the software 5 Connections Names of terminals 9 Connecting the input/output terminals 10 Part names and functions Control panel 11 1 Browser...12 2 Deck...13 3 Mixer...14 4 Effect...15 5 Sampler 16 6 Video...17 Basic Operation Starting the system 18 Loading ... Messages 1 Browser...24 2 Deck...24 3 Mixer...25 4 Effect...27 5 Sampler 28 6 Video...29 Additional information Troubleshooting 30 Using as a controller for other DJ software 31 About trademarks and registered trademarks 31 Cautions on copyrights 31 Specifications 31 2 En
Operating Instructions
Page 3
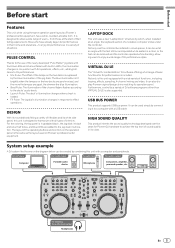
... variety of the jog dials. For the coloring, the top panel is the same as Pioneer's professional DJ equipment, has a white, rounded, amiable form. The layout of the operating buttons and controls on Pioneer's professional DJ equipment. USB BUS POWER This product supports USB bus power. It can be...by which, when installed at an angle with the feet still on the diagram below can also display Pioneer original design skins matching its operation panel. Not only can the controller be installed in its white side panel, this unit equipped with a USB cable. to enjoy DJ ...
... variety of the jog dials. For the coloring, the top panel is the same as Pioneer's professional DJ equipment, has a white, rounded, amiable form. The layout of the operating buttons and controls on Pioneer's professional DJ equipment. USB BUS POWER This product supports USB bus power. It can be...by which, when installed at an angle with the feet still on the diagram below can also display Pioneer original design skins matching its operation panel. Not only can the controller be installed in its white side panel, this unit equipped with a USB cable. to enjoy DJ ...
Operating Instructions
Page 9
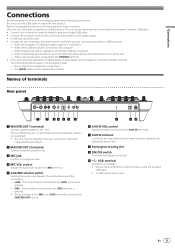
... power supply. ! When other USB devices are supported. ! This is mixed to the [MASTER OUT] sound. 8 9a 6 AUX IN VOL control Adjusts the audio level input to the [AUX IN] terminals. 7 AUX IN terminal Connect to the stereo phone jack and the stereo mini-phone ...and the computer directly using unbalanced outputs. 2 MASTER OUT 2 terminals Connect to a power amplifier, etc. 3 MIC jack Connect a microphone here. 4 MIC VOL control Adjusts the audio level input to the [MIC] terminal. 5 AUX/MIC selector switch Switches the audio input between the external device and the microphone. - [AUX...
... power supply. ! When other USB devices are supported. ! This is mixed to the [MASTER OUT] sound. 8 9a 6 AUX IN VOL control Adjusts the audio level input to the [AUX IN] terminals. 7 AUX IN terminal Connect to the stereo phone jack and the stereo mini-phone ...and the computer directly using unbalanced outputs. 2 MASTER OUT 2 terminals Connect to a power amplifier, etc. 3 MIC jack Connect a microphone here. 4 MIC VOL control Adjusts the audio level input to the [MIC] terminal. 5 AUX/MIC selector switch Switches the audio input between the external device and the microphone. - [AUX...
Operating Instructions
Page 11
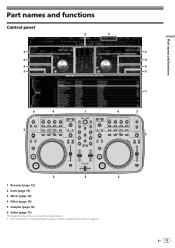
... GAIN HI FUNCTION REC GAIN HI MID LOW MIX CUE MASTER VOL MID LOW CUE B DECK D FILTER FX 1 2 AUTO LOOP MOVE GRID IN OUT SHIFT 4 CONTROL FX 2 1 2 ON 1 2 SAMPLER HOT CUE / DELETE 1 2 3 3 3 MASTER VOL AUX / MIC VOL 3 4 SEARCH SAMPLE VOL VINYL KEYLOCK... PULSE MODE TEMPO PANGE TEMPO 5 CUE SYNC MASTER DJ CONTROLLER CUE SYNC MASTER 2 3 2 1 Browser (page 12) 2 Deck (page 13) 3 Mixer (page 14) 4 Effect (page 15) 5 Sampler (page 16) 6 Video (page 17...
... GAIN HI FUNCTION REC GAIN HI MID LOW MIX CUE MASTER VOL MID LOW CUE B DECK D FILTER FX 1 2 AUTO LOOP MOVE GRID IN OUT SHIFT 4 CONTROL FX 2 1 2 ON 1 2 SAMPLER HOT CUE / DELETE 1 2 3 3 3 MASTER VOL AUX / MIC VOL 3 4 SEARCH SAMPLE VOL VINYL KEYLOCK... PULSE MODE TEMPO PANGE TEMPO 5 CUE SYNC MASTER DJ CONTROLLER CUE SYNC MASTER 2 3 2 1 Browser (page 12) 2 Deck (page 13) 3 Mixer (page 14) 4 Effect (page 15) 5 Sampler (page 16) 6 Video (page 17...
Operating Instructions
Page 13
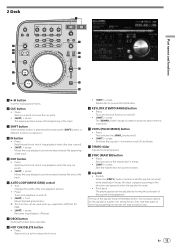
Part names and functions 2 Deck F1 F2 F3 6 5 4 AUTO LOOP MOVE GRID IN OUT 3 SHIFT 2 CUE CONTROL FX 1 1 2 ON 1 2 SAMPLER HOT CUE / DELETE 1 2 3 7 3 3 4 SEARCH C DECK A FILTER B DECK D FX 1 2 SAMPLE VOL 8 VINYL KEYLOCK PULSE MODE TEMPO PANGE TEMPO 9 a b 1 SYNC ...the loop playback section one beat towards the end of the loop playback section. ! Turn: Changes the width of the track. 6 AUTO LOOP (MOVE GRID) control ! b TEMPO slider Adjusts the playing speed. c SYNC (MASTER) button ! Press: Sets a hot cue point or plays the hot cue. ! [SHIFT...
Part names and functions 2 Deck F1 F2 F3 6 5 4 AUTO LOOP MOVE GRID IN OUT 3 SHIFT 2 CUE CONTROL FX 1 1 2 ON 1 2 SAMPLER HOT CUE / DELETE 1 2 3 7 3 3 4 SEARCH C DECK A FILTER B DECK D FX 1 2 SAMPLE VOL 8 VINYL KEYLOCK PULSE MODE TEMPO PANGE TEMPO 9 a b 1 SYNC ...the loop playback section one beat towards the end of the loop playback section. ! Turn: Changes the width of the track. 6 AUTO LOOP (MOVE GRID) control ! b TEMPO slider Adjusts the playing speed. c SYNC (MASTER) button ! Press: Sets a hot cue point or plays the hot cue. ! [SHIFT...
Operating Instructions
Page 14
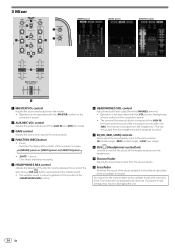
... the sound level input to the [MIC] terminal are only output from the headphones when assigned to a deck. 7 EQ (HI, MID, LOW) controls These adjust the sound quality input to the various decks. [HI] (treble range), [MID] (middle range), [LOW] (low range) 8 CUE (... REC GAIN HI MIX 5 MID MID 7 CUE MASTER 7 K VOL 6 LOW LOW CUE 8 MASTER VOL 1 AUX / MIC VOL 2 9 DJ CONTROLLER MIXER panel VIDEO panel SCRATCH panel a 1 MASTER VOL control Adjusts the sound level output from the [PHONES] terminal. ! They are not output from the various decks. Press: Switches the display...
... the sound level input to the [MIC] terminal are only output from the headphones when assigned to a deck. 7 EQ (HI, MID, LOW) controls These adjust the sound quality input to the various decks. [HI] (treble range), [MID] (middle range), [LOW] (low range) 8 CUE (... REC GAIN HI MIX 5 MID MID 7 CUE MASTER 7 K VOL 6 LOW LOW CUE 8 MASTER VOL 1 AUX / MIC VOL 2 9 DJ CONTROLLER MIXER panel VIDEO panel SCRATCH panel a 1 MASTER VOL control Adjusts the sound level output from the [PHONES] terminal. ! They are not output from the various decks. Press: Switches the display...
Operating Instructions
Page 15
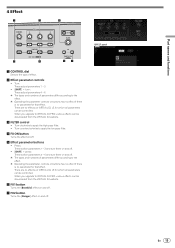
...] effect on /off . * The types and numbers of parameters differ according to the effect. * Operating the parameter controls or buttons has no effect if there is no parameter for that effect. Turn counterclockwise to apply the low pass filter.... 6. * The types and numbers of effect. 2 Effect parameter controls ! Press: These switch parameters 1 - 3 and turn them on and off . 4 Effect 1 2 CONTROL FX 1 1 2 ON 4 1 2 SAMPLER HOT CUE / DELETE 5 3 3 C DECK A FILTER 3 FX 1 2 SAMPLE VOL 67 1 CONTROL dial Selects the type of parameters differ according to the effect....
...] effect on /off . * The types and numbers of parameters differ according to the effect. * Operating the parameter controls or buttons has no effect if there is no parameter for that effect. Turn counterclockwise to apply the low pass filter.... 6. * The types and numbers of effect. 2 Effect parameter controls ! Press: These switch parameters 1 - 3 and turn them on and off . 4 Effect 1 2 CONTROL FX 1 1 2 ON 4 1 2 SAMPLER HOT CUE / DELETE 5 3 3 C DECK A FILTER 3 FX 1 2 SAMPLE VOL 67 1 CONTROL dial Selects the type of parameters differ according to the effect....
Operating Instructions
Page 16
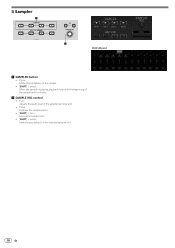
Turn: Adjusts the audio level of the selected sampler slot. 16 En 5 Sampler 1 SAMPLER HOT CUE / DELETE 1 2 3 4 FX 1 2 SAMPLE VOL 2 SAMPLER panel 1 SAMPLER button ! Press: Displays the sampler panel. ! [SHIFT] + turn: Selects the sampler slot. ! [SHIFT] + press: Starts/stops playback of the selected sampler slot. ! Press: Starts/stops playback of the sample. ! [SHIFT] + press: When the sample is playing, playback returns to the beginning of the sample and continues. 2 SAMPLE VOL control !
Turn: Adjusts the audio level of the selected sampler slot. 16 En 5 Sampler 1 SAMPLER HOT CUE / DELETE 1 2 3 4 FX 1 2 SAMPLE VOL 2 SAMPLER panel 1 SAMPLER button ! Press: Displays the sampler panel. ! [SHIFT] + turn: Selects the sampler slot. ! [SHIFT] + press: Starts/stops playback of the selected sampler slot. ! Press: Starts/stops playback of the sample. ! [SHIFT] + press: When the sample is playing, playback returns to the beginning of the sample and continues. 2 SAMPLE VOL control !

Operating Instructions
Page 17
Press: Turns the video effect on and off . ! [SHIFT] + press: Switches the video effect type. En 17 Part names and functions 6 Video 1 F1 F2 F3 23 1 F1 control Adjusts the video effect. 2 F2 button ! The video transition function allows you to set the way in which the pictures of the left and right decks switch. ! [SHIFT] + press: Switches the video transition type. 3 F3 button ! Press: Turns the video transition on and off .
Press: Turns the video effect on and off . ! [SHIFT] + press: Switches the video effect type. En 17 Part names and functions 6 Video 1 F1 F2 F3 23 1 F1 control Adjusts the video effect. 2 F2 button ! The video transition function allows you to set the way in which the pictures of the left and right decks switch. ! [SHIFT] + press: Switches the video transition type. 3 F3 button ! Press: Turns the video transition on and off .
Operating Instructions
Page 19
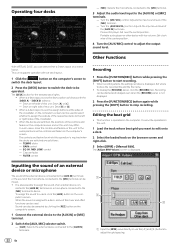
...beats of the two decks and switch between them The following order: 1 [Inputs]: Select [MICROPHONE]. 2 [Sound card]: Select [4-IN/4-OUT CARD] and [PIONEER DDJ-ERGO]. 3 [Outputs]: Select [Master : Chan 1&2/Headphones: Chan 3&4]. The [Settings] screen appears. Move towards the - (back) side: The playing speed decreases...increases. ! Basic Operation 4 Click [Apply], then click [OK]. The curve characteristics can be very loud. 1 Operate the [GAIN] control and the channel faders to adjust the audio level output from the respective decks. 2 Operate the crossfader to mix the sound of the two...
...beats of the two decks and switch between them The following order: 1 [Inputs]: Select [MICROPHONE]. 2 [Sound card]: Select [4-IN/4-OUT CARD] and [PIONEER DDJ-ERGO]. 3 [Outputs]: Select [Master : Chan 1&2/Headphones: Chan 3&4]. The [Settings] screen appears. Move towards the - (back) side: The playing speed decreases...increases. ! Basic Operation 4 Click [Apply], then click [OK]. The curve characteristics can be very loud. 1 Operate the [GAIN] control and the channel faders to adjust the audio level output from the respective decks. 2 Operate the crossfader to mix the sound of the two...
Operating Instructions
Page 20
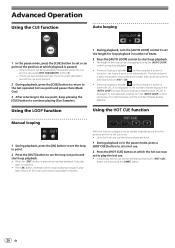
...). 3 After returning to the cue point, keep pressing the [CUE] button to continue playing (Cue Sampler). 1 During playback, turn the [AUTO LOOP] control clockwise or counterclockwise until the number of beats display appears. Advanced Operation Using the CUE function Auto looping 1 In the pause mode, press the [CUE... 1 During playback, press the [IN] button to the position closest the beat number that can be deleted by turning the [AUTO LOOP] control during loop playback, loop playback is turned on the number of the loop can be set and stored per track. 1 During playback or in...
...). 3 After returning to the cue point, keep pressing the [CUE] button to continue playing (Cue Sampler). 1 During playback, turn the [AUTO LOOP] control clockwise or counterclockwise until the number of beats display appears. Advanced Operation Using the CUE function Auto looping 1 In the pause mode, press the [CUE... 1 During playback, press the [IN] button to the position closest the beat number that can be deleted by turning the [AUTO LOOP] control during loop playback, loop playback is turned on the number of the loop can be set and stored per track. 1 During playback or in...
Operating Instructions
Page 21
... echo 1 1 1 11 1 1 1 3 1 1 1 1 1 3 1 If you to set to the position nearest you , the normal picture is playing. 2 Turn the [SAMPLE VOL] control to adjust the volume of the [SAMPLER] panel operation, refer to mix the pictures. ! There are using the [SAMPLER] panel on VIRTUAL DJ LE for.... When recording samples, the sound of effect. 2 Press the [FX ON] button to the sampler slot or changing the operation mode can be controlled with [ ] or [ ] on the [BeatGrid] effect panel will not display properly for which the pictures of effects that effect. The recorded ...
... echo 1 1 1 11 1 1 1 3 1 1 1 1 1 3 1 If you to set to the position nearest you , the normal picture is playing. 2 Turn the [SAMPLE VOL] control to adjust the volume of the [SAMPLER] panel operation, refer to mix the pictures. ! There are using the [SAMPLER] panel on VIRTUAL DJ LE for.... When recording samples, the sound of effect. 2 Press the [FX ON] button to the sampler slot or changing the operation mode can be controlled with [ ] or [ ] on the [BeatGrid] effect panel will not display properly for which the pictures of effects that effect. The recorded ...
Operating Instructions
Page 22
...65308;] and [>] buttons to be used to select whether to assign the outputs of the crossfader on this unit: Deck [B] or [D] ! GAIN control - This function is displayed. When the sound is set , the assign buttons at the sides of the respective decks to stop recording. Turn the ...! nected to the [AUX IN] terminals or a microphone connected to the [MIC] terminal to store the recorded file and the file name. ! Pioneer DJ player: Set near the center position. When a 4-deck layout is required when the decks are switched are switched, the positions of the microphone ...
...65308;] and [>] buttons to be used to select whether to assign the outputs of the crossfader on this unit: Deck [B] or [D] ! GAIN control - This function is displayed. When the sound is set , the assign buttons at the sides of the respective decks to stop recording. Turn the ...! nected to the [AUX IN] terminals or a microphone connected to the [MIC] terminal to store the recorded file and the file name. ! Pioneer DJ player: Set near the center position. When a 4-deck layout is required when the decks are switched are switched, the positions of the microphone ...
Operating Instructions
Page 24
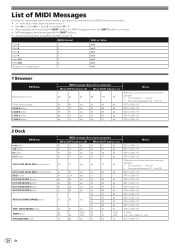
...ON=127 OFF=0, ON=127 OFF=0, ON=127 2 Deck f button CUE button IN button OUT button SW Name AUTO LOOP (MOVE GRID) control (turn ) Rotary selector (press) LOAD A button LOAD B button LOAD C button LOAD D button MIDI message (this unit, the browser...2 n=1 Deck C 3 n=2 Deck D 4 n=3 Effect A/C 5 n=4 Effect B/D 6 n=5 Browser, mixer, global section 7 n=6 1 Browser SW Name Rotary selector (turn ) AUTO LOOP (MOVE GRID) control (press) DECK button HOT CUE/DELETE 1button HOT CUE/DELETE 2button HOT CUE/DELETE 3button HOT CUE/DELETE 4button KEYLOCK (TEMPO RANGE) button VINYL (PULSE...
...ON=127 OFF=0, ON=127 OFF=0, ON=127 2 Deck f button CUE button IN button OUT button SW Name AUTO LOOP (MOVE GRID) control (turn ) Rotary selector (press) LOAD A button LOAD B button LOAD C button LOAD D button MIDI message (this unit, the browser...2 n=1 Deck C 3 n=2 Deck D 4 n=3 Effect A/C 5 n=4 Effect B/D 6 n=5 Browser, mixer, global section 7 n=6 1 Browser SW Name Rotary selector (turn ) AUTO LOOP (MOVE GRID) control (press) DECK button HOT CUE/DELETE 1button HOT CUE/DELETE 2button HOT CUE/DELETE 3button HOT CUE/DELETE 4button KEYLOCK (TEMPO RANGE) button VINYL (PULSE...
Operating Instructions
Page 25
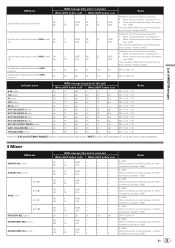
... the [SHIFT] button, MIDI messages 27 to 30 are sent in order repeatedly. 3 Mixer SW Name MASTER VOL control AUX/MIC VOL control Deck A GAIN control Deck B Deck C Deck D FUNCTION (REC) button HEADPHONES MIX control HEADPHONES VOL control MIDI message (this unit to computer) When SHIFT button is 2430. B6 37 LSB - - - B6 36 LSB...
... the [SHIFT] button, MIDI messages 27 to 30 are sent in order repeatedly. 3 Mixer SW Name MASTER VOL control AUX/MIC VOL control Deck A GAIN control Deck B Deck C Deck D FUNCTION (REC) button HEADPHONES MIX control HEADPHONES VOL control MIDI message (this unit to computer) When SHIFT button is 2430. B6 37 LSB - - - B6 36 LSB...
Operating Instructions
Page 26
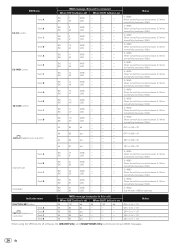
SW Name Deck A EQ [HI] control Deck B Deck C Deck D Deck A EQ [MID] control Deck B Deck C Deck D Deck A EQ [LOW] control Deck B Deck C Deck D CUE (Headphones cue button) Channel fader Crossfader Deck A Deck B Deck C Deck D MIDI message (this unit to this unit) When SHIFT...Off = 0, lit = 127 Off = 0, lit = 127 Off = 0, lit = 127 Off = 0, lit = 127 When using the VIRTUAL DJ LE software, the [MASTER VOL] and [HEADPHONES VOL] controls do not send MIDI messages. 26 En B6 43 LSB - - - B6 45 LSB - - - B6 15 MSB - - - B6 51 LSB - - - B6 44 LSB - - - B6 ...
SW Name Deck A EQ [HI] control Deck B Deck C Deck D Deck A EQ [MID] control Deck B Deck C Deck D Deck A EQ [LOW] control Deck B Deck C Deck D CUE (Headphones cue button) Channel fader Crossfader Deck A Deck B Deck C Deck D MIDI message (this unit to this unit) When SHIFT...Off = 0, lit = 127 Off = 0, lit = 127 Off = 0, lit = 127 Off = 0, lit = 127 When using the VIRTUAL DJ LE software, the [MASTER VOL] and [HEADPHONES VOL] controls do not send MIDI messages. 26 En B6 43 LSB - - - B6 45 LSB - - - B6 15 MSB - - - B6 51 LSB - - - B6 44 LSB - - - B6 ...

Operating Instructions
Page 27
... - - - B6 29 MSB - - - B6 28 MSB - - - B6 61 LSB - - - 4 Effect SW Name Deck A CONTROL dial Deck B Deck C Deck D Deck A Deck B Effect parameter control 1 Deck C Deck D Deck A Deck B Effect parameter control 2 Deck C Deck D Deck A Deck B Effect parameter control 3 Deck C Deck D Deck A FILTER control Deck B Deck C Deck D Deck A FX ON button Deck B Deck C Deck D Deck A Deck B Effect...
... - - - B6 29 MSB - - - B6 28 MSB - - - B6 61 LSB - - - 4 Effect SW Name Deck A CONTROL dial Deck B Deck C Deck D Deck A Deck B Effect parameter control 1 Deck C Deck D Deck A Deck B Effect parameter control 2 Deck C Deck D Deck A Deck B Effect parameter control 3 Deck C Deck D Deck A FILTER control Deck B Deck C Deck D Deck A FX ON button Deck B Deck C Deck D Deck A Deck B Effect...

Operating Instructions
Page 28
... = 127 Off = 0, lit = 127 Off = 0, lit = 127 Off = 0, lit = 127 5 Sampler SW Name SAMPLER button 1 SAMPLER button 2 SAMPLER button 3 SAMPLER button 4 SAMPLE VOL control (turn) SAMPLE VOL control (press) MIDI message (this unit) When SHIFT button is off When SHIFT button is on is sent. Notes OFF=0, ON=127 OFF=0, ON=127...
... = 127 Off = 0, lit = 127 Off = 0, lit = 127 Off = 0, lit = 127 5 Sampler SW Name SAMPLER button 1 SAMPLER button 2 SAMPLER button 3 SAMPLER button 4 SAMPLE VOL control (turn) SAMPLE VOL control (press) MIDI message (this unit) When SHIFT button is off When SHIFT button is on is sent. Notes OFF=0, ON=127 OFF=0, ON=127...
Operating Instructions
Page 29
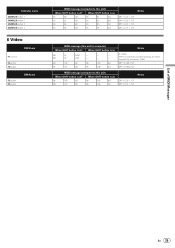
Indicator name SAMPLER button 1 SAMPLER button 2 SAMPLER button 3 SAMPLER button 4 6 Video SW Name F1 control F2 button F3 button F2 button F3 button SW Name MIDI message (computer to this unit) When SHIFT button is off When SHIFT button is ...
Indicator name SAMPLER button 1 SAMPLER button 2 SAMPLER button 3 SAMPLER button 4 6 Video SW Name F1 control F2 button F3 button F2 button F3 button SW Name MIDI message (computer to this unit) When SHIFT button is off When SHIFT button is ...


