Service Manual
Page 1
... DIAGRAM 3 3. TEST MODE 10 5. FL INFORMATION 27 10. PIONEER' The Art of Entertainment Service Manual • a I • 1 1 • II • i • I • I rI STEREO DOUBLE CASSETTE DECK CT-IA/504R ORDER NO. SAFETY INFORMATION 2 2. PANEL FACILITIES 28 ...11. Haven 1087 Keetberglaan 1, 9120 Melsele, Belgium PIONEER ELECTRONICS AUSTRALIA PTY. ADJUSTMENTS 11 6. PCB PARTS LIST 24 9. P.O. EXPLODED VIEWS, PACKING ...
... DIAGRAM 3 3. TEST MODE 10 5. FL INFORMATION 27 10. PIONEER' The Art of Entertainment Service Manual • a I • 1 1 • II • i • I • I rI STEREO DOUBLE CASSETTE DECK CT-IA/504R ORDER NO. SAFETY INFORMATION 2 2. PANEL FACILITIES 28 ...11. Haven 1087 Keetberglaan 1, 9120 Melsele, Belgium PIONEER ELECTRONICS AUSTRALIA PTY. ADJUSTMENTS 11 6. PCB PARTS LIST 24 9. P.O. EXPLODED VIEWS, PACKING ...
Service Manual
Page 4
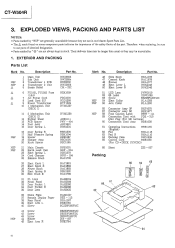
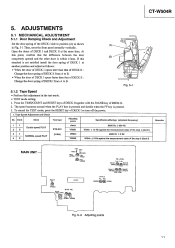
CT-W504R 3. EXPLODED VIEWS, PACKING AND PARTS LIST NOTES: • Parts marked by "NSF" are not always kept in ... 2 Unit 5 Strain Relief 6 FU1001, FU1002 Fuse (1.5A) 7 AC Power Cord 8 Lead Card 31P 9 Power Transformer 10 1 Mechanism Unit (DECK I) 11 2 Mechanism Unit (DECK II) 12 Rubber Sheet 13 PCB Spacer 14 Foot Assy 15 Door Spring L 16 Door Spring R 17 Half Pressure Spring NSF' 18 Spacer 19...) 62 Pad RHA1115 63 Pad R RHA1116 64 Packing Case RHG1635 65 Control Cord RDE1030 (For CD • DECK SYNCRO) 66 Sheet Z23 - 007 Packing 60 59 65 61 66 \' , ,63 62, 64 4
CT-W504R 3. EXPLODED VIEWS, PACKING AND PARTS LIST NOTES: • Parts marked by "NSF" are not always kept in ... 2 Unit 5 Strain Relief 6 FU1001, FU1002 Fuse (1.5A) 7 AC Power Cord 8 Lead Card 31P 9 Power Transformer 10 1 Mechanism Unit (DECK I) 11 2 Mechanism Unit (DECK II) 12 Rubber Sheet 13 PCB Spacer 14 Foot Assy 15 Door Spring L 16 Door Spring R 17 Half Pressure Spring NSF' 18 Spacer 19...) 62 Pad RHA1115 63 Pad R RHA1116 64 Packing Case RHG1635 65 Control Cord RDE1030 (For CD • DECK SYNCRO) 66 Sheet Z23 - 007 Packing 60 59 65 61 66 \' , ,63 62, 64 4

Service Manual
Page 8
... (except during the assist), the speed can be returned to Fig.1) Exiting the Test Mode To exit the test mode, press the RESET key of DECK I Deck II (MODE No.) aTd-M4"''' MO 'O, 02 -00 -29 -10 -2 .2 0 , 0 .2 FL display Fig. 1 FL display example 1 (The state of TIME/...II " lights up • Reverse SW Check = : " I side) 1O Deck I (HALF) Deck II (HALF) 2 FL display Fig. 2 FL display example 2 (The state of TEST MODE) 3. MODE No. CT-W504R 4. to the CD SYNCHRO jack of DECK I or II). Adjustment and Check (Deck II Display) (The mechanism will operate even in the test mode...
... (except during the assist), the speed can be returned to Fig.1) Exiting the Test Mode To exit the test mode, press the RESET key of DECK I Deck II (MODE No.) aTd-M4"''' MO 'O, 02 -00 -29 -10 -2 .2 0 , 0 .2 FL display Fig. 1 FL display example 1 (The state of TIME/...II " lights up • Reverse SW Check = : " I side) 1O Deck I (HALF) Deck II (HALF) 2 FL display Fig. 2 FL display example 2 (The state of TEST MODE) 3. MODE No. CT-W504R 4. to the CD SYNCHRO jack of DECK I or II). Adjustment and Check (Deck II Display) (The mechanism will operate even in the test mode...
Service Manual
Page 9
... at another position and adjust as shown in the test mode. • TEST mode setting. 1. If this point, confirm that of DECK II : Change the door spring of DECK I side to B. (A) (B) 4 Fig. 5-1 5.1.2 Tape Speed • Perform this adjustment in Fig. 5-1 Then, erect the front ... ch RVP322 Deck I opens faster than that of DECK II : Change the door spring of DECK I XI IC501 VR80I BIAS AdJ 8451 cWro TP11 A m Lch Rch L452 VR651 VR652 PB LEVEL Lch Lch Q,. Deckl eNtl VR101 Deck! VRIO3 DVeRcIk012 3 Deck! Tape Speed Adjustment and Check No. CT-W504R 5. XI...
... at another position and adjust as shown in the test mode. • TEST mode setting. 1. If this point, confirm that of DECK II : Change the door spring of DECK I side to B. (A) (B) 4 Fig. 5-1 5.1.2 Tape Speed • Perform this adjustment in Fig. 5-1 Then, erect the front ... ch RVP322 Deck I opens faster than that of DECK II : Change the door spring of DECK I XI IC501 VR80I BIAS AdJ 8451 cWro TP11 A m Lch Rch L452 VR651 VR652 PB LEVEL Lch Lch Q,. Deckl eNtl VR101 Deck! VRIO3 DVeRcIk012 3 Deck! Tape Speed Adjustment and Check No. CT-W504R 5. XI...
Service Manual
Page 10
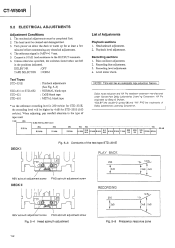
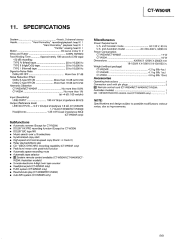
... 4 kHz 2 kHz 1 kHz 500 Hz 10s 250 Hz 125 Hz 63 Hz 40 Hz 20 dB DECK I Fig. 5-3 Constants of tape used. Recording sections 1. Dolby noise reduction and HX Pro headroom extension ...attention to the type of the test tape STD-331E PLAY BACK 250 3dB REV azimuth adjustment screw DECK II FWD azimuth adjustment screw RECORDING 250 O 3d8 12 5k 'ok A 3dB 4cl B 125k ... DOLBY NR : OFF TAPE SELECTOR : NORM List of Adjustments Playback sections 1. Turn power on allow the deck to the OUTPUT terminals. 6. the recording level will be higher by Bang & CPufsen. The reference signal ...
... 4 kHz 2 kHz 1 kHz 500 Hz 10s 250 Hz 125 Hz 63 Hz 40 Hz 20 dB DECK I Fig. 5-3 Constants of tape used. Recording sections 1. Dolby noise reduction and HX Pro headroom extension ...attention to the type of the test tape STD-331E PLAY BACK 250 3dB REV azimuth adjustment screw DECK II FWD azimuth adjustment screw RECORDING 250 O 3d8 12 5k 'ok A 3dB 4cl B 125k ... DOLBY NR : OFF TAPE SELECTOR : NORM List of Adjustments Playback sections 1. Turn power on allow the deck to the OUTPUT terminals. 6. the recording level will be higher by Bang & CPufsen. The reference signal ...

Service Manual
Page 11
... 1. Mode Input signal & test tape Adjustment location Measuring location 1. Head Azimuth Adjustment • Turn VR101, 102 (Deck I VR 101 (Lch) VR 102 (Rch) TP. 1 (Lch) TP. 2 (Rch) Adjustment value Maximum playback signal level. No. CT-W504R PLAYBACK SECTION 1. No. PLAY section of STD-331E test tape. Recording Bias Adjustment • After the...
... 1. Mode Input signal & test tape Adjustment location Measuring location 1. Head Azimuth Adjustment • Turn VR101, 102 (Deck I VR 101 (Lch) VR 102 (Rch) TP. 1 (Lch) TP. 2 (Rch) Adjustment value Maximum playback signal level. No. CT-W504R PLAYBACK SECTION 1. No. PLAY section of STD-331E test tape. Recording Bias Adjustment • After the...

Service Manual
Page 12
No. Deck II VR321 (Lch) VR322 (Rch) 3. REC! Check 4. Remarks 14 Mode 1. Level Meter Check No. REC/ PLAY Record the above signal onto the STD-821 test ... switch OFF. Adjustment location REC level control volume 2 . PLAY Record the above signal onto the STD-831 or STD-632 test tape, and playback. Check 4. CT-W504R 3. REC PAUSE Input signal & test tape Apply a 315 Hz/0 dBV signal to the Line Input terminals. REC/ PLAY Record the above signal onto the...
No. Deck II VR321 (Lch) VR322 (Rch) 3. REC! Check 4. Remarks 14 Mode 1. Level Meter Check No. REC/ PLAY Record the above signal onto the STD-821 test ... switch OFF. Adjustment location REC level control volume 2 . PLAY Record the above signal onto the STD-831 or STD-632 test tape, and playback. Check 4. CT-W504R 3. REC PAUSE Input signal & test tape Apply a 315 Hz/0 dBV signal to the Line Input terminals. REC/ PLAY Record the above signal onto the...
Service Manual
Page 18
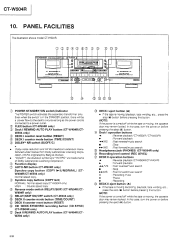
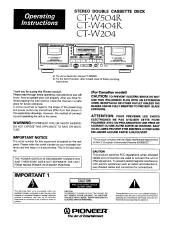
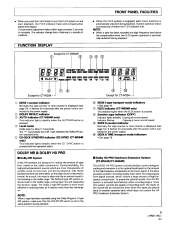
... illustration shows model CT-W504R. NOTE: If the cower is moving , the cassette door may remain locked. W204 only) rg DECK I eject button (A) • l` the tape is turned off while the tape Is r^oving, the cassette door may remain locked. PIONEER MR. =Mt...power outlet. (2-) FLEX button (CT-W504R only) Deck I REWIND AUTO PLAY button (CT-W404R/CTW204 only) ® DECK I counter reset button (RESET) DECK I -5) Headphones jack (PHONES) (CT-W504R only) 1-b Recording level control (REC LEVEL) DECK II operation buttons Reverse playback (CT-W504R/CT-W404R) : Po-ward playback : ...
... illustration shows model CT-W504R. NOTE: If the cower is moving , the cassette door may remain locked. W204 only) rg DECK I eject button (A) • l` the tape is turned off while the tape Is r^oving, the cassette door may remain locked. PIONEER MR. =Mt...power outlet. (2-) FLEX button (CT-W504R only) Deck I REWIND AUTO PLAY button (CT-W404R/CTW204 only) ® DECK I counter reset button (RESET) DECK I -5) Headphones jack (PHONES) (CT-W504R only) 1-b Recording level control (REC LEVEL) DECK II operation buttons Reverse playback (CT-W504R/CT-W404R) : Po-ward playback : ...
Service Manual
Page 19
... start • High-speed and normal-speed copy (Deck I -* Deck II) • Relay playback/blank skip • CD • DECK SYNCHRO recording capability (CT-W504R only) • Peak level meter with pin plugs 2 Ell Remote control cord (CT-W504R/CT-W404R/CT-W204: Australian models) 1 CD • DECKSYNCHRO control cord (CT-W504R only) 1 NOTE: Specifications and design subject to...
... start • High-speed and normal-speed copy (Deck I -* Deck II) • Relay playback/blank skip • CD • DECK SYNCHRO recording capability (CT-W504R only) • Peak level meter with pin plugs 2 Ell Remote control cord (CT-W504R/CT-W404R/CT-W204: Australian models) 1 CD • DECKSYNCHRO control cord (CT-W504R only) 1 NOTE: Specifications and design subject to...
Operating Instructions
Page 1
...SEPARATE THE UNIT FROM MAINS POWER IN STANDBY POSITION. II ...AUTON_ _tS_ld_4 -=. ! ! • The above illustration shows CT-W504R. ATTENTION: POUR PREVENIR LES CHOCS WARNING:To PREVENT FIRE OR SHOCK HAZARD, DO NOT EXPOSE THIS APPLIANCE TO RAIN OR... and connectors for this Pioneer product. NO USER-SERSERVICING TO intended to alert the user to the presence of important operating and maintenance (servicing) instructions in a safe place for your unit properly. Ii. STEREO DOUBLE CASSE'n'E DECK CT- /504R CT-W404R CT-W204 )_ _==m=_==== CT-WSO4_II U _i i_ll...
...SEPARATE THE UNIT FROM MAINS POWER IN STANDBY POSITION. II ...AUTON_ _tS_ld_4 -=. ! ! • The above illustration shows CT-W504R. ATTENTION: POUR PREVENIR LES CHOCS WARNING:To PREVENT FIRE OR SHOCK HAZARD, DO NOT EXPOSE THIS APPLIANCE TO RAIN OR... and connectors for this Pioneer product. NO USER-SERSERVICING TO intended to alert the user to the presence of important operating and maintenance (servicing) instructions in a safe place for your unit properly. Ii. STEREO DOUBLE CASSE'n'E DECK CT- /504R CT-W404R CT-W204 )_ _==m=_==== CT-WSO4_II U _i i_ll...
Operating Instructions
Page 4
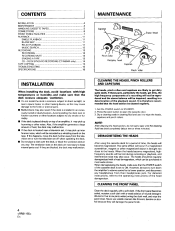
... ...HANDLING CASSETTE TAPES ...CONNECTIONS ...FRONT PANEL FACILITIES ...PLAYBACK ...SINGLE PLAYBACK ...BLANK SKIP ...RELAY PLAYBACK ...MUSIC SEARCH ...RECORDING ...RECORDING ...RECORDING MUTE ...ERASING A TAPE ...CD • DECK SYNCHRO RECORDING (CT-W504R only) ...TAPE COPYING ...TROUBLESHOOTING ...SPECIFICATIONS ... Set the POWER switch to open the cassette door. 3. NOTE: After cleaning the head section, do not load...
... ...HANDLING CASSETTE TAPES ...CONNECTIONS ...FRONT PANEL FACILITIES ...PLAYBACK ...SINGLE PLAYBACK ...BLANK SKIP ...RELAY PLAYBACK ...MUSIC SEARCH ...RECORDING ...RECORDING ...RECORDING MUTE ...ERASING A TAPE ...CD • DECK SYNCHRO RECORDING (CT-W504R only) ...TAPE COPYING ...TROUBLESHOOTING ...SPECIFICATIONS ... Set the POWER switch to open the cassette door. 3. NOTE: After cleaning the head section, do not load...

Operating Instructions
Page 5
...recordings will not operate correctly. Let the tape run for Side B Cover prevention adhesive tape • I AUTOMATIC TAPE SELECTOR FUNCTION This cassette deck is not possible to match the tape recording bias and equalization. Some cassette tapes come with a plastic or thick paper stopper to clear the ...CHECK CASSE'R'E BEFORE USE items before starting to record, to allow you . To rerecord on the tape cassette to both the tape and the deck. D, Fig. Store tapes in the rollers. HANDLING CASSETTE TAPES I to use them with this stopper when loading the cassette and replace it...
...recordings will not operate correctly. Let the tape run for Side B Cover prevention adhesive tape • I AUTOMATIC TAPE SELECTOR FUNCTION This cassette deck is not possible to match the tape recording bias and equalization. Some cassette tapes come with a plastic or thick paper stopper to clear the ...CHECK CASSE'R'E BEFORE USE items before starting to record, to allow you . To rerecord on the tape cassette to both the tape and the deck. D, Fig. Store tapes in the rollers. HANDLING CASSETTE TAPES I to use them with this stopper when loading the cassette and replace it...
Operating Instructions
Page 6
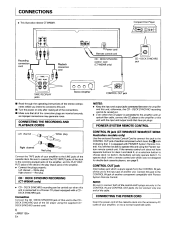
...Remotel::n_r_[ _i_ CD • DECK SYNCHRO jack Recording connection CD • DECK SYNCHRO control cord (CT-W504R only) cord _ _ _PloorandYbeact ,kon I .Ec _*llJ/, I Left channel _..._e plug CONTROL IN jack (CT-WSO4R/CT-W404R/CT-W204: Australian models only) Use... the enclosed Remote Control Cord to connect this jack to the input jack of this unit is connected to the amplifier with an optical fiber cable, connect the CD player to the ampfifier or this unit with Pioneer System Remote Control. You will only operate deck...
...Remotel::n_r_[ _i_ CD • DECK SYNCHRO jack Recording connection CD • DECK SYNCHRO control cord (CT-W504R only) cord _ _ _PloorandYbeact ,kon I .Ec _*llJ/, I Left channel _..._e plug CONTROL IN jack (CT-WSO4R/CT-W404R/CT-W204: Australian models only) Use... the enclosed Remote Control Cord to connect this jack to the input jack of this unit is connected to the amplifier with an optical fiber cable, connect the CD player to the ampfifier or this unit with Pioneer System Remote Control. You will only operate deck...
Operating Instructions
Page 7
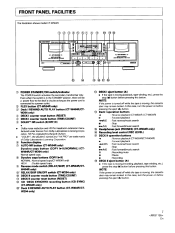
... AUTO reset mode PLAY button button (B/OFF/C) button (RESET) (TIME/COUNT) (CT.W404R/CTW204 only) DECK I counter DECK I counter DOLBY* 4_ @ DECK I operation buttons POWER STANDBY/ON switchlindicator The POWER switch activates the secondary transformer only. NOTE: If the power is turned off... while the tape is connected to a power outlet. Even when the switch is in the STANDBY position, there will be a power flowto the deck's circuits as long as the power cord is moving (playback, tape winding, etc.), press the stop (•) button before pressing the eject (A) button. (_ _' ...
... AUTO reset mode PLAY button button (B/OFF/C) button (RESET) (TIME/COUNT) (CT.W404R/CTW204 only) DECK I counter DECK I counter DOLBY* 4_ @ DECK I operation buttons POWER STANDBY/ON switchlindicator The POWER switch activates the secondary transformer only. NOTE: If the power is turned off... while the tape is connected to a power outlet. Even when the switch is in the STANDBY position, there will be a power flowto the deck's circuits as long as the power cord is moving (playback, tape winding, etc.), press the stop (•) button before pressing the eject (A) button. (_ _' ...
Operating Instructions
Page 8
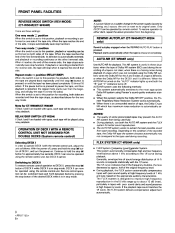
...• This system automatically switches to the most appropriate Dolby NR system using Pioneer's sound quality evaluation standard. • When this system selects the Dolby NR OFF position, the Pioneer Proprietary Noise Reduction System works automatically. • When there is an unrecorded ...over , based on the appropriate auditory characteristics. REVERSE MODE SWITCH (REV MODE) (CT-W504R/CT-W404R) There are recorded and then the tape stops, as follows: With the power off . NOTES: CT-WSO4RICT-W404R If Deck I and II are loaded with the 1/f curve. Repeat mode C._ position (...
...• This system automatically switches to the most appropriate Dolby NR system using Pioneer's sound quality evaluation standard. • When this system selects the Dolby NR OFF position, the Pioneer Proprietary Noise Reduction System works automatically. • When there is an unrecorded ...over , based on the appropriate auditory characteristics. REVERSE MODE SWITCH (REV MODE) (CT-W504R/CT-W404R) There are recorded and then the tape stops, as follows: With the power off . NOTES: CT-WSO4RICT-W404R If Deck I and II are loaded with the 1/f curve. Repeat mode C._ position (...
Operating Instructions
Page 9
...the power supply. It flashes for CT-W204J DECK I counter indicator Q Normally the tape counter or time counter is displayed (see page 10). the CD SYNC button DOLBY • NR & DOLBY HX PRO • Dolby HX PRO Headroom Extension [CT-WSO4R/CT-W404R] System Dolby NR System Dolby ... from a flashing to the boosting in the treble range. DOLBY NR B/C indicator AUTO indicator (CT-WSO4R only) This indicator lights steadily when the AUTO-NR pressed. Level meter Holds peak for CT-W204 - -J DECK I tape transport 0 _) mode indicators • See page 10. The "o- To guarantee optimal...
...the power supply. It flashes for CT-W204J DECK I counter indicator Q Normally the tape counter or time counter is displayed (see page 10). the CD SYNC button DOLBY • NR & DOLBY HX PRO • Dolby HX PRO Headroom Extension [CT-WSO4R/CT-W404R] System Dolby NR System Dolby ... from a flashing to the boosting in the treble range. DOLBY NR B/C indicator AUTO indicator (CT-WSO4R only) This indicator lights steadily when the AUTO-NR pressed. Level meter Holds peak for CT-W204 - -J DECK I tape transport 0 _) mode indicators • See page 10. The "o- To guarantee optimal...
Operating Instructions
Page 10
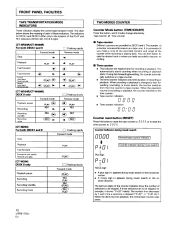
... desired track or where you make a note of the recorded content and range of the PLAY and REC indicators (DECK I and II. Tape counter .-_ Time counter • Tape counter [CT-WSO4R/CT-W404R] For both DECK I TWOMODES COUNTER These indicators display the current tape transport mode. FRONT PANEL FACILITIES TAPE TRANSPORTATION INDICATORS MODE I I I and II...
... desired track or where you make a note of the recorded content and range of the PLAY and REC indicators (DECK I and II. Tape counter .-_ Time counter • Tape counter [CT-WSO4R/CT-W404R] For both DECK I TWOMODES COUNTER These indicators display the current tape transport mode. FRONT PANEL FACILITIES TAPE TRANSPORTATION INDICATORS MODE I I I and II...

Operating Instructions
Page 11
...can be performed. Load prerecorded tapes in Deck I RELAY PLAYBACK ] 2 3 2 3 1 5 (5) (1) 1 5 (5) (1) When relay playback mode is not clear, or if the Dolby NR system was used for recording. 3. [CT-W504RICT-W404R] Set the REV MODE switch to o (see page 12). [CT-W204] Set the RELAY/SKIP switch to... that were used for convenience When the type of Dolby NR system (B/C)used during recording of the deck that will select the most appropriate Dolby NR system automatically (see page 8). 4. Turn the AUTO NR system on before playing back tapes for recording. [CT-W-504R/CT-W404R] 3.
...can be performed. Load prerecorded tapes in Deck I RELAY PLAYBACK ] 2 3 2 3 1 5 (5) (1) 1 5 (5) (1) When relay playback mode is not clear, or if the Dolby NR system was used for recording. 3. [CT-W504RICT-W404R] Set the REV MODE switch to o (see page 12). [CT-W204] Set the RELAY/SKIP switch to... that were used for convenience When the type of Dolby NR system (B/C)used during recording of the deck that will select the most appropriate Dolby NR system automatically (see page 8). 4. Turn the AUTO NR system on before playing back tapes for recording. [CT-W-504R/CT-W404R] 3.

Operating Instructions
Page 12
PLAYBACK PLAYBACK SEQUENCE WITH REV MODE SWITCH SETTING The playback sequence depends on which playback (1_ or : DECK I forward playback I : DECK II forward playback II ooll oo II. •• 15 times relay (31 sides playback) From the stop mode Press the playback ...level intervals, like classical music, or with noise in the blanks between selections; conferences or talk shows, where ICT-W204 only] DECK I ( II ) is rewound automatically while DECK II ( I 6 sides playback) is playing so that relay playback continues smoothly. How Selections When lection to selections back, count...
PLAYBACK PLAYBACK SEQUENCE WITH REV MODE SWITCH SETTING The playback sequence depends on which playback (1_ or : DECK I forward playback I : DECK II forward playback II ooll oo II. •• 15 times relay (31 sides playback) From the stop mode Press the playback ...level intervals, like classical music, or with noise in the blanks between selections; conferences or talk shows, where ICT-W204 only] DECK I ( II ) is rewound automatically while DECK II ( I 6 sides playback) is playing so that relay playback continues smoothly. How Selections When lection to selections back, count...

Operating Instructions
Page 13
...To resume recording, either the C) or the C._ position. 4. When the button is released, the deck will then enter recording standby mode. • To create a blank which is recorded. (Except for CT-W204) Use this function to the ---"position. Load a tape for approximately four seconds. Adjust the ...recording level. The deck will enter recording standby mode. • To resume recording, press the pause (...
...To resume recording, either the C) or the C._ position. 4. When the button is released, the deck will then enter recording standby mode. • To create a blank which is recorded. (Except for CT-W204) Use this function to the ---"position. Load a tape for approximately four seconds. Adjust the ...recording level. The deck will enter recording standby mode. • To resume recording, press the pause (...


