Owner's Manual
Page 1
COMPACT DISC PLAYER CMX-3000 Operating Instructions
COMPACT DISC PLAYER CMX-3000 Operating Instructions
Owner's Manual
Page 2
Please read through these operating instructions so you will know how to operate your model properly. However the method of the power plug and power outlet may sometimes differ from that shown in a safe place for buying this Pioneer product. After you have finished reading the instructions, put them away in the explanatory drawings. In some countries or regions, the shape of connecting and operating the unit is the same. K015 En 2 Read before use Thank you for future reference.
Please read through these operating instructions so you will know how to operate your model properly. However the method of the power plug and power outlet may sometimes differ from that shown in a safe place for buying this Pioneer product. After you have finished reading the instructions, put them away in the explanatory drawings. In some countries or regions, the shape of connecting and operating the unit is the same. K015 En 2 Read before use Thank you for future reference.
Owner's Manual
Page 3
This is located on your security. 3 Read before use IMPORTANT NOTICE The serial number for your enclosed warranty card and keep it in a secure area. Please write this equipment is for this serial number on the rear panel.
This is located on your security. 3 Read before use IMPORTANT NOTICE The serial number for your enclosed warranty card and keep it in a secure area. Please write this equipment is for this serial number on the rear panel.
Owner's Manual
Page 4
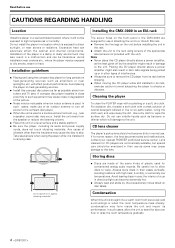
...! In such cases, allow discs to wipe the surface dry. Placing the CD player directly above a power amplifier, as possible away from its rack before shipping. ÷ When moving the CD player while still installed in its audio and power supply cords, does not touch vibrating materials. Read before use CAUTIONS REGARDING HANDLING Location Install the player in a well-ventilated location where it is...
...! In such cases, allow discs to wipe the surface dry. Placing the CD player directly above a power amplifier, as possible away from its rack before shipping. ÷ When moving the CD player while still installed in its audio and power supply cords, does not touch vibrating materials. Read before use CAUTIONS REGARDING HANDLING Location Install the player in a well-ventilated location where it is...
Owner's Manual
Page 5
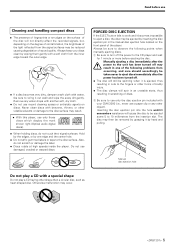
...use record cleaning sprays or anti-static agents on discs. Manually ejecting a disc immediately after the power to the unit has been turned off may be removed by grasping it becomes impossible to the CD player and wait for 1 minute or more before use only those discs which display the mark shown right (Optical audio digital...will not directly affect the recorded signals, but, depending on the front panel of sound quality. Manual disc ejection hole Do not play a CD having other shape than a circular disc, such as heart shaped disc. Also, do not touch their signal surfaces. ...
...use record cleaning sprays or anti-static agents on discs. Manually ejecting a disc immediately after the power to the unit has been turned off may be removed by grasping it becomes impossible to the CD player and wait for 1 minute or more before use only those discs which display the mark shown right (Optical audio digital...will not directly affect the recorded signals, but, depending on the front panel of sound quality. Manual disc ejection hole Do not play a CD having other shape than a circular disc, such as heart shaped disc. Also, do not touch their signal surfaces. ...
Owner's Manual
Page 6
... Rewind 13 Cueing Point Settings 13 Changing Playback Speed 13 Setting a Master Tempo 13 Jog Dial Functions 14 Applications ADVANCED OPERATIONS 15 Scratch Play 15 Hot Cue 15 Loop Playback 16 WAVE Display 16 CD TEXT Display 16 Mixing (Segueing) Different Tracks 17 Beat Synchro 17 Auto BPM Synchro 17 Fader Start Playback 18 Relay Play Using Two Players 18 Data Copy 18 Appendix TROUBLESHOOTING 19 Error Message Display 20 Cleaning the Jog Dial 20 SPECIFICATIONS 1. Player 482...
... Rewind 13 Cueing Point Settings 13 Changing Playback Speed 13 Setting a Master Tempo 13 Jog Dial Functions 14 Applications ADVANCED OPERATIONS 15 Scratch Play 15 Hot Cue 15 Loop Playback 16 WAVE Display 16 CD TEXT Display 16 Mixing (Segueing) Different Tracks 17 Beat Synchro 17 Auto BPM Synchro 17 Fader Start Playback 18 Relay Play Using Two Players 18 Data Copy 18 Appendix TROUBLESHOOTING 19 Error Message Display 20 Cleaning the Jog Dial 20 SPECIFICATIONS 1. Player 482...
Owner's Manual
Page 7
... use by checking needle position. BPM SYNCHRO HOT CUE Each of the players can be programmed in combination with a 0.05% increment digital display (within a ±6% range) allows exact control of times. REAL TIME SEAMLESS LOOP This function simplifies setting and releasing loops. RELOOP Allows you are loaded directly without changing pitch. Press the RELOOP button after releasing loop play begins. In addition, an ADJUST mode has been added to facilitate adjustment. ÷ MASTER TEMPO Changes music tempo...
... use by checking needle position. BPM SYNCHRO HOT CUE Each of the players can be programmed in combination with a 0.05% increment digital display (within a ±6% range) allows exact control of times. REAL TIME SEAMLESS LOOP This function simplifies setting and releasing loops. RELOOP Allows you are loaded directly without changing pitch. Press the RELOOP button after releasing loop play begins. In addition, an ADJUST mode has been added to facilitate adjustment. ÷ MASTER TEMPO Changes music tempo...
Owner's Manual
Page 8
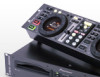
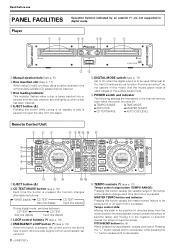
...; TIME MODE ÷ MASTER TEMPO ÷ AUTO CUE LEVEL Remote Control Unit 1 EJECT button (0) 2 CD TEXT/WAVE button (see p. 16) Each time the button is pressed the function changes alternately as follows: 3 WAVE display 3 CD TEXT 3 CD TEXT disc title display track title display During digital mode, switches between CD TEXT 2 3 CD TEXT disc title display track title display 3 LOOP control buttons (*) (see p. 16) 4 EMERGENCY LOOP button (*) (see p. 16) When this button is pressed, the current point is set...
...; TIME MODE ÷ MASTER TEMPO ÷ AUTO CUE LEVEL Remote Control Unit 1 EJECT button (0) 2 CD TEXT/WAVE button (see p. 16) Each time the button is pressed the function changes alternately as follows: 3 WAVE display 3 CD TEXT 3 CD TEXT disc title display track title display During digital mode, switches between CD TEXT 2 3 CD TEXT disc title display track title display 3 LOOP control buttons (*) (see p. 16) 4 EMERGENCY LOOP button (*) (see p. 16) When this button is pressed, the current point is set...
Owner's Manual
Page 9
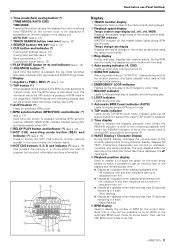
... frames (F). = WAVE Display / Character Display During WAVE display, indicates the volume level of the tempo as specified using the tempo control slide. 3 Ring display During relay play time. ÷ Display as it appears when displaying elapsed time: All indicators unlit and then indicators light up when auto cueing is turned on the master player lights during TAP BPM count mode. REV) (*) (see p. 12) - BMP SYNC indicator flashes during playback, the BPM counter switches to manual mode, and the BPM value is calculated...
... frames (F). = WAVE Display / Character Display During WAVE display, indicates the volume level of the tempo as specified using the tempo control slide. 3 Ring display During relay play time. ÷ Display as it appears when displaying elapsed time: All indicators unlit and then indicators light up when auto cueing is turned on the master player lights during TAP BPM count mode. REV) (*) (see p. 12) - BMP SYNC indicator flashes during playback, the BPM counter switches to manual mode, and the BPM value is calculated...
Owner's Manual
Page 10
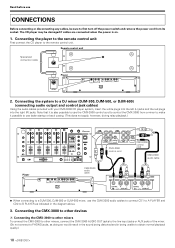
... remote control unit First connect the CD player to a DJ mixer (DJM-300, DJM-500, or DJM-600) (connecting audio output and control jack cables) Using the audio cables provided with your CMX-3000 CD player system, insert the white plugs into the left (L) jacks and the red plugs into the right (R) jacks. Note that it is on. 1. Connecting the CMX-3000 to other devices A Connecting the CMX-3000 to other mixers To connect the CMX-3000 to other mixers, connect the CMX-3000 AUDIO OUT jacks to the line input jacks or AUX jacks...
... remote control unit First connect the CD player to a DJ mixer (DJM-300, DJM-500, or DJM-600) (connecting audio output and control jack cables) Using the audio cables provided with your CMX-3000 CD player system, insert the white plugs into the left (L) jacks and the red plugs into the right (R) jacks. Note that it is on. 1. Connecting the CMX-3000 to other devices A Connecting the CMX-3000 to other mixers To connect the CMX-3000 to other mixers, connect the CMX-3000 AUDIO OUT jacks to the line input jacks or AUX jacks...
Owner's Manual
Page 11
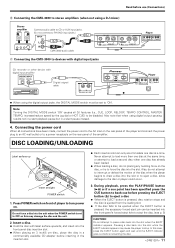
... when using a DJ mixer) Stereo amplifier Connect audio cable to CD or AUX input jacks. (Do not connect to PHONO input jacks.) INPUT CD L R CMX-3000 audio cable C Connecting the CMX-3000 to the disc or player could occur. 3. Pressing a disc back into the slot or to eject a disc, since damage to devices with digital input jacks Player CD recorder or other device with label surface upwards, and insert into the slot. Note: Turning the DIGITAL MODE switch 'ON' causes all connections have...
... when using a DJ mixer) Stereo amplifier Connect audio cable to CD or AUX input jacks. (Do not connect to PHONO input jacks.) INPUT CD L R CMX-3000 audio cable C Connecting the CMX-3000 to the disc or player could occur. 3. Pressing a disc back into the slot or to eject a disc, since damage to devices with digital input jacks Player CD recorder or other device with label surface upwards, and insert into the slot. Note: Turning the DIGITAL MODE switch 'ON' causes all connections have...
Owner's Manual
Page 12
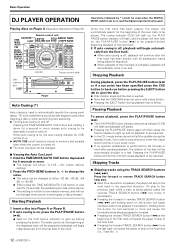
... variable level mode will be cancel. ¶ This setting is written to non-volatile memory, and will cause the player to skip to the first track (i.e., Track No. 1). Basic Operation DJ PLAYER OPERATION Playing discs on Player A (Operation identical for Player B) JOG MODE TIME MODE EJECT /AUTO CUE TRACK SEARCH (4,¢) SEARCH (1,¡) CUE PLAY/ PAUSE (3 8) Remote control unit LOOP IN/ PITCH MASTER TEMPO REALTIME CUE BEND TEMPO RANGE Jog dial Tempo control slide Disc insertion slot EJECT Player Auto Cueing (*) Auto cueing is used to automatically...
... variable level mode will be cancel. ¶ This setting is written to non-volatile memory, and will cause the player to skip to the first track (i.e., Track No. 1). Basic Operation DJ PLAYER OPERATION Playing discs on Player A (Operation identical for Player B) JOG MODE TIME MODE EJECT /AUTO CUE TRACK SEARCH (4,¢) SEARCH (1,¡) CUE PLAY/ PAUSE (3 8) Remote control unit LOOP IN/ PITCH MASTER TEMPO REALTIME CUE BEND TEMPO RANGE Jog dial Tempo control slide Disc insertion slot EJECT Player Auto Cueing (*) Auto cueing is used to automatically...

Owner's Manual
Page 13
... the sound is muted and the cueing indicator (CUE) lights up, the cueing point will have been stored to memory. ¶ Each time a new cueing point is pressed, the range of that point directly after the sound which the jog dial is shown in the display. ¶ The playback speed can be changed without changing the pitch ( "Setting a Master Tempo"). 7 Selecting the tempo adjust range Press the TEMPO RANGE button. The direction indicated...
... the sound is muted and the cueing indicator (CUE) lights up, the cueing point will have been stored to memory. ¶ Each time a new cueing point is pressed, the range of that point directly after the sound which the jog dial is shown in the display. ¶ The playback speed can be changed without changing the pitch ( "Setting a Master Tempo"). 7 Selecting the tempo adjust range Press the TEMPO RANGE button. The direction indicated...
Owner's Manual
Page 14
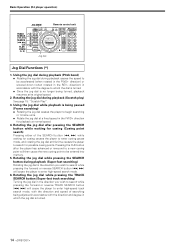
Basic Operation (DJ player operation) JOG MODE Remote control unit TRACK SEARCH (4,¢) SEARCH (1,¡) CUE PLAY/ PAUSE (3 8) Jog dial Jog Dial Functions (*) 1. direction) in accordance with the direction and speed of the SEARCH button (1, ¡) while waiting for cueing causes the player to search for possible cueing points. Using the jog dial while playback is no longer being adjusted in accordance with the degree to which the...
Basic Operation (DJ player operation) JOG MODE Remote control unit TRACK SEARCH (4,¢) SEARCH (1,¡) CUE PLAY/ PAUSE (3 8) Jog dial Jog Dial Functions (*) 1. direction) in accordance with the direction and speed of the SEARCH button (1, ¡) while waiting for cueing causes the player to search for possible cueing points. Using the jog dial while playback is no longer being adjusted in accordance with the degree to which the...

Owner's Manual
Page 15
... play in the direction and speed corresponding to the direction and speed in the SCRATCH jog mode, the playback mode changes from slow to normal playback and search depending on how long the button is held down. Applications ADVANCED OPERATIONS Operations indicated by * cannot be used when the DIGITAL MODE switch is set to on (and the digital output terminal is used , press the REC button to turn off...
... play in the direction and speed corresponding to the direction and speed in the SCRATCH jog mode, the playback mode changes from slow to normal playback and search depending on how long the button is held down. Applications ADVANCED OPERATIONS Operations indicated by * cannot be used when the DIGITAL MODE switch is set to on (and the digital output terminal is used , press the REC button to turn off...
Owner's Manual
Page 16
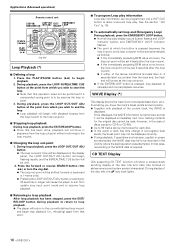
... program Loop play information Loop play information can be memorized for the original disc cannot be displayed on the display panel, the LOOP OUT/OUT ADJ button will begin flashing rapidly, and the IN/REALTIME CUE button will show a consecutively scrolling display of the disc title and track title (limited to begin , with playback of the disc title, the disc mark lights. 16...
... program Loop play information Loop play information can be memorized for the original disc cannot be displayed on the display panel, the LOOP OUT/OUT ADJ button will begin flashing rapidly, and the IN/REALTIME CUE button will show a consecutively scrolling display of the disc title and track title (limited to begin , with playback of the disc title, the disc mark lights. 16...
Owner's Manual
Page 17
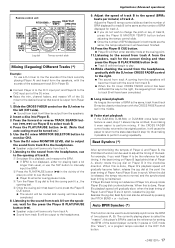
... the speakers, with the CROSS FADER control set in synch. Adjust the Player B tempo control slide so that auto cueing must be muted and cueing will then enter standby mode at the point the beat timing of track B to monitor CH2. 6. The currently playing player is released, the tempo returns to select track B. 4. Adjust the speed of Player A and Player B are in synch, release the jog dial. buttons. Auto BPM Synchro (*) This function can be cleanly mixed even with the sounds...
... the speakers, with the CROSS FADER control set in synch. Adjust the Player B tempo control slide so that auto cueing must be muted and cueing will then enter standby mode at the point the beat timing of track B to monitor CH2. 6. The currently playing player is released, the tempo returns to select track B. 4. Adjust the speed of Player A and Player B are in synch, release the jog dial. buttons. Auto BPM Synchro (*) This function can be cleanly mixed even with the sounds...
Owner's Manual
Page 18
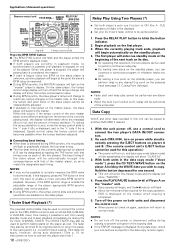
... the CMX-3000 to a control jack on how to connect the player and mixer.) 18 Relay Play Using Two Players (*) ÷ Set both units in this occurs, if the tempo control of the player, appropriate BPM synchro playback may be returned to ON (the A. The fader may also be possible. ¶ During BPM synchro, the tempo control slide and pitch bend operations are currently in the displays). ÷ Set your connections and perform the data copy function...
... the CMX-3000 to a control jack on how to connect the player and mixer.) 18 Relay Play Using Two Players (*) ÷ Set both units in this occurs, if the tempo control of the player, appropriate BPM synchro playback may be returned to ON (the A. The fader may also be possible. ¶ During BPM synchro, the tempo control slide and pitch bend operations are currently in the displays). ÷ Set your connections and perform the data copy function...
Owner's Manual
Page 19
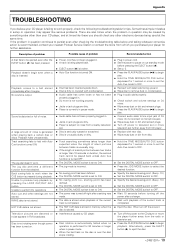
... has been inserted upside down. ÷ Disc is dirty or covered with Auto Cue function turned ON. Unable to produce loop playback by something else other than 10 seconds in audio cable properly. ÷ Check switch and volume settings on DJ mixer. ÷ Wipe away dust or dirt and reinsert plugs. ÷ Press the PLAY/PAUSE button (38) to begin play. ÷ Hold the TIME MODE/AUTO CUE button depressed...
... has been inserted upside down. ÷ Disc is dirty or covered with Auto Cue function turned ON. Unable to produce loop playback by something else other than 10 seconds in audio cable properly. ÷ Check switch and volume settings on DJ mixer. ÷ Wipe away dust or dirt and reinsert plugs. ÷ Press the PLAY/PAUSE button (38) to begin play. ÷ Hold the TIME MODE/AUTO CUE button depressed...
Owner's Manual
Page 20
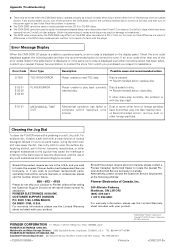
... disc adapter. (Note that attempting to replay such discs may result in damage or breakdown.) ÷ The BPM value measured by Pioneer Corporation. Mechanical operation has failed to correct the error. Appendix (Troubleshooting) ÷ There may be avoided. PIONEER ELECTRONICS (USA) INC. Should this product require service in Published by the CMX-3000 may differ from the BPM value recorded on the display panel.
... disc adapter. (Note that attempting to replay such discs may result in damage or breakdown.) ÷ The BPM value measured by Pioneer Corporation. Mechanical operation has failed to correct the error. Appendix (Troubleshooting) ÷ There may be avoided. PIONEER ELECTRONICS (USA) INC. Should this product require service in Published by the CMX-3000 may differ from the BPM value recorded on the display panel.


