Installation Manual
Page 2
... To prevent damage 6 - When using the screw holes on the steering column 26 - Installation using a rear display connected to separately sold power amp 14 When connecting a rear view camera 16 When connecting the external video component 17 - Fastening the detachable faceplate 22 2 En Installing the GPS ...antenna 23 - Parts supplied 23 - When installing the antenna inside the vehicle (on the sun visor 25 - Using an AV input (AV1) 17 - For AVIC-Z150BH...
... To prevent damage 6 - When using the screw holes on the steering column 26 - Installation using a rear display connected to separately sold power amp 14 When connecting a rear view camera 16 When connecting the external video component 17 - Fastening the detachable faceplate 22 2 En Installing the GPS ...antenna 23 - Parts supplied 23 - When installing the antenna inside the vehicle (on the sun visor 25 - Using an AV input (AV1) 17 - For AVIC-Z150BH...
Installation Manual
Page 3
... the vehicle. We recommend that only authorized Pioneer service personnel, who have special training and experience in an emergency. It is not a substitute for professional installation only. Never use this product (and the rear view camera option if purchased) are in the separate ...to install this manual ! Important safeguards WARNING Pioneer does not recommend that is designed for your attention from the safe operation of actual driving conditions. ! Installing or servicing this navigation system (or the rear view camera option if purchased) if doing so will divert...
... the vehicle. We recommend that only authorized Pioneer service personnel, who have special training and experience in an emergency. It is not a substitute for professional installation only. Never use this product (and the rear view camera option if purchased) are in the separate ...to install this manual ! Important safeguards WARNING Pioneer does not recommend that is designed for your attention from the safe operation of actual driving conditions. ! Installing or servicing this navigation system (or the rear view camera option if purchased) if doing so will divert...
Installation Manual
Page 13
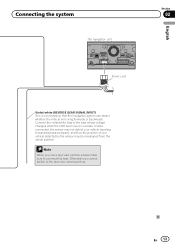
... the position of your vehicle detected by the sensor may be misaligned from the actual position. Note When you cannot switch to the rear view camera picture. Otherwise you use a rear view camera, please make sure to the lead whose voltage changes when the shift lever is moving forwards or backwards. English Section 02 En 13...
... the position of your vehicle detected by the sensor may be misaligned from the actual position. Note When you cannot switch to the rear view camera picture. Otherwise you use a rear view camera, please make sure to the lead whose voltage changes when the shift lever is moving forwards or backwards. English Section 02 En 13...

Installation Manual
Page 16
... En Do not connect to the rear view camera only. WARNING USE INPUT ONLY FOR REVERSE OR MIRROR IMAGE REAR VIEW CAMERA. The rear view camera is moved to Connecting the power cord (2) on trailers, or backing into a tight parking spot. This mode is available when the rear view camera setting is behind you while driving. Rear view camera (e.g. OTHER USE MAY RESULT IN INJURY...
... En Do not connect to the rear view camera only. WARNING USE INPUT ONLY FOR REVERSE OR MIRROR IMAGE REAR VIEW CAMERA. The rear view camera is moved to Connecting the power cord (2) on trailers, or backing into a tight parking spot. This mode is available when the rear view camera setting is behind you while driving. Rear view camera (e.g. OTHER USE MAY RESULT IN INJURY...
Operation Manual
Page 7
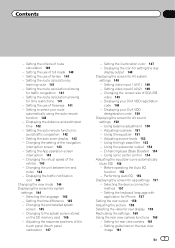
...the use of toll roads 140 - Displaying the distance and estimated time 142 - Displaying the icon for setting the rear display output 148 Displaying the screen for rear view camera 161 - Setting video input 2 (AV2) 149 - Adjusting loudness 151 - Using the equalizer 151 - Setting the...to select your DivX VOD deregistration code 150 Displaying the screen for rear display 159 Replicating the settings 160 Using the rear view camera functions 160 - Displaying the traffic notification icon 144 Changing the view mode 144 Displaying the screen for traffic congestion 141 - Using ...
...the use of toll roads 140 - Displaying the distance and estimated time 142 - Displaying the icon for setting the rear display output 148 Displaying the screen for rear view camera 161 - Setting video input 2 (AV2) 149 - Adjusting loudness 151 - Using the equalizer 151 - Setting the...to select your DivX VOD deregistration code 150 Displaying the screen for rear display 159 Replicating the settings 160 Using the rear view camera functions 160 - Displaying the traffic notification icon 144 Changing the view mode 144 Displaying the screen for traffic congestion 141 - Using ...
Operation Manual
Page 33
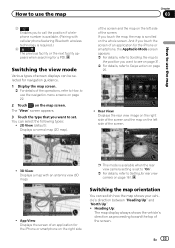
... the screen of an application for the iPhone or smartphone on the right side p This mode is available when the rear view camera setting is required.) 4 The previous facility or the next facility appears when searching for the iPhone or smartphone, the AppRadio Mode screen appears. = For ...): Displays a normal map (2D map). En 33 Switching the view mode Various types of the screen and the map on the whole screen. Rear View: Displays the rear view image on the right side of screen displays can be selected for rear view camera on page 161. If you touch the map, the map is scrolled ...
... the screen of an application for the iPhone or smartphone on the right side p This mode is available when the rear view camera setting is required.) 4 The previous facility or the next facility appears when searching for the iPhone or smartphone, the AppRadio Mode screen appears. = For ...): Displays a normal map (2D map). En 33 Switching the view mode Various types of the screen and the map on the whole screen. Rear View: Displays the rear view image on the right side of screen displays can be selected for rear view camera on page 161. If you touch the map, the map is scrolled ...
Operation Manual
Page 158
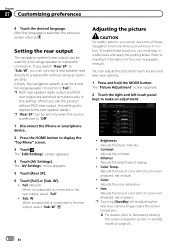
.... Adjusting the picture CAUTION For safety reasons, you can be set for each source and rear view camera. 1 Press and hold the MODE button. p Touching [Standby] while adjusting the rear view camera image clears the screen temporarily. = For details, refer to the rear output, select "Sub. After the language is in a safe place and apply the parking...
.... Adjusting the picture CAUTION For safety reasons, you can be set for each source and rear view camera. 1 Press and hold the MODE button. p Touching [Standby] while adjusting the rear view camera image clears the screen temporarily. = For details, refer to the rear output, select "Sub. After the language is in a safe place and apply the parking...
Operation Manual
Page 159
... characteristics, you may not be changed. 3 Touch the source you can choose either to show the same image as follows. ! Rear view camera image ! p Because of [Rear Monitor Output]. = For details, refer to show the selected source on (nighttime). p You cannot adjust "Color" and "Hue"... an emergency announcement, traffic announcement, or news program, the current setting cannot be available with some rear view cameras. The source you want to Displaying the icon for rear display You can select is output to Displaying the AV operation screen on page 71. 2 Touch on...
... characteristics, you may not be changed. 3 Touch the source you can choose either to show the same image as follows. ! Rear view camera image ! p Because of [Rear Monitor Output]. = For details, refer to show the selected source on (nighttime). p You cannot adjust "Color" and "Hue"... an emergency announcement, traffic announcement, or news program, the current setting cannot be available with some rear view cameras. The source you want to Displaying the icon for rear display You can select is output to Displaying the AV operation screen on page 71. 2 Touch on...

Operation Manual
Page 160
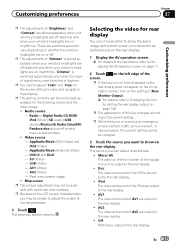
... are output only when the corresponding settings on page 16. p AVIC FEEDS is available separately to the rear display. Camera for Rear view mode Rear view can import settings you have made on your dealer.) Rear view camera The navigation system features a function that a portion of the rear view camera installed on the utility program AVIC FEEDS which is available on our website. 1 Use...
... are output only when the corresponding settings on page 16. p AVIC FEEDS is available separately to the rear display. Camera for Rear view mode Rear view can import settings you have made on your dealer.) Rear view camera The navigation system features a function that a portion of the rear view camera installed on the utility program AVIC FEEDS which is available on our website. 1 Use...
Operation Manual
Page 161
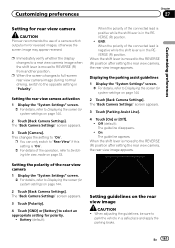
... and apply the parking brake. Setting the polarity of the rear view camera 1 Display the "System Settings" screen. = For details, refer to select an appropriate setting for rear view camera CAUTION Pioneer recommends the use of the operation, refer to the REVERSE (R) position after setting the rear view camera, the rear view image appears. Customizing preferences Chapter 27 Customizing preferences Setting for...
... and apply the parking brake. Setting the polarity of the rear view camera 1 Display the "System Settings" screen. = For details, refer to select an appropriate setting for rear view camera CAUTION Pioneer recommends the use of the operation, refer to the REVERSE (R) position after setting the rear view camera, the rear view image appears. Customizing preferences Chapter 27 Customizing preferences Setting for...

Operation Manual
Page 162
The range projected by the rear view camera is saved and the rear view image appears. # If you touch [Default], the point returns to the preadjustment position. # If you touch , the display returns to adjust the position of the ... vehicle width and distance. (The guidelines are straight lines.) ! The image quality may deteriorate depending on the rear view camera image may differ from the rear bumper. 2 m (6 ft. 7 in.) Markings 50 cm (1 ft. 8 in.) 25 cm (9-7/8 in .) Rear bumper 3 Display the "System Settings" screen. = For details, refer to turn the ignition switch off (ACC OFF...
The range projected by the rear view camera is saved and the rear view image appears. # If you touch [Default], the point returns to the preadjustment position. # If you touch , the display returns to adjust the position of the ... vehicle width and distance. (The guidelines are straight lines.) ! The image quality may deteriorate depending on the rear view camera image may differ from the rear bumper. 2 m (6 ft. 7 in.) Markings 50 cm (1 ft. 8 in.) 25 cm (9-7/8 in .) Rear bumper 3 Display the "System Settings" screen. = For details, refer to turn the ignition switch off (ACC OFF...
Operation Manual
Page 165
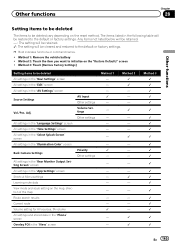
...the "Select Splash Screen" screen All settings in the "Illumination Color" screen Back Camera Settings All settings in the "Rear Monitor Output Setting Screen" screen All settings in the "App Settings" screen Shortcut Menu settings Learning route data View mode and scale setting on the reset method. Method 2: Touch the item you want... search results Current route Volume setting for AV sources, TA volume All settings and stored data in the "Phone" screen Overlay POI in the "View" screen AV Input Other settings Volume Settings Other settings Polarity Other settings Method 1 - - - 1 1 1 - -
...the "Select Splash Screen" screen All settings in the "Illumination Color" screen Back Camera Settings All settings in the "Rear Monitor Output Setting Screen" screen All settings in the "App Settings" screen Shortcut Menu settings Learning route data View mode and scale setting on the reset method. Method 2: Touch the item you want... search results Current route Volume setting for AV sources, TA volume All settings and stored data in the "Phone" screen Overlay POI in the "View" screen AV Input Other settings Volume Settings Other settings Polarity Other settings Method 1 - - - 1 1 1 - -
Operation Manual
Page 169
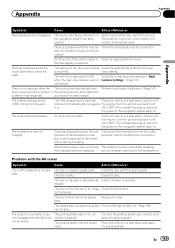
...nection methods are touched, or the actual positions that cannot output to a different key responds. The setting for the rear view camera Select the appropriate setting for "Back when the rear view camera was not charged. Then restart the engine, and turn off it is a type this system Check what type of ...disc it in. (ACC OFF). An error has occurred. Park your vehicle in [R] Select the correct polarity setting for the rear is covered by ...
...nection methods are touched, or the actual positions that cannot output to a different key responds. The setting for the rear view camera Select the appropriate setting for "Back when the rear view camera was not charged. Then restart the engine, and turn off it is a type this system Check what type of ...disc it in. (ACC OFF). An error has occurred. Park your vehicle in [R] Select the correct polarity setting for the rear is covered by ...


