
Owner's Manual
Page 8
.... Warranty Disclaimer. and Tele Atlas North America, Inc. Disclaimer of Canada. The Data may include the data of licensors, including Her Majesty the Queen in part by the United States Government, then use, duplication, reproduction, release, modification, disclosure or transfer of this Agreement and you . U.S. For purpose of Santa Clara. If...
.... Warranty Disclaimer. and Tele Atlas North America, Inc. Disclaimer of Canada. The Data may include the data of licensors, including Her Majesty the Queen in part by the United States Government, then use, duplication, reproduction, release, modification, disclosure or transfer of this Agreement and you . U.S. For purpose of Santa Clara. If...

Owner's Manual
Page 9
...the Map Database • This database was developed and recorded up to comply with permission from Natural Resource Canada, The Queen in any part of this Agreement without permission from the copyright owner. • If the local traffic regulations or conditions deviate from Her Majesty the ...Queen in Right of Canada with any part or the whole of this data, follow the local traffic regulations (such as signs, indications, etc.) and conditions (such as construction, weather,...
...the Map Database • This database was developed and recorded up to comply with permission from Natural Resource Canada, The Queen in any part of this Agreement without permission from the copyright owner. • If the local traffic regulations or conditions deviate from Her Majesty the ...Queen in Right of Canada with any part or the whole of this data, follow the local traffic regulations (such as signs, indications, etc.) and conditions (such as construction, weather,...

Owner's Manual
Page 17
... made by XM Satellite Radio in this navigation system with a Pioneer iPod adapter (CD-IB100), you remain on a CD-R in JPEG format and import original images in certain areas. Resume play Before ejecting a DVD-Video/CD/MP3 disc from that point so...part of October 2005. About XM NavTraffic Service and Pioneer Navigation ❒ XM NavTraffic subscription is required and is updated and when you can utilize the XM display which appears in this function for Points of time. POI information is played. Approximately 10.1 million POIs are included in this navigation system...
... made by XM Satellite Radio in this navigation system with a Pioneer iPod adapter (CD-IB100), you remain on a CD-R in JPEG format and import original images in certain areas. Resume play Before ejecting a DVD-Video/CD/MP3 disc from that point so...part of October 2005. About XM NavTraffic Service and Pioneer Navigation ❒ XM NavTraffic subscription is required and is updated and when you can utilize the XM display which appears in this function for Points of time. POI information is played. Approximately 10.1 million POIs are included in this navigation system...

Owner's Manual
Page 26
... to the Street 24 In the selected area, if you touch "City" without entering the name of city or area, you can just enter part of the cities or areas, which you have selected an area that could possibly follow your destination. Searching your destination after pressing the item. &#...8226; Touching the specifies the selected street and streets intersecting it, allowing you to previous screen. ❒ For example, for the first time with this system or when you have searched in the text box. Inputting the name of the place you wish to step 9. Now input the street name, select...
... to the Street 24 In the selected area, if you touch "City" without entering the name of city or area, you can just enter part of the cities or areas, which you have selected an area that could possibly follow your destination. Searching your destination after pressing the item. &#...8226; Touching the specifies the selected street and streets intersecting it, allowing you to previous screen. ❒ For example, for the first time with this system or when you have searched in the text box. Inputting the name of the place you wish to step 9. Now input the street name, select...

Owner's Manual
Page 32
... with the scroll cursor. The shortcuts described here are those that can be selected with the system as route calculation for the location indicated by the scroll cursor, or registering a location in ...not scrolled. This item can be used when the route is set. Settings menu Set the navigation functions so they can add changes to your route and check it will also be found. ... When the map is displayed, briefly touch any part of the map. Nearby POIs (Points Of Interest) will start scrolling. ➲ Moving the map to view the part you to the destination. ➲ Setting the Route...
... with the scroll cursor. The shortcuts described here are those that can be selected with the system as route calculation for the location indicated by the scroll cursor, or registering a location in ...not scrolled. This item can be used when the route is set. Settings menu Set the navigation functions so they can add changes to your route and check it will also be found. ... When the map is displayed, briefly touch any part of the map. Nearby POIs (Points Of Interest) will start scrolling. ➲ Moving the map to view the part you to the destination. ➲ Setting the Route...

Owner's Manual
Page 38
... mode. 3 Scroll the map and move the scroll cursor to the place you want to make your destination. ➲ Moving the map to view the part you touch anywhere on the map, the map display changes to confirm. Touch "OK" to Scroll mode. ➲ Shortcut menu ➞ Page 30 36 If...
... mode. 3 Scroll the map and move the scroll cursor to the place you want to make your destination. ➲ Moving the map to view the part you touch anywhere on the map, the map display changes to confirm. Touch "OK" to Scroll mode. ➲ Shortcut menu ➞ Page 30 36 If...

Owner's Manual
Page 64
...data, not necessarily background picture data to the right of the list. If you cannot use a CD-R (-RW) containing MP3 files or the Audio data part (CD-DA session) for the "Background Picture Setting" function. ❒ Only JPEG format (".jpg" or ".JPG") pictures can be used as a ... loading a picture stored on a CD-R (-RW) onto the navigation system as the background picture. ❒ When storing original pictures on a CD-R (RW), create a folder named "BG" in the CD-R (-RW), and store the picture files in the Pioneer DVD Map Disc. The location pointed by a personal computer or a digital...
...data, not necessarily background picture data to the right of the list. If you cannot use a CD-R (-RW) containing MP3 files or the Audio data part (CD-DA session) for the "Background Picture Setting" function. ❒ Only JPEG format (".jpg" or ".JPG") pictures can be used as a ... loading a picture stored on a CD-R (-RW) onto the navigation system as the background picture. ❒ When storing original pictures on a CD-R (RW), create a folder named "BG" in the CD-R (-RW), and store the picture files in the Pioneer DVD Map Disc. The location pointed by a personal computer or a digital...
Other Manual
Page 3
... Parts supplied - DIN Rear-mount - When using a display connected to separately sold power amp 13 When connecting a Rear view camera 15 When connecting the external video component and the display 16 - Installation notes - English Contents IMPORTANT INFORMATION 1 ABOUT YOUR NEW NAVIGATION SYSTEM AND... THIS MANUAL 1 IMPORTANT SAFEGUARDS 3 PLEASE READ ALL OF THESE INSTRUCTIONS REGARDING YOUR NAVIGATION SYSTEM AND RETAIN THEM FOR FUTURE REFERENCE 3 Connecting the...
... Parts supplied - DIN Rear-mount - When using a display connected to separately sold power amp 13 When connecting a Rear view camera 15 When connecting the external video component and the display 16 - Installation notes - English Contents IMPORTANT INFORMATION 1 ABOUT YOUR NEW NAVIGATION SYSTEM AND... THIS MANUAL 1 IMPORTANT SAFEGUARDS 3 PLEASE READ ALL OF THESE INSTRUCTIONS REGARDING YOUR NAVIGATION SYSTEM AND RETAIN THEM FOR FUTURE REFERENCE 3 Connecting the...
Other Manual
Page 5
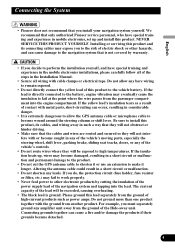
...or shift lever. Please ground this product and its cables, and wiring away in such a way that they will not interfere with metal parts, short-circuiting can cause a fire and/or damage the products if their grounds became detached. 4 Français Italiano Nederlands Do ... it longer. English Español Deutsch Connecting the System • Pioneer does not recommend that you must separately ground any amplifier unit away from the ground of the Hide-away unit. The current capacity of the navigation system and tapping into the engine compartment. Connecting grounds together can...
...or shift lever. Please ground this product and its cables, and wiring away in such a way that they will not interfere with metal parts, short-circuiting can cause a fire and/or damage the products if their grounds became detached. 4 Français Italiano Nederlands Do ... it longer. English Español Deutsch Connecting the System • Pioneer does not recommend that you must separately ground any amplifier unit away from the ground of the Hide-away unit. The current capacity of the navigation system and tapping into the engine compartment. Connecting grounds together can...

Other Manual
Page 7
... of the auto antenna. Parts supplied Español Deutsch Français Italiano Display unit Hide-away unit Power cord Connector 30-pin cable Extension lead (for reverse signal) Extension lead (for speed signal) GPS antenna Extension antenna cable System extension connector 6 Nederlands English...current drain and malfunction as well as damage to an external power amp's system remote control terminal (max. 300 mA 12 V DC). Likewise, do not connect the blue lead to your navigation system. Connecting speakers with output and/or impedance values other than those noted ...
... of the auto antenna. Parts supplied Español Deutsch Français Italiano Display unit Hide-away unit Power cord Connector 30-pin cable Extension lead (for reverse signal) Extension lead (for speed signal) GPS antenna Extension antenna cable System extension connector 6 Nederlands English...current drain and malfunction as well as damage to an external power amp's system remote control terminal (max. 300 mA 12 V DC). Likewise, do not connect the blue lead to your navigation system. Connecting speakers with output and/or impedance values other than those noted ...

Other Manual
Page 18
...; Certain government laws may prohibit or restrict the placement and use the supplied parts in them to safely operate the vehicle. Refer all applicable laws and regulations regarding the use, installation and operation of your navigation system to authorized Pioneer service personnel. • Never install this product or they may work loose and the...
...; Certain government laws may prohibit or restrict the placement and use the supplied parts in them to safely operate the vehicle. Refer all applicable laws and regulations regarding the use, installation and operation of your navigation system to authorized Pioneer service personnel. • Never install this product or they may work loose and the...

Other Manual
Page 22
Installation Parts supplied Display unit Screw Holder Side bracket (2 pcs.) Rubber bushing Binding screw (5 × 6 mm) (4 pcs.) Flush surface screw (5 × 6 mm) (4 pcs.) Frame Screw (4 × 3 mm) (4 pcs.) Fixing screw (2 pcs.) Conceal tape Hide-away unit Side bracket (2 pcs.) Washer faced screw (4 × 8 mm) (4 pcs.) Self-tapping screw (6 × 16 mm) (4 pcs.) 21
Installation Parts supplied Display unit Screw Holder Side bracket (2 pcs.) Rubber bushing Binding screw (5 × 6 mm) (4 pcs.) Flush surface screw (5 × 6 mm) (4 pcs.) Frame Screw (4 × 3 mm) (4 pcs.) Fixing screw (2 pcs.) Conceal tape Hide-away unit Side bracket (2 pcs.) Washer faced screw (4 × 8 mm) (4 pcs.) Self-tapping screw (6 × 16 mm) (4 pcs.) 21

Other Manual
Page 25
... the unit, use AD-GA10 (sold separately). 24 Nederlands Italiano Français Deutsch Español English In this case, stick conceal tape on parts that protrude from "Front" (conventional DIN Front-mount) or "Rear" (DIN Rear-mount installation, using the top and bottom tabs. Display unit Conceal tape Side...
... the unit, use AD-GA10 (sold separately). 24 Nederlands Italiano Français Deutsch Español English In this case, stick conceal tape on parts that protrude from "Front" (conventional DIN Front-mount) or "Rear" (DIN Rear-mount installation, using the top and bottom tabs. Display unit Conceal tape Side...

Other Manual
Page 26
... the display unit using the screw holes on the shape of the display unit become aligned (are fitted), and tighten the screws at 2 places on parts that protrude from the dashboard. Installation DIN Rear-mount Installation using the fixing screws after removing the frame. Select a position where the screw holes of...
... the display unit using the screw holes on the shape of the display unit become aligned (are fitted), and tighten the screws at 2 places on parts that protrude from the dashboard. Installation DIN Rear-mount Installation using the fixing screws after removing the frame. Select a position where the screw holes of...

Other Manual
Page 28
... models, install the GPS antenna on as level a surface as possible where the GPS antenna faces the window. Make sure the surface is removed. Installation Parts supplied GPS antenna Metal sheet Clamp (5 pcs.) Waterproof pad When installing the antenna inside the vehicle.
... models, install the GPS antenna on as level a surface as possible where the GPS antenna faces the window. Make sure the surface is removed. Installation Parts supplied GPS antenna Metal sheet Clamp (5 pcs.) Waterproof pad When installing the antenna inside the vehicle.


