Owner's Manual
Page 6
... - Creating new categories 131 - Changing the splash screen 135 - Adjusting the screen brightness 137 - Using balance adjustment 139 - Adjusting source levels 142 - Switching the auto antenna setting 143 - Switching the sound muting/ attenuation 144 - Route 127 - Regional Settings 129 - Restore Factory Settings 129 - Sound settings 130 - Recording your customized POI 132... - Setting the rear output 145 - Warnings 128 - Setting your home position 134 The options on the "AV Settings" menu 143 - Setting video input 1 (AV1) 143 - GPS & Time Settings 123 -
... - Creating new categories 131 - Changing the splash screen 135 - Adjusting the screen brightness 137 - Using balance adjustment 139 - Adjusting source levels 142 - Switching the auto antenna setting 143 - Switching the sound muting/ attenuation 144 - Route 127 - Regional Settings 129 - Restore Factory Settings 129 - Sound settings 130 - Recording your customized POI 132... - Setting the rear output 145 - Warnings 128 - Setting your home position 134 The options on the "AV Settings" menu 143 - Setting video input 1 (AV1) 143 - GPS & Time Settings 123 -

Owner's Manual
Page 123
...A method for changing the volume setting for setting the preferences in the "Navi Settings" menu Preferences related to the "Navi Settings" menu. GPS & Time Settings Indicates the connection status of this function. 5 Touch to return to the navigation functions can be set. The "Sound settings"...the "Navi Settings" menu Basic operations in detail. 3 On-off control Touching [On] or [Off] enables activation or deactivation of the GPS antenna, its reception sensitivity, and from how many satellites the signal is described here, along with an operational example. 1 Press MENU button to ...
...A method for changing the volume setting for setting the preferences in the "Navi Settings" menu Preferences related to the "Navi Settings" menu. GPS & Time Settings Indicates the connection status of this function. 5 Touch to return to the navigation functions can be set. The "Sound settings"...the "Navi Settings" menu Basic operations in detail. 3 On-off control Touching [On] or [Off] enables activation or deactivation of the GPS antenna, its reception sensitivity, and from how many satellites the signal is described here, along with an operational example. 1 Press MENU button to ...
Owner's Manual
Page 124
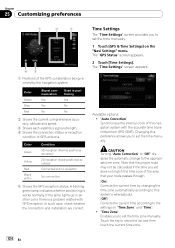
...2 Shows the current comprehensive accuracy, altitude and speed. 3 Shows each satellite's signal strength. 4 Shows the connection status or reception condition of GPS antenna. The "Time Settings" screen appears. In such case, check whether the connection and installation are correct. Available options; ! "Auto Correction" ...Used in another color, there is works normally. Time Settings The "Time Settings" screen provides you set the time manually. 1 Touch [GPS & Time Settings] on "Time Zone" and "Time". ! Note that the proper route may not be calculated if the time you ...
...2 Shows the current comprehensive accuracy, altitude and speed. 3 Shows each satellite's signal strength. 4 Shows the connection status or reception condition of GPS antenna. The "Time Settings" screen appears. In such case, check whether the connection and installation are correct. Available options; ! "Auto Correction" ...Used in another color, there is works normally. Time Settings The "Time Settings" screen provides you set the time manually. 1 Touch [GPS & Time Settings] on "Time Zone" and "Time". ! Note that the proper route may not be calculated if the time you ...
Owner's Manual
Page 156
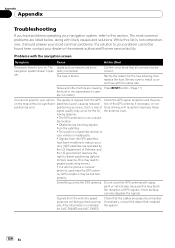
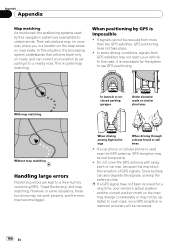
... block the reception of GPS signals. lowing reasons: • The GPS antenna is blown. na, GPS reception may occur for the fuse blowing, then replace the fuse. Something covers the GPS antenna. Snow buildup can also...GPS antenna with likely causes and solutions. porarily. on . While this list is not comprehensive, it should answer your dealer or the nearest authorized Pioneer service facility. racy. (GPS satellites are properly connected. rectly connected. The most common problems. If a solution to distort positioning data for AVIC-F900BT and AVIC-F90BT...
... block the reception of GPS signals. lowing reasons: • The GPS antenna is blown. na, GPS reception may occur for the fuse blowing, then replace the fuse. Something covers the GPS antenna. Snow buildup can also...GPS antenna with likely causes and solutions. porarily. on . While this list is not comprehensive, it should answer your dealer or the nearest authorized Pioneer service facility. racy. (GPS satellites are properly connected. rectly connected. The most common problems. If a solution to distort positioning data for AVIC-F900BT and AVIC-F90BT...
Owner's Manual
Page 166
... may , on the map may diverge considerably or may be updated. If signals cannot be recovered. 166 En Do not cover the GPS antenna with spray paint or car wax, because this navigation system are kept to a nearby road. Snow buildup can correct your vehicle's actual position and the ...
... may , on the map may diverge considerably or may be updated. If signals cannot be recovered. 166 En Do not cover the GPS antenna with spray paint or car wax, because this navigation system are kept to a nearby road. Snow buildup can correct your vehicle's actual position and the ...
Owner's Manual
Page 190
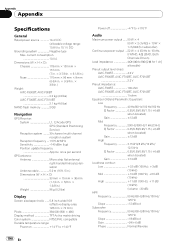
...GPS antenna: Antenna Micro strip flat antenna/ right-handed helical polarisation Antenna cable 5.0 m (16 ft. 5 in.) Dimensions (W × H × D 33 mm × 15 mm × 36 mm (1-1/4 in. × 5/8 in. × 1-3/8 in .) Weight: AVIC-F900BT, AVIC-F90BT 2.2 kg (4.9 lbs) AVIC-F700BT, AVIC-F7010BT 2.1 kg (4.6 lbs) NAND flash memory 2 GB Navigation GPS Receiver: System L1, C/Acode GPS...allowable) Preout output level (max): AVIC-F90BT 4.0 V AVIC-F900BT, AVIC-F700BT, AVIC-F7010BT 2.2 V Preout impedance: AVIC-F90BT 100 ohm AVIC-F900BT, AVIC-F700BT, AVIC-F7010BT 1 kohm Equalizer (3-Band ...
...GPS antenna: Antenna Micro strip flat antenna/ right-handed helical polarisation Antenna cable 5.0 m (16 ft. 5 in.) Dimensions (W × H × D 33 mm × 15 mm × 36 mm (1-1/4 in. × 5/8 in. × 1-3/8 in .) Weight: AVIC-F900BT, AVIC-F90BT 2.2 kg (4.9 lbs) AVIC-F700BT, AVIC-F7010BT 2.1 kg (4.6 lbs) NAND flash memory 2 GB Navigation GPS Receiver: System L1, C/Acode GPS...allowable) Preout output level (max): AVIC-F90BT 4.0 V AVIC-F900BT, AVIC-F700BT, AVIC-F7010BT 2.2 V Preout impedance: AVIC-F90BT 100 ohm AVIC-F900BT, AVIC-F700BT, AVIC-F7010BT 1 kohm Equalizer (3-Band ...
Installation Manual
Page 2
... Using "AV1 Input" (AV1) 17 - Parts supplied 26 - Mounting on the side of the navigation unit 22 Installing the GPS antenna 23 - Contents IMPORTANT INFORMATION ABOUT YOUR NEW NAVIGATION SYSTEM AND THIS MANUAL 3 IMPORTANT SAFEGUARDS PLEASE READ ALL OF THESE INSTRUCTIONS REGARDING...source 19 Installation Precautions before connecting the system 5 Before installing this Navigation System 28 Installation notes 23 - When installing the antenna outside the vehicle (on the body) 25 Installing the microphone 26 - Adjusting the microphone angle 27 After Installation After Installing...
... Using "AV1 Input" (AV1) 17 - Parts supplied 26 - Mounting on the side of the navigation unit 22 Installing the GPS antenna 23 - Contents IMPORTANT INFORMATION ABOUT YOUR NEW NAVIGATION SYSTEM AND THIS MANUAL 3 IMPORTANT SAFEGUARDS PLEASE READ ALL OF THESE INSTRUCTIONS REGARDING...source 19 Installation Precautions before connecting the system 5 Before installing this Navigation System 28 Installation notes 23 - When installing the antenna outside the vehicle (on the body) 25 Installing the microphone 26 - Adjusting the microphone angle 27 After Installation After Installing...
Installation Manual
Page 5
...or servicing this product, its connecting cables may eventually cause the insulation to the vehicle battery. CAUTION ! Make sure that only authorized Pioneer service personnel, who have special training and experience in any of the vehicle's moving parts, especially the steering wheel, shift lever, ...yellow lead of the vehicle's controls. ! Connecting grounds together can occur, resulting in the installation manual. ! Do not cut the GPS antenna cable to shorten it longer. The black lead is not covered by cutting the insulation of the power supply lead of the steps...
...or servicing this product, its connecting cables may eventually cause the insulation to the vehicle battery. CAUTION ! Make sure that only authorized Pioneer service personnel, who have special training and experience in any of the vehicle's moving parts, especially the steering wheel, shift lever, ...yellow lead of the vehicle's controls. ! Connecting grounds together can occur, resulting in the installation manual. ! Do not cut the GPS antenna cable to shorten it longer. The black lead is not covered by cutting the insulation of the power supply lead of the steps...

Installation Manual
Page 7
...current drain and malfunction. Do not connect this lead to use this lead as the power supply lead for the auto-antenna or antenna booster. Such connection could cause excessive current drain and malfunction. Be sure not to the system control terminal of external power... amps. Connector Extension lead (for speed signal) Notice for reverse signal) GPS antenna Microphone Parts supplied The navigation unit Power cord En 7 Be sure not to the auto-antenna relay control terminal or the antenna booster power control terminal. ! RCA connector Extension lead (for the blue/...
...current drain and malfunction. Do not connect this lead to use this lead as the power supply lead for the auto-antenna or antenna booster. Such connection could cause excessive current drain and malfunction. Be sure not to the system control terminal of external power... amps. Connector Extension lead (for speed signal) Notice for reverse signal) GPS antenna Microphone Parts supplied The navigation unit Power cord En 7 Be sure not to the auto-antenna relay control terminal or the antenna booster power control terminal. ! RCA connector Extension lead (for the blue/...

Installation Manual
Page 9
... The XM tuner, HD-Radio tuner and SIRIUS satellite radio tuner will not receive their coverage area. En 9 Connecting the System Section 03 English Microphone GPS antenna DIGITAL OUT This terminal is intended to support future equipment and should not be used if you drive outside of images on a display inside a vehicle...
... The XM tuner, HD-Radio tuner and SIRIUS satellite radio tuner will not receive their coverage area. En 9 Connecting the System Section 03 English Microphone GPS antenna DIGITAL OUT This terminal is intended to support future equipment and should not be used if you drive outside of images on a display inside a vehicle...

Installation Manual
Page 21
GPS antenna and its weight. Improper installation of the unit with your nearest dealer if installation requires the drilling of holes or other antenna leads. Places that the connections are correct and the system works properly. If this area. ! Do not cover this navigation system is.... - Before installing ! Places exposed to confirm that may become subject to bear its lead In addition you should lay or route each antenna lead as far as possible from other modifications of the vehicle cannot be damaged if it securely. This is not securely installed, the current...
GPS antenna and its weight. Improper installation of the unit with your nearest dealer if installation requires the drilling of holes or other antenna leads. Places that the connections are correct and the system works properly. If this area. ! Do not cover this navigation system is.... - Before installing ! Places exposed to confirm that may become subject to bear its lead In addition you should lay or route each antenna lead as far as possible from other modifications of the vehicle cannot be damaged if it securely. This is not securely installed, the current...

Installation Manual
Page 23
...installed with your system. When installing the GPS antenna on the outside of the GPS antenna. ! Do not paint the GPS antenna, as possible. The magnet attached to pull the antenna lead when removing the GPS antenna. The GPS antenna is blocked. Take care not to the antenna is left on the outside it may be... will be knocked off and scratch the vehicle body. ! Do not cut the GPS antenna lead to shorten it or use an extension to use the metal sheet provided with a magnet. Parts supplied GPS antenna Metal sheet Clamp (5 pcs.) Waterproof pad Trunk lid Roof Rear shelf ! If ...
...installed with your system. When installing the GPS antenna on the outside of the GPS antenna. ! Do not paint the GPS antenna, as possible. The magnet attached to pull the antenna lead when removing the GPS antenna. The GPS antenna is blocked. Take care not to the antenna is left on the outside it may be... will be knocked off and scratch the vehicle body. ! Do not cut the GPS antenna lead to shorten it or use an extension to use the metal sheet provided with a magnet. Parts supplied GPS antenna Metal sheet Clamp (5 pcs.) Waterproof pad Trunk lid Roof Rear shelf ! If ...

Installation Manual
Page 24
... the surface is fastened with its magnet.) GPS antenna Metal Sheet Peel off the protective sheet on the surface if it into small pieces. ! On such models, install the GPS antenna on as level a surface as possible where the GPS antenna faces the window. Section 04 Installation When installing... the antenna inside the vehicle. 24 En Clamps Use clamps to pass through. Some models ...
... the surface is fastened with its magnet.) GPS antenna Metal Sheet Peel off the protective sheet on the surface if it into small pieces. ! On such models, install the GPS antenna on as level a surface as possible where the GPS antenna faces the window. Section 04 Installation When installing... the antenna inside the vehicle. 24 En Clamps Use clamps to pass through. Some models ...

Installation Manual
Page 25
... lead into the interior of the vehicle. When routing the lead in the lead on the roof or trunk lid. (The GPS antenna is fastened with a magnet.) GPS antenna English Section 04 When routing the lead in from the top of the door Make a U-shaped loop in from flowing along ...necessary inside the vehicle. Clamps Use clamps to secure the lead where necessary inside the vehicle. Installation When installing the antenna outside the vehicle (on the body) Put the GPS antenna in a position as level as possible, such as on the outside the rubber packing to prevent rainwater from inside...
... lead into the interior of the vehicle. When routing the lead in the lead on the roof or trunk lid. (The GPS antenna is fastened with a magnet.) GPS antenna English Section 04 When routing the lead in from the top of the door Make a U-shaped loop in from flowing along ...necessary inside the vehicle. Clamps Use clamps to secure the lead where necessary inside the vehicle. Installation When installing the antenna outside the vehicle (on the body) Put the GPS antenna in a position as level as possible, such as on the outside the rubber packing to prevent rainwater from inside...


