Owner's Manual
Page 2
After you for buying this Pioneer product. The actual screens may differ from startup to termination 16 On first-time startup 16 2 En Regular startup 17 How to use the navigation menu screens 18 - How to read the map screen 20 - Before removing the vehicle battery 11 - ...in "History" 33 Selecting a location stored in a USB storage device 15 - Inserting a disc 14 - Inserting an SD memory card 15 - Switching the map between 2D and 3D 22 - Terminology 8 - Searching for a nearby POI 28 - Contents Thank you have finished reading the instructions, keep this manual in a...
After you for buying this Pioneer product. The actual screens may differ from startup to termination 16 On first-time startup 16 2 En Regular startup 17 How to use the navigation menu screens 18 - How to read the map screen 20 - Before removing the vehicle battery 11 - ...in "History" 33 Selecting a location stored in a USB storage device 15 - Inserting a disc 14 - Inserting an SD memory card 15 - Switching the map between 2D and 3D 22 - Terminology 8 - Searching for a nearby POI 28 - Contents Thank you have finished reading the instructions, keep this manual in a...
Owner's Manual
Page 3
... a specified phone 53 - Checking the local weather information 50 - Pairing from the history 57 - Dialing a phone number on the map 42 Checking the current itinerary 42 Editing waypoints and the destination Editing waypoints 44 - Playing simulated travel at high speed 42 - Checking ...the entire route overview on the "Map Confirmation Screen" 58 - Sorting waypoints 44 - Checking your cellular phone 52 - Checking worldwide weather conditions 50 Using traffic information 50 ...
... a specified phone 53 - Checking the local weather information 50 - Pairing from the history 57 - Dialing a phone number on the map 42 Checking the current itinerary 42 Editing waypoints and the destination Editing waypoints 44 - Playing simulated travel at high speed 42 - Checking ...the entire route overview on the "Map Confirmation Screen" 58 - Sorting waypoints 44 - Checking your cellular phone 52 - Checking worldwide weather conditions 50 Using traffic information 50 ...
Owner's Manual
Page 6
... 116 - Set Home 129 - Setting the POI appearance 131 - Creating new categories 131 - Checking the version information 138 - Using the direct traffic announcement function 116 - Map Settings 125 - Smart Zoom 126 - Regional Settings 129 - About 130 6 En - Displaying the "System Settings" menu 135 - Setting the illumination color 137 - Turning off the...
... 116 - Set Home 129 - Setting the POI appearance 131 - Creating new categories 131 - Checking the version information 138 - Using the direct traffic announcement function 116 - Map Settings 125 - Smart Zoom 126 - Regional Settings 129 - About 130 6 En - Displaying the "System Settings" menu 135 - Setting the illumination color 137 - Turning off the...
Owner's Manual
Page 8
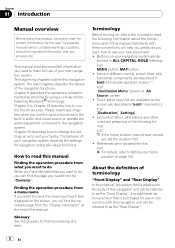
... chapters describe the details of your navigation system are presented in the following information about the conventions used in ALL CAPITAL, BOLD lettering: e.g.) MENU button, MAP button. !
... chapters describe the details of your navigation system are presented in the following information about the conventions used in ALL CAPITAL, BOLD lettering: e.g.) MENU button, MAP button. !

Owner's Manual
Page 9
...the "external storage device (USB, SD)". Assign your original image as a splash screen You can be selected for navigation guidance. 2D map screen 3D map screen A wide variety of Points of Interest (POI) information More than 100 types of DVD-Video, DivX, iPod, and any ...can also create your original image data is possible to the destination. Introduction Chapter 01 Introduction "Video image" "Video image" in DVD drive (AVIC-F900BTand AVIC-F90BT) DVD-Video (commercial-release DVDVideo), DVD-R/-RW/-R DL (DVD-Video, DVD-VR, Data), CD (commercial-release audio CD), CD-R/RW (CD...
...the "external storage device (USB, SD)". Assign your original image as a splash screen You can be selected for navigation guidance. 2D map screen 3D map screen A wide variety of Points of Interest (POI) information More than 100 types of DVD-Video, DivX, iPod, and any ...can also create your original image data is possible to the destination. Introduction Chapter 01 Introduction "Video image" "Video image" in DVD drive (AVIC-F900BTand AVIC-F90BT) DVD-Video (commercial-release DVDVideo), DVD-R/-RW/-R DL (DVD-Video, DVD-VR, Data), CD (commercial-release audio CD), CD-R/RW (CD...
Owner's Manual
Page 11
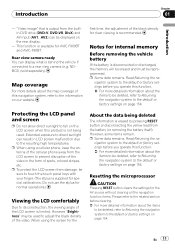
...from the battery (or removing the battery itself). When using a cellular phone, keep the antenna of the video. Read Returning the na- Map coverage For more detailed information about the items to be sure to a rear view camera (e.g. Read Returning the na- This function is .... p When using the screen for special calibrations. Rear view camera ready You can result in the form of the black density for AVIC-F900BT and AVIC-F90BT. En 11 Extended exposure to the information on page 154. first time, the adjustment of spots, colored stripes, etc. However, "...
...from the battery (or removing the battery itself). When using a cellular phone, keep the antenna of the video. Read Returning the na- Map coverage For more detailed information about the items to be sure to a rear view camera (e.g. Read Returning the na- This function is .... p When using the screen for special calibrations. Rear view camera ready You can result in the form of the black density for AVIC-F900BT and AVIC-F90BT. En 11 Extended exposure to the information on page 154. first time, the adjustment of spots, colored stripes, etc. However, "...

Owner's Manual
Page 12
... a pen tip or other equipment to this navigation system with IP-BUS, be reset under the following conditions: ! If your vehicle position shown on the map with a significant positioning error. 1 Turn the ignition switch OFF. 2 Press RESET button with the op- When changing the combination of the system. ! When adding/removing...
... a pen tip or other equipment to this navigation system with IP-BUS, be reset under the following conditions: ! If your vehicle position shown on the map with a significant positioning error. 1 Turn the ignition switch OFF. 2 Press RESET button with the op- When changing the combination of the system. ! When adding/removing...

Owner's Manual
Page 13
...RESET button = For details concerning operations, refer to Resetting the microprocessor on page 11. 5 MENU button Press MENU button to view the map screen. En 13 Press and hold to display the "Picture Adjustment" screen. = For details concerning operations, refer to Adjusting the screen brightness... on page 136. 6 MAP button Press to display the "Top Menu". Basic operation 43 2 1 Chapter 02 Basic operation 5 6 7 8 9 a Checking part names and ...
...RESET button = For details concerning operations, refer to Resetting the microprocessor on page 11. 5 MENU button Press MENU button to view the map screen. En 13 Press and hold to display the "Picture Adjustment" screen. = For details concerning operations, refer to Adjusting the screen brightness... on page 136. 6 MAP button Press to display the "Top Menu". Basic operation 43 2 1 Chapter 02 Basic operation 5 6 7 8 9 a Checking part names and ...
Owner's Manual
Page 14
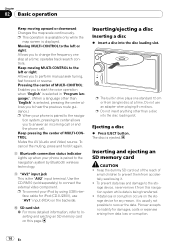
... ! Do not use "AV1" input (RCA) on the storage device for any reason, it . ! Inserting and ejecting an SD memory card CAUTION ! Pioneer accepts no liability for iPod (CD-IU230V), use an adapter when playing 8-cm discs. p This operation is available only while the.... Ejecting a disc % Press EJECT button. Enables you to hear the previous route guidance.) p When your phone is the "AV2" input terminal. Changes the map scale continuously. Inserting/ejecting a disc Inserting a disc % Insert a disc into the disc loading slot. If data loss or corruption occurs on the backside. Use...
... ! Do not use "AV1" input (RCA) on the storage device for any reason, it . ! Inserting and ejecting an SD memory card CAUTION ! Pioneer accepts no liability for iPod (CD-IU230V), use an adapter when playing 8-cm discs. p This operation is available only while the.... Ejecting a disc % Press EJECT button. Enables you to hear the previous route guidance.) p When your phone is the "AV2" input terminal. Changes the map scale continuously. Inserting/ejecting a disc Inserting a disc % Insert a disc into the disc loading slot. If data loss or corruption occurs on the backside. Use...
Owner's Manual
Page 19
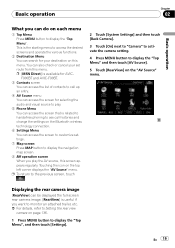
...the rear view camera on the Bluetooth wireless technology connection. 6 Settings Menu You can access the screen to customize settings. 7 Map screen Press MAP button to display the navigation map screen. 8 AV operation screen When you can be displayed the full-screen rear camera image. [RearView] is related to hands... Top Menu Press MENU button to display the "Top Menu", and then touch [Settings]. En 19 p [MSN Direct] is available for AVICF900BT and AVIC-F90BT. 3 Contacts screen You can access the list of contacts to call up an entry. 4 AV Source menu You can access the screen for your set...
...the rear view camera on the Bluetooth wireless technology connection. 6 Settings Menu You can access the screen to customize settings. 7 Map screen Press MAP button to display the navigation map screen. 8 AV operation screen When you can be displayed the full-screen rear camera image. [RearView] is related to hands... Top Menu Press MENU button to display the "Top Menu", and then touch [Settings]. En 19 p [MSN Direct] is available for AVICF900BT and AVIC-F90BT. 3 Contacts screen You can access the list of contacts to call up an entry. 4 AV Source menu You can access the screen for your set...

Owner's Manual
Page 20
... Current time d cb 5 Compass The red arrow indicates north. 6 Map mode selector = For details, refer to Switching the map between 2D and 3D on page 22. 7 Shortcut to the "Map Confirmation Screen" Touching this shortcut enables the screen to switch to the "Map Confirmation Screen" directly with the current position or the cursor...a guidance point, this appears green. You need to become familiar with the mark (*) appears only when the route is set. p Depending on the map. Chapter 02 Basic operation How to use the map Most of the information provided by your navigation system can do with the...
... Current time d cb 5 Compass The red arrow indicates north. 6 Map mode selector = For details, refer to Switching the map between 2D and 3D on page 22. 7 Shortcut to the "Map Confirmation Screen" Touching this shortcut enables the screen to switch to the "Map Confirmation Screen" directly with the current position or the cursor...a guidance point, this appears green. You need to become familiar with the mark (*) appears only when the route is set. p Depending on the map. Chapter 02 Basic operation How to use the map Most of the information provided by your navigation system can do with the...

Owner's Manual
Page 21
... retracts the bar. If a waypoint is set to "On". = For details, refer to Checking the current route conditions on page 41. g Map scale The scale of guidance flags : Destination The checkered flag indicates your destination. : Waypoint The yellow flags indicate your waypoints. : Start point The... green flag indicates your vehicle. h Second Maneuver Arrow* Shows the turning direction after the next waypoint is playing appears. Meaning of the map is traveling along f Multi-Info window Shows the value on the items selected on "Displayed Info". cle is indicated by distance. p ...
... retracts the bar. If a waypoint is set to "On". = For details, refer to Checking the current route conditions on page 41. g Map scale The scale of guidance flags : Destination The checkered flag indicates your destination. : Waypoint The yellow flags indicate your waypoints. : Start point The... green flag indicates your vehicle. h Second Maneuver Arrow* Shows the turning direction after the next waypoint is playing appears. Meaning of the map is traveling along f Multi-Info window Shows the value on the items selected on "Displayed Info". cle is indicated by distance. p ...

Owner's Manual
Page 22
... in or out. However, the pin-shaped icon is based on the following settings in purple on the map indicates that your route includes a road not matching your preference on the map database. "Unpaved Roads", "Highways", "Ferries", "U-turns", "Permit Needed", "Toll Roads". Holding MULTI-CONTROL... while moving it . Switching the map between 2D and 3D 2D map screen 3D map screen 1 Press MAP button to display the navigation map screen. 2 Touch or to switch the map mode. 22 En p Zooming out will reduce the size of the icon and further...
... in or out. However, the pin-shaped icon is based on the following settings in purple on the map indicates that your route includes a road not matching your preference on the map database. "Unpaved Roads", "Highways", "Ferries", "U-turns", "Permit Needed", "Toll Roads". Holding MULTI-CONTROL... while moving it . Switching the map between 2D and 3D 2D map screen 3D map screen 1 Press MAP button to display the navigation map screen. 2 Touch or to switch the map mode. 22 En p Zooming out will reduce the size of the icon and further...

Owner's Manual
Page 23
... a brief informational overview about the location being shown. (The information shown varies depending on the map briefly to switch the 2D map mode. 3 Touch the map briefly. Basic operation Chapter 02 2 Touch to show the tilt controls and rotation angle. Controls...Display the "Destination Menu". The scrolling increment depends on your destination, and then shows the route on the "Map Confirmation Screen". p Pressing MAP button returns the map to switch the 3D map mode. j 4 Enter the information for tilt and rotation angle 4 Touch the controls to your dragging length...
... a brief informational overview about the location being shown. (The information shown varies depending on the map briefly to switch the 2D map mode. 3 Touch the map briefly. Basic operation Chapter 02 2 Touch to show the tilt controls and rotation angle. Controls...Display the "Destination Menu". The scrolling increment depends on your destination, and then shows the route on the "Map Confirmation Screen". p Pressing MAP button returns the map to switch the 3D map mode. j 4 Enter the information for tilt and rotation angle 4 Touch the controls to your dragging length...

Owner's Manual
Page 26
...Street Center] allows you to select the representative point of the city and proceed to the "Map Confirmation Screen". ! In that you to select the representative location of the street and proceed to the "Map Confirmation Screen". 9 Enter the street name and touch the desired one from the list. ...the city name. 7 Enter the city name or Zip code. ! After entering the second street name and selecting the desired intersection, the "Map Confirmation Screen" appears. If you have entered is already set, touching [Intersection] allows you don't know the house number or cannot input the...
...Street Center] allows you to select the representative point of the city and proceed to the "Map Confirmation Screen". ! In that you to select the representative location of the street and proceed to the "Map Confirmation Screen". 9 Enter the street name and touch the desired one from the list. ...the city name. 7 Enter the city name or Zip code. ! After entering the second street name and selecting the desired intersection, the "Map Confirmation Screen" appears. If you have entered is already set, touching [Intersection] allows you don't know the house number or cannot input the...

Owner's Manual
Page 27
...POI) Information about various facilities (Points Of Interest - Searching for and selecting a location 11 Touch on of the options at the bottom of the "Map Confirmation Screen" to select the next operation. 2 Touch [Around Cursor]. By selecting the category (or entering the POI Name), you can do with ...another address. 3 Drag the map to move the cursor to search for the vicinity Points of entering the street name or house number will appear at the bottom of the...
...POI) Information about various facilities (Points Of Interest - Searching for and selecting a location 11 Touch on of the options at the bottom of the "Map Confirmation Screen" to select the next operation. 2 Touch [Around Cursor]. By selecting the category (or entering the POI Name), you can do with ...another address. 3 Drag the map to move the cursor to search for the vicinity Points of entering the street name or house number will appear at the bottom of the...
Owner's Manual
Page 28
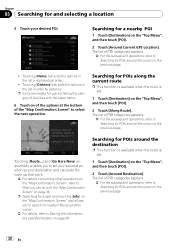
...]. Touching [Name] tab sorts the options in the list in order by distance. p Searching for a spot and touching [Info] on the "Map Confirmation Screen" also allows you to Viewing the information of a specified location on page 36. Touching [Route...] and [Go Here Now] sequentially enables...on page 38. Touching [Distance] tab sorts the options in the list in alphabetical order. ! Searching for POIs around the cursor on the "Map Confirmation Screen", refer to select the next operation. p Icons are helpful for POIs around the cursor on the "Top Menu", and then touch ...
...]. Touching [Name] tab sorts the options in the list in order by distance. p Searching for a spot and touching [Info] on the "Map Confirmation Screen" also allows you to Viewing the information of a specified location on page 36. Touching [Route...] and [Go Here Now] sequentially enables...on page 38. Touching [Distance] tab sorts the options in the list in alphabetical order. ! Searching for POIs around the cursor on the "Map Confirmation Screen", refer to select the next operation. p Icons are helpful for POIs around the cursor on the "Top Menu", and then touch ...

Owner's Manual
Page 30
... using the prestored shortcut. 1 Touch [Destination] on the "Top Menu", and then touch [POI]. 2 Touch [Saved Criteria]. 3 Touch one of the "Map Confirmation Screen" to complete the entry. 4 Touch the desired POI. 5 Touch on the "Top Menu", and then touch [POI]. 2 Touch [Saved Criteria]....Criteria] allows you to store it as your destination and calculate the route up that point. = For details concerning other operations on the "Map Confirmation Screen", refer to What you to set your selected search method including all categories. ! If there aren't anymore detailed categories, a blank...
... using the prestored shortcut. 1 Touch [Destination] on the "Top Menu", and then touch [POI]. 2 Touch [Saved Criteria]. 3 Touch one of the "Map Confirmation Screen" to complete the entry. 4 Touch the desired POI. 5 Touch on the "Top Menu", and then touch [POI]. 2 Touch [Saved Criteria]....Criteria] allows you to store it as your destination and calculate the route up that point. = For details concerning other operations on the "Map Confirmation Screen", refer to What you to set your selected search method including all categories. ! If there aren't anymore detailed categories, a blank...

Owner's Manual
Page 31
...for POIs by using the data on external storage devices (USB, SD) Creating a customized POI is possible by using the utility programme "AVIC FEEDS" which is available separately, on your destination and calculate the route up that point. = For details concerning other operations on the... "Map Confirmation Screen", refer to What you can do with the "Map Confirmation Screen" on the list. Searching for searches. 1 Connect the USB device or insert the SD card. 2 Touch...
...for POIs by using the data on external storage devices (USB, SD) Creating a customized POI is possible by using the utility programme "AVIC FEEDS" which is available separately, on your destination and calculate the route up that point. = For details concerning other operations on the... "Map Confirmation Screen", refer to What you can do with the "Map Confirmation Screen" on the list. Searching for searches. 1 Connect the USB device or insert the SD card. 2 Touch...

Owner's Manual
Page 32
... latitude and longitude pinpoints the location. 1 Touch [Destination] on the "Top Menu", and then touch [Route Function]. 4 Touch to select the next operation. The "Map Confirmation Screen" appears. 7 Touch on the cursor just before entering this screen. 32 En The screen returns to enter. Touching [N/S] or [E/W] changes the hemisphere. 5 ...previous screen. The values on the latitude key or longitude key shows the coordinates on of the options at the bottom of the "Map Confirmation Screen" to delete the current value and enter the desired coordinate. 2 Touch [Coordinate]. !
... latitude and longitude pinpoints the location. 1 Touch [Destination] on the "Top Menu", and then touch [Route Function]. 4 Touch to select the next operation. The "Map Confirmation Screen" appears. 7 Touch on the cursor just before entering this screen. 32 En The screen returns to enter. Touching [N/S] or [E/W] changes the hemisphere. 5 ...previous screen. The values on the latitude key or longitude key shows the coordinates on of the options at the bottom of the "Map Confirmation Screen" to delete the current value and enter the desired coordinate. 2 Touch [Coordinate]. !


