Owner's Manual
Page 1
Important Information for the User first! English Operation Manual MULTIMEDIA NAVIGATION RECEIVER AVIC-8000NEX AVIC-7000NEX AVIC-6000NEX AVIC-5000NEX AVIC-X8610BS Notice to all users: This software requires that the product is ...properly connected to read Important Information for the User includes the important information that you must understand before using this product. Be sure to your vehicle's parking brake and depending on your Authorized Pioneer...
Important Information for the User first! English Operation Manual MULTIMEDIA NAVIGATION RECEIVER AVIC-8000NEX AVIC-7000NEX AVIC-6000NEX AVIC-5000NEX AVIC-X8610BS Notice to all users: This software requires that the product is ...properly connected to read Important Information for the User includes the important information that you must understand before using this product. Be sure to your vehicle's parking brake and depending on your Authorized Pioneer...
Owner's Manual
Page 2
...startup of the map 29 - Inserting and ejecting an SD memory card 15 - Selecting a front source on the source list 21 - Introduction Manual overview 10 - Plugging and unplugging a USB storage device 16 Startup and termination 16 On first-time startup 17 Regular startup 17 - Attaching ...source selection screen 21 - How to read through these instructions so you have finished reading the instructions, keep this document in this Pioneer product. Please read the Map screen 26 Frequently shown route events 26 Seeing the current position on using the hardware buttons 19 ...
...startup of the map 29 - Inserting and ejecting an SD memory card 15 - Selecting a front source on the source list 21 - Introduction Manual overview 10 - Plugging and unplugging a USB storage device 16 Startup and termination 16 On first-time startup 17 Regular startup 17 - Attaching ...source selection screen 21 - How to read through these instructions so you have finished reading the instructions, keep this document in this Pioneer product. Please read the Map screen 26 Frequently shown route events 26 Seeing the current position on using the hardware buttons 19 ...
Owner's Manual
Page 4
... into strong frequencies 76 Storing song information to a Bluetooth device automatically 57 - Deleting a registered device 57 Connecting a registered Bluetooth device manually 58 Switching visibility 58 Entering the PIN code for nearby Bluetooth devices 55 - Using the preset dial lists 64 Receiving a phone call ... device 71 Using the radio Using the touch panel keys 74 Reading the screen 74 Starting procedure 75 Selecting a band 75 Manual tuning 75 Seek tuning 75 Selecting a preset channel from the history 63 - Searching for Bluetooth wireless connection 59 Displaying the ...
... into strong frequencies 76 Storing song information to a Bluetooth device automatically 57 - Deleting a registered device 57 Connecting a registered Bluetooth device manually 58 Switching visibility 58 Entering the PIN code for nearby Bluetooth devices 55 - Using the preset dial lists 64 Receiving a phone call ... device 71 Using the radio Using the touch panel keys 74 Reading the screen 74 Starting procedure 75 Selecting a band 75 Manual tuning 75 Seek tuning 75 Selecting a preset channel from the history 63 - Searching for Bluetooth wireless connection 59 Displaying the ...
Owner's Manual
Page 7
Subscribing to the SiriusXM Satellite Radio service 130 Using the touch panel keys 130 Reading the screen 131 Starting procedure 132 Manual tuning 133 Selecting a preset channel from the preset channel list 133 Storing broadcast channels 133 Selecting a SiriusXM channel directly 133 Selecting a channel from a list of ...
Subscribing to the SiriusXM Satellite Radio service 130 Using the touch panel keys 130 Reading the screen 131 Starting procedure 132 Manual tuning 133 Selecting a preset channel from the preset channel list 133 Storing broadcast channels 133 Selecting a SiriusXM channel directly 133 Selecting a channel from a list of ...

Owner's Manual
Page 10
... necessary page from the Contents. Conventions used in this manual indicates moving on screen, you touch [OK], the entry is deleted. ! Menu items, screen titles, and functional components are those for AVIC-8000NEX. Any additional screen that is connected to this...take a few minutes to read Important Information for the User (a separate manual) which contains warnings, cautions, and other important information that the description is intended for the models indicated by the icons. e.g.) 8000NEX 7000NEX Terms used in this product are indicated with double quotation marks " ...
... necessary page from the Contents. Conventions used in this manual indicates moving on screen, you touch [OK], the entry is deleted. ! Menu items, screen titles, and functional components are those for AVIC-8000NEX. Any additional screen that is connected to this...take a few minutes to read Important Information for the User (a separate manual) which contains warnings, cautions, and other important information that the description is intended for the models indicated by the icons. e.g.) 8000NEX 7000NEX Terms used in this product are indicated with double quotation marks " ...
Owner's Manual
Page 11
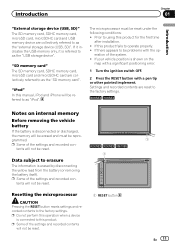
Prior to operate properly. ! If this product fails to using this manual, iPod and iPhone will be problems with a pen tip or other pointed implement. "iPod" In this product for the first time after installation. ! tents will ... there appears to the factory settings. tents will be erased and must be reset. Settings and recorded contents are reset to the factory settings. 8000NEX 7000NEX Notes on the map with a significant positioning error. 1 Turn the ignition switch OFF. 2 Press the RESET button with the op-
Prior to operate properly. ! If this product fails to using this manual, iPod and iPhone will be problems with a pen tip or other pointed implement. "iPod" In this product for the first time after installation. ! tents will ... there appears to the factory settings. tents will be erased and must be reset. Settings and recorded contents are reset to the factory settings. 8000NEX 7000NEX Notes on the map with a significant positioning error. 1 Turn the ignition switch OFF. 2 Press the RESET button with the op-
Owner's Manual
Page 12
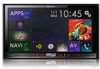
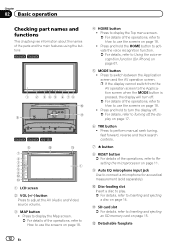
... the MODE button is pressed, the display will turn the display off the display on page 18. 4 HOME button ! Press to perform manual seek tuning, fast forward, reverse and track search controls. 7 h button 8 RESET button = For details of the operations, refer to ... Basic operation Checking part names and functions This chapter gives information about the names of the parts and the main features using the buttons. 8000NEX 7000NEX 1 2 3 4 5 6 78 a b 9 6000NEX 5000NEX X8610BS 8 a 7 2 3 4 5 6 c d b 1 1 LCD screen 2 VOL (+/-) button Press to switch between the Application screen...
... the MODE button is pressed, the display will turn the display off the display on page 18. 4 HOME button ! Press to perform manual seek tuning, fast forward, reverse and track search controls. 7 h button 8 RESET button = For details of the operations, refer to ... Basic operation Checking part names and functions This chapter gives information about the names of the parts and the main features using the buttons. 8000NEX 7000NEX 1 2 3 4 5 6 78 a b 9 6000NEX 5000NEX X8610BS 8 a 7 2 3 4 5 6 c d b 1 1 LCD screen 2 VOL (+/-) button Press to switch between the Application screen...

Owner's Manual
Page 14
Do not operate this manual. ! The following key. Ejecting an SD memory card during data transfer can on using the LCD panel 8000NEX 7000NEX WARNING ! Doing so may result in injury in this product until the LCD panel has completely opened or closed . The following screen appears. 2 ...it may damage the card. If the LCD panel is left open. Adjusting the LCD panel angle 8000NEX 7000NEX 1 Press the h button. Doing so may cause a malfunction. ! Ejecting a disc 8000NEX 7000NEX 14 En Do not open or close the LCD panel by the procedure described in the event of an ...
Do not operate this manual. ! The following key. Ejecting an SD memory card during data transfer can on using the LCD panel 8000NEX 7000NEX WARNING ! Doing so may result in injury in this product until the LCD panel has completely opened or closed . The following screen appears. 2 ...it may damage the card. If the LCD panel is left open. Adjusting the LCD panel angle 8000NEX 7000NEX 1 Press the h button. Doing so may cause a malfunction. ! Ejecting a disc 8000NEX 7000NEX 14 En Do not open or close the LCD panel by the procedure described in the event of an ...
Owner's Manual
Page 16
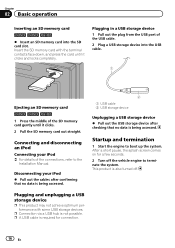
... SD memory card into the USB cable. 1 Ejecting an SD memory card 6000NEX 5000NEX X8610BS 1 Press the middle of the connections, refer to the Installation Manual. Connecting and disconnecting an iPod Connecting your iPod % Pull out the cables after confirming that no data is being accessed. 2 1 USB cable 2 USB storage device...
... SD memory card into the USB cable. 1 Ejecting an SD memory card 6000NEX 5000NEX X8610BS 1 Press the middle of the connections, refer to the Installation Manual. Connecting and disconnecting an iPod Connecting your iPod % Pull out the cables after confirming that no data is being accessed. 2 1 USB cable 2 USB storage device...
Owner's Manual
Page 53
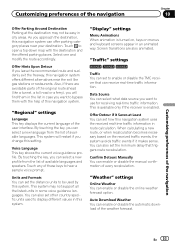
..., or when recalculation becomes necessary based on menus and keyboard screens appear in an animated way. Confirm Detours Manually You can enable or disable the manual confirmation of the weather forecast. "Regional" settings Language This key displays the current language of this navigation system...uses the received real-time traffic information in route calculation. Select one and modify the route accordingly. "Traffic" settings 8000NEX 7000NEX 6000NEX Traffic You can set to use for receiving real-time traffic information. Offer Hints Upon Detour If you approach the destination...
..., or when recalculation becomes necessary based on menus and keyboard screens appear in an animated way. Confirm Detours Manually You can enable or disable the manual confirmation of the weather forecast. "Regional" settings Language This key displays the current language of this navigation system...uses the received real-time traffic information in route calculation. Select one and modify the route accordingly. "Traffic" settings 8000NEX 7000NEX 6000NEX Traffic You can set to use for receiving real-time traffic information. Offer Hints Upon Detour If you approach the destination...

Owner's Manual
Page 55
..., refer to display the Top menu screen. 3 Touch the following keys in function that feature the following screen appears. For details, refer to the instruction manual of three devices can be performed.
..., refer to display the Top menu screen. 3 Touch the following keys in function that feature the following screen appears. For details, refer to the instruction manual of three devices can be performed.

Owner's Manual
Page 57
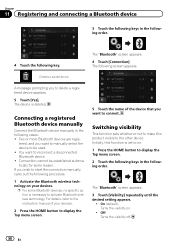
.... 1 Press the HOME button to display the Top menu screen. 2 Touch the following keys in the following screen appears. For details, refer to the instruction manual of the registered devices. Registering and connecting a Bluetooth device The "Bluetooth" screen appears. 3 Touch [Auto Connect] repeatedly until the desired setting appears. ! Off: Turns the...
.... 1 Press the HOME button to display the Top menu screen. 2 Touch the following keys in the following screen appears. For details, refer to the instruction manual of the registered devices. Registering and connecting a Bluetooth device The "Bluetooth" screen appears. 3 Touch [Auto Connect] repeatedly until the desired setting appears. ! Off: Turns the...
Owner's Manual
Page 58
... screen appears. 3 Touch [Visibility] repeatedly until the desired setting appears. ! Deletes a paired device. tered, and you want to manually select the device to be established automatically for some Bluetooth devices, no specific action is necessary to delete a registered device appears. 5 Touch... Off: Turns the visibility off. 58 En Two or more Bluetooth devices are regis- For details, refer to the instruction manual of your devices. The following screen appears. Switching visibility This function sets whether or not to connect. Initially, this product visible...
... screen appears. 3 Touch [Visibility] repeatedly until the desired setting appears. ! Deletes a paired device. tered, and you want to manually select the device to be established automatically for some Bluetooth devices, no specific action is necessary to delete a registered device appears. 5 Touch... Off: Turns the visibility off. 58 En Two or more Bluetooth devices are regis- For details, refer to the instruction manual of your devices. The following screen appears. Switching visibility This function sets whether or not to connect. Initially, this product visible...
Owner's Manual
Page 65
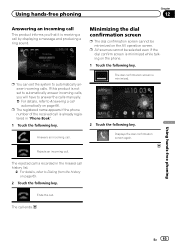
... phoning Rejects an incoming call . Using hands-free phoning Chapter 12 Answering an incoming call This product informs you will have to answer the calls manually. = For details, refer to Answering a call automatically on page 66. The dial confirmation screen is recorded in "Phone Book". 1 Touch the following key. The rejected...
... phoning Rejects an incoming call . Using hands-free phoning Chapter 12 Answering an incoming call This product informs you will have to answer the calls manually. = For details, refer to Answering a call automatically on page 66. The dial confirmation screen is recorded in "Phone Book". 1 Touch the following key. The rejected...

Owner's Manual
Page 68
... not be transferred correctly. (Image data cannot be performed. ! tries on the other end of the line hangs up the phone. ! Refer to the instruction manual that case, disconnect your phone, and then perform pairing again from your phone to this case, transfer items one by operating your phone is displayed...
... not be transferred correctly. (Image data cannot be performed. ! tries on the other end of the line hangs up the phone. ! Refer to the instruction manual that case, disconnect your phone, and then perform pairing again from your phone to this case, transfer items one by operating your phone is displayed...
Owner's Manual
Page 69
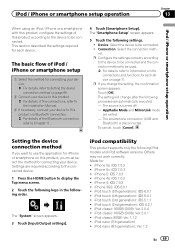
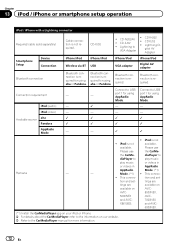
...): Ver. 2.0.1 ! The setting will change the setting, the confirmation screen appears. Made for each device on this product according to the device to the Installation Manual. 3 If necessary, connect your device. iPod classic 160GB (2009): Ver. 2.0.4 ! The basic flow of iPod / iPhone or smartphone setup 1 Select the method for connecting your...
...): Ver. 2.0.1 ! The setting will change the setting, the confirmation screen appears. Made for each device on this product according to the device to the Installation Manual. 3 If necessary, connect your device. iPod classic 160GB (2009): Ver. 2.0.4 ! The basic flow of iPod / iPhone or smartphone setup 1 Select the method for connecting your...

Owner's Manual
Page 70
... iPod, it may not be compatible with this product. p Compatibility with Lightning connector ! p Operation methods may not be compatible with this product. 70 En This manual applies to the information on our website. iPhone 3GS ! MirrorLink device compatibility p This product is not guaranteed. iPod classic 160GB ! iPhone 5s ! iPod touch 4th...
... iPod, it may not be compatible with this product. p Compatibility with Lightning connector ! p Operation methods may not be compatible with this product. 70 En This manual applies to the information on our website. iPhone 3GS ! MirrorLink device compatibility p This product is not guaranteed. iPod classic 160GB ! iPhone 5s ! iPod touch 4th...
Owner's Manual
Page 72
...- ! and AVIC- 7000NEX X8610BS. and AVIC- 6000NEX. (*1) Install the CarMediaPlayer app on your iPod or iPhone. = For details about the CarMediaPlayer, refer to the information on AVIC- Lightning to USB - - Bluetooth connection is required. iPod is not required. AVIC- 8000NEX, 5000NEX AVIC- Chapter 13 iPod... BT USB VGA adapter Digital AV adapter Bluetooth connection is required for using AppRadio Mode. diaPlayer to diaPlayer to the CarMediaPlayer manual for using aha or Pandora. tion and set - CD-IV202AV ! port 1 for using AppRadio port 1 for using ...
...- ! and AVIC- 7000NEX X8610BS. and AVIC- 6000NEX. (*1) Install the CarMediaPlayer app on your iPod or iPhone. = For details about the CarMediaPlayer, refer to the information on AVIC- Lightning to USB - - Bluetooth connection is required. iPod is not required. AVIC- 8000NEX, 5000NEX AVIC- Chapter 13 iPod... BT USB VGA adapter Digital AV adapter Bluetooth connection is required for using AppRadio Mode. diaPlayer to diaPlayer to the CarMediaPlayer manual for using aha or Pandora. tion and set - CD-IV202AV ! port 1 for using AppRadio port 1 for using ...
Owner's Manual
Page 74
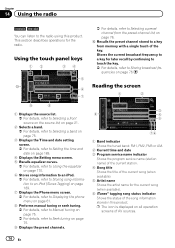
... Tagging) on page 189. 7 Displays the Phone menu screen. = For details, refer to Displaying the phone menu on page 61. 8 Performs manual tuning or seek tuning. = For details, refer to Manual tuning on page 75. = For details, refer to a key for the radio. Using the touch panel keys 12 34 5 a 6 7 = For details...
... Tagging) on page 189. 7 Displays the Phone menu screen. = For details, refer to Displaying the phone menu on page 61. 8 Performs manual tuning or seek tuning. = For details, refer to Manual tuning on page 75. = For details, refer to a key for the radio. Using the touch panel keys 12 34 5 a 6 7 = For details...
Owner's Manual
Page 75
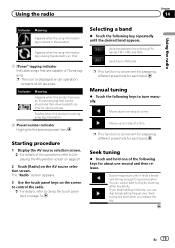
...operations, refer to Displaying the AV operation screen on page 20. 2 Touch [Radio] on all operation screens of the following keys to tune manually. Switches between the following key repeatedly until it finds a broadcast strong enough for later purchase. p This function is convenient for preparing different preset... different preset lists for each band. If you keep holding either key briefly. Switches to Using the touch panel keys on page 74. Manual tuning % Touch the following keys for about one step at a time. Appears when the song information tag is being transferred to an ...
...operations, refer to Displaying the AV operation screen on page 20. 2 Touch [Radio] on all operation screens of the following keys to tune manually. Switches between the following key repeatedly until it finds a broadcast strong enough for later purchase. p This function is convenient for preparing different preset... different preset lists for each band. If you keep holding either key briefly. Switches to Using the touch panel keys on page 74. Manual tuning % Touch the following keys for about one step at a time. Appears when the song information tag is being transferred to an ...


