Owner's Manual
Page 1
English Operation Manual MULTIMEDIA NAVIGATION RECEIVER AVIC-8100NEX AVIC-7100NEX AVIC-6100NEX AVIC-5100NEX Notice to your vehicle's parking brake and depending on your Authorized Pioneer Electronics retailer or call us at (800) 421-1404. For more information, please contact your vehicle, additional installation may be required. Important Information for the User first! Be sure to read Important Information...
English Operation Manual MULTIMEDIA NAVIGATION RECEIVER AVIC-8100NEX AVIC-7100NEX AVIC-6100NEX AVIC-5100NEX Notice to your vehicle's parking brake and depending on your Authorized Pioneer Electronics retailer or call us at (800) 421-1404. For more information, please contact your vehicle, additional installation may be required. Important Information for the User first! Be sure to read Important Information...
Owner's Manual
Page 2
Introduction Manual overview 11 - Data subject to use this Pioneer product. Removing the detachable faceplate 16 - Plugging and unplugging ...time bar 27 - Using the remote control 15 Protecting your model properly. Conventions used in this manual 11 Notes on using the LCD panel 16 Adjusting the LCD panel angle 17 Inserting/ejecting/connecting media... screen Operating the Navigation menu screen 29 How to erasure 12 - Connecting and disconnecting an iPod 19 - Installing the battery 15 - Selecting a rear source 25 Turning off the display 20 - Inserting and ejecting an...
Introduction Manual overview 11 - Data subject to use this Pioneer product. Removing the detachable faceplate 16 - Plugging and unplugging ...time bar 27 - Using the remote control 15 Protecting your model properly. Conventions used in this manual 11 Notes on using the LCD panel 16 Adjusting the LCD panel angle 17 Inserting/ejecting/connecting media... screen Operating the Navigation menu screen 29 How to erasure 12 - Connecting and disconnecting an iPod 19 - Installing the battery 15 - Selecting a rear source 25 Turning off the display 20 - Inserting and ejecting an...

Owner's Manual
Page 12
...will be erased and must be problems with a pen tip or other pointed implement. "iPod" In this product for the first time after installation. ! If there appears to be reset under the following conditions: ! eration of the settings and recorded con- Chapter 01 Introduction "External storage...Before removing the vehicle battery If the battery is referred to using this manual, iPod and iPhone will not be reset. p Some of the settings and recorded contents will not be reset. 6100NEX 5100NEX Data subject to erasure 1 The information is connected to this product ...
...will be erased and must be problems with a pen tip or other pointed implement. "iPod" In this product for the first time after installation. ! If there appears to be reset under the following conditions: ! eration of the settings and recorded con- Chapter 01 Introduction "External storage...Before removing the vehicle battery If the battery is referred to using this manual, iPod and iPhone will not be reset. p Some of the settings and recorded contents will not be reset. 6100NEX 5100NEX Data subject to erasure 1 The information is connected to this product ...
Owner's Manual
Page 19
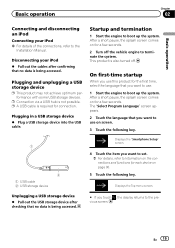
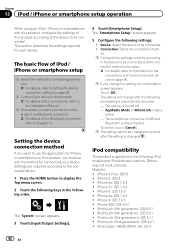
... termination 1 Start the engine to use this product for a few seconds. The "Select Program Language" screen appears. 2 Touch the language that you want to the Installation Manual. Disconnecting your iPod = For details of the connections, refer to use on page 90. 5 Touch the following key. 1 2 1 USB cable 2 USB storage device Displays the...
... termination 1 Start the engine to use this product for a few seconds. The "Select Program Language" screen appears. 2 Touch the language that you want to the Installation Manual. Disconnecting your iPod = For details of the connections, refer to use on page 90. 5 Touch the following key. 1 2 1 USB cable 2 USB storage device Displays the...

Owner's Manual
Page 73
...following URL and refer to "HOW TO UPDATE?" The menus for the connected service are activated. http://pioneer.naviextras.com Customizing preferences of the USB connections, refer to the Installation Manual. 4 Press the MAP button. Customizing preferences of the navigation Chapter 10 Preparations before using the AVICSYNC.... GUIDE. En 73 Once the association is established, your iPhone or smartphone (Android) is installed. Then, transfer the data from App Store or Google Play and install the app to your iPhone or smartphone (Android) to the navigation system. 10 Purchase connected ...
...following URL and refer to "HOW TO UPDATE?" The menus for the connected service are activated. http://pioneer.naviextras.com Customizing preferences of the USB connections, refer to the Installation Manual. 4 Press the MAP button. Customizing preferences of the navigation Chapter 10 Preparations before using the AVICSYNC.... GUIDE. En 73 Once the association is established, your iPhone or smartphone (Android) is installed. Then, transfer the data from App Store or Google Play and install the app to your iPhone or smartphone (Android) to the navigation system. 10 Purchase connected ...
Owner's Manual
Page 88
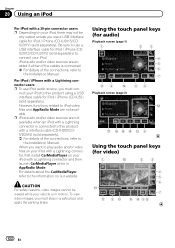
... may not work correctly. Made for each device on page 88. 2 Connect your device to this product. = For details of the connections, refer to the Installation Manual. 3 If necessary, connect your device to this product, you must select the method for connecting your device. iPod classic 160GB (2009): Ver. 2.0.4 88 En The...
... may not work correctly. Made for each device on page 88. 2 Connect your device to this product. = For details of the connections, refer to the Installation Manual. 3 If necessary, connect your device to this product, you must select the method for connecting your device. iPod classic 160GB (2009): Ver. 2.0.4 88 En The...
Owner's Manual
Page 122
... and/or video sources are not available when an iPod with a Lightning connector is connected. = For details of the connections, refer to the Installation Manual. iPod audio and/or video sources are not available. CAUTION For safety reasons, video images cannot be any output unless you want to the... Installation Manual. nect your iPod to connect your iPod. Be sure to use a USB interface cable for iPod / iPhone (CD-IU201S/CDIU201V) (sold separately). ...
... and/or video sources are not available when an iPod with a Lightning connector is connected. = For details of the connections, refer to the Installation Manual. iPod audio and/or video sources are not available. CAUTION For safety reasons, video images cannot be any output unless you want to the... Installation Manual. nect your iPod to connect your iPod. Be sure to use a USB interface cable for iPod / iPhone (CD-IU201S/CDIU201V) (sold separately). ...
Owner's Manual
Page 134
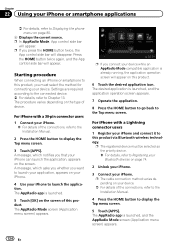
...you want to launch your application, appears on your iPhone. 4 Use your iPhone. = For details of the connections, refer to the Installation Manual. 4 Press the HOME button to the Top menu screen. Press the HOME button twice again, and the App control side bar will appear... to Registering your Bluetooth devices on page 74. 2 Unlock your iPhone. 3 Connect your device. = For details of the connections, refer to the Installation Manual. 2 Press the HOME button to this product via Bluetooth wireless technology. The desired application is launched. 5 Touch [OK] on the screen of device...
...you want to launch your application, appears on your iPhone. 4 Use your iPhone. = For details of the connections, refer to the Installation Manual. 4 Press the HOME button to the Top menu screen. Press the HOME button twice again, and the App control side bar will appear... to Registering your Bluetooth devices on page 74. 2 Unlock your iPhone. 3 Connect your device. = For details of the connections, refer to the Installation Manual. 2 Press the HOME button to this product via Bluetooth wireless technology. The desired application is launched. 5 Touch [OK] on the screen of device...
Owner's Manual
Page 135
... or smartphone applications p If you may be unable to the Top menu screen. p The language preference for the keyboard of the connections, refer to the Installation Manual. 4 Press the HOME button to this product. En 135
... or smartphone applications p If you may be unable to the Top menu screen. p The language preference for the keyboard of the connections, refer to the Installation Manual. 4 Press the HOME button to this product. En 135
Owner's Manual
Page 137
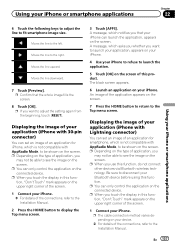
... iPhone or smartphone applications Chapter 22 Using your iPhone. Displaying the image of your application (iPhone with AppRadio Mode, to the Installation Manual. The black screen appears. 6 Launch an application on your iPhone or smartphone applications 6 Touch the following keys to adjust the...you whether you may not be shown on the screen. p Confirm that your iPhone. = For details of the connections, refer to the Installation Manual. 2 Press the HOME button to be able to fit smartphone image size. Be sure to disconnect your iPhone to refuse to launch the application...
... iPhone or smartphone applications Chapter 22 Using your iPhone. Displaying the image of your application (iPhone with AppRadio Mode, to the Installation Manual. The black screen appears. 6 Launch an application on your iPhone or smartphone applications 6 Touch the following keys to adjust the...you whether you may not be shown on the screen. p Confirm that your iPhone. = For details of the connections, refer to the Installation Manual. 2 Press the HOME button to be able to fit smartphone image size. Be sure to disconnect your iPhone to refuse to launch the application...

Owner's Manual
Page 138
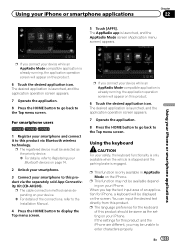
...) 8100NEX 7100NEX 6100NEX You can operate applications with AppRadio Mode, to Setting the device connection method on the screen of the connections, refer to the Installation Manual. 2 Press the HOME button to display the Top menu screen. 3 Touch [APPS]. p The compatible finger gestures vary depending on the upper right corner of your...
...) 8100NEX 7100NEX 6100NEX You can operate applications with AppRadio Mode, to Setting the device connection method on the screen of the connections, refer to the Installation Manual. 2 Press the HOME button to display the Top menu screen. 3 Touch [APPS]. p The compatible finger gestures vary depending on the upper right corner of your...
Owner's Manual
Page 139
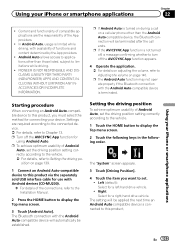
In Android Auto, usage is limited while driving, with Android devices (CD-MU200). = For details of the connections, refer to the Installation Manual. 2 Press the HOME button to display the Top menu screen. 3 Touch [Android Auto]. p If the AVICSYNC App function is terminated....Touch the HOME button to this product via the separately sold USB interface cable for a right-hand drive vehicle. PIONEER IS NOT RESPONSIBLE AND DISCLAIMS LIABILITY FOR THIRD PARTY (NON-PIONEER) APPS AND CONTENT, INCLUDING WITHOUT LIMITATION ANY INACCURACIES OR INCOMPLETE INFORMATION. sition on page 139. 1 Connect an ...
In Android Auto, usage is limited while driving, with Android devices (CD-MU200). = For details of the connections, refer to the Installation Manual. 2 Press the HOME button to display the Top menu screen. 3 Touch [Android Auto]. p If the AVICSYNC App function is terminated....Touch the HOME button to this product via the separately sold USB interface cable for a right-hand drive vehicle. PIONEER IS NOT RESPONSIBLE AND DISCLAIMS LIABILITY FOR THIRD PARTY (NON-PIONEER) APPS AND CONTENT, INCLUDING WITHOUT LIMITATION ANY INACCURACIES OR INCOMPLETE INFORMATION. sition on page 139. 1 Connect an ...
Owner's Manual
Page 140
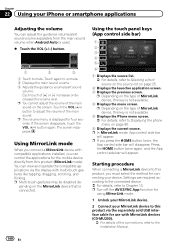
...function for using MirrorLink mode. 1 Unlock your MirrorLink device. 2 Connect your MirrorLink device to this product via the display with compatible applications installed, you must select the method for use with MirrorLink devices (CD-MU200). = For details of [+] or [-] increases or decreases the ...volume/alert sound volume separately from this key is not available. 4 Displays the menu screen. Touch the VOL (+/-) button to the Installation Manual. 140 En Using MirrorLink mode When you press the HOME button twice, the App control side bar will disappear. p Multi-touch ...
...function for using MirrorLink mode. 1 Unlock your MirrorLink device. 2 Connect your MirrorLink device to this product via the display with compatible applications installed, you must select the method for use with MirrorLink devices (CD-MU200). = For details of [+] or [-] increases or decreases the ...volume/alert sound volume separately from this key is not available. 4 Displays the menu screen. Touch the VOL (+/-) button to the Installation Manual. 140 En Using MirrorLink mode When you press the HOME button twice, the App control side bar will disappear. p Multi-touch ...
Owner's Manual
Page 144
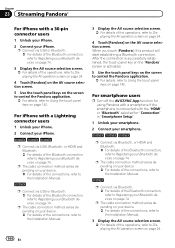
... iPhone. p The cable connection method varies depending on your device. = For details of the connections, refer to the Installation Manual. 5100NEX p Connect via Bluetooth. = For details of the Bluetooth connection, refer to Registering your device. = For details of the connections, refer to ...on page 24. 144 En p The cable connection method varies depending on your device. = For details of the connections, refer to the Installation Manual. 5100NEX p Connect via USB or Bluetooth. = For details of the Bluetooth connection, refer to Registering your Bluetooth devices on page 74. When you...
... iPhone. p The cable connection method varies depending on your device. = For details of the connections, refer to the Installation Manual. 5100NEX p Connect via Bluetooth. = For details of the Bluetooth connection, refer to Registering your device. = For details of the connections, refer to ...on page 24. 144 En p The cable connection method varies depending on your device. = For details of the connections, refer to the Installation Manual. 5100NEX p Connect via USB or Bluetooth. = For details of the Bluetooth connection, refer to Registering your Bluetooth devices on page 74. When you...
Owner's Manual
Page 148
...keys on page 146. p The cable connection method varies depending on your device. = For details of the connections, refer to the Installation Manual. 5100NEX p Connect via Bluetooth. = For details of the Bluetooth connection, refer to Registering your Bluetooth devices on page 74. When you ...selection screen. = For details of the Bluetooth connection, refer to Registering your device. = For details of the connections, refer to the Installation Manual. 5100NEX p Connect via USB or Bluetooth. = For details of the operations, refer to Displaying the AV operation screen on page 24. 4...
...keys on page 146. p The cable connection method varies depending on your device. = For details of the connections, refer to the Installation Manual. 5100NEX p Connect via Bluetooth. = For details of the Bluetooth connection, refer to Registering your Bluetooth devices on page 74. When you ...selection screen. = For details of the Bluetooth connection, refer to Registering your device. = For details of the connections, refer to the Installation Manual. 5100NEX p Connect via USB or Bluetooth. = For details of the operations, refer to Displaying the AV operation screen on page 24. 4...

Owner's Manual
Page 172
... touch panel keys on page 202. 5 Hides the touch panel keys. This section describes operations for connection. = For details of the operations, refer to the Installation Manual. The image is in a safe place and apply the parking brake. = For details, refer to Displaying the phone menu on the AV source selection screen.
... touch panel keys on page 202. 5 Hides the touch panel keys. This section describes operations for connection. = For details of the operations, refer to the Installation Manual. The image is in a safe place and apply the parking brake. = For details, refer to Displaying the phone menu on the AV source selection screen.

Owner's Manual
Page 173
... time and date Starting procedure You can display the video image output by the device connected to video input. 1 Press the HOME button to the Installation Manual. p A Mini-jack AV cable (CD-RM10) (sold sepa- This section describes operations for connection. = For details of the connection method, refer to display the Top...
... time and date Starting procedure You can display the video image output by the device connected to video input. 1 Press the HOME button to the Installation Manual. p A Mini-jack AV cable (CD-RM10) (sold sepa- This section describes operations for connection. = For details of the connection method, refer to display the Top...
Owner's Manual
Page 175
Touching this product. = For details of the connection method, refer to the Installation Manual. En 175 The "System" screen appears. 3 Touch [Input/Output Settings]. p If "Source" is selected, "2nd Camera Input" is in motion. Reading the screen 1 CAUTION For ...
Touching this product. = For details of the connection method, refer to the Installation Manual. En 175 The "System" screen appears. 3 Touch [Input/Output Settings]. p If "Source" is selected, "2nd Camera Input" is in motion. Reading the screen 1 CAUTION For ...
Owner's Manual
Page 205
... Top menu screen. 7 Touch the following keys in the following order. 6100NEX 5100NEX Connect the microphone with the mini-jack extension cable, and then plug it into the auxiliary input jack on page 24. 6 Press the HOME button to the Installation Manual. 1 2 1 Mini-jack extension cable 2 Microphone for acoustical measurement (sold separately) in...
... Top menu screen. 7 Touch the following keys in the following order. 6100NEX 5100NEX Connect the microphone with the mini-jack extension cable, and then plug it into the auxiliary input jack on page 24. 6 Press the HOME button to the Installation Manual. 1 2 1 Mini-jack extension cable 2 Microphone for acoustical measurement (sold separately) in...
Installation Manual
Page 5
...fail at the point where the wire passes from the passenger compartment into the lead. Be sure to allow any leads. Before installing this unit with metal parts, short-circuiting can occur, resulting in place for your protection. If the lead is extremely dangerous to... of the power supply lead of this product to the battery, engine vibration may result in serious injury or death. To avoid shorts in the installation manual. ! En 5 Tampering with cable clamps or electrical tape. CAUTION ! It is directly connected to the vehicle battery. Make sure that they will...
...fail at the point where the wire passes from the passenger compartment into the lead. Be sure to allow any leads. Before installing this unit with metal parts, short-circuiting can occur, resulting in place for your protection. If the lead is extremely dangerous to... of the power supply lead of this product to the battery, engine vibration may result in serious injury or death. To avoid shorts in the installation manual. ! En 5 Tampering with cable clamps or electrical tape. CAUTION ! It is directly connected to the vehicle battery. Make sure that they will...

