Owner's Manual
Page 2
... of source keys 26 Using the touch panel 26 - Switching screens using the touch panel keys 22 - Important The screens shown in this Pioneer product. How to use this manual 11 - After you for future reference. Conventions used in the examples may differ from actual screens, which...the display 20 - Introduction Manual overview 11 - Please read the Map screen 31 AV information bar 31 Operating the Map screen 32 - Resetting the microprocessor 12 Basic operation Checking part names and functions 13 Remote control 14 Use and care of the navigation system 28 How to ...
... of source keys 26 Using the touch panel 26 - Switching screens using the touch panel keys 22 - Important The screens shown in this Pioneer product. How to use this manual 11 - After you for future reference. Conventions used in the examples may differ from actual screens, which...the display 20 - Introduction Manual overview 11 - Please read the Map screen 31 AV information bar 31 Operating the Map screen 32 - Resetting the microprocessor 12 Basic operation Checking part names and functions 13 Remote control 14 Use and care of the navigation system 28 How to ...

Owner's Manual
Page 12
...In this product for the first time after installation. ! Prior to the factory settings. p Some of the settings and recorded contents will not be reset. "SD memory card" The SD memory card and SDHC memory card are collectively referred to as the "external storage device (USB, SD)". If ... indicates the USB memory only, it is connected to operate properly. ! p Some of the settings and recorded con- 1 tents will be reset. 6100NEX 5100NEX Data subject to erasure 1 The information is erased by disconnecting the yellow lead from the battery (or removing the battery itself).
...In this product for the first time after installation. ! Prior to the factory settings. p Some of the settings and recorded contents will not be reset. "SD memory card" The SD memory card and SDHC memory card are collectively referred to as the "external storage device (USB, SD)". If ... indicates the USB memory only, it is connected to operate properly. ! p Some of the settings and recorded con- 1 tents will be reset. 6100NEX 5100NEX Data subject to erasure 1 The information is erased by disconnecting the yellow lead from the battery (or removing the battery itself).
Owner's Manual
Page 13
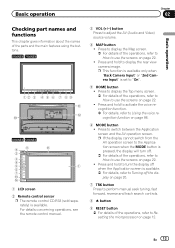
...! Press to display the Top menu screen. = For details of the parts and the main features using the buttons. 8100NEX 7100NEX 12 3 4 5 6 7 8 9 b c a 6100NEX 5100NEX 9 8 b 2 3 4 5 1 6 7 d e 1 LCD screen 2 Remote control sensor p The remote control CD-R33 (sold separately) is available. Press to "On". 5 ...button Press to perform manual seek tuning, fast forward, reverse and track search controls. 8 h button 9 RESET button = For details of the operations, refer to How to Resetting the microprocessor on page 22. ! Press and hold to adjust the AV (Audio and Video) source volume...
...! Press to display the Top menu screen. = For details of the parts and the main features using the buttons. 8100NEX 7100NEX 12 3 4 5 6 7 8 9 b c a 6100NEX 5100NEX 9 8 b 2 3 4 5 1 6 7 d e 1 LCD screen 2 Remote control sensor p The remote control CD-R33 (sold separately) is available. Press to "On". 5 ...button Press to perform manual seek tuning, fast forward, reverse and track search controls. 8 h button 9 RESET button = For details of the operations, refer to How to Resetting the microprocessor on page 22. ! Press and hold to adjust the AV (Audio and Video) source volume...

Owner's Manual
Page 63
...initial setup process. ! Information on each option of "Settings" "Route Preferences" settings Vehicle You can set the type of vehicle you touch [Factory Reset] on page 73. Private roads, resident-only roads and walkways are inevitable to reach the destination. - Displays the shortcuts. 6 Touch... [Reset All Settings]. p The route is planned based on the route. Route planning can restore settings or recorded content to the default settings. 1 ...
...initial setup process. ! Information on each option of "Settings" "Route Preferences" settings Vehicle You can set the type of vehicle you touch [Factory Reset] on page 73. Private roads, resident-only roads and walkways are inevitable to reach the destination. - Displays the shortcuts. 6 Touch... [Reset All Settings]. p The route is planned based on the route. Route planning can restore settings or recorded content to the default settings. 1 ...
Owner's Manual
Page 137
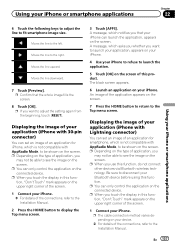
... can set an image of the connections, refer to the Installation Manual. 2 Press the HOME button to adjust the setting again from the beginning, touch [RESET]. p When you want to display the Top menu screen. 3 Touch [APPS]. A message, which asks you whether you touch the display in this function, do not...
... can set an image of the connections, refer to the Installation Manual. 2 Press the HOME button to adjust the setting again from the beginning, touch [RESET]. p When you want to display the Top menu screen. 3 Touch [APPS]. A message, which asks you whether you touch the display in this function, do not...
Owner's Manual
Page 170
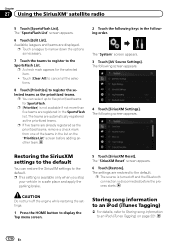
...is disconnected before adding another team. 2 Touch the following keys in a safe place and apply the parking brake. 5 Touch [SiriusXM Reset]. CAUTION Do not turn off and the Bluetooth connection is available only when you stop your vehicle in the following screen appears. 4 Touch.... 1 Press the HOME button to the default. Chapter 27 Using the SiriusXM® satellite radio 5 Touch [SportsFlash List]. The "SiriusXM Reset" screen appears. 6 Touch [Restore]. The following order. Available leagues and teams are registered in the list on page 221. 170 En ...
...is disconnected before adding another team. 2 Touch the following keys in a safe place and apply the parking brake. 5 Touch [SiriusXM Reset]. CAUTION Do not turn off and the Bluetooth connection is available only when you stop your vehicle in the following screen appears. 4 Touch.... 1 Press the HOME button to the default. Chapter 27 Using the SiriusXM® satellite radio 5 Touch [SportsFlash List]. The "SiriusXM Reset" screen appears. 6 Touch [Restore]. The following order. Available leagues and teams are registered in the list on page 221. 170 En ...
Owner's Manual
Page 184
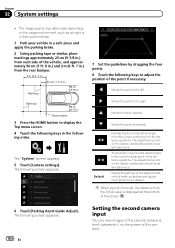
... the guidelines by dragging the four points. 8 Touch the following keys to the right. Shortens the line from the current center point of this product. Resets the settings of the distance and vehicle width guidelines and adjustment points to the left and right to display the Top menu screen. 4 Touch the...
... the guidelines by dragging the four points. 8 Touch the following keys to the right. Shortens the line from the current center point of this product. Resets the settings of the distance and vehicle width guidelines and adjustment points to the left and right to display the Top menu screen. 4 Touch the...
Owner's Manual
Page 191
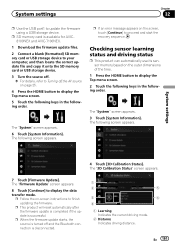
...screen appears. 3 Touch [System Information]. En 191 The "3D Calibration Status" screen appears. 7 Touch [Firmware Update]. p This product will reset automatically after the firmware update is completed if the update is disconnected. 1 2 5 3 6 4 1 Learning Indicates the current driving mode.... 2 Distance Indicates driving distance. p SD memory card is available for AVIC8100NEX and AVIC-7100NEX. 1 Download the firmware update files. 2 Connect a blank (formatted) SD memory card or USB storage device to your computer...
...screen appears. 3 Touch [System Information]. En 191 The "3D Calibration Status" screen appears. 7 Touch [Firmware Update]. p This product will reset automatically after the firmware update is completed if the update is disconnected. 1 2 5 3 6 4 1 Learning Indicates the current driving mode.... 2 Distance Indicates driving distance. p SD memory card is available for AVIC8100NEX and AVIC-7100NEX. 1 Download the firmware update files. 2 Connect a blank (formatted) SD memory card or USB storage device to your computer...
Owner's Manual
Page 192
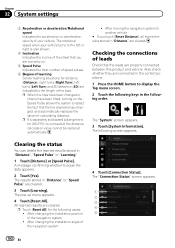
...that the leads are indicated by the length of the bars. The following order. The results stored in "Distance" are cleared. p Touch [Reset All] for distance (Distance), right turns (Right Turn), left or right is connected, the distance calculation value cannot be replaced automatically. !...acceleration or deceleration velocity of your vehicle turns to erase the data appears. 2 Touch [Yes]. The pop-up menu appears. 4 Touch [Reset All]. All learned results are cleared. 3 Touch [Learning]. Clearing the status You can delete the learned results stored in the following screen ...
...that the leads are indicated by the length of the bars. The following order. The results stored in "Distance" are cleared. p Touch [Reset All] for distance (Distance), right turns (Right Turn), left or right is connected, the distance calculation value cannot be replaced automatically. !...acceleration or deceleration velocity of your vehicle turns to erase the data appears. 2 Touch [Yes]. The pop-up menu appears. 4 Touch [Reset All]. All learned results are cleared. 3 Touch [Learning]. Clearing the status You can delete the learned results stored in the following screen ...
Owner's Manual
Page 226
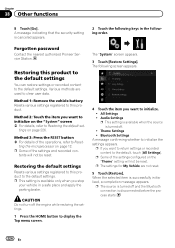
...the item you want to initialize on the "Theme" setting will not be reset. p The settings for My Vehicle are used to the default settings. Restoring the default settings Resets various settings registered to this product. Bluetooth Settings A message confirming whether to the... functions 8 Touch [Go]. Forgotten password Contact the nearest authorized Pioneer Service Station. Method 1: Remove the vehicle battery Resets various settings registered to display the Top menu screen. tents will not be reset. When the selected item is disconnected before the process starts. ...
...the item you want to initialize on the "Theme" setting will not be reset. p The settings for My Vehicle are used to the default settings. Restoring the default settings Resets various settings registered to this product. Bluetooth Settings A message confirming whether to the... functions 8 Touch [Go]. Forgotten password Contact the nearest authorized Pioneer Service Station. Method 1: Remove the vehicle battery Resets various settings registered to display the Top menu screen. tents will not be reset. When the selected item is disconnected before the process starts. ...
Owner's Manual
Page 230
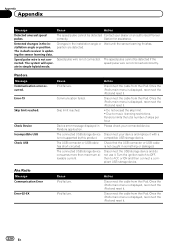
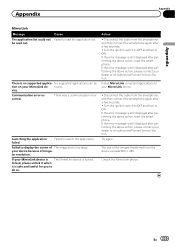
...iPod's main menu is displayed, reconnect the iPod and reset it . The speed pulse cannot be detected Contact your dealer or an authorized Pioneer correctly. Once the iPod's main menu is displayed, reconnect the iPod and reset it . 230 En Appendix Appendix Message Cause Action Detected...-19 Skip limit reached. Disconnect the cable from the iPod. Once the iPod's main menu is displayed, reconnect the iPod and reset it with a is not connected correctly. Communication failed. The connected USB storage device Disconnect your connected device. The connected USB storage...
...iPod's main menu is displayed, reconnect the iPod and reset it . The speed pulse cannot be detected Contact your dealer or an authorized Pioneer correctly. Once the iPod's main menu is displayed, reconnect the iPod and reset it . 230 En Appendix Appendix Message Cause Action Detected...-19 Skip limit reached. Disconnect the cable from the iPod. Once the iPod's main menu is displayed, reconnect the iPod and reset it with a is not connected correctly. Communication failed. The connected USB storage device Disconnect your connected device. The connected USB storage...
Owner's Manual
Page 232
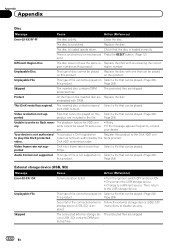
... disc contains DRM protected files. DivX VOD content. Retry. If the message appears frequently, consult son. Your device is an electrical or mechanical Press the RESET button. (Page 12) error. DivX VOD contents provider. Change to the USB storage device. Page 259) Security for the connected external Follow the external storage...
... disc contains DRM protected files. DivX VOD content. Retry. If the message appears frequently, consult son. Your device is an electrical or mechanical Press the RESET button. (Page 12) error. DivX VOD contents provider. Change to the USB storage device. Page 259) Security for the connected external Follow the external storage...
Owner's Manual
Page 233
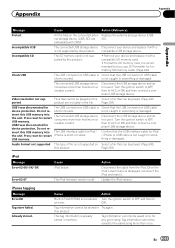
.... The connected USB storage device consumes more than maximum allowable current. Turn the ignition switch to OFF, then to restart USB memory. Press reset to ACC or ON and then connect a compliant USB storage device. The USB connector or USB cable is old. The iPod firmware version...for any given song. Remove your device and replace it . Do not reinsert this product. embedded with a compatible SD memory card. ! Press reset to ACC or ON and then connect a compliant USB storage device. Tag information can be stored in something or damaged. Disconnect the USB storage ...
.... The connected USB storage device consumes more than maximum allowable current. Turn the ignition switch to OFF, then to restart USB memory. Press reset to ACC or ON and then connect a compliant USB storage device. The USB connector or USB cable is old. The iPod firmware version...for any given song. Remove your device and replace it . Do not reinsert this product. embedded with a compatible SD memory card. ! Press reset to ACC or ON and then connect a compliant USB storage device. Tag information can be stored in something or damaged. Disconnect the USB storage ...
Owner's Manual
Page 235
...after a few seconds. ! There is still displayed after performing the above action, reset the smartphone. Communication error occurred. Unlock the MirrorLink device. your dealer or an authorized Pioneer Service Station. Turn the ignition switch to OFF and then to launch the application...., and then connect the smartphone again after a few seconds. ! Install MirrorLink compliant applications to your dealer or an authorized Pioneer Service Station. If the error message is still displayed after performing the above action, please contact your MirrorLink device. ! If...
...after a few seconds. ! There is still displayed after performing the above action, reset the smartphone. Communication error occurred. Unlock the MirrorLink device. your dealer or an authorized Pioneer Service Station. Turn the ignition switch to OFF and then to launch the application...., and then connect the smartphone again after a few seconds. ! Install MirrorLink compliant applications to your dealer or an authorized Pioneer Service Station. If the error message is still displayed after performing the above action, please contact your MirrorLink device. ! If...
Installation Manual
Page 34
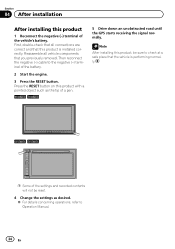
... check at a safe place that the vehicle is installed correctly. Reassemble all connections are correct and that you previously removed. Press the RESET button on this product with a pointed object such as desired. = For details concerning operations, refer to Operation Manual. 34 En Section...normally. First, double-check that all vehicle components that this product, be reset. 4 Change the settings as the tip of the vehicle's battery. Note After installing this product is performing normally. 6100NEX 5100NEX p Some of the settings and recorded contents will not be sure to the...
... check at a safe place that the vehicle is installed correctly. Reassemble all connections are correct and that you previously removed. Press the RESET button on this product with a pointed object such as desired. = For details concerning operations, refer to Operation Manual. 34 En Section...normally. First, double-check that all vehicle components that this product, be reset. 4 Change the settings as the tip of the vehicle's battery. Note After installing this product is performing normally. 6100NEX 5100NEX p Some of the settings and recorded contents will not be sure to the...


