Owner's Manual
Page 1
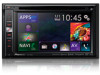
...on your Authorized Pioneer Electronics retailer or call us at (800) 421-1404. Operation Manual MULTIMEDIA NAVIGATION RECEIVER AVIC-8000NEX AVIC-7000NEX AVIC-6000NEX AVIC-5000NEX AVIC-X8610BS Notice to ...all users: This software requires that the product is properly connected to read Important Information for the User includes the important information that you must understand before using this product. Important Information for the User first! For more information, please contact your vehicle, additional installation...
...on your Authorized Pioneer Electronics retailer or call us at (800) 421-1404. Operation Manual MULTIMEDIA NAVIGATION RECEIVER AVIC-8000NEX AVIC-7000NEX AVIC-6000NEX AVIC-5000NEX AVIC-X8610BS Notice to ...all users: This software requires that the product is properly connected to read Important Information for the User includes the important information that you must understand before using this product. Important Information for the User first! For more information, please contact your vehicle, additional installation...
Owner's Manual
Page 11
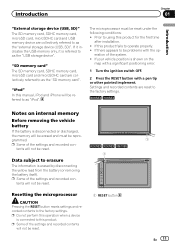
...by disconnecting the yellow lead from the battery (or removing the battery itself). tents will not be reset. p Do not perform this manual, iPod and iPhone will not be referred to as "iPod". The microprocessor must be reset under the following conditions: ! tents will... microSD card and microSDHC card are reset to the factory settings. If this product for the first time after installation. ! If there appears to be reset. 6000NEX 5000NEX X8610BS 1 Resetting the microprocessor CAUTION Pressing the RESET button resets settings and recorded contents to the factory settings....
...by disconnecting the yellow lead from the battery (or removing the battery itself). tents will not be reset. p Do not perform this manual, iPod and iPhone will not be referred to as "iPod". The microprocessor must be reset under the following conditions: ! tents will... microSD card and microSDHC card are reset to the factory settings. If this product for the first time after installation. ! If there appears to be reset. 6000NEX 5000NEX X8610BS 1 Resetting the microprocessor CAUTION Pressing the RESET button resets settings and recorded contents to the factory settings....
Owner's Manual
Page 16
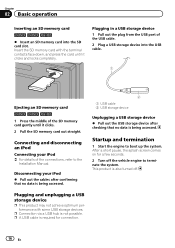
... off . After a short pause, the splash screen comes on for connection. 16 En Startup and termination 1 Start the engine to the Installation Manual. Chapter 02 Basic operation Inserting an SD memory card 6000NEX 5000NEX X8610BS % Insert an SD memory card into the USB cable. 1 Ejecting an SD memory card 6000NEX... 5000NEX X8610BS 1 Press the middle of the SD memory card gently until it clicks. 2 Pull the SD memory card out ...
... off . After a short pause, the splash screen comes on for connection. 16 En Startup and termination 1 Start the engine to the Installation Manual. Chapter 02 Basic operation Inserting an SD memory card 6000NEX 5000NEX X8610BS % Insert an SD memory card into the USB cable. 1 Ejecting an SD memory card 6000NEX... 5000NEX X8610BS 1 Press the middle of the SD memory card gently until it clicks. 2 Pull the SD memory card out ...
Owner's Manual
Page 69
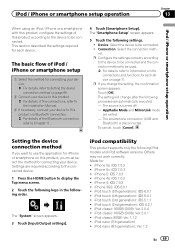
... method on this product, you must select the method for connecting your device to this product. = For details of the Bluetooth connection, refer to the Installation Manual. 3 If necessary, connect your device. iPod touch (2nd generation): iOS 4.2.1 ! iPod classic 80GB: Ver. 1.1.2 ! To cancel, touch [Cancel]. Made for each device on page 71...
... method on this product, you must select the method for connecting your device to this product. = For details of the Bluetooth connection, refer to the Installation Manual. 3 If necessary, connect your device. iPod touch (2nd generation): iOS 4.2.1 ! iPod classic 80GB: Ver. 1.1.2 ! To cancel, touch [Cancel]. Made for each device on page 71...
Owner's Manual
Page 72
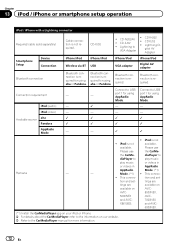
... is not ! iPod is required. diaPlayer to diaPlayer to USB - - This connec- ! This connec- AVIC- 8000NEX, 5000NEX AVIC- and AVIC- 6000NEX. (*1) Install the CarMediaPlayer app on your iPod or iPhone. = For details about the CarMediaPlayer, refer to the information on AVIC- Lightning Di- Mode. - 1 - - - - - - 1 1 1 1 1 1 1 ...1 for using AppRadio port 1 for using aha or Pandora. Please use Please use the CarMe- Lightning to the CarMediaPlayer manual for using aha or Pandora. CD-IH202 ! AppRadio Mode. (*1) Mode. (*1) ! CD-IU52 ! CD-IU52 ! ...
... is not ! iPod is required. diaPlayer to diaPlayer to USB - - This connec- ! This connec- AVIC- 8000NEX, 5000NEX AVIC- and AVIC- 6000NEX. (*1) Install the CarMediaPlayer app on your iPod or iPhone. = For details about the CarMediaPlayer, refer to the information on AVIC- Lightning Di- Mode. - 1 - - - - - - 1 1 1 1 1 1 1 ...1 for using AppRadio port 1 for using aha or Pandora. Please use Please use the CarMe- Lightning to the CarMediaPlayer manual for using aha or Pandora. CD-IH202 ! AppRadio Mode. (*1) Mode. (*1) ! CD-IU52 ! CD-IU52 ! ...
Owner's Manual
Page 103
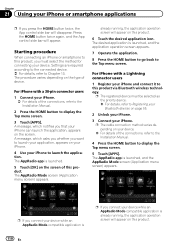
... on your iPod, there may not be viewed while your vehicle is connected. = For details of the connections, refer to the Installation Manual. For iPod / iPhone with a Lightning connector users p To use a USB interface cable for iPod / iPhone (CD-IU52) (sold separately). = For details of ... connections, refer to iPod video files and AppRadio Mode are enabled if either of the cables is in motion. However, functions related to the Installation Manual. p iPod audio and/or video sources are not available when an iPod with a Lightning connector is connected to this product using a USB ...
... on your iPod, there may not be viewed while your vehicle is connected. = For details of the connections, refer to the Installation Manual. For iPod / iPhone with a Lightning connector users p To use a USB interface cable for iPod / iPhone (CD-IU52) (sold separately). = For details of ... connections, refer to iPod video files and AppRadio Mode are enabled if either of the cables is in motion. However, functions related to the Installation Manual. p iPod audio and/or video sources are not available when an iPod with a Lightning connector is connected to this product using a USB ...
Owner's Manual
Page 110
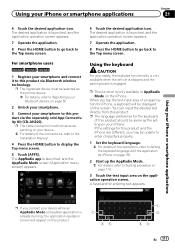
The procedure varies depending on the type of the connections, refer to the Installation Manual. 2 Press the HOME button to display the Top menu screen. 5 Touch [APPS]. A message, which notifies you that your iPhone or smartphone applications p If you connect ... side bar will appear on this product. 110 En The desired application is launched. 5 Touch [OK] on the screen of the connections, refer to the Installation Manual. 4 Press the HOME button to display the Top menu screen. 3 Touch [APPS]. Press the HOME button twice again, and the App control side bar will...
The procedure varies depending on the type of the connections, refer to the Installation Manual. 2 Press the HOME button to display the Top menu screen. 5 Touch [APPS]. A message, which notifies you that your iPhone or smartphone applications p If you connect ... side bar will appear on this product. 110 En The desired application is launched. 5 Touch [OK] on the screen of the connections, refer to the Installation Manual. 4 Press the HOME button to display the Top menu screen. 3 Touch [APPS]. Press the HOME button twice again, and the App control side bar will...
Owner's Manual
Page 111
... already running, the application operation screen will be unable to enter characters properly. 1 Set the keyboard language. = For details of the connections, refer to the Installation Manual. 4 Press the HOME button to Starting procedure on page 110. 3 Touch the text input area on the screen. p The language preference for the keyboard of...
... already running, the application operation screen will be unable to enter characters properly. 1 Set the keyboard language. = For details of the connections, refer to the Installation Manual. 4 Press the HOME button to Starting procedure on page 110. 3 Touch the text input area on the screen. p The language preference for the keyboard of...

Owner's Manual
Page 113
...'t Touch" mark appears on the upper right corner of the screen. 1 Connect your iPhone. = For details of the connections, refer to the Installation Manual. 2 Press the HOME button to display the Top menu screen. 3 Touch [APPS]. p The cable connection method varies depending on the upper right... smartphone, which asks you whether you want to launch your application, appears on your iPhone. 4 Use your iPhone to refuse to the Installation Manual. Displaying the image of your iPhone. p When you touch the display in this function, "Don't Touch" mark appears on your Bluetooth...
...'t Touch" mark appears on the upper right corner of the screen. 1 Connect your iPhone. = For details of the connections, refer to the Installation Manual. 2 Press the HOME button to display the Top menu screen. 3 Touch [APPS]. p The cable connection method varies depending on the upper right... smartphone, which asks you whether you want to launch your application, appears on your iPhone. 4 Use your iPhone to refuse to the Installation Manual. Displaying the image of your iPhone. p When you touch the display in this function, "Don't Touch" mark appears on your Bluetooth...
Owner's Manual
Page 114
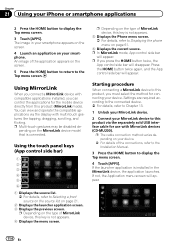
... (MirrorLink mode). p In MirrorLink mode, App control side bar will appear. 114 En Using MirrorLink When you connect a MirrorLink device with compatible applications installed, you press the HOME button twice, the App control side bar will appear. Using the touch panel keys (App control side bar) 1 2 3... cable for use with multi-touch gestures like tapping, dragging, scrolling, and flicking. An image of the connections, refer to the Installation Manual. 3 Press the HOME button to Selecting a front source on the source list on your iPhone or smartphone applications 2 Press the...
... (MirrorLink mode). p In MirrorLink mode, App control side bar will appear. 114 En Using MirrorLink When you connect a MirrorLink device with compatible applications installed, you press the HOME button twice, the App control side bar will appear. Using the touch panel keys (App control side bar) 1 2 3... cable for use with multi-touch gestures like tapping, dragging, scrolling, and flicking. An image of the connections, refer to the Installation Manual. 3 Press the HOME button to Selecting a front source on the source list on your iPhone or smartphone applications 2 Press the...
Owner's Manual
Page 118
p The cable connection method varies depending on your device. = For details of the connections, refer to the Installation Manual. 5000NEX X8610BS p Connect via USB or Bluetooth. = For details of the Bluetooth connection, refer to Registering your Bluetooth devices on page ... your Bluetooth devices on page 55. p The cable connection method varies depending on your device. = For details of the connections, refer to the Installation Manual. 5000NEX X8610BS p Connect via USB, Bluetooth, or HDMI and Bluetooth. = For details of the Bluetooth connection, refer to Registering your device. = For ...
p The cable connection method varies depending on your device. = For details of the connections, refer to the Installation Manual. 5000NEX X8610BS p Connect via USB or Bluetooth. = For details of the Bluetooth connection, refer to Registering your Bluetooth devices on page ... your Bluetooth devices on page 55. p The cable connection method varies depending on your device. = For details of the connections, refer to the Installation Manual. 5000NEX X8610BS p Connect via USB, Bluetooth, or HDMI and Bluetooth. = For details of the Bluetooth connection, refer to Registering your device. = For ...
Owner's Manual
Page 122
... on page 120. p The cable connection method varies depending on your device. = For details of the connections, refer to the Installation Manual. 5000NEX X8610BS p Connect via USB or Bluetooth. = For details of the Bluetooth connection, refer to Registering your Bluetooth devices on page 55... selection screen. = For details of the operations, refer to Registering your device. = For details of the connections, refer to the Installation Manual. 5000NEX X8610BS p Connect via USB or Bluetooth. = For details of the Bluetooth connection, refer to Displaying the AV operation screen on page ...
... on page 120. p The cable connection method varies depending on your device. = For details of the connections, refer to the Installation Manual. 5000NEX X8610BS p Connect via USB or Bluetooth. = For details of the Bluetooth connection, refer to Registering your Bluetooth devices on page 55... selection screen. = For details of the operations, refer to Registering your device. = For details of the connections, refer to the Installation Manual. 5000NEX X8610BS p Connect via USB or Bluetooth. = For details of the Bluetooth connection, refer to Displaying the AV operation screen on page ...
Owner's Manual
Page 123
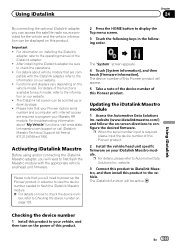
...manual of this product. website (www.idatalinkmaestro.com/) and follow the on how to first flash the Maestro module with the appropriate vehicle and head unit firmware. website. 3 Connect this product to program your iDatalink Maestro module. After installing the iDatalink adapter, be scrolled up the Pioneer... order. Activating iDatalink Maestro Before using and/or connecting the iDatalink Maestro adapter, you can be displayed on this Pioneer product. 2 Install the vehicle/head unit specific firmware on the vehicle model. The "System" screen appears. 4 Touch [System Information...
...manual of this product. website (www.idatalinkmaestro.com/) and follow the on how to first flash the Maestro module with the appropriate vehicle and head unit firmware. website. 3 Connect this product to program your iDatalink Maestro module. After installing the iDatalink adapter, be scrolled up the Pioneer... order. Activating iDatalink Maestro Before using and/or connecting the iDatalink Maestro adapter, you can be displayed on this Pioneer product. 2 Install the vehicle/head unit specific firmware on the vehicle model. The "System" screen appears. 4 Touch [System Information...
Owner's Manual
Page 141
... the Phone menu screen. 1 Current time and date Starting procedure 1 Display the AV source selection screen. = For details of the connection method, refer to the Installation Manual. rately) is in a safe place and apply the parking brake. = For details, refer to Displaying the phone menu on page 61. 7 Changes the wide screen...
... the Phone menu screen. 1 Current time and date Starting procedure 1 Display the AV source selection screen. = For details of the connection method, refer to the Installation Manual. rately) is in a safe place and apply the parking brake. = For details, refer to Displaying the phone menu on page 61. 7 Changes the wide screen...
Owner's Manual
Page 142
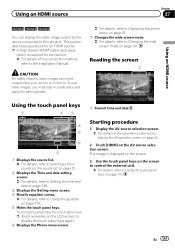
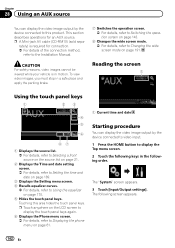
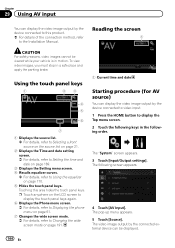
.... = For details, refer to Setting the time and date on page 189. 3 Displays the Setting menu screen. 4 Recalls equalizer curves. = For details, refer to the Installation Manual. p A Mini-jack AV cable (CD-RM10) (sold sepa- To view video images, you must stop in motion. The following order. Chapter 28 Using an AUX...
.... = For details, refer to Setting the time and date on page 189. 3 Displays the Setting menu screen. 4 Recalls equalizer curves. = For details, refer to the Installation Manual. p A Mini-jack AV cable (CD-RM10) (sold sepa- To view video images, you must stop in motion. The following order. Chapter 28 Using an AUX...
Owner's Manual
Page 144
.... = For details, refer to Setting the time and date on page 189. 3 Displays the Setting menu screen. 4 Recalls equalizer curves. = For details, refer to the Installation Manual. p Touch anywhere on the LCD screen to display the touch panel keys again. 6 Displays the Phone menu screen. = For details, refer to Displaying the phone...
.... = For details, refer to Setting the time and date on page 189. 3 Displays the Setting menu screen. 4 Recalls equalizer curves. = For details, refer to the Installation Manual. p Touch anywhere on the LCD screen to display the touch panel keys again. 6 Displays the Phone menu screen. = For details, refer to Displaying the phone...
Owner's Manual
Page 147
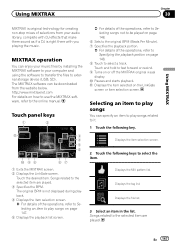
... and using the software to transfer the files to select the item. Selecting an item to play songs You can enjoy your music files by installing the MIXTRAX software to your audio library, complete with DJ effects that make them sound as if a DJ is not displayed during playback. 4 Displays the... is right there with you playing the music. Displays the file list. 3 Select an item in the list. En 147 Songs related to the online manual. b Displays the item selected on how to use the MIXTRAX software, refer to the selected item are played. 3 Specifies the BPM. Displays the MIX pattern...
... and using the software to transfer the files to select the item. Selecting an item to play songs You can enjoy your music files by installing the MIXTRAX software to your audio library, complete with DJ effects that make them sound as if a DJ is not displayed during playback. 4 Displays the... is right there with you playing the music. Displays the file list. 3 Select an item in the list. En 147 Songs related to the online manual. b Displays the item selected on how to use the MIXTRAX software, refer to the selected item are played. 3 Specifies the BPM. Displays the MIX pattern...
Owner's Manual
Page 173
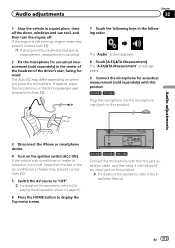
... is canceled. 2 Fix the microphone for acoustical measurement (sold separately) in the center of the headrest of the operations, refer to the Installation Manual. The Auto EQ may differ depending on the ignition switch (ACC ON). Audio adjustments 3 Disconnect the iPhone or smartphone device. 4 Turn on... operations, refer to Displaying the AV operation screen on page 20. 6 Press the HOME button to display the Top menu screen. 6000NEX 5000NEX X8610BS Connect the microphone with this product. = For details of the driver's seat, facing forward. If the engine is turned on this...
... is canceled. 2 Fix the microphone for acoustical measurement (sold separately) in the center of the headrest of the operations, refer to the Installation Manual. The Auto EQ may differ depending on the ignition switch (ACC ON). Audio adjustments 3 Disconnect the iPhone or smartphone device. 4 Turn on... operations, refer to Displaying the AV operation screen on page 20. 6 Press the HOME button to display the Top menu screen. 6000NEX 5000NEX X8610BS Connect the microphone with this product. = For details of the driver's seat, facing forward. If the engine is turned on this...
Installation Manual
Page 2
...manual 3 Important safeguards 3 Connection Precautions before installation 23 To avoid electromagnetic interference 23 Before installing 23 - Notice for the blue/white lead 6 Parts supplied 7 Connecting the power cord (1) 8 Connecting the power cord (2) 10 Connecting the system 12 Connecting to rear video output 22 Installation...27 - Mounting on the steering column 30 - Connecting an Android device with Lightning connector 14 - For AVIC-8000NEX and AVIC-7000NEX users 24 Installing this product 5 To prevent damage 6 - Connecting via the HDMI port 14 - Connecting via the ...
...manual 3 Important safeguards 3 Connection Precautions before installation 23 To avoid electromagnetic interference 23 Before installing 23 - Notice for the blue/white lead 6 Parts supplied 7 Connecting the power cord (1) 8 Connecting the power cord (2) 10 Connecting the system 12 Connecting to rear video output 22 Installation...27 - Mounting on the steering column 30 - Connecting an Android device with Lightning connector 14 - For AVIC-8000NEX and AVIC-7000NEX users 24 Installing this product 5 To prevent damage 6 - Connecting via the HDMI port 14 - Connecting via the ...
Installation Manual
Page 5
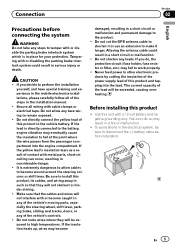
...connected to the battery, engine vibration may result in the installation manual. ! Never feed power to other electronic products by cutting the insulation of the power supply lead of the vehicle's controls. ! Before installing this unit with or disable the parking brake interlock system... insulation heats up, wires may fail to work properly. ! En 5 Use this product ! Connection Section 02 English Precautions before installation. Do not directly connect the yellow lead of the lead will not obstruct or hinder driving. ! Tampering with or become wound ...
...connected to the battery, engine vibration may result in the installation manual. ! Never feed power to other electronic products by cutting the insulation of the power supply lead of the vehicle's controls. ! Before installing this unit with or disable the parking brake interlock system... insulation heats up, wires may fail to work properly. ! En 5 Use this product ! Connection Section 02 English Precautions before installation. Do not directly connect the yellow lead of the lead will not obstruct or hinder driving. ! Tampering with or become wound ...

