Owner's Manual
Page 3
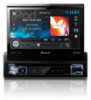
...operating systems or safety features, including air bags, hazard lamp buttons or (iii) impair the driver's ability to install or service this PIONEER product. IMPORTANT SAFEGUARDS Please read all of these instructions regarding your display and retain them for future reference. 1 Do not install the ...damage and injury and the potential violation of applicable laws, this unit is not for use with 30-pin connector 45 Installation DIN front/rear-mount 45 Installing the microphone 46 Additional information Troubleshooting 47 Error messages 49 Understanding auto EQ error messages 52 Understanding...
...operating systems or safety features, including air bags, hazard lamp buttons or (iii) impair the driver's ability to install or service this PIONEER product. IMPORTANT SAFEGUARDS Please read all of these instructions regarding your display and retain them for future reference. 1 Do not install the ...damage and injury and the potential violation of applicable laws, this unit is not for use with 30-pin connector 45 Installation DIN front/rear-mount 45 Installing the microphone 46 Additional information Troubleshooting 47 Error messages 49 Understanding auto EQ error messages 52 Understanding...

Owner's Manual
Page 45
... (small). it may cause malfunctions. ! Leave ample space 5 cm 5 cm 5cm 1 Dashboard 2 Leave gap 3 LCD panel DIN front/rear-mount This unit can be opened and closed without contacting with operation of the side brackets. DIN Front-mount 1 Decide the position of the vehicle. - Do not use unauthorized parts as a result of...
... (small). it may cause malfunctions. ! Leave ample space 5 cm 5 cm 5cm 1 Dashboard 2 Leave gap 3 LCD panel DIN front/rear-mount This unit can be opened and closed without contacting with operation of the side brackets. DIN Front-mount 1 Decide the position of the vehicle. - Do not use unauthorized parts as a result of...

Owner's Manual
Page 46
...happens, use the following screw holes. 46 En 2 3 1 Screw 2 Dashboard or console 3 Factory radio mounting bracket Note In some types of AVH-X7500BT) CAUTION It is attached upside down, the trim ring will enable it to remove the trim ring. Note Install the microphone in the bracket. 1 ...182 53 2 3 4 1 Dashboard 2 Mounting sleeve 3 Side bracket 4 Screw (2 mm × 3 mm) DIN Rear-mount 1 Determine the appropriate position where the holes on the shape of the trim ring outwards to pick up , install the microphone clip. (Lowering...
...happens, use the following screw holes. 46 En 2 3 1 Screw 2 Dashboard or console 3 Factory radio mounting bracket Note In some types of AVH-X7500BT) CAUTION It is attached upside down, the trim ring will enable it to remove the trim ring. Note Install the microphone in the bracket. 1 ...182 53 2 3 4 1 Dashboard 2 Mounting sleeve 3 Side bracket 4 Screw (2 mm × 3 mm) DIN Rear-mount 1 Determine the appropriate position where the holes on the shape of the trim ring outwards to pick up , install the microphone clip. (Lowering...


