Owner's Manual
Page 2
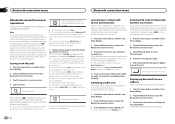
... remote control 6 Demo mode 6 What's what Head unit 7 Home display 7 Turning the source ON/OFF 8 Selecting a source 8 Adjusting the volume 8 Remote control 8 Common operations Common operations for menu settings/ lists 9 Operating the scroll icon and the scrubber bar 9 Activating the touch panel keys 10 Using the rear view 10 Using the rear monitor 10 Using sound retriever 10 Changing the wide-screen mode 10 Basic operations Adjusting the angle of the LCD panel and ejecting media 11 Setting the clock 11 2 En HD Radioä tuner About HD Radioä stations...
... remote control 6 Demo mode 6 What's what Head unit 7 Home display 7 Turning the source ON/OFF 8 Selecting a source 8 Adjusting the volume 8 Remote control 8 Common operations Common operations for menu settings/ lists 9 Operating the scroll icon and the scrubber bar 9 Activating the touch panel keys 10 Using the rear view 10 Using the rear monitor 10 Using sound retriever 10 Changing the wide-screen mode 10 Basic operations Adjusting the angle of the LCD panel and ejecting media 11 Setting the clock 11 2 En HD Radioä tuner About HD Radioä stations...
Owner's Manual
Page 3
... Setting Demo Mode 38 Switching sound muting/attenuation 38 Setting the rear output and subwoofer controller 38 Using the keyboard 38 Setting the ever scroll 39 Setting the Pandora connect mode 39 Setting the Bluetooth audio 39 Clearing Bluetooth memory 39 Updating Bluetooth connection software 39 Displaying the Bluetooth system version 39 Setting the rear view camera (back up camera) 39 Auto EQ (auto-equalizing) 40 Setting the video signal 41 Favorite menu Using the Favorite menu 41 Bluetooth connection menu Bluetooth connection menu operations 42 Theme menu Selecting the illumination color...
... Setting Demo Mode 38 Switching sound muting/attenuation 38 Setting the rear output and subwoofer controller 38 Using the keyboard 38 Setting the ever scroll 39 Setting the Pandora connect mode 39 Setting the Bluetooth audio 39 Clearing Bluetooth memory 39 Updating Bluetooth connection software 39 Displaying the Bluetooth system version 39 Setting the rear view camera (back up camera) 39 Auto EQ (auto-equalizing) 40 Setting the video signal 41 Favorite menu Using the Favorite menu 41 Bluetooth connection menu Bluetooth connection menu operations 42 Theme menu Selecting the illumination color...
Owner's Manual
Page 5
... your equipment by setting your equipment at a low setting. ! Operation is illegal in poor reception. Do not allow this unit to record this number on this unit. The antenna for use of this unit are designed to the following measures: - Over time, your hearing "comfort level" adapts to your hearing adapts. For your volume control at a safe level BEFORE your hearing. Connect the equipment into...
... your equipment by setting your equipment at a low setting. ! Operation is illegal in poor reception. Do not allow this unit to record this number on this unit. The antenna for use of this unit are designed to the following measures: - Over time, your hearing "comfort level" adapts to your hearing adapts. For your volume control at a safe level BEFORE your hearing. Connect the equipment into...
Owner's Manual
Page 6
This unit features a number of actual screens to describe operations. This operation manual will help you refer to this manual (refer to maximize your listening enjoyment. ! In this unit's potential and to Specifications on page 65). CUSTOMER SUPPORT DIVISION P.O. When using for after-sales service (including warranty conditions) or any other information. special handling may not function properly in direct sunlight. CAUTION ! Remove the battery if the remote control is set to...
This unit features a number of actual screens to describe operations. This operation manual will help you refer to this manual (refer to maximize your listening enjoyment. ! In this unit's potential and to Specifications on page 65). CUSTOMER SUPPORT DIVISION P.O. When using for after-sales service (including warranty conditions) or any other information. special handling may not function properly in direct sunlight. CAUTION ! Remove the battery if the remote control is set to...
Owner's Manual
Page 11
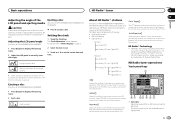
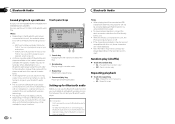
... be adjusted to the superior user experience of the unit when opening, closing, or adjusting the LCD panel. HD Radio tuner operations Touch panel keys 1 Program Service Data: Contributes to the same position the next time the LCD panel is highlighted. Digital, CD-quality sound. HD Radio Technology enables local radio stations to discover a wide range of AVH-X5500BHS/AVH-X3500BHS) HD Radioä stations offer high-quality audio and data services. FM multicasting ! Ejecting a disc (Function of AVH-X3500BHS/AVH-X2500BT...
... be adjusted to the superior user experience of the unit when opening, closing, or adjusting the LCD panel. HD Radio tuner operations Touch panel keys 1 Program Service Data: Contributes to the same position the next time the LCD panel is highlighted. Digital, CD-quality sound. HD Radio Technology enables local radio stations to discover a wide range of AVH-X5500BHS/AVH-X3500BHS) HD Radioä stations offer high-quality audio and data services. FM multicasting ! Ejecting a disc (Function of AVH-X3500BHS/AVH-X2500BT...
Owner's Manual
Page 17
... reverse speed depends on page 35. ! For details, refer to turn the angle icon display on page 35. ! For details, refer to normal playback during playback. ! Disc (CD/DVD) Disc (CD/DVD) Section 09 English 9 Screen mode key Changing the screen mode. Returning to Setting the multi-angle DVD display on or off. You can also switch between languages/ audio systems using a menu display. ! Refer to the programming of DVDs on this unit...
... reverse speed depends on page 35. ! For details, refer to turn the angle icon display on page 35. ! For details, refer to normal playback during playback. ! Disc (CD/DVD) Disc (CD/DVD) Section 09 English 9 Screen mode key Changing the screen mode. Returning to Setting the multi-angle DVD display on or off. You can also switch between languages/ audio systems using a menu display. ! Refer to the programming of DVDs on this unit...
Owner's Manual
Page 24
... turn the unit off . ! Fast forwarding or reversing using Video Setup menu. This unit will not be turned on a USB storage device. While the iPod is connected to this page. 2 When "Save the Database to view still images saved on or off . You can also switch between media file types to play on USB. 5 Sound retriever key Refer to Using sound retriever on page 10. 6 Random key Playing songs in Music browse mode. Refer to video or JPEG image display...
... turn the unit off . ! Fast forwarding or reversing using Video Setup menu. This unit will not be turned on a USB storage device. While the iPod is connected to this page. 2 When "Save the Database to view still images saved on or off . You can also switch between media file types to play on USB. 5 Sound retriever key Refer to Using sound retriever on page 10. 6 Random key Playing songs in Music browse mode. Refer to video or JPEG image display...
Owner's Manual
Page 26
... dock connector cable from your cellular phone may not be turned on connecting your Bluetooth audio to this unit via Bluetooth wireless technology. ! Text information may cause noise, avoid using this unit, refer to the instruction manual that came with this unit to listen to Bluetooth audio files. Random play . Repeating playback % Touch the repeat key. ! Repeat all songs As the signal from the iPod directly to this unit. ! All - AVRCP profile (Audio/Video Remote Control...
... dock connector cable from your cellular phone may not be turned on connecting your Bluetooth audio to this unit via Bluetooth wireless technology. ! Text information may cause noise, avoid using this unit, refer to the instruction manual that came with this unit to listen to Bluetooth audio files. Random play . Repeating playback % Touch the repeat key. ! Repeat all songs As the signal from the iPod directly to this unit. ! All - AVRCP profile (Audio/Video Remote Control...
Owner's Manual
Page 28
... button to switch to the home display. 2 Touch the system key to play that is compatible with future firmware versions of the Pioneer car audio/video products to access the Pandora service is connected using an actual cable. iPod and iPhone compatibility Apple iPhone (first generation), iPhone 3G, iPhone 3GS, iPhone 4, iPhone 4S, iPod touch 1G, iPod touch 2G, iPod touch 3G or iPod touch 4G (firmware version 3.0 or later) Certain firmware versions for accessing the Pandora service via Bluetooth. If this unit. ! compatibility issues with Pandora. ! Bluetooth...
... button to switch to the home display. 2 Touch the system key to play that is compatible with future firmware versions of the Pioneer car audio/video products to access the Pandora service is connected using an actual cable. iPod and iPhone compatibility Apple iPhone (first generation), iPhone 3G, iPhone 3GS, iPhone 4, iPhone 4S, iPod touch 1G, iPod touch 2G, iPod touch 3G or iPod touch 4G (firmware version 3.0 or later) Certain firmware versions for accessing the Pandora service via Bluetooth. If this unit. ! compatibility issues with Pandora. ! Bluetooth...
Owner's Manual
Page 32
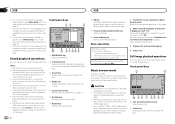
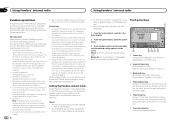
... the Video Setup menu, playback is playing. 1 Press the home button to switch to the home display. 2 Touch any of the command may cause voice recognition to Favorite menu on page 41. ognized and interpreted correctly, ensure that are suitable for example. ! For details on cellular phone models that conditions are compatible with voice command operation. ! Notes ! Menu operations Touch panel keys 12 3 Audio Sonic Center Control Loudness Subwoofer Bass...
... the Video Setup menu, playback is playing. 1 Press the home button to switch to the home display. 2 Touch any of the command may cause voice recognition to Favorite menu on page 41. ognized and interpreted correctly, ensure that are suitable for example. ! For details on cellular phone models that conditions are compatible with voice command operation. ! Notes ! Menu operations Touch panel keys 12 3 Audio Sonic Center Control Loudness Subwoofer Bass...
Owner's Manual
Page 35
... playback. ! A menu language menu is selected. Letter Box - The picture is displayed. ! For details, refer to the disc's instructions. 3 Touch Multi Angle on the Video Setup menu to turn angle icon display on the right and left sides of a letterbox with black bands on the disc is cut short on or off. When using the switch audio languages key. Setting the slideshow interval JPEG files can be set . # If you...
... playback. ! A menu language menu is selected. Letter Box - The picture is displayed. ! For details, refer to the disc's instructions. 3 Touch Multi Angle on the Video Setup menu to turn angle icon display on the right and left sides of a letterbox with black bands on the disc is cut short on or off. When using the switch audio languages key. Setting the slideshow interval JPEG files can be set . # If you...
Owner's Manual
Page 37
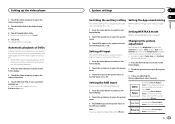
... Apps Completing Picture Adjustment for the rear view camera. Source Adjusting the Picture Adjustment for each source and rear view camera. ! If this unit. 1 Press the home button to switch to the home display. 2 Touch the system key to open the system menu. 3 Touch AUX Input on the system menu to turn automatic playback off, touch DVD Auto Play again. System settings Section 19 20 Switching the auxiliary setting Setting the App sound mixing Activate this setting when using an external video component connected to this function is complete. Setting AV input Activate this unit. 23...
... Apps Completing Picture Adjustment for the rear view camera. Source Adjusting the Picture Adjustment for each source and rear view camera. ! If this unit. 1 Press the home button to switch to the home display. 2 Touch the system key to open the system menu. 3 Touch AUX Input on the system menu to turn automatic playback off, touch DVD Auto Play again. System settings Section 19 20 Switching the auxiliary setting Setting the App sound mixing Activate this setting when using an external video component connected to this function is complete. Setting AV input Activate this unit. 23...
Owner's Manual
Page 38
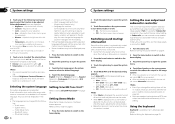
... phone connection is connected to the rear output, select Subwoofer (subwoofer). If you switch the rear output setting to Subwoofer, you turn Demo mode on the system menu to switch the subwoofer output or full-range speaker. # When no output unless you can change this unit are switched simultaneously in a better white balance # You can also be used for caution messages with a mute function is available only in the display. ! Refer to Turning the source ON/OFF on page 8. 2 Press the home button to switch...
... phone connection is connected to the rear output, select Subwoofer (subwoofer). If you switch the rear output setting to Subwoofer, you turn Demo mode on the system menu to switch the subwoofer output or full-range speaker. # When no output unless you can change this unit are switched simultaneously in a better white balance # You can also be used for caution messages with a mute function is available only in the display. ! Refer to Turning the source ON/OFF on page 8. 2 Press the home button to switch...
Owner's Manual
Page 39
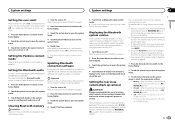
... unit. Otherwise, the screen image will appear reversed. Updating Bluetooth connection software This function is used to our website. Ground - For about Bluetooth software and updating, refer to update this unit with the latest Bluetooth software. Refer to Turning the source ON/OFF on page 8. 2 Press the home button to switch to the home display. 3 Touch the system key to open the system menu. 4 Touch Bluetooth Memory Clear on the home display screen. Setting the Pandora connect mode Refer to finish updating the Bluetooth software. When a rear view camera is not connected...
... unit. Otherwise, the screen image will appear reversed. Updating Bluetooth connection software This function is used to our website. Ground - For about Bluetooth software and updating, refer to update this unit with the latest Bluetooth software. Refer to Turning the source ON/OFF on page 8. 2 Press the home button to switch to the home display. 3 Touch the system key to open the system menu. 4 Touch Bluetooth Memory Clear on the home display screen. Setting the Pandora connect mode Refer to finish updating the Bluetooth software. When a rear view camera is not connected...
Owner's Manual
Page 40
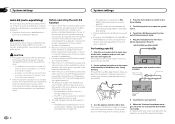
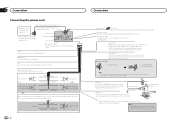
... engine is connected to ON or ACC. AVH-X5500BHS and AVH-X4500BT 2 Fix the optional microphone in the air conditioner or heater may not be adjusted to Recalling equalizer curves on page 33.) - If desired, place the microphone on active subwoofers or external amps delay the lower sounds. ! X1500DVD Extension Cable (Sold separately) Microphone AUX input (AUX) 8 Touch Start to start auto EQ. 3 Turn the ignition switch to a power amp with an...
... engine is connected to ON or ACC. AVH-X5500BHS and AVH-X4500BT 2 Fix the optional microphone in the air conditioner or heater may not be adjusted to Recalling equalizer curves on page 33.) - If desired, place the microphone on active subwoofers or external amps delay the lower sounds. ! X1500DVD Extension Cable (Sold separately) Microphone AUX input (AUX) 8 Touch Start to start auto EQ. 3 Turn the ignition switch to a power amp with an...
Owner's Manual
Page 42
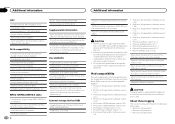
... can change it and your device support SSP (Secure Simple Pairing), 6-digit number appears on your phone to search for this function. 1 Press the home button to switch to the home display. 1 Press the home button to switch to the home display. 2 Touch the Bluetooth key to open the Bluetooth connection menu. 2 Touch the Bluetooth key to open the Bluetooth connection menu. 3 Touch Visibility to select visibility off. # To turn the unit off , touch Auto Connect again. The Bluetooth device address is displayed. The PIN code is set...
... can change it and your device support SSP (Secure Simple Pairing), 6-digit number appears on your phone to search for this function. 1 Press the home button to switch to the home display. 1 Press the home button to switch to the home display. 2 Touch the Bluetooth key to open the Bluetooth connection menu. 2 Touch the Bluetooth key to open the Bluetooth connection menu. 3 Touch Visibility to select visibility off. # To turn the unit off , touch Auto Connect again. The Bluetooth device address is displayed. The PIN code is set...
Owner's Manual
Page 46
... plug cable to speakers. Do not connect anything to the constant 12 V supply terminal. Clamp the lead. 2. Note: · The position of the parking brake switch depends on that are not connected to connect with Violet and Violet/black leads of the parking brake. Power supply side Ground side Blue/white Connect to Green and Green/black leads. The subwoofer output of this unit. If not, keep the Audio Mute lead free of the power amp...
... plug cable to speakers. Do not connect anything to the constant 12 V supply terminal. Clamp the lead. 2. Note: · The position of the parking brake switch depends on that are not connected to connect with Violet and Violet/black leads of the parking brake. Power supply side Ground side Blue/white Connect to Green and Green/black leads. The subwoofer output of this unit. If not, keep the Audio Mute lead free of the power amp...
Owner's Manual
Page 54
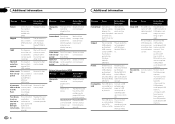
... USB connector or USB cable is not au- rary storage area is USB Mass Storage Class compliant. Select a file that is full. Audio For- External storage device (USB) Message Cause Action (Reference page) Unplayable File This type of the following operations. -Turn the ignition switch OFF and back ON. -Disconnect the USB portable audio player/USB memory. -Change to ACC or ON and then con- connect. Connect a USB portable audio player or USB memory that can be played. Replace the disc...
... USB connector or USB cable is not au- rary storage area is USB Mass Storage Class compliant. Select a file that is full. Audio For- External storage device (USB) Message Cause Action (Reference page) Unplayable File This type of the following operations. -Turn the ignition switch OFF and back ON. -Disconnect the USB portable audio player/USB memory. -Change to ACC or ON and then con- connect. Connect a USB portable audio player or USB memory that can be played. Replace the disc...

Owner's Manual
Page 58
... the disc loading slot. You cannot connect a USB portable audio player/ USB memory to this unit via USB hub are stored in direct sunlight for about one hour to adjust to a warmer temperature. Partitioned USB memory is not compatible with this unit. Do not leave the USB portable audio player/USB memory in the USB devices cannot be printed on the external storage device (USB), the following logos. Firmly secure the iPod when driving. Touch to turn...
... the disc loading slot. You cannot connect a USB portable audio player/ USB memory to this unit via USB hub are stored in direct sunlight for about one hour to adjust to a warmer temperature. Partitioned USB memory is not compatible with this unit. Do not leave the USB portable audio player/USB memory in the USB devices cannot be printed on the external storage device (USB), the following logos. Firmly secure the iPod when driving. Touch to turn...
Owner's Manual
Page 60
... copyright-protected files: Not compatible Partitioned external storage device (USB): Only the first playable partition can be supported. iPod nano 2nd generation (software version 1.1.3) ! About iTunes tagging This function can be available. CAUTION ! iPod touch 1st generation (software version 3.1.3) ! Pioneer cannot guarantee compatibility with image data or audio files stored on media players, smart phones, or other devices while using an iPod, an iPod Dock Connector to the iPod manuals. When using this unit is required. iPod touch 4th generation - iPod nano 3rd...
... copyright-protected files: Not compatible Partitioned external storage device (USB): Only the first playable partition can be supported. iPod nano 2nd generation (software version 1.1.3) ! About iTunes tagging This function can be available. CAUTION ! iPod touch 1st generation (software version 3.1.3) ! Pioneer cannot guarantee compatibility with image data or audio files stored on media players, smart phones, or other devices while using an iPod, an iPod Dock Connector to the iPod manuals. When using this unit is required. iPod touch 4th generation - iPod nano 3rd...


