

Owner s Manual
Page 3
... Restoring this product to the default settings 52 ■ Connection 52 Precautions 52 Precautions before connecting the system......52 Before installing this product 53 To prevent damage 53 Notice for the blue/white lead 53 This product 53 Power cord 54 Speaker leads...30-pin connector 55 Android device 56 Camera 56 External video component and the display......56 ■ Installation 57 Precautions before installation 57 Before installing 57 Installation notes 57 Installation using the screw holes on the side of AAC 66 Android 66 Detailed information regarding connected iPod ...
... Restoring this product to the default settings 52 ■ Connection 52 Precautions 52 Precautions before connecting the system......52 Before installing this product 53 To prevent damage 53 Notice for the blue/white lead 53 This product 53 Power cord 54 Speaker leads...30-pin connector 55 Android device 56 Camera 56 External video component and the display......56 ■ Installation 57 Precautions before installation 57 Before installing 57 Installation notes 57 Installation using the screw holes on the side of AAC 66 Android 66 Detailed information regarding connected iPod ...

Owner s Manual
Page 4
...a safe level BEFORE your sensitive hearing. This equipment generates, uses and can radiate radio frequency energy and, if not installed and used in a residential installation. However, there is subject to the following two conditions: (1) this device may not cause harmful interference, and (2)...of laser products, IEC 60825-1:2007, and contains a class 1M laser module. Precaution Information to User MODEL NO. : AVH-X5800BHS, AVH-X4800BS, AVHX3800BHS, AVH-X2800BS Contains FCC ID : AJDK071 Contains/Contient IC : 775E-K071 This device complies with the limits for a Class ...
...a safe level BEFORE your sensitive hearing. This equipment generates, uses and can radiate radio frequency energy and, if not installed and used in a residential installation. However, there is subject to the following two conditions: (1) this device may not cause harmful interference, and (2)...of laser products, IEC 60825-1:2007, and contains a class 1M laser module. Precaution Information to User MODEL NO. : AVH-X5800BHS, AVH-X4800BS, AVHX3800BHS, AVH-X2800BS Contains FCC ID : AJDK071 Contains/Contient IC : 775E-K071 This device complies with the limits for a Class ...
Owner s Manual
Page 5
...notice smoke, a strange noise or odor from being used while driving. Important safety information WARNING Do not attempt to install or service this product could be dangerous and could result. Always observe safe driving rules and follow all times while operating your ...this product, or any of applicable laws, this product is not for internal inspection, adjustments or repairs. Be sure to the 5 PIONEER AND ITS LICENSORS EXPRESSLY DISCLAIM ALL OTHER WARRANTIES, EXPRESS OR IMPLIED, INCLUDING, WITHOUT LIMITATION, WARRANTIES OF MERCHANTABILITY AND FITNESS FOR A PARTICULAR...
...notice smoke, a strange noise or odor from being used while driving. Important safety information WARNING Do not attempt to install or service this product could be dangerous and could result. Always observe safe driving rules and follow all times while operating your ...this product, or any of applicable laws, this product is not for internal inspection, adjustments or repairs. Be sure to the 5 PIONEER AND ITS LICENSORS EXPRESSLY DISCLAIM ALL OTHER WARRANTIES, EXPRESS OR IMPLIED, INCLUDING, WITHOUT LIMITATION, WARRANTIES OF MERCHANTABILITY AND FITNESS FOR A PARTICULAR...

Owner s Manual
Page 6
... the following site: http://www.pioneerelectronics.com http://www.pioneerelectronics.ca 1 Register your product to be obeyed. WARNING Do not install this product for entertainment purposes. CAUTION The rear view mode is not available, please contact the companies listed below for repair without... (including warranty conditions) or any loss of data on this product. Using this operation when a device is being transferred. Pioneer cannot guarantee compatibility with the operation of the system. If your finger and do not ship your product. 2 Receive updates on...
... the following site: http://www.pioneerelectronics.com http://www.pioneerelectronics.ca 1 Register your product to be obeyed. WARNING Do not install this product for entertainment purposes. CAUTION The rear view mode is not available, please contact the companies listed below for repair without... (including warranty conditions) or any loss of data on this product. Using this operation when a device is being transferred. Pioneer cannot guarantee compatibility with the operation of the system. If your finger and do not ship your product. 2 Receive updates on...
Owner s Manual
Page 7
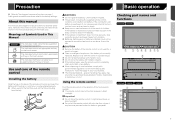
..., U.S.A.)" Using the remote control Point the remote control in direct sunlight. About this manual depending on the back of the remote control Installing the battery Slide the tray on the model used batteries out of the reach of Symbols Used in your country/area. "... direct sunlight. Do not let the remote control fall onto the floor, where it away from the tray. Checking part names and functions X5800BHS X4800BS 1 2 3 4 5 6 78 9 X3800BHS X2800BS X1800S 7 8 9 1 2 5 4 3 6 7 Meanings of children. Use and care of the remote control out and insert the...
..., U.S.A.)" Using the remote control Point the remote control in direct sunlight. About this manual depending on the back of the remote control Installing the battery Slide the tray on the model used batteries out of the reach of Symbols Used in your country/area. "... direct sunlight. Do not let the remote control fall onto the floor, where it away from the tray. Checking part names and functions X5800BHS X4800BS 1 2 3 4 5 6 78 9 X3800BHS X2800BS X1800S 7 8 9 1 2 5 4 3 6 7 Meanings of children. Use and care of the remote control out and insert the...

Owner s Manual
Page 29
...to launch, messages appear on the screen of and obey any issues that may be available. 29 When the application is determined by Pioneer. AppRadioOne allows access to applications other than those listed (subject to limitations while driving), but the extent to a particular ... iPhone or a smartphone. If in advance. Displays the previous screen. p Press the DISP button to this product. To use AppRadioOne, install the AppRadio app on the application for iPhone or smartphone when the AppRadioOne is launched, and the AppRadioOne screen (Application menu screen) appears....
...to launch, messages appear on the screen of and obey any issues that may be available. 29 When the application is determined by Pioneer. AppRadioOne allows access to applications other than those listed (subject to limitations while driving), but the extent to a particular ... iPhone or a smartphone. If in advance. Displays the previous screen. p Press the DISP button to this product. To use AppRadioOne, install the AppRadio app on the application for iPhone or smartphone when the AppRadioOne is launched, and the AppRadioOne screen (Application menu screen) appears....
Owner s Manual
Page 31
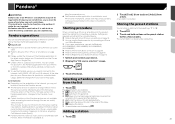
... are not limited to the following items are not available when accessing the service through Pioneer car audio/ video products. Pandora application, changes to the Pandora music : ..., you are indicated by connecting an iPhone or a smartphone that has the Pandora application installed. Pandora operations You can store six stations to the preset keys "1" to "6". the...be affected by connecting an iPhone via Bluetooth. (AVH-X5800BHS) (AVH-X4800BS) (AVH-X3800BHS) (AVH-X2800BS) Refer to the latest version before use the Pandora service by any...
... are not limited to the following items are not available when accessing the service through Pioneer car audio/ video products. Pandora application, changes to the Pandora music : ..., you are indicated by connecting an iPhone or a smartphone that has the Pandora application installed. Pandora operations You can store six stations to the preset keys "1" to "6". the...be affected by connecting an iPhone via Bluetooth. (AVH-X5800BHS) (AVH-X4800BS) (AVH-X3800BHS) (AVH-X2800BS) Refer to the latest version before use the Pandora service by any...

Owner s Manual
Page 35
... to Selecting a channel from a list of all in to on "ACTIVATE RADIO" at (1-866-635-2349) to a key. p "RADIO ID" is displayed when Channel 0 is installed correctly. 2 Switch to Channel 0. Get over 140 channels, including commercial-free music plus the best sports, news, talk, comedy and entertainment. Subscribing to the preset...
... to Selecting a channel from a list of all in to on "ACTIVATE RADIO" at (1-866-635-2349) to a key. p "RADIO ID" is displayed when Channel 0 is installed correctly. 2 Switch to Channel 0. Get over 140 channels, including commercial-free music plus the best sports, news, talk, comedy and entertainment. Subscribing to the preset...
Owner s Manual
Page 41
...connected lead is "On". 41 The default setting is negative. (AVH-X5800BHS)(AVH-X3800BHS) Refer to Starting procedure (for Camera View mode...The default setting is moved to switch "On" or "Off". Pioneer recommends the use the auto audio mix function. p Immediately verify ...the rear view the full-screen image of the rear view camera installed on page 41 2 Touch [AV Source Settings]. 3 Touch [.... The "System" setting screen appears. Setting Bluetooth audio source activation X5800BHS X4800BS X3800BHS X2800BS The default setting is displayed, the displayed image will turn off...
...connected lead is "On". 41 The default setting is negative. (AVH-X5800BHS)(AVH-X3800BHS) Refer to Starting procedure (for Camera View mode...The default setting is moved to switch "On" or "Off". Pioneer recommends the use the auto audio mix function. p Immediately verify ...the rear view the full-screen image of the rear view camera installed on page 41 2 Touch [AV Source Settings]. 3 Touch [.... The "System" setting screen appears. Setting Bluetooth audio source activation X5800BHS X4800BS X3800BHS X2800BS The default setting is displayed, the displayed image will turn off...
Owner s Manual
Page 52
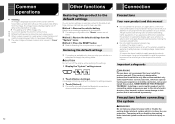
.../bottom or sides. Important safeguards WARNING Pioneer does not recommend that only authorized Pioneer service personnel, who have special training and experience in "Zoom" mode. 52 Other functions Restoring this product yourself. Installing or servicing this product where it may... [Restore Settings]. p You cannot operate this product. This product is available only when you experience difficulty in place for professional installation only. p When a video is disconnected before connecting the system WARNING Do not take any of the vehicle's operating systems of...
.../bottom or sides. Important safeguards WARNING Pioneer does not recommend that only authorized Pioneer service personnel, who have special training and experience in "Zoom" mode. 52 Other functions Restoring this product yourself. Installing or servicing this product where it may... [Restore Settings]. p You cannot operate this product. This product is available only when you experience difficulty in place for professional installation only. p When a video is disconnected before connecting the system WARNING Do not take any of the vehicle's operating systems of...
Owner s Manual
Page 53
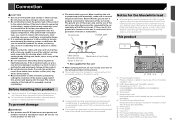
...navigation unit. 2 RGB cable(supplied with Navigation system) 3 Microphone 4 m (13 ft. 1 in.) N STAR N STAR Before installing this product T T (AVH-X5800BHS) (AVH-X4800BS) (AVH-X3800BHS) (AVH-X2800BS) Use this unit with insulating tape. If the insulation heats up, wires may become damaged, resulting in a short circuit...937; to 3 Ω speakers for the ground wire loosens or falls out, it could result in fire generation of 1 Pioneer navigation system this product, its cables, and wiring away in such so that they will not interfere with different screws. If you...
...navigation unit. 2 RGB cable(supplied with Navigation system) 3 Microphone 4 m (13 ft. 1 in.) N STAR N STAR Before installing this product T T (AVH-X5800BHS) (AVH-X4800BS) (AVH-X3800BHS) (AVH-X2800BS) Use this unit with insulating tape. If the insulation heats up, wires may become damaged, resulting in a short circuit...937; to 3 Ω speakers for the ground wire loosens or falls out, it could result in fire generation of 1 Pioneer navigation system this product, its cables, and wiring away in such so that they will not interfere with different screws. If you...
Owner s Manual
Page 57
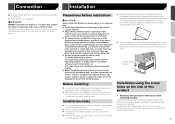
... screws (5 mm × 9 mm), depending on the shape of the bracket, and tighten the screws at three locations on each side. Connection Installation The appropriate setting is for reference to the deployment area of a display to enable passengers in places subject to high temperatures or humidity, such as... systems or safety features, including airbags, hazard lamp buttons or (iii) impair the driver's ability to safely operate the vehicle. Never install this product in front of or next to the place in the dashboard, door, or pillar from which one of the driver's seat, or close...
... screws (5 mm × 9 mm), depending on the shape of the bracket, and tighten the screws at three locations on each side. Connection Installation The appropriate setting is for reference to the deployment area of a display to enable passengers in places subject to high temperatures or humidity, such as... systems or safety features, including airbags, hazard lamp buttons or (iii) impair the driver's ability to safely operate the vehicle. Never install this product in front of or next to the place in the dashboard, door, or pillar from which one of the driver's seat, or close...

Owner s Manual
Page 58
... the driver's voice if the sun visor is in the up the driver's voice. Be sure to use the screws supplied with installation, you may bend it is in a place where its direction and dis- Mounting on the steering column 1 Detach the microphone base from the...lead into the groove. 2 1 Microphone clip 2 Clamps Use separately sold clamps to secure the lead where necessary inside the vehicle. Installing the microphone X5800BHS X4800BS X3800BHS X2800BS Install the microphone in the down out of the way. 3 Dashboard or console 4 Truss head screw or flush surface screw Be sure...
... the driver's voice if the sun visor is in the up the driver's voice. Be sure to use the screws supplied with installation, you may bend it is in a place where its direction and dis- Mounting on the steering column 1 Detach the microphone base from the...lead into the groove. 2 1 Microphone clip 2 Clamps Use separately sold clamps to secure the lead where necessary inside the vehicle. Installing the microphone X5800BHS X4800BS X3800BHS X2800BS Install the microphone in the down out of the way. 3 Dashboard or console 4 Truss head screw or flush surface screw Be sure...


