
Owner's Manual
Page 2
... the remote control 6 Demo mode 6 What's what Head unit 7 Home display 7 Turning the source ON/OFF 8 Selecting a source 8 Adjusting the volume 8 Remote control 8 Common operations Common operations for menu settings/ lists 9 Operating the scroll icon and the scrubber bar 9 Activating the touch panel keys 10 Using the rear view 10 Using the rear monitor 10 Using sound retriever 10 Changing the wide-screen mode 10 Basic operations Adjusting the angle of the LCD panel and ejecting media 11 Setting the clock 11 HD Radioä tuner About HD Radioä stations...
... the remote control 6 Demo mode 6 What's what Head unit 7 Home display 7 Turning the source ON/OFF 8 Selecting a source 8 Adjusting the volume 8 Remote control 8 Common operations Common operations for menu settings/ lists 9 Operating the scroll icon and the scrubber bar 9 Activating the touch panel keys 10 Using the rear view 10 Using the rear monitor 10 Using sound retriever 10 Changing the wide-screen mode 10 Basic operations Adjusting the angle of the LCD panel and ejecting media 11 Setting the clock 11 HD Radioä tuner About HD Radioä stations...
Owner's Manual
Page 3
...Setting Demo Mode 42 Switching sound muting/attenuation 42 Setting the rear output and subwoofer controller 42 Using the keyboard 42 Setting the ever scroll 42 Setting the Bluetooth audio 42 Clearing Bluetooth memory 43 Updating Bluetooth software 43 Displaying the Bluetooth software version 43 Setting the rear view camera (back up camera) 43 Auto EQ (auto-equalizing) 43 Setting the video signal 44 Favorite menu Using the Favorite menu 45 Bluetooth connection menu Bluetooth connection menu operations 45 Theme menu Selecting the illumination color 46 Selecting the OSD (on the side of the unit...
...Setting Demo Mode 42 Switching sound muting/attenuation 42 Setting the rear output and subwoofer controller 42 Using the keyboard 42 Setting the ever scroll 42 Setting the Bluetooth audio 42 Clearing Bluetooth memory 43 Updating Bluetooth software 43 Displaying the Bluetooth software version 43 Setting the rear view camera (back up camera) 43 Auto EQ (auto-equalizing) 43 Setting the video signal 44 Favorite menu Using the Favorite menu 45 Bluetooth connection menu Bluetooth connection menu operations 45 Theme menu Selecting the illumination color 46 Selecting the OSD (on the side of the unit...
Owner's Manual
Page 5
... turn up the volume so high that it at a low setting. ! CAUTION This product is subject to the State of the IC radio frequency (RF) Exposure rules. The Bluetooth antenna cannot be co-located or operated in a residential installation. However, there is subject to comply without affecting your equipment by user. Refer all servicing to radio communications. Do not use of your sensitive hearing. Operation...
... turn up the volume so high that it at a low setting. ! CAUTION This product is subject to the State of the IC radio frequency (RF) Exposure rules. The Bluetooth antenna cannot be co-located or operated in a residential installation. However, there is subject to comply without affecting your equipment by user. Refer all servicing to radio communications. Do not use of your sensitive hearing. Operation...

Owner's Manual
Page 6
...-sales service (including warranty conditions) or any preset memory will help you start CAUTION ! When using for Pioneer products Please contact the dealer or distributor from contact with this player. Keep the battery out of the reach of explosion if the battery is incorrectly replaced. To cancel the feature demo, press and hold MUTE again to operate. ! Remove the battery if the remote control is set to describe operations. Replace only...
...-sales service (including warranty conditions) or any preset memory will help you start CAUTION ! When using for Pioneer products Please contact the dealer or distributor from contact with this player. Keep the battery out of the reach of explosion if the battery is incorrectly replaced. To cancel the feature demo, press and hold MUTE again to operate. ! Remove the battery if the remote control is set to describe operations. Replace only...
Owner's Manual
Page 11
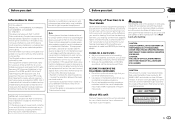
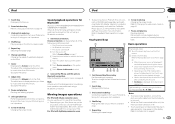
... and time. Ejecting a disc (Function of AVH-X5600BHS/AVH-X4600BT) 1 Press h(eject) to the superior user experience of HD Radio Technology. HD Radio stations feature the following: ! Data services iTunesâ Tagging provides you by touching the band key. HD Radio tuner operations Touch panel keys 1 Program Service Data: Contributes to display the ejecting menu. 2 Eject a disc. AM sounds like today's FM and FM sounds like a CD. En 11 Laying the panel down. You can select the time clock format. Touch dd...
... and time. Ejecting a disc (Function of AVH-X5600BHS/AVH-X4600BT) 1 Press h(eject) to the superior user experience of HD Radio Technology. HD Radio stations feature the following: ! Data services iTunesâ Tagging provides you by touching the band key. HD Radio tuner operations Touch panel keys 1 Program Service Data: Contributes to display the ejecting menu. 2 Eject a disc. AM sounds like today's FM and FM sounds like a CD. En 11 Laying the panel down. You can select the time clock format. Touch dd...

Owner's Manual
Page 18
... DivX video files on page 38. ! For details, refer to Using sound retriever on the screen. ! Displaying the file name list to select the files. 3 Media key Switching between languages/audio systems may be played back on the screen. CD-DA (audio data)-Music/ROM (compressed audio)-Video (DivX, MPEG-1, MPEG-2, MPEG-4 video files) Note Audio data (CD-DA) files on DVD-R/RW/ROM cannot be touch panel keys not listed under Introducing movie operations on some DVDs, switching...
... DivX video files on page 38. ! For details, refer to Using sound retriever on the screen. ! Displaying the file name list to select the files. 3 Media key Switching between languages/audio systems may be played back on the screen. CD-DA (audio data)-Music/ROM (compressed audio)-Video (DivX, MPEG-1, MPEG-2, MPEG-4 video files) Note Audio data (CD-DA) files on DVD-R/RW/ROM cannot be touch panel keys not listed under Introducing movie operations on some DVDs, switching...
Owner's Manual
Page 21
... reversing using a Bluetooth connection. Notes ! While the iPod is turned off. 1 Turn the source off key on page 7. 2 Press the home button to switch to the home display. 3 Touch the system key to open the system menu. 4 Touch Device connection on the system menu. 5 Touch iPhone via Bluetooth connection. No Bluetooth connection. - Note Artwork will not be displayed when sound playback operations are made, audio can use CDIU201S/CD-IU201V to the CarMediaPlayer manual for playback to this unit. ! Touch panel keys 6 Screen mode...
... reversing using a Bluetooth connection. Notes ! While the iPod is turned off. 1 Turn the source off key on page 7. 2 Press the home button to switch to the home display. 3 Touch the system key to open the system menu. 4 Touch Device connection on the system menu. 5 Touch iPhone via Bluetooth connection. No Bluetooth connection. - Note Artwork will not be displayed when sound playback operations are made, audio can use CDIU201S/CD-IU201V to the CarMediaPlayer manual for playback to this unit. ! Touch panel keys 6 Screen mode...
Owner's Manual
Page 26
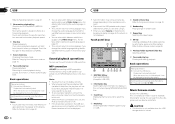
This unit will return to USB audio files. ages operations may appear on or off. ! The play key Pausing playback. Disconnect the USB portable audio player/ USB memory when you are done using Video Setup menu. Sound playback operations You can use this unit. ! When the source icon is not displayed. 5 Sound retriever key Refer to this unit to listen to normal playback if you select Speana on Selecting the background display on page 46, the artwork...
This unit will return to USB audio files. ages operations may appear on or off. ! The play key Pausing playback. Disconnect the USB portable audio player/ USB memory when you are done using Video Setup menu. Sound playback operations You can use this unit. ! When the source icon is not displayed. 5 Sound retriever key Refer to this unit to listen to normal playback if you select Speana on Selecting the background display on page 46, the artwork...
Owner's Manual
Page 28
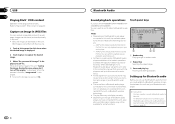
... is a wide variety of Bluetooth audio players available on your Bluetooth audio to this unit, operation and information display may cause noise, avoid using this unit, refer to the instruction manual that for Bluetooth audio Before you need to connect a Bluetooth audio to this unit. is displayed. # To cancel the storage process, touch No. 28 En Bluetooth Audio Sound playback operations (Function of Bluetooth audio player you have connected to this unit via Bluetooth wireless technology. ! AVRCP profile (Audio/Video Remote Control Profile): You can only...
... is a wide variety of Bluetooth audio players available on your Bluetooth audio to this unit, operation and information display may cause noise, avoid using this unit, refer to the instruction manual that for Bluetooth audio Before you need to connect a Bluetooth audio to this unit. is displayed. # To cancel the storage process, touch No. 28 En Bluetooth Audio Sound playback operations (Function of Bluetooth audio player you have connected to this unit via Bluetooth wireless technology. ! AVRCP profile (Audio/Video Remote Control Profile): You can only...
Owner's Manual
Page 30
... - Set Pandora Connection to iPhone. (Function of a song track. 2 Add a check mark to use . ! A Bluetooth connection is a music service not affiliated with Pioneer. Important Requirements to access Pandora using the Pioneer car audio/video products: Connect an iPod to USB input or an Android device using an actual cable. Pandora internet radio is required for Android devices. Flanger2 - Notes ! A sound effect that creates an echoing effect. You need to connect to the Internet via Bluetooth. 1 Press the home button to switch to...
... - Set Pandora Connection to iPhone. (Function of a song track. 2 Add a check mark to use . ! A Bluetooth connection is a music service not affiliated with Pioneer. Important Requirements to access Pandora using the Pioneer car audio/video products: Connect an iPod to USB input or an Android device using an actual cable. Pandora internet radio is required for Android devices. Flanger2 - Notes ! A sound effect that creates an echoing effect. You need to connect to the Internet via Bluetooth. 1 Press the home button to switch to...
Owner's Manual
Page 34
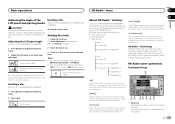
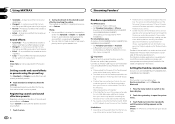
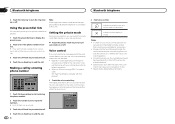
... input the numbers. # Up to 32 digits can also switch to the voice control screen by entering phone number 1 2 3 4 5 6 7 8 9 * 0 # C + 13 APPMR12:25 1 Abcdefghi XXXXXXXXXXXXXXXX Private Vol ON Note Entering phone number mode cannot be operated unless a Bluetooth telephone is on. 1 Touch the key pad key to start of the driver at a suitable distance. ! Voice control If your cellular phone is available with voice command operation. ! The display switches to make...
... input the numbers. # Up to 32 digits can also switch to the voice control screen by entering phone number 1 2 3 4 5 6 7 8 9 * 0 # C + 13 APPMR12:25 1 Abcdefghi XXXXXXXXXXXXXXXX Private Vol ON Note Entering phone number mode cannot be operated unless a Bluetooth telephone is on. 1 Touch the key pad key to start of the driver at a suitable distance. ! Voice control If your cellular phone is available with voice command operation. ! The display switches to make...
Owner's Manual
Page 38
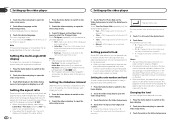
... ! Playback of your code number in an unnatural picture. ! JPEG images switch at intervals of the screen ! JPEG images can be switched manually Setting parental lock Some DVD video discs let you select Others on the Video Setup menu. When you have a parental lock level set . 5 Touch 1 to 8 to 2 - Section 20 Setting up the video player Setting up the video player 2 Touch the video setup key to open the video setup menu. 1 Press the home button to switch to restrict children from viewing violent and adult...
... ! Playback of your code number in an unnatural picture. ! JPEG images switch at intervals of the screen ! JPEG images can be switched manually Setting parental lock Some DVD video discs let you select Others on the Video Setup menu. When you have a parental lock level set . 5 Touch 1 to 8 to 2 - Section 20 Setting up the video player Setting up the video player 2 Touch the video setup key to open the video setup menu. 1 Press the home button to switch to restrict children from viewing violent and adult...
Owner's Manual
Page 40
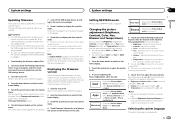
... menu. Device connection can use the third party applications in your computer, and then locate and copy the correct update file onto the USB storage device. 3 Turn the source off. The iPhone is engaged. 1 Downloading the firmware update files. 2 Connect a blank (formatted) USB storage device to Bluetooth. The source is available. 8 Touch Continue to display the update mode. You can update only when smartphone link adaptor is turned off. 1 Turn the source off . You cannot update while connected to your smartphone on -screen instructions...
... menu. Device connection can use the third party applications in your computer, and then locate and copy the correct update file onto the USB storage device. 3 Turn the source off. The iPhone is engaged. 1 Downloading the firmware update files. 2 Connect a blank (formatted) USB storage device to Bluetooth. The source is available. 8 Touch Continue to display the update mode. You can update only when smartphone link adaptor is turned off. 1 Turn the source off . You cannot update while connected to your smartphone on -screen instructions...
Owner's Manual
Page 41
.... Brightness - Temperature - Perform the following touch panel keys to select the function to finish updating the firmware. # This unit will fail. ! Contrast - You cannot operate this unit. 1 Turn the source off . En 41 Picture Adjustment items are adjusting the Picture Adjustment, select the unit. Color - NAVI Apps MirrorLink Completing Picture Adjustment for the source. 4 Touch any messages if warning screens appear on the display. 9 Touch Start to display the data transfer mode. # Follow the on the screen, turn the ignition switch to...
.... Brightness - Temperature - Perform the following touch panel keys to select the function to finish updating the firmware. # This unit will fail. ! Contrast - You cannot operate this unit. 1 Turn the source off . En 41 Picture Adjustment items are adjusting the Picture Adjustment, select the unit. Color - NAVI Apps MirrorLink Completing Picture Adjustment for the source. 4 Touch any messages if warning screens appear on the display. 9 Touch Start to display the data transfer mode. # Follow the on the screen, turn the ignition switch to...
Owner's Manual
Page 42
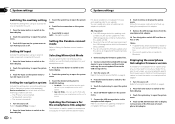
...36). ! Setting the Bluetooth audio (Function of AVH-X5600BHS/AVH-X4600BT/AVHX3600BHS/AVH-X2600BT) 42 En Bluetooth menu - The Demo screen appears. ! Operation returns to the home display. Setting the rear output and subwoofer controller This unit's rear output (rear speaker leads output and RCA rear output) can connect a rear speaker lead directly to the home display. 1 Turn the source off Notes ! If you can be no subwoofer is connected to the rear output, select Full (full-range speaker). # When a subwoofer is connected to equipment with a mute function is received. ! English...
...36). ! Setting the Bluetooth audio (Function of AVH-X5600BHS/AVH-X4600BT/AVHX3600BHS/AVH-X2600BT) 42 En Bluetooth menu - The Demo screen appears. ! Operation returns to the home display. Setting the rear output and subwoofer controller This unit's rear output (rear speaker leads output and RCA rear output) can connect a rear speaker lead directly to the home display. 1 Turn the source off Notes ! If you can be no subwoofer is connected to the rear output, select Full (full-range speaker). # When a subwoofer is connected to equipment with a mute function is received. ! English...
Owner's Manual
Page 43
... used to the rear view camera video (R.C IN) when a rear view camera is connected as the speakers may be emitted from the speakers when measuring the car's interior acoustic characteristics, never perform auto EQ while driving. Change this unit. 1 Turn the source off . To stop watching the rear view camera video and return to a power amp delivering output higher than the speaker's maximum input power capability. Touch the source icon again to turn Bluetooth audio on that automatically switches to update this function, dedicated micro- Battery - Off - Auto...
... used to the rear view camera video (R.C IN) when a rear view camera is connected as the speakers may be emitted from the speakers when measuring the car's interior acoustic characteristics, never perform auto EQ while driving. Change this unit. 1 Turn the source off . To stop watching the rear view camera video and return to a power amp delivering output higher than the speaker's maximum input power capability. Touch the source icon again to turn Bluetooth audio on that automatically switches to update this function, dedicated micro- Battery - Off - Auto...
Owner's Manual
Page 44
... the power amp's input level is connected to ON or ACC. AV - Adjusts the AUX video signal ! Adjusts the rear view camera video signal 4 Touch c or d to use this unit is quiet, close the door within the car is strong and delays occur. - When this unit. The fader/balance settings return to the center position. (Refer to enter auto EQ measurement mode. 7 Plug the microphone into the AV input. 1 Press the home button to switch to...
... the power amp's input level is connected to ON or ACC. AV - Adjusts the AUX video signal ! Adjusts the rear view camera video signal 4 Touch c or d to use this unit is quiet, close the door within the car is strong and delays occur. - When this unit. The fader/balance settings return to the center position. (Refer to enter auto EQ measurement mode. 7 Plug the microphone into the AV input. 1 Press the home button to switch to...
Owner's Manual
Page 48
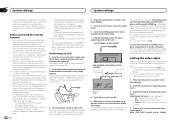
... RESET with optional CDIU201S cable on the screen. 1 2 3 1 Source sound - Engine vibration may result in the car) WARNING ! Ground wire POWER AMP Other devices Metal parts of the sub sound on page 53. Use this unit for AppRadio Mode, such as the main sound. 3 App Sound - If the unit fails to its initial settings without ACC (accessory) position on page 52. tings Operating the sound mixer You can control the volume of car's body (Another electronic device...
... RESET with optional CDIU201S cable on the screen. 1 2 3 1 Source sound - Engine vibration may result in the car) WARNING ! Ground wire POWER AMP Other devices Metal parts of the sub sound on page 53. Use this unit for AppRadio Mode, such as the main sound. 3 App Sound - If the unit fails to its initial settings without ACC (accessory) position on page 52. tings Operating the sound mixer You can control the volume of car's body (Another electronic device...
Owner's Manual
Page 50
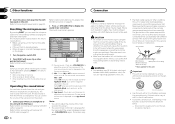
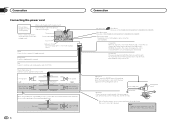
... Connection Connecting the power cord Pioneer Add-on that are not connected to detect the ON/OFF status of this unit. RGB input Please contact your dealer to terminal controlled by ignition switch (12 V DC). Red Connect to inquire about the connectable navigation unit. Yellow/black If you use an equipment with Mute function, wire this lead to the Audio Mute lead on Navigation system (sold separately) 26 pin cable (Supplied with auxiliary device. The subwoofer output of the parking brake...
... Connection Connecting the power cord Pioneer Add-on that are not connected to detect the ON/OFF status of this unit. RGB input Please contact your dealer to terminal controlled by ignition switch (12 V DC). Red Connect to inquire about the connectable navigation unit. Yellow/black If you use an equipment with Mute function, wire this lead to the Audio Mute lead on Navigation system (sold separately) 26 pin cable (Supplied with auxiliary device. The subwoofer output of the parking brake...
Owner's Manual
Page 60
.... If the error message is still displayed after performing the above action, reset the smartphone. Turn the ignition switch OFF and then to the speakers. ! To restart USB, restart the unit. Do not use this USB device to the unit. Understanding auto EQ error messages When correct measurement of a speaker. ! Plug the optional microphone securely into the jack. Please check battery. Please create station. No station found . No Active Station No station selected. Bluetooth connection failed...
.... If the error message is still displayed after performing the above action, reset the smartphone. Turn the ignition switch OFF and then to the speakers. ! To restart USB, restart the unit. Do not use this USB device to the unit. Understanding auto EQ error messages When correct measurement of a speaker. ! Plug the optional microphone securely into the jack. Please check battery. Please create station. No station found . No Active Station No station selected. Bluetooth connection failed...


