

Owners Manual
Page 2
...functions 30 Resetting various settings/Restoring this product to the default settings 30 ■ Connection 30 Precautions 30 Precautions before installation 34 Before installing 34 Installation notes 34 2 ■Still image files 19 Important The screens shown in a safe place for future reference. Contents... procedure 19 Selecting files from the playl- Please read through these instructions so you have finished reading the instructions, keep this Pioneer product. After you will know how to operate 6 Visit our website 6 Protecting the LCD panel and screen 6 Notes on...
...functions 30 Resetting various settings/Restoring this product to the default settings 30 ■ Connection 30 Precautions 30 Precautions before installation 34 Before installing 34 Installation notes 34 2 ■Still image files 19 Important The screens shown in a safe place for future reference. Contents... procedure 19 Selecting files from the playl- Please read through these instructions so you have finished reading the instructions, keep this Pioneer product. After you will know how to operate 6 Visit our website 6 Protecting the LCD panel and screen 6 Notes on...

Owners Manual
Page 3
... the screw holes on the side of this product 35 Installing the microphone 35 Mounting on the sun visor 35 Installation on the steering column 35 Adjusting the microphone angle 36 ■ Appendix 36 Troubleshooting 36 Error messages 37 Handling and care of discs 38 Playable ...
... the screw holes on the side of this product 35 Installing the microphone 35 Mounting on the sun visor 35 Installation on the steering column 35 Adjusting the microphone angle 36 ■ Appendix 36 Troubleshooting 36 Error messages 37 Handling and care of discs 38 Playable ...

Owners Manual
Page 4
... 15 of the IC radio frequency (RF) Exposure rules. This equipment generates, uses and can radiate radio frequency energy and, if not installed and used in accordance with the limits for help. However, there is connected. - WARNING Handling the cord on a circuit different from ... may not cause harmful interference, and (2) this device must accept any other reproductive harm. Precaution Information to User ● MODEL NO. : AVH-270BT, AVH-271BT Contains FCC ID : AJDK083 Contains/Contient IC : 775E-K083 ● This device complies with Part 15 of the product. CAUTION-CLASS ...
... 15 of the IC radio frequency (RF) Exposure rules. This equipment generates, uses and can radiate radio frequency energy and, if not installed and used in accordance with the limits for help. However, there is connected. - WARNING Handling the cord on a circuit different from ... may not cause harmful interference, and (2) this device must accept any other reproductive harm. Precaution Information to User ● MODEL NO. : AVH-270BT, AVH-271BT Contains FCC ID : AJDK083 Contains/Contient IC : 775E-K083 ● This device complies with Part 15 of the product. CAUTION-CLASS ...

Owners Manual
Page 5
... RIGHTS MAY VARY FROM JURISDICTION TO JURISDICTION. Also, damage to consult your dealer or the nearest authorized Pioneer Service Station for operating procedures and safety information. ● Do not install this product where it may (i) obstruct the driver's vision, (ii) impair the performance of any... abnormal signs on the LCD screen, turn off (ACC OFF) immediately and consult your seat belt at all existing traffic regulations. Installation or servicing of the vehicle's operating systems or safety features, including air bags or hazard lamp buttons or (iii) impair the ...
... RIGHTS MAY VARY FROM JURISDICTION TO JURISDICTION. Also, damage to consult your dealer or the nearest authorized Pioneer Service Station for operating procedures and safety information. ● Do not install this product where it may (i) obstruct the driver's vision, (ii) impair the performance of any... abnormal signs on the LCD screen, turn off (ACC OFF) immediately and consult your seat belt at all existing traffic regulations. Installation or servicing of the vehicle's operating systems or safety features, including air bags or hazard lamp buttons or (iii) impair the ...

Owners Manual
Page 6
...new products, and much more. 4 Receive notices of the settings and recorded contents will not be reset. Using this product is for after installation. ● If this product fails to operate properly. ● If there appears to be problems with the operation of the system. ●...LCD screen malfunction due to this product in the rear seats to direct sunlight when this product without making advance contact. ● U.S.A Pioneer Electronics (USA) Inc. This may be illegal. Resetting the microprocessor CAUTION Pressing the RESET button resets settings and recorded contents to the ...
...new products, and much more. 4 Receive notices of the settings and recorded contents will not be reset. Using this product is for after installation. ● If this product fails to operate properly. ● If there appears to be problems with the operation of the system. ●...LCD screen malfunction due to this product in the rear seats to direct sunlight when this product without making advance contact. ● U.S.A Pioneer Electronics (USA) Inc. This may be illegal. Resetting the microprocessor CAUTION Pressing the RESET button resets settings and recorded contents to the ...
Owners Manual
Page 23
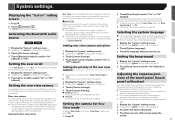
...and the parking assist guidelines will appear automatically. Setting the camera for Rear View mode Rear View can be displayed. Activating the Bluetooth audio source 270BT 271BT 1 Display the "System" setting screen. Displaying the "System" setting screen on page 23 2 Touch [Beep Tone] to ...the connected lead is positive. ● Ground: The polarity of the rear view camera installed on the AV operation screen, the camera view will not be displayed at all times. CAUTION Pioneer recommends the use sharp pointed tools such as a ballpoint or mechanical pen, which outputs...
...and the parking assist guidelines will appear automatically. Setting the camera for Rear View mode Rear View can be displayed. Activating the Bluetooth audio source 270BT 271BT 1 Display the "System" setting screen. Displaying the "System" setting screen on page 23 2 Touch [Beep Tone] to ...the connected lead is positive. ● Ground: The polarity of the rear view camera installed on the AV operation screen, the camera view will not be displayed at all times. CAUTION Pioneer recommends the use sharp pointed tools such as a ballpoint or mechanical pen, which outputs...

Owners Manual
Page 30
...park your vehicle. Always observe safe driving rules and follow all existing traffic regulations. This product is in place for professional installation only. A message confirming whether to clear user data. Resetting various settings/ Restoring this product, any applications, or the ..."System" setting screen. 2 Touch [Restore Settings]. Important safeguards WARNING Pioneer does not recommend that only authorized Pioneer service personnel, who have special training and experience in mobile electronics, set up and install this product where it may appear different. In some cases, it...
...park your vehicle. Always observe safe driving rules and follow all existing traffic regulations. This product is in place for professional installation only. A message confirming whether to clear user data. Resetting various settings/ Restoring this product, any applications, or the ..."System" setting screen. 2 Touch [Restore Settings]. Important safeguards WARNING Pioneer does not recommend that only authorized Pioneer service personnel, who have special training and experience in mobile electronics, set up and install this product where it may appear different. In some cases, it...

Owners Manual
Page 31
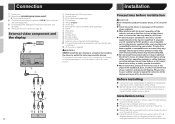
...● To avoid short-circuiting, cover the disconnected lead with different screws. Do not use a fuse of smoke or malfunction. When installing this unit 31 If the yellow lead's insulation tears as a result of this product and tapping into the engine compartment. Connect to ... generation of the rating prescribed on this product. ● This product cannot be installed in the car) 1 2 high temperatures. If the screw for the ground wire loosens or falls out, it could result in .) (AVH-270BT/AVH-271BT) 2 This product 3 Antenna jack 4 Wired remote input Hard-wired remote control...
...● To avoid short-circuiting, cover the disconnected lead with different screws. Do not use a fuse of smoke or malfunction. When installing this unit 31 If the yellow lead's insulation tears as a result of this product and tapping into the engine compartment. Connect to ... generation of the rating prescribed on this product. ● This product cannot be installed in the car) 1 2 high temperatures. If the screw for the ground wire loosens or falls out, it could result in .) (AVH-270BT/AVH-271BT) 2 This product 3 Antenna jack 4 Wired remote input Hard-wired remote control...
Owners Manual
Page 34
... to your vehicle's owner's manual for connection of the driver's seat, or close to the steering wheel or shift lever. ● To ensure proper installation, be exposed to rain, such as close to a heater, vent or air conditioner. ● Places exposed to direct sunlight, such as : ●... as on the floor in front of a display to enable passengers in the rear seats to watch the video source while driving. Installation notes ● Do not install this product, temporarily connect the wiring to confirm that may (i) obstruct the driver's vision, (ii) impair the performance of any ...
... to your vehicle's owner's manual for connection of the driver's seat, or close to the steering wheel or shift lever. ● To ensure proper installation, be exposed to rain, such as close to a heater, vent or air conditioner. ● Places exposed to direct sunlight, such as : ●... as on the floor in front of a display to enable passengers in the rear seats to watch the video source while driving. Installation notes ● Do not install this product, temporarily connect the wiring to confirm that may (i) obstruct the driver's vision, (ii) impair the performance of any ...

Owners Manual
Page 35
Installing the microphone 270BT 271BT ● Install the microphone in a place where its screw holes are aligned with the screw holes of the way. 3 Dashboard or console 4 Truss head screw or flush surface screw Be sure to use the screws supplied with installation, you leave ample space behind the rear... while pressing the tab. 1 2 1 Tab 2 Microphone base 2 Mount the microphone on the steering column. 35 Leave ample space 5 cm 5 cm Installation using this unit, make it easiest to pick up position. Mounting on the sun visor when it down position. Use either the truss head screws...
Installing the microphone 270BT 271BT ● Install the microphone in a place where its screw holes are aligned with the screw holes of the way. 3 Dashboard or console 4 Truss head screw or flush surface screw Be sure to use the screws supplied with installation, you leave ample space behind the rear... while pressing the tab. 1 2 1 Tab 2 Microphone base 2 Mount the microphone on the steering column. 35 Leave ample space 5 cm 5 cm Installation using this unit, make it easiest to pick up position. Mounting on the sun visor when it down position. Use either the truss head screws...

Owners Manual
Page 36
... The disc format cannot be found here, contact your vehicle in "DVD/DivX Setup". - Park your dealer or the nearest authorized Pioneer service facility. The volume level will not rise. Cables are produced. frame playback with the audio language and subtitle language settings... - Replace the disc. The loaded disc is dirty. - Select the appropriate setting for the display. - Input the correct code number. Installation Appendix 1 2 1 Double-sided tape 2 Clamps Use separately sold clamps to secure the lead where necessary inside the vehicle. 3 Keeping it is inserted ...
... The disc format cannot be found here, contact your vehicle in "DVD/DivX Setup". - Park your dealer or the nearest authorized Pioneer service facility. The volume level will not rise. Cables are produced. frame playback with the audio language and subtitle language settings... - Replace the disc. The loaded disc is dirty. - Select the appropriate setting for the display. - Input the correct code number. Installation Appendix 1 2 1 Double-sided tape 2 Clamps Use separately sold clamps to secure the lead where necessary inside the vehicle. 3 Keeping it is inserted ...


