
Owners Manual
Page 2
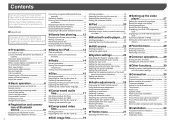
... playback of DVDs 29 Setting the video signal for the rear view camera 29 ■Favorite menu 29 ■ ■ Precaution 4 Setup...interlock 5 When using a display connected to V OUT.......6 To avoid battery exhaustion 6 Rear view camera 6 Handling the USB connector 6 Failure to operate 6 Visit our website 6 Protecting the LCD ...Setting the ever scroll 23 Setting the rear view camera 23 Setting the camera for Rear View mode..........23 Selecting the system .../ iPhone with 30-pin connector 33 Camera 33 External video component and the display......34 ■ Installation 34...
... playback of DVDs 29 Setting the video signal for the rear view camera 29 ■Favorite menu 29 ■ ■ Precaution 4 Setup...interlock 5 When using a display connected to V OUT.......6 To avoid battery exhaustion 6 Rear view camera 6 Handling the USB connector 6 Failure to operate 6 Visit our website 6 Protecting the LCD ...Setting the ever scroll 23 Setting the rear view camera 23 Setting the camera for Rear View mode..........23 Selecting the system .../ iPhone with 30-pin connector 33 Camera 33 External video component and the display......34 ■ Installation 34...

Owners Manual
Page 5
...shock could result in a safe place, turn the ignition switch off the power immediately and consult your dealer or the nearest authorized Pioneer Service Station. Always observe safe driving rules and follow all times while operating your vehicle. License, Warranty Disclaimer & Limitation of Liability ... WARRANTY ARE THE ONLY WARRANTIES MADE BY PIONEER OR ANY OF ITS LICENSORS, AS APPLICABLE. Be sure to install or service this product by this product, any applications, or the rear view camera option (if purchased) if doing so may result in potentially hazardous situations. ...
...shock could result in a safe place, turn the ignition switch off the power immediately and consult your dealer or the nearest authorized Pioneer Service Station. Always observe safe driving rules and follow all times while operating your vehicle. License, Warranty Disclaimer & Limitation of Liability ... WARRANTY ARE THE ONLY WARRANTIES MADE BY PIONEER OR ANY OF ITS LICENSORS, AS APPLICABLE. Be sure to install or service this product by this product, any applications, or the rear view camera option (if purchased) if doing so may result in potentially hazardous situations. ...

Owners Manual
Page 6
...9679; SCREEN IMAGE MAY APPEAR REVERSED. ● USE INPUT ONLY FOR REVERSE OR MIRROR IMAGE REAR VIEW CAMERA. Failure to operate After-sales service for Pioneer products Please contact the dealer or distributor from which you attempt to watch video images. In case the ...the microprocessor CAUTION Pressing the RESET button resets settings and recorded contents to this operation when a device is being transferred. ● Pioneer cannot guarantee compatibility with all USB mass storage devices and assumes no responsibility for entertainment purposes. 6 Handling the USB connector CAUTION &#...
...9679; SCREEN IMAGE MAY APPEAR REVERSED. ● USE INPUT ONLY FOR REVERSE OR MIRROR IMAGE REAR VIEW CAMERA. Failure to operate After-sales service for Pioneer products Please contact the dealer or distributor from which you attempt to watch video images. In case the ...the microprocessor CAUTION Pressing the RESET button resets settings and recorded contents to this operation when a device is being transferred. ● Pioneer cannot guarantee compatibility with all USB mass storage devices and assumes no responsibility for entertainment purposes. 6 Handling the USB connector CAUTION &#...
Owners Manual
Page 23
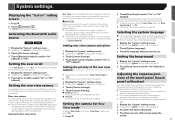
... screen 1 Press . 2 Touch , and then . Activating the Bluetooth audio source 270BT 271BT 1 Display the "System" setting screen. Displaying the "System" setting screen on page 23 2 Touch [Camera Settings]. 3 Touch [Back Camera Input] to switch "On" or "Off" (default). ND-BC6) is required for...To display "Rear View" at all times, "Rear View" needs to be displayed. CAUTION Pioneer recommends the use of the rear view camera installed on page 23 2 Touch [Camera Settings]. 3 Touch [Camera Polarity]. ● Battery (default): The polarity of the connected lead is positive. ●...
... screen 1 Press . 2 Touch , and then . Activating the Bluetooth audio source 270BT 271BT 1 Display the "System" setting screen. Displaying the "System" setting screen on page 23 2 Touch [Camera Settings]. 3 Touch [Back Camera Input] to switch "On" or "Off" (default). ND-BC6) is required for...To display "Rear View" at all times, "Rear View" needs to be displayed. CAUTION Pioneer recommends the use of the rear view camera installed on page 23 2 Touch [Camera Settings]. 3 Touch [Camera Polarity]. ● Battery (default): The polarity of the connected lead is positive. ●...

Owners Manual
Page 24
... is 18:00-6:00 (6:00 PM-6:00 AM). When the cursors are saved. Proceed to the picture adjustment for each source and rear view camera. Setting the dimmer Setting the dimmer trigger p This setting is turned on or off (daytime) and on (nighttime). "Brightness" and "Contrast" are switched automatically...
... is 18:00-6:00 (6:00 PM-6:00 AM). When the cursors are saved. Proceed to the picture adjustment for each source and rear view camera. Setting the dimmer Setting the dimmer trigger p This setting is turned on or off (daytime) and on (nighttime). "Brightness" and "Contrast" are switched automatically...

Owners Manual
Page 29
... video signal for the video signal input into the AV input. 1 Display the "Video Setup" screen. 2 Touch [Video Signal Setting]. 3 Touch [Camera]. p The default setting is "Full", and for the selected menu is filled in. To cancel the registration, touch the star icon in ... "Favorites" screen. p This setting is available when the selected source is removed from the first chapter of the menu item that you connect a rear view camera to this key changes according to "12hour" (default) or "24hour". p You can set the correct time and date. Creating a shortcut 1 Display the ...
... video signal for the video signal input into the AV input. 1 Display the "Video Setup" screen. 2 Touch [Video Signal Setting]. 3 Touch [Camera]. p The default setting is "Full", and for the selected menu is filled in. To cancel the registration, touch the star icon in ... "Favorites" screen. p This setting is available when the selected source is removed from the first chapter of the menu item that you connect a rear view camera to this key changes according to "12hour" (default) or "24hour". p You can set the correct time and date. Creating a shortcut 1 Display the ...

Owners Manual
Page 30
...settings or recorded content to the default settings. A message confirming whether to install this product yourself. We recommend that only authorized Pioneer service personnel, who have special training and experience in place for your vehicle. Precautions before connecting the system WARNING Do not ...This product is disconnected before making the necessary adjustments. ● Do not install this product, any applications, or the rear view camera option (if purchased) if doing so will appear coarser when viewed in serious injury or death. 30 NEVER SERVICE THIS PRODUCT YOURSELF...
...settings or recorded content to the default settings. A message confirming whether to install this product yourself. We recommend that only authorized Pioneer service personnel, who have special training and experience in place for your vehicle. Precautions before connecting the system WARNING Do not ...This product is disconnected before making the necessary adjustments. ● Do not install this product, any applications, or the rear view camera option (if purchased) if doing so will appear coarser when viewed in serious injury or death. 30 NEVER SERVICE THIS PRODUCT YOURSELF...

Owners Manual
Page 33
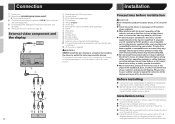
... output 3 RCA cable (supplied with ND-BC6) 4 This product 5 Brown (R.C IN) 6 Power supply 33 WARNING USE INPUT ONLY FOR REVERSE OR MIRROR IMAGE REAR VIEW CAMERA. iPod / iPhone For details on your subwoofer system. Do not use . 1 3 2 4 8 8 1 System remote control Connect ...of full-screen images displayed while backing or checking the rear of the vehicle may appear reversed. ● With the rear view camera you can change the RCA output of the subwoofer depending on how to connect an external device using a separately sold cable, refer...
... output 3 RCA cable (supplied with ND-BC6) 4 This product 5 Brown (R.C IN) 6 Power supply 33 WARNING USE INPUT ONLY FOR REVERSE OR MIRROR IMAGE REAR VIEW CAMERA. iPod / iPhone For details on your subwoofer system. Do not use . 1 3 2 4 8 8 1 System remote control Connect ...of full-screen images displayed while backing or checking the rear of the vehicle may appear reversed. ● With the rear view camera you can change the RCA output of the subwoofer depending on how to connect an external device using a separately sold cable, refer...
Owners Manual
Page 34
... front of or next to the place in the dashboard, door, or pillar from which one of your dealer. If parts other view cameras. Setting the rear view camera on page 23 External video component and the display 1 3 2 4 5 1 Rear display with RCA input jacks 2 To video input 3 RCA cables (sold ... is for reference to the deployment area of the driver's seat, or close to the door or on page 32 Connect only the rear view camera to rain, such as on the floor in a manner that: ● Could injure the driver or passengers if the vehicle stops suddenly. ● May interfere...
... front of or next to the place in the dashboard, door, or pillar from which one of your dealer. If parts other view cameras. Setting the rear view camera on page 23 External video component and the display 1 3 2 4 5 1 Rear display with RCA input jacks 2 To video input 3 RCA cables (sold ... is for reference to the deployment area of the driver's seat, or close to the door or on page 32 Connect only the rear view camera to rain, such as on the floor in a manner that: ● Could injure the driver or passengers if the vehicle stops suddenly. ● May interfere...


