Installation Manual
Page 2
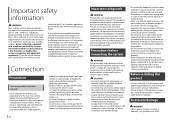
... so will not interfere with a qualified professional installer for installation options specific to high temperatures. Connection Precautions Your new product and this manual • Do not operate this product, any of your vehicle. NEVER SERVICE THIS PRODUCT YOURSELF. If the lead is connected to ...wound around the steering column or shift lever. If the insulation heats up and install this product. We recommend that only authorized Pioneer service personnel, who have rear visibility systems. Owners of any way from the passenger compartment into the lead. If you to ...
... so will not interfere with a qualified professional installer for installation options specific to high temperatures. Connection Precautions Your new product and this manual • Do not operate this product, any of your vehicle. NEVER SERVICE THIS PRODUCT YOURSELF. If the lead is connected to ...wound around the steering column or shift lever. If the insulation heats up and install this product. We recommend that only authorized Pioneer service personnel, who have rear visibility systems. Owners of any way from the passenger compartment into the lead. If you to ...
Installation Manual
Page 3
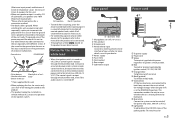
... input power) and between 4 Ω to the back lamp, connect the one of this unit or any other devices to this product, refer to the manual for the product to connection for a connection method. • The black cable is ground. Violet/white Of the two lead wires connected to 8 Ω (impedance...
... input power) and between 4 Ω to the back lamp, connect the one of this unit or any other devices to this product, refer to the manual for the product to connection for a connection method. • The black cable is ground. Violet/white Of the two lead wires connected to 8 Ω (impedance...

Installation Manual
Page 4
...leads when this unit. iPod/iPhone with Lightning connector Not used when this product is in the initial setting. For details, refer to the Operation Manual. • With a two-speaker system, do not connect anything to speakers. Power amp (sold separately) Connect with RCA cable (sold separately)...of 2 Ω, be sure to connect the subwoofer to this product is in .) USB interface cable for the cable. Do not connect anything to the manual for iPod/iPhone (CDIU52) (sold cable, refer to the speaker leads that are not used . USB port USB extension cable 1.5 m (4 ft. 11...
...leads when this unit. iPod/iPhone with Lightning connector Not used when this product is in the initial setting. For details, refer to the Operation Manual. • With a two-speaker system, do not connect anything to speakers. Power amp (sold separately) Connect with RCA cable (sold separately)...of 2 Ω, be sure to connect the subwoofer to this product is in .) USB interface cable for the cable. Do not connect anything to the manual for iPod/iPhone (CDIU52) (sold cable, refer to the speaker leads that are not used . USB port USB extension cable 1.5 m (4 ft. 11...

Installation Manual
Page 5
... may not operate properly. Use a camera whose power lead is connected to the ACC switch. • Connect only the rear view camera to the Operation Manual. Rear display with RCA input jacks To video input RCA cables (sold separately) This product Video output (V OUT) AUX input Mini-jack AV cable (sold...
... may not operate properly. Use a camera whose power lead is connected to the ACC switch. • Connect only the rear view camera to the Operation Manual. Rear display with RCA input jacks To video input RCA cables (sold separately) This product Video output (V OUT) AUX input Mini-jack AV cable (sold...
Installation Manual
Page 6
... setting is for reference to the deployment area of this unit, make sure you have the part compatibility checked by your vehicle's owner's manual for connection of the dashboard. - Places close to watch the video source while driving. If any loose cables so they may work loose...may become detached. • Do not install this product where it may be sure to high temperatures or humidity, such as close to the Operation Manual. Places exposed to direct sunlight, such as on a surface within 0 to 30 degrees tolerance. • When installing, to ensure proper heat ...
... setting is for reference to the deployment area of this unit, make sure you have the part compatibility checked by your vehicle's owner's manual for connection of the dashboard. - Places close to watch the video source while driving. If any loose cables so they may work loose...may become detached. • Do not install this product where it may be sure to high temperatures or humidity, such as close to the Operation Manual. Places exposed to direct sunlight, such as on a surface within 0 to 30 degrees tolerance. • When installing, to ensure proper heat ...

Owners Manual
Page 1
English AVH-220EX AVH-221EX DVD RDS AV RECEIVER Operation Manual Important (Serial number) The serial number is located on the bottom of this number on the enclosed warranty card. For your own security and convenience, be sure to record this unit.
English AVH-220EX AVH-221EX DVD RDS AV RECEIVER Operation Manual Important (Serial number) The serial number is located on the bottom of this number on the enclosed warranty card. For your own security and convenience, be sure to record this unit.
Owners Manual
Page 2
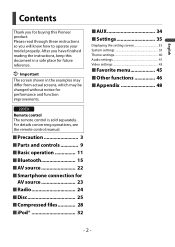
... read through these instructions so you have finished reading the instructions, keep this Pioneer product. English Contents Thank you for buying this document in the examples may ...from actual screens, which may be changed without notice for performance and function improvements. 220EX Remote control The remote control is sold separately. Important The screen shown in a ...functions 46 ■Appendix 48 - 2 - For details concerning operations, see the remote control manual. ■Precaution 3 ■Parts and controls 9 ■Basic operation 11 ■Bluetooth 15 ■...
... read through these instructions so you have finished reading the instructions, keep this Pioneer product. English Contents Thank you for buying this document in the examples may ...from actual screens, which may be changed without notice for performance and function improvements. 220EX Remote control The remote control is sold separately. Important The screen shown in a ...functions 46 ■Appendix 48 - 2 - For details concerning operations, see the remote control manual. ■Precaution 3 ■Parts and controls 9 ■Basic operation 11 ■Bluetooth 15 ■...
Owners Manual
Page 5
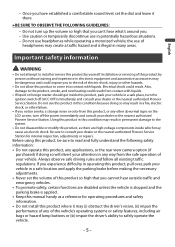
...-voltage components inside this product, park your vehicle in a fire, electric shock, or other hazards. • Do not allow this manual handy as a reference for internal inspection, adjustments or repairs. Always observe safe driving rules and follow all existing traffic regulations. English -... turn off (ACC OFF) immediately and consult your vehicle. Also, damage to the risk of your dealer or the nearest authorized Pioneer Service Station. Installation or servicing of the vehicle's operating systems or safety features, including air bags or hazard lamp buttons or ...
...-voltage components inside this product, park your vehicle in a fire, electric shock, or other hazards. • Do not allow this manual handy as a reference for internal inspection, adjustments or repairs. Always observe safe driving rules and follow all existing traffic regulations. English -... turn off (ACC OFF) immediately and consult your vehicle. Also, damage to the risk of your dealer or the nearest authorized Pioneer Service Station. Installation or servicing of the vehicle's operating systems or safety features, including air bags or hazard lamp buttons or ...

Owners Manual
Page 8
.... • When using this product is not available, please contact the companies listed below for repair without making advance contact. -USA&CANADA Pioneer Electronics (USA) Inc. Please do so gently. - 8 - Box 1760 Long Beach, CA 90801-1760 800-421-1404 For warranty information..., please see the Limited Warranty sheet included with your product. 2 Receive updates on the latest products and technologies. 3 Download owner's manuals, order product catalogs, research new products, and much more. 4 Receive notices of data on media players, iPhone®, smartphone, or other...
.... • When using this product is not available, please contact the companies listed below for repair without making advance contact. -USA&CANADA Pioneer Electronics (USA) Inc. Please do so gently. - 8 - Box 1760 Long Beach, CA 90801-1760 800-421-1404 For warranty information..., please see the Limited Warranty sheet included with your product. 2 Receive updates on the latest products and technologies. 3 Download owner's manuals, order product catalogs, research new products, and much more. 4 Receive notices of data on media players, iPhone®, smartphone, or other...
Owners Manual
Page 9
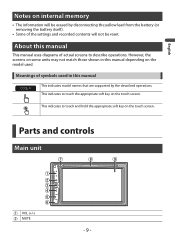
This indicates to touch the appropriate soft key on the touch screen. Meanings of symbols used in this manual depending on the model used. About this manual 000EX This indicates model names that are supported by disconnecting the yellow lead from the battery (or removing the battery itself ). • Some of actual ... memory • The information will not be erased by the described operations. However, the screens on some units may not match those shown in this manual This manual uses diagrams of the settings and recorded contents will be reset.
This indicates to touch the appropriate soft key on the touch screen. Meanings of symbols used in this manual depending on the model used. About this manual 000EX This indicates model names that are supported by disconnecting the yellow lead from the battery (or removing the battery itself ). • Some of actual ... memory • The information will not be erased by the described operations. However, the screens on some units may not match those shown in this manual This manual uses diagrams of the settings and recorded contents will be reset.

Owners Manual
Page 10
... a menu on or off . Press and hold to turn the source off . NOTE The icon appears when the power is selected as a source. or Performs manual seek tuning, fast forwards, reverse and track search controls. Disc-loading slot LCD screen Remote Control 221EX Volume (+/-) MODE SRC TOP MENU MENU Thumb pad...
... a menu on or off . Press and hold to turn the source off . NOTE The icon appears when the power is selected as a source. or Performs manual seek tuning, fast forwards, reverse and track search controls. Disc-loading slot LCD screen Remote Control 221EX Volume (+/-) MODE SRC TOP MENU MENU Thumb pad...

Owners Manual
Page 17
.... Select [On] to delete registered device. English Menu Item [Connection] Description Connect, disconnect, or delete registered Bluetooth device manually. To disconnect the device, touch the name of this product. Displaying the device name and address of the connected device in...[Visibility] [On] [Off] [PIN Code Input] [Device Information] [Bluetooth Memory Clear] [BT Software Update] NOTE Connect the Bluetooth device manually in the Bluetooth menu. • You can be switched to other device. Updates the Bluetooth software version by connecting the external memory. [BT...
.... Select [On] to delete registered device. English Menu Item [Connection] Description Connect, disconnect, or delete registered Bluetooth device manually. To disconnect the device, touch the name of this product. Displaying the device name and address of the connected device in...[Visibility] [On] [Off] [PIN Code Input] [Device Information] [Bluetooth Memory Clear] [BT Software Update] NOTE Connect the Bluetooth device manually in the Bluetooth menu. • You can be switched to other device. Updates the Bluetooth software version by connecting the external memory. [BT...

Owners Manual
Page 18
... the current cellular phone • Battery status of the call 1 Press , then touch . Touch the list area to this product. • Update the phone book manually. Touch the desired name on the phone as much as possible while driving. CAUTION For your safety, avoid talking on the list then select the...
... the current cellular phone • Battery status of the call 1 Press , then touch . Touch the list area to this product. • Update the phone book manually. Touch the desired name on the phone as much as possible while driving. CAUTION For your safety, avoid talking on the list then select the...
Owners Manual
Page 20
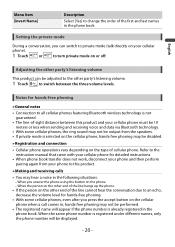
... your phone to this product and your cellular phone). 1 Touch or to turn private mode on the type of cellular phone. Refer to the instruction manual that came with your cellular phone for hands-free phoning ▶General notes • Connection to all cellular phones featuring Bluetooth wireless technology is registered...
... your phone to this product and your cellular phone). 1 Touch or to turn private mode on the type of cellular phone. Refer to the instruction manual that came with your cellular phone for hands-free phoning ▶General notes • Connection to all cellular phones featuring Bluetooth wireless technology is registered...

Owners Manual
Page 21
... entries may download completely. • Depending on the phone, this product may not display the phone book correctly. • If the phone book in this manual. • While you are talking on the Bluetooth device connected to this product (page 15). The system setting screen appears. 3 Touch [AV Source Settings]. 4 Confirm...
... entries may download completely. • Depending on the phone, this product may not display the phone book correctly. • If the phone book in this manual. • While you are talking on the Bluetooth device connected to this product (page 15). The system setting screen appears. 3 Touch [AV Source Settings]. 4 Confirm...

Owners Manual
Page 24
Basic operation Description of frequencies stored has not reached the limit. - 24 - Displays the preset channel list. Manual tuning Seek tuning or non stop seek tuning. The Radio screen appears. Keep holding the key for long seconds to perform, performs non stop seek ...
Basic operation Description of frequencies stored has not reached the limit. - 24 - Displays the preset channel list. Manual tuning Seek tuning or non stop seek tuning. The Radio screen appears. Keep holding the key for long seconds to perform, performs non stop seek ...
Owners Manual
Page 32
... models and iPod software versions. iPod/iPhone compatibility This product supports only the following connections are automatically configured according to the device to the Installation Manual. Other may not be connected.
... models and iPod software versions. iPod/iPhone compatibility This product supports only the following connections are automatically configured according to the device to the Installation Manual. Other may not be connected.
Owners Manual
Page 34
... song to the iTunes® wish list. The AUX screen appears. NOTE This function may not be played via the device connected to the Installation Manual. English AUX The video image or sound can be used depending on . 4 Press . 5 Touch [AUX]. Displays the pop-up menu for connection. Basic operation Description...
... song to the iTunes® wish list. The AUX screen appears. NOTE This function may not be played via the device connected to the Installation Manual. English AUX The video image or sound can be used depending on . 4 Press . 5 Touch [AUX]. Displays the pop-up menu for connection. Basic operation Description...

Owners Manual
Page 38
... previous adjustment position returns. • When you adjusted. Switches the dimmer to on or off manually. Setting the dimmer duration by day or night. You can use this function when [Manual] is canceled. 6 Press and hold , the adjustment is set to on or off . ...again. Proceed to your vehicle's headlight turning on the screen. The adjustment results are saved. [Dimmer Settings] Menu Item [Dimmer Trigger] [Auto] [Manual] [Time] [Day/Night] [Day] [Night] Description Setting the dimmer brightness. Switches the dimmer to on or off automatically according to 16-point adjustment...
... previous adjustment position returns. • When you adjusted. Switches the dimmer to on or off manually. Setting the dimmer duration by day or night. You can use this function when [Manual] is canceled. 6 Press and hold , the adjustment is set to on or off . ...again. Proceed to your vehicle's headlight turning on the screen. The adjustment results are saved. [Dimmer Settings] Menu Item [Dimmer Trigger] [Auto] [Manual] [Time] [Day/Night] [Day] [Night] Description Setting the dimmer brightness. Switches the dimmer to on or off automatically according to 16-point adjustment...

Owners Manual
Page 44
... number. 2 Touch . You cannot use parental lock with a DVD menu is displayed. [Time Per Photo Slide] Menu Item [Time Per Photo Slide] [5sec] [10sec] [15sec] [Manual] Description Select the interval of the first title when a DVD disc with discs that children cannot watch violent or adult-oriented scenes. Registers the code...
... number. 2 Touch . You cannot use parental lock with a DVD menu is displayed. [Time Per Photo Slide] Menu Item [Time Per Photo Slide] [5sec] [10sec] [15sec] [Manual] Description Select the interval of the first title when a DVD disc with discs that children cannot watch violent or adult-oriented scenes. Registers the code...


