
Owner's Manual
Page 2
...operating and maintenance (servicing) instructions in the literature accompanying the appliance. Reorient or relocate the receiving antenna. - Consult the dealer or an experienced radio/TV technician for the first time, read the following measures: - D8-10-1-2_En This Class B digital apparatus complies with Canadian ICES-003. CAUTION : THE USE OF OPTICAL INSTRUMENTS WITH THIS PRODUCT...risk of the available power supply differs according to improve heat radiation (at least 10 cm at top, 10 cm at rear, and 10 cm at each side). Model When installing this unit will not occur in...
...operating and maintenance (servicing) instructions in the literature accompanying the appliance. Reorient or relocate the receiving antenna. - Consult the dealer or an experienced radio/TV technician for the first time, read the following measures: - D8-10-1-2_En This Class B digital apparatus complies with Canadian ICES-003. CAUTION : THE USE OF OPTICAL INSTRUMENTS WITH THIS PRODUCT...risk of the available power supply differs according to improve heat radiation (at least 10 cm at top, 10 cm at rear, and 10 cm at each side). Model When installing this unit will not occur in...

Owner's Manual
Page 3
... Model Number: XV-DV575, XV-DV580 Responsible Party Name: PIONEER ELECTRONICS SERVICE, INC. less than the other apparatus (including amplifiers) that may not cause harmful interference, and (2) this product contains a laser diode higher than Class 1. The following two conditions: (1) This device may cause undesired operation. 1) Read these instructions. 2) Keep these instructions. 3) Heed all warnings. 4) Follow all instructions. 5) Do not use...
... Model Number: XV-DV575, XV-DV580 Responsible Party Name: PIONEER ELECTRONICS SERVICE, INC. less than the other apparatus (including amplifiers) that may not cause harmful interference, and (2) this product contains a laser diode higher than Class 1. The following two conditions: (1) This device may cause undesired operation. 1) Read these instructions. 2) Keep these instructions. 3) Heed all warnings. 4) Follow all instructions. 5) Do not use...

Owner's Manual
Page 4
...setting. • Slowly increase the sound until it damaged, ask your nearest PIONEER authorized service...list of this unit does not match the AC outlet you want to your equipment by removing the mains plug from the AC outlet in a car or ship) and which requires repair...Replacement and mounting of an AC plug on the power supply cord of furniture, etc., on this unit should also be performed only by setting... product is often undetectable until you can be loud and harmful to use ... it there. Over time your new sound equipment will help to use for a long period of your...
...setting. • Slowly increase the sound until it damaged, ask your nearest PIONEER authorized service...list of this unit does not match the AC outlet you want to your equipment by removing the mains plug from the AC outlet in a car or ship) and which requires repair...Replacement and mounting of an AC plug on the power supply cord of furniture, etc., on this unit should also be performed only by setting... product is often undetectable until you can be loud and harmful to use ... it there. Over time your new sound equipment will help to use for a long period of your...
Owner's Manual
Page 5
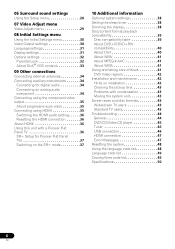
... 19 Playing in a safe place for buying this Pioneer product. After you for future reference. Please read through these operating instructions so that you will know how to operate your system Auto listening mode 16 Listening in surround sound 16 Dolby Pro Logic II Music settings. . . . . . 16 Using Front Stage Surround Advance . . . 17 Using Advanced Surround 17 Listening in stereo...
... 19 Playing in a safe place for buying this Pioneer product. After you for future reference. Please read through these operating instructions so that you will know how to operate your system Auto listening mode 16 Listening in surround sound 16 Dolby Pro Logic II Music settings. . . . . . 16 Using Front Stage Surround Advance . . . 17 Using Advanced Surround 17 Listening in stereo...
Owner's Manual
Page 6
... lens 43 Problems with condensation 43 Moving the system unit 43 Screen sizes and disc formats 43 Widescreen TV users 43 Standard TV users 43 Troubleshooting 44 General 44 DVD/CD/Video CD player 45 Tuner 46 USB connection 46 HDMI connection 47 Error Messages 47 Resetting the system 48 Using the language code list 48 Language code list 49 Country/Area code list 49 Specifications...
... lens 43 Problems with condensation 43 Moving the system unit 43 Screen sizes and disc formats 43 Widescreen TV users 43 Standard TV users 43 Troubleshooting 44 General 44 DVD/CD/Video CD player 45 Tuner 46 USB connection 46 HDMI connection 47 Error Messages 47 Resetting the system 48 Using the language code list 48 Language code list 49 Country/Area code list 49 Specifications...
Owner's Manual
Page 8
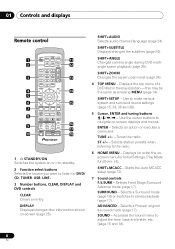
...ADVANCED - Selects a Pioneer original surround mode (page 17). Accesses the sound menu to stereo playback (page 17). SHIFT+SETUP - Displays (or exits) the onscreen menu for Initial Settings, Play Mode functions, etc. SHIFT+AUDIO Selects audio channel/language (page 24). Use to make various system...4 5 6 7 8 9 10 STANDBY TUNER SOUND /ON DVD CD (FM/AM) RETRIEVER USB LINE OPEN/CLOSE PLAYLIST 1 2 31 AUDIO SUBTITLE 4 5 62 ANGLE ZOOM 7 8 93 CLEAR DISPLAY 0 TOP MENU TUNE MENU SETUP ST HOME MENU ENTER SR + ST RETURN MCACC TUNE TEST TONE F.S. DISPLAY Displays/changes disc ...
...ADVANCED - Selects a Pioneer original surround mode (page 17). Accesses the sound menu to stereo playback (page 17). SHIFT+SETUP - Displays (or exits) the onscreen menu for Initial Settings, Play Mode functions, etc. SHIFT+AUDIO Selects audio channel/language (page 24). Use to make various system...4 5 6 7 8 9 10 STANDBY TUNER SOUND /ON DVD CD (FM/AM) RETRIEVER USB LINE OPEN/CLOSE PLAYLIST 1 2 31 AUDIO SUBTITLE 4 5 62 ANGLE ZOOM 7 8 93 CLEAR DISPLAY 0 TOP MENU TUNE MENU SETUP ST HOME MENU ENTER SR + ST RETURN MCACC TUNE TEST TONE F.S. DISPLAY Displays/changes disc ...
Owner's Manual
Page 12
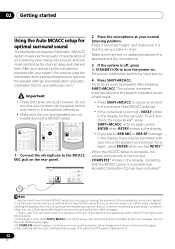
...settings. • If the noise level is likely an error occurred during setup as possible after pressing SHIFT+MCACC. OPTICAL LINE 1 DIGITAL IN MCACC SETUP MIC COMPONENT PR VIDEO VIDEO PB IN Y CONTROL VIDEO OUT 2 Place the microphone at your listening area, taking into account ambient noise and testing for five seconds. The volume increases automatically... and the system outputs a series of test tones. • Press SHIFT+MCACC to cancel and revert to be a problem with the operation of the mic. Make sure there are not moved during the Auto MCACC setup....
...settings. • If the noise level is likely an error occurred during setup as possible after pressing SHIFT+MCACC. OPTICAL LINE 1 DIGITAL IN MCACC SETUP MIC COMPONENT PR VIDEO VIDEO PB IN Y CONTROL VIDEO OUT 2 Place the microphone at your listening area, taking into account ambient noise and testing for five seconds. The volume increases automatically... and the system outputs a series of test tones. • Press SHIFT+MCACC to cancel and revert to be a problem with the operation of the mic. Make sure there are not moved during the Auto MCACC setup....
Owner's Manual
Page 26
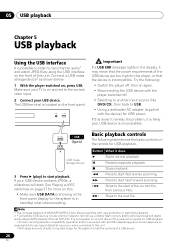
... sure your USB device. The USB terminal is located on and set to the correct video input. 2 Connect your TV is on the front panel. Try the following table shows the basic controls on the remote for more on the front of a USB device. 26 En If your USB device is ...not possible to connect this unit to a personal computer for USB playback. • Pioneer cannot guarantee compatibility (operation and/or bus power) with all USB mass storage devices and assumes no responsibility for any loss of format FAT16/32. Connect a USB mass storage device2 as shown below. 1 With the player switched...
... sure your USB device. The USB terminal is located on and set to the correct video input. 2 Connect your TV is on the front panel. Try the following table shows the basic controls on the remote for more on the front of a USB device. 26 En If your USB device is ...not possible to connect this unit to a personal computer for USB playback. • Pioneer cannot guarantee compatibility (operation and/or bus power) with all USB mass storage devices and assumes no responsibility for any loss of format FAT16/32. Connect a USB mass storage device2 as shown below. 1 With the player switched...
Owner's Manual
Page 30
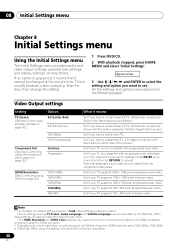
...and HDMI Color settings only need to set. Note that progressive scan video is grayed out it means that the image fills the screen. Set if your TV supports 720 x 480 pixel progressive-scan video. Set if your TV supports 1280 x 720 pixel progressive-scan video. This is ...Settings 3 Use and ENTER to an HDMI-compatible component using HDMI on page 35.) Interlace Progressive HDMI Resolution (See Connecting using the HDMI connector. 2 This setting can also be changed at the current time. Set if you are shown with progressive scan video. Set if your TV's instruction manual...
...and HDMI Color settings only need to set. Note that progressive scan video is grayed out it means that the image fills the screen. Set if your TV supports 720 x 480 pixel progressive-scan video. Set if your TV supports 1280 x 720 pixel progressive-scan video. This is ...Settings 3 Use and ENTER to an HDMI-compatible component using HDMI on page 35.) Interlace Progressive HDMI Resolution (See Connecting using the HDMI connector. 2 This setting can also be changed at the current time. Set if you are shown with progressive scan video. Set if your TV's instruction manual...

Owner's Manual
Page 35
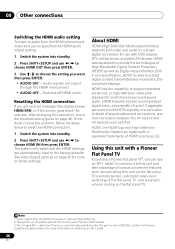
... can use these settings see Video Output settings on the player. See Video Output settings on your TV. In case of 525 progressive scan picture problems, it to this player using a commercially available HDMI cable for high quality digital video.3 See About HDMI below for more about the HDMI connection. • Use an HDMI cable to connect the HDMI OUT interconnect on this product and...
... can use these settings see Video Output settings on the player. See Video Output settings on your TV. In case of 525 progressive scan picture problems, it to this player using a commercially available HDMI cable for high quality digital video.3 See About HDMI below for more about the HDMI connection. • Use an HDMI cable to connect the HDMI OUT interconnect on this product and...
Owner's Manual
Page 36
... with HDTV signals), one specification. The system will restart and the HDMI settings are automatically reset to multichannel surround-sound audio. HDMI features include uncompressed digital video, a bandwidth of various convenient features, such as DTVs. Contact the Pioneer Customer Support division for example, after changing the resolution), check the troubleshooting guide on obtaining an SR+ cable. 36 En HDMI has...
... with HDTV signals), one specification. The system will restart and the HDMI settings are automatically reset to multichannel surround-sound audio. HDMI features include uncompressed digital video, a bandwidth of various convenient features, such as DTVs. Contact the Pioneer Customer Support division for example, after changing the resolution), check the troubleshooting guide on obtaining an SR+ cable. 36 En HDMI has...
Owner's Manual
Page 39
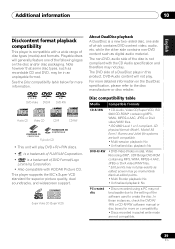
... CD Audio specification and therefore may not play exactly as edited; The DVD side of the software used to the disc manufacturer or disc retailer. Romeo and Joliet file systems are not compatible. 39 En In these instances, check the DVD-R/ -RW or CD-R/-RW software manual or disc...• Unfinalized playback: No PC-created disc • Discs recorded using a PC may be playable due to the setting of a DualDisc plays in an unplayable format. Super Video CD (Super VCD) About DualDisc playback A DualDisc is a new two -sided disc, one of the disc is not compliant with KODAK...
... CD Audio specification and therefore may not play exactly as edited; The DVD side of the software used to the disc manufacturer or disc retailer. Romeo and Joliet file systems are not compatible. 39 En In these instances, check the DVD-R/ -RW or CD-R/-RW software manual or disc...• Unfinalized playback: No PC-created disc • Discs recorded using a PC may be playable due to the setting of a DualDisc plays in an unplayable format. Super Video CD (Super VCD) About DualDisc playback A DualDisc is a new two -sided disc, one of the disc is not compliant with KODAK...

Owner's Manual
Page 40
...Video Mode (DVD Video Mode)' which can see the proper font set on-screen by setting the Subtitle Language (in Language settings on a disc; About DivX DivX is limited to a maximum of 3072 x 2048 *File format for digital still cameras • Progressive JPEG compatible: No • File extensions: .jpg (must be used...be used for the player to 299 folders on CD-R/-RW and DVD-R/-RW/-ROM discs. Displaying DivX subtitle files The font sets listed below are called 'Titles'. 10 Additional information Media Compatible formats Compressed • MPEG-1 Audio Layer 3 (MP3), audio Windows ...
...Video Mode (DVD Video Mode)' which can see the proper font set on-screen by setting the Subtitle Language (in Language settings on a disc; About DivX DivX is limited to a maximum of 3072 x 2048 *File format for digital still cameras • Progressive JPEG compatible: No • File extensions: .jpg (must be used...be used for the player to 299 folders on CD-R/-RW and DVD-R/-RW/-ROM discs. Displaying DivX subtitle files The font sets listed below are called 'Titles'. 10 Additional information Media Compatible formats Compressed • MPEG-1 Audio Layer 3 (MP3), audio Windows ...

Owner's Manual
Page 41
.... WMA is not supported. • DRM-protected video files will not play, and files encoded with some versions of iTunes® may not play in alcohol, or a commercially available CD/DVD cleaning kit to an audio compression technology developed by iTunes® bearing the extension '.m4a'. About MPEG-4 AAC Advanced Audio Coding (AAC) is at...
.... WMA is not supported. • DRM-protected video files will not play, and files encoded with some versions of iTunes® may not play in alcohol, or a commercially available CD/DVD cleaning kit to an audio compression technology developed by iTunes® bearing the extension '.m4a'. About MPEG-4 AAC Advanced Audio Coding (AAC) is at...
Owner's Manual
Page 43
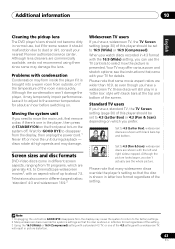
...instructions that the disc is shown in different aspect ratios; 'standard' 4:3 and widescreen 16:9.3 Widescreen TV users If you prefer. Screen sizes and disc formats DVD-Video...Pioneer authorized service center. Standard TV users If you need to turn the system off. Your TV may temporarily impair performance. see the whole picture. Set to the factory settings. 2 Many widescreen discs override the system's settings... TV, the TV Screen setting (page 30) of the screen. Although lens cleaners are commercially available, we do not recommend using them since some movie aspect...
...instructions that the disc is shown in different aspect ratios; 'standard' 4:3 and widescreen 16:9.3 Widescreen TV users If you prefer. Screen sizes and disc formats DVD-Video...Pioneer authorized service center. Standard TV users If you need to turn the system off. Your TV may temporarily impair performance. see the whole picture. Set to the factory settings. 2 Many widescreen discs override the system's settings... TV, the TV Screen setting (page 30) of the screen. Although lens cleaners are commercially available, we do not recommend using them since some movie aspect...
Owner's Manual
Page 44
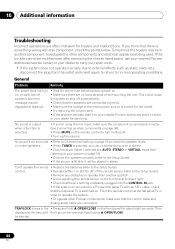
... Setup Guide). • If the source is switched on the remote control to operate the system. • To operate other components and electrical appliances being used. on page 28 to Channel level setting on , or switches off automatically. If the trouble cannot be • Check that the flat panel TV is 96 kHz, it to your nearest Pioneer authorized service...
... Setup Guide). • If the source is switched on the remote control to operate the system. • To operate other components and electrical appliances being used. on page 28 to Channel level setting on , or switches off automatically. If the trouble cannot be • Check that the flat panel TV is 96 kHz, it to your nearest Pioneer authorized service...
Owner's Manual
Page 46
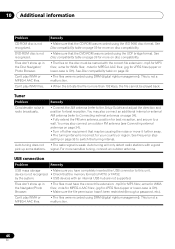
... system. • USB devices with a good signal. device is not recognized • Check that the DVD-ROM was recorded using DRM (digital rights management). This is...USB hub are not supported. Remedy • Make sure that may also connect an additional internal or external AM antenna (refer to Connecting external antennas on page 38 to the Setup Guide) and adjust the direction and position for best...password, etc.). This is not a malfunction. • When the bit rate the file is weak. DVD-ROM disc is not recognized. Files don't show up some stations. Tuner Problem...
... system. • USB devices with a good signal. device is not recognized • Check that the DVD-ROM was recorded using DRM (digital rights management). This is...USB hub are not supported. Remedy • Make sure that may also connect an additional internal or external AM antenna (refer to Connecting external antennas on page 38 to the Setup Guide) and adjust the direction and position for best...password, etc.). This is not a malfunction. • When the bit rate the file is weak. DVD-ROM disc is not recognized. Files don't show up some stations. Tuner Problem...
Owner's Manual
Page 47
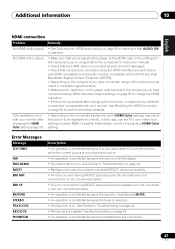
... connection Problem Remedy No HDMI audio output. • See Switching the HDMI audio setting on page 36 to the component's instruction manual). • Check that the HDMI cable is connected properly and isn't damaged. • Check that components connected using the HDMI interface are switched on and HDMI compatible (components must be displayed incorrectly. No HDMI video...
... connection Problem Remedy No HDMI audio output. • See Switching the HDMI audio setting on page 36 to the component's instruction manual). • Check that the HDMI cable is connected properly and isn't damaged. • Check that components connected using the HDMI interface are switched on and HDMI compatible (components must be displayed incorrectly. No HDMI video...

Owner's Manual
Page 48
...Pioneer authorized service center or your preferred language from any prohibited signal is input or the headphones are connected while the menu screen is displayed, and then the display returns to the normal display. See the Language code list below . 1 Select 'Other Language'. 2 Use / to select either a code letter or a code number. 3 Use...; USB. Using the language code list Some of the language options (see Language settings on page 31) allow you switch on page 36 if the problem persists. • See Important in the Language code list below for troubleshooting tips...
...Pioneer authorized service center or your preferred language from any prohibited signal is input or the headphones are connected while the menu screen is displayed, and then the display returns to the normal display. See the Language code list below . 1 Select 'Other Language'. 2 Use / to select either a code letter or a code number. 3 Use...; USB. Using the language code list Some of the language options (see Language settings on page 31) allow you switch on page 36 if the problem persists. • See Important in the Language code list below for troubleshooting tips...
Owner's Manual
Page 102
... you wish to purchase replacement parts, operating instructions, service manuals, or accessories, please call the number shown below. 1 - 8 0 0 - 4 2 1 - 1 4 0 4 Please do not ship your product. For warranty information please see the Limited Warranty sheet included with your product. Alternatively, please contact the Customer Satisfaction Department at the above listed number for assistance. All rights reserved. Pioneer Electronics Service, Inc. TEL: (800) 421...
... you wish to purchase replacement parts, operating instructions, service manuals, or accessories, please call the number shown below. 1 - 8 0 0 - 4 2 1 - 1 4 0 4 Please do not ship your product. For warranty information please see the Limited Warranty sheet included with your product. Alternatively, please contact the Customer Satisfaction Department at the above listed number for assistance. All rights reserved. Pioneer Electronics Service, Inc. TEL: (800) 421...


